

Last Updated on March 7, 2022 by Rakesh Gupta
Big Idea or Enduring Question:
- How can you automatically invite customers to a Chatter Group?
Objectives:
This blog post will help us to understand the following
- Create a Flow to auto-invite customers to a chatter group.
- Use get element to avoid hard code of Id
- Understand how to use Flow to create records
Business Use Case
Pamela Kline is working as a System administrator at Universal Containers (UC). She has received a requirement from the management to auto invite new contacts to a Private Chatter Group Universal Container Customers.
Automation Champion Approach (I-do):
Salesforce gives you the ability to open Chatter access to external audiences. A chatter customer group represents a group of users (internal including customers). It’s a great way to collaborate with your customers and has all the posts and files contained in your Salesforce org. You can have multiple Chatter groups for customers based on business types, geography, or a single Chatter group to collaborate with your customers. Customers have limited Chatter access and can only see the groups they are invited to and interact with members of those groups.
Let’s take a minute’s pause here and understand CollaborationInvitation objects in Salesforce. This object represents an invitation to join Chatter, either directly or through a group.
| Field Name | Details |
| InvitedUserEmail | The email address for the user invited to join Chatter. |
| SharedEntityId | The ID of the user or group associated with this invitation. To invite a customer, set SharedEntityId to the ID of the private CollaborationGroup with Allow Customers turned on. |
To solve this requirement, we will use the After-save Record-Triggered Flow. Check out this article to understand why we are using after-save record-triggered flow for this scenario.
Before discussing the solution, let me show you a diagram of a Process Flow at a high level. Please spend a few minutes going through the following Flow diagram and understand it.  Let’s begin building this automation process.
Guided Practice (We-do):
There are 3 steps to solve Pamela’s business requirement using Record-Triggered Flow. We must:
- Create a chatter group
- Grant Invite Customers To Chatter system permissions
- Salesforce Flow Steps:
- Define flow properties for record-triggered flow
- Add a decision element to check if the email has value
- Add a Get Records element to find the chatter group Id
- Add a decision element to check if chatter group found or not
- Add a Create Records element to invite customers to a chatter group
Step 1: Create a Chatter Group
- Navigate to App Launcher and click on the Groups.
- Clicks on the New button.
- Name the Group
- Check the checkbox for Allow Customers
- Select the Private for Access Type.
- Click Save.

Step 2: Grant Invite Customers To Chatter to Users
Now grant Invite Customers To Chatter system permissions to users via profile & permission set. 
Step 3.1: Salesforce Flow – Define Flow Properties
- Click Setup.
- In the Quick Find box, type Flows.
- Select Flows then click on the New Flow.
- Select the Record-Triggered Flow option, and click on Create and configure the flow as follows:
- Object: Contact
- Trigger the Flow When: A record is created or updated
- Set Entry Criteria
- Condition Requirements: None
- Optimize the Flow For Action and Related Records
- Click Done.

Step 3.2: Salesforce Flow – Using Decision Element to Check if Email Has Value
Now we will use the Decision element to check if the email has value.- On Flow Designer, click on the +icon and select the Decision element.
- Enter a name in the Label field; the API Name will auto-populate.
- Under Outcome Details, enter the Label the API Name will auto-populate.
- Condition Requirements to Execute Outcome: All Conditions Are Met (AND)
- Row 1:
- Resource: {!$Record.Email}
- Operator: Is Null
- Value: {!$GlobalConstant.False}
- Row 1:
- When to Execute Outcome: Only if the record that triggered the flow to run is updated to meet the condition requirements.
- Click Done.

Step 3.3: Salesforce Flow – Adding a Get Record Element to Find Chatter Group Details
The next step is to get the chatter group Id. Now follow the steps below:
- On Flow Designer, click on the + icon and select the Get Records element.
- Enter a name in the Label field; the API Name will auto-populate.
- Select the Collaboration Group object from the dropdown list.
- Select All Conditions Are Met (AND).
- Set Filter Conditions
- Row 1:
- Field: Name
- Operator: Equals
- Value: Universal Container Customers
- Row 1:
- How Many Records to Store:
- select Only the first record
- How to Store Record Data:
- Choose the option to Automatically store all fields.
- Click Done.

Step 3.4: Salesforce Flow – Using Decision Element to Check if Chatter Group Exists or Not
Now we will use the Decision element to check if the chatter group exists or not.- On Flow Designer, click on the +icon and select the Decision element.
- Enter a name in the Label field; the API Name will auto-populate.
- Under Outcome Details, enter the Label the API Name will auto-populate.
- Condition Requirements to Execute Outcome: All Conditions Are Met (AND)
- Row 1:
- Resource: {!Get_Chatter_Group}
- Operator: Is Null
- Value: {!$GlobalConstant.False}
- Row 1:
- When to Execute Outcome: If the condition requirements are met
- Click Done.

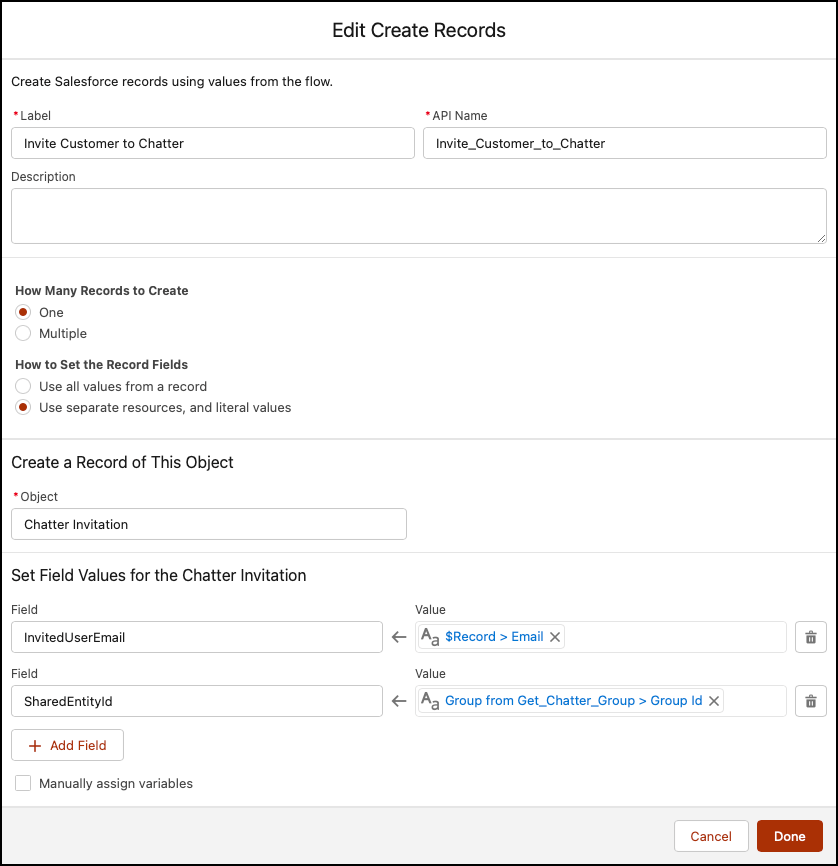
Step 3.5: Salesforce Flow – Add a Create Records Element to Invite Customers to a Chatter Group
The next step is to invite customers to a chatter group, for this, we will use the Create Records element.
- On Flow Designer, click on the + icon and select the Create Records onto the canvas.
- Enter a name in the Label field; the API Name will auto-populate.
- Input the following information:
- How Many Records to Create: One
- How to Set the Record Fields: Use separate resources, and literal values
- Object: Collaboration Invitation
- Set Field Values for the Customer Invitation
- Row 1:
- Field: InvitedUserEmail
- Value: {!$Record.Email}
- Click Add Field
- Row 2:
- Field: SharedEntityId
- Value: {!Get_Chatter_Group.Id}
- Click Done.
In the end, Pamela’s Flow will look like the following screenshot:

Once everything looks good, perform the steps below:
- Click Save.
- Enter Flow Label the API Name will auto-populate.
- Click Show Advanced.
- API Version for Running the Flow: 54
- Interview Label: Invite Customers to Chatter {!$Flow.CurrentDateTime}
- Click Save.

Almost there! Once everything looks good, click the Activate button.
Proof of Concept
Now onwards if a contact is created and it has an email address populated, then the record-triggered flow will fire and auto sends the chatter group invitation to them.
- Currently, I logged-In as a user Tushar Gupta’s (Profile: – Sales Reps EMEA) account. Now create a new contact as shown in the following screenshot:

- Contact will receive an email from Salesforce to join the Chatter group.


Formative Assessment:
I want to hear from you!
What is one thing you learned from this post? How do you envision applying this new knowledge in the real world? Feel free to share in the comments below.


