

Last Updated on July 11, 2023 by Rakesh Gupta
Big Idea or Enduring Question:
- How can you automatically add specific users to the account team?
Once an Account Manager creates a new account, the Manager can add a team member, or multiple team members, to an Account Team. This blog is a sequel to my previous blog – Auto Add Member to New User’s Default Account Team.
As you may recall from my previous blog, an Account Team is a set of users that usually work together on an Account. A typical Account Team may include an Account Manager, Sales representative, Legal advisor, etc. In the previous blog, I discussed how to automatically add a member to a new user’s default account team. In this blog, I will go one step further and discuss requirement #2 – how to add multiple team members to an account team.
In Salesforce, a user can define Account Team in two places:
- Define Default Account Team on user’s record
- Manually add the members to Account Team for each new account record
Furthermore, one user can be associated with multiple Account Teams, and an account team can have multiple users. Yes! You are right! A Junction object is needed if one user is to be associated with multiple account teams and an account team is associated with multiple users. Lo and behold, there is such a junction object that connects one team member to multiple account teams and associates multiple account teams with a user. The object is called AccountTeamMember! In other words, the AccountTeamMember is a junction object between Account and User, as shown in the following screenshot:

Objectives:
After reading this article, the reader will be able to:
- Understand AccountTeamMember and AccountTeamMemberRole and how to use it.
- Create a Record-Triggered Flow to automatically add users to account team.
- Learn how to use a Decision element to find whether a Record variable – or a Record collection variable – contains a record.
- Find out how to use the Loop element to extract records from a record collection.
- And, last but not least, discover how to use the Create Records element to create multiple records (add users to account team) at once (Bulk Safe).
Business Use case
Martin Jones is working as a System Administrator at Gurukul on Cloud (GoC). At GoC they use Account Team to easily track collaboration on Accounts. GoC has a team of Legal Advisors that helps on the legal side of all deals. Martin has received a new requirement from the higher management:
- Automatically add Legal Advisors (all users with profile legal advisor) to new accounts if the account Type =Customer – Direct and grant them the following access as stated below:
- Account:- Read
- Contact :- Read
- Case:- Private
- Opportunity:- Read
Automation Champion Approach (I-do):
There are a few possible solutions for the above business scenario, but I’ll use After-save Record-Triggered Flow to solve the business requirement.
Before we proceed further, let us understand the characteristics of a AccountTeamMember object – It represents a User on the default account team of another User.
| Field Name | Details |
| UserId | ID of the User who is a member of this account team |
| AccountId | ID of the Account to which this user is a team member |
| TeamMemberRole | Role associated with this team member |
| AccountAccessLevel / CaseAccessLevel /
ContactAccessLevel / OpportunityAccessLevel |
Set Access level for account, case, contact and opportunity objects. |
Before discussing the solution, let me show you a diagram of a Process Flow at a high level. Please spend a few minutes to go through the following Flow diagram and understand it.

Let’s begin building this automation process.
Guided Practice (We-do):
There are 11 steps to solve Martin’s business requirement using Record-triggered Flow. We must:
- Define flow properties for record-triggered flow
- Create a formula to determine whether the record is created or updated
- Add a decision element to check if the account type is Customer – Direct
- Add a get record element to find legal advisor profile details
- Add a decision element to check if legal advisor profile was found or not (from step 4)
- Add a get record element to find all users with profile legal advisor
- Add a decision element to check if users with profile legal advisor was found or not (from step 6)
- Add a loop element to retrieve records from the record collection variable (from step 6)
- Add an assignment element to add account team member to a record variable
- Add an assignment element to add record variable to a record collection variable
- Add a create records element to add legal advisors to account team
Step 1: Define Flow Properties
- Click Setup.
- In the Quick Find box, type Flows.
- Select Flows then click on the New Flow.
- Select the Record-Triggered Flow option, click on Create
- Object: Account
- Trigger Opportunity Flow When: A record is created or updated
- Set Entry Criteria
- Condition Requirements: None
- Optimize the Flow For Action and Related Records
- Click Done.

Step 2: Formula to Determine Whether the Account is Created or Updated
- Under Toolbox, select Manager, then click New Resource to determine whether the record is created or updated.
- Input the following information:
- Resource Type: Formula
- API Name: forB_IsNew
- Data Type: Boolean
- Formula: IsNew()
- Click Done.

Step 3: Using Decision Element to Check If the Account’s Type is Customer – Direct
- On Flow Designer, click on the + icon and select the Decision element.
- Enter a name in the Label field; the API Name will auto-populate.
- Under Outcome Details, enter the Label; the API Name will auto-populate.
- Condition Requirements to Execute Outcome: All Conditions Are Met (AND)
- Row 1:
- Resource: {!$Record.Type}
- Operator: Equals
- Value: Customer – Direct
- Click Add Condition
- Row 2:
- Resource: {!forB_IsNew}
- Operator: Equals
- Value: {!$GlobalConstant.True}
- Row 1:

Step 4: Adding a Get Record Element to Find Legal Advisor Profile Details
To find Legal Advisor profile details, we will use Get Records element.
- On Flow Designer, below the Customer – Direct node, click on the +icon and select the Get Records element.
- Enter a name in the Label field; the API Name will auto-populate.
- Select the Profile object from the dropdown list.
- Select All Conditions Are Met (AND).
- Set Filter Conditions
- Row 1:
- Field: Name
- Operator: Equals
- Value: Legal Advisor
- Row 1:
- How Many Records to Store:
- select Only the first record
- How to Store Record Data:
- Choose the option to Automatically store all fields.
- Click Done.

Step 5: Using Decision Element to Check If Legal Advisor Profile was Found or Not
Now, will use the Decision element to check if the previous Get Records element returns a contact record.
- On Flow Designer, click on the +icon and select the Decision element.
- Enter a name in the Label field; the API Name will auto-populate.
- Under Outcome Details, enter the Label the API Name will auto-populate.
- Condition Requirements to Execute Outcome: All Conditions Are Met (AND)
- Row 1:
- Resource: {!Get_Legal_Advisor_Profile}
- Operator: Is Null
- Value: {!$GlobalConstant.False}
- Row 1:
- When to Execute Outcome: If the condition requirements are met.
- Click Done.

Step 6: Adding a Get Record Element to Find Active Users with Profile Legal Advisor
Now we will use the Get Records element to find Active Legal Advisors.
- On Flow Designer, below the Yes node, click on the +icon and select the Get Records element.
- Enter a name in the Label field; the API Name will auto-populate.
- Select the User object from the dropdown list.
- Select All Conditions Are Met (AND).
- Set Filter Conditions
- Row 1:
- Field: IsActive
- Operator: Equals
- Value: {!$GlobalConstant.True}
- Click Add Condition
- Row 2:
- Resource: ProfileId
- Operator: Equals
- Value: {!Get_Legal_Advisor_Profile.Id}
- Row 1:
- How Many Records to Store:
- select All record
- How to Store Record Data:
- Choose the option to Automatically store all fields.
- Click Done.

Step 7: Using Decision Element to Check If Users with Profile Legal Advisor was Found or Not
Now, we will use the Decision element to check if the previous Get Records element returns a user record or not.
- On Flow Designer, click on the+icon and select the Decision element.
- Enter a name in the Label field; the API Name will auto-populate.
- Under Outcome Details, enter the Label the API Name will auto-populate.
- Condition Requirements to Execute Outcome: All Conditions Are Met (AND)
- Row 1:
- Resource: {!Legal_Advisors}
- Operator: Is Null
- Value: {!$GlobalConstant.False}
- Row 1:
- When to Execute Outcome: If the condition requirements are met.
- Click Done.

Step 8: Add a Loop Element to Retrieve Records from Record Collection Variable (from step 6)
- On Flow Designer, below the Legal Advisor Found node, click on the +icon and select the Loop element.
- Enter a name in the Label field; the API Name will auto-populate.
- For Collection Variable select {!Legal_Advisors}.
- For Specify Direction for Iterating Over Collection select the option First item to last item.
- Click Done.

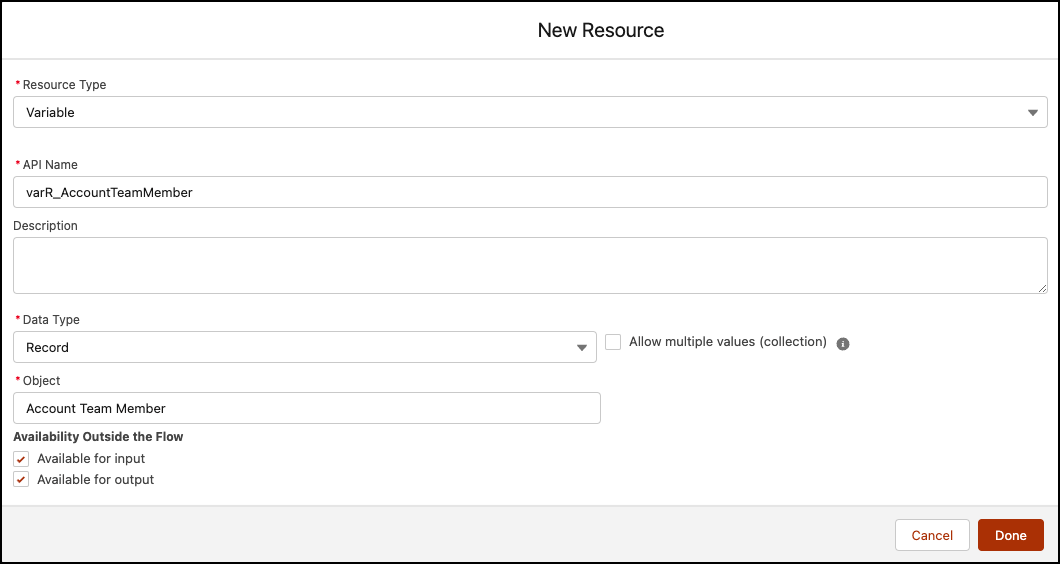
Step 9: Adding an Assignment Element to Add Account Team Member to a Record Variable
The next step is to assign legal advisor’s to correct account and grant record access. For this, we will use Assignment element.
- Create a Record Variable varR_AccountTeamMember type Account Team Member to add the account team member.

- On Flow Designer, click on the +icon and select the Assignment element.
- Enter a name in the Label field; the API Name will auto-populate.
- Set Variable Values
- Row 1:
- Field: {!varR_AccountTeamMember.AccountId}
- Operator: Equals
- Value: {!$Record.Id}
- Add Assignment
- Row 2:
- Field: {!varR_AccountTeamMember.AccountAccessLevel}
- Operator: Equals
- Value: Read Only
- Add Assignment
- Row 3:
- Field: {!varR_AccountTeamMember.ContactAccessLevel}
- Operator: Equals
- Value: Read Only
- Add Assignment
- Row 4:
- Field: {!varR_AccountTeamMember.CaseAccessLevel}
- Operator: Equals
- Value: Private
- Add Assignment
- Row 5:
- Field: {!varR_AccountTeamMember.OpportunityAccessLevel}
- Operator: Equals
- Value: Read Only
- Add Assignment
- Row 6:
- Field: {!varR_AccountTeamMember.TeamMemberRole}
- Operator: Equals
- Value: Legal Advisor
- Add Assignment
- Row 7:
- Field: {!varR_AccountTeamMember.UserId}
- Operator: Equals
- Value: {!Loop_Through_Users.Id}
- Row 1:
- Click Done.

Step 10: Adding an Assignment Element to Add the Record Variable to Record Collection Variable
- Create a Record Collection Variable varR_AccountTeamMembers type Account Team Member to store record variable (created in step 9) for the bulk process.

- On Flow Designer, click on the +icon and select the Assignment element.
- Enter a name in the Label field; the API Name will auto-populate.
- Set Variable Values
- Row 1:
- Field: {!varR_AccountTeamMembers}
- Operator: Add
- Value: {!varR_AccountTeamMember}
- Row 1:
- Click Done.


Step 11: Adding a Create Records Element to Add Users to Account Team
The final task is to insert data into the Account Team Member object. For this, we will use the Create Records element.
- On Flow Designer, click on the +icon and select the Create Records element.
- Enter a name in the Label field; the API Name will auto-populate.
- For How Many Records to Create select Multiple.
- Map Record Collection: {!varR_AccountTeamMembers}
- Click Done.

In the end, Martin’s Flow will look like the following screenshot:

Once everything looks good, perform the steps below:
- Click Save.
- Enter Flow Label the API Name will auto-populate.
- Click Show Advanced.
- API Version for Running the Flow: 55
- Interview Label: Auto Add Members to Account Team {!$Flow.CurrentDateTime}
- Click Save.

Almost there! Once everything looks good, click the Activate button.
Proof of Concept
Next time, when the user creates an Account, the record-triggered flow we created will fire and add Legal Advisor to the Account Team.

I hope you enjoyed and learned, from the duo blogs, how to add an individual team member and multiple team members to an Account Team. Mastering these skills will enhance your productivity and propel you to try various permutations and combinations to incorporate automation in your day-to-day processes and procedures.
Formative Assessment:
I want to hear from you!
What is one thing you learned from this post? How do you envision applying this new knowledge in the real world? Feel free to share in the comments below.


i want to know if there is the possibility to add multiple member to account team because we put just one id in custom label ?
Use Custom Metadata Types and store to store multiple account member details
Hi Rakesh,
I have a scenario where account team members will be copied to case team members when ever a new case is created using flow, my flow is getting failed due to inactive team members in account (account team members) can you help me how can we ignore inactive users when account team users were getting copied over newly created case.
Thanks.
I am so sorry for the delay in my response. You may have to use Record Lookup elements to filter out inactive account team member.
Hi Rakesh, great article. But, is there any way I could reverse this process? Like Whenever I add Account Team Member on Account, I want somehow update the account record with some value. If you could share your view on this?
You have a very limited option. First – try to write Apex scheduled job which will run every night and perform the necessary action.
Second use Inline Visualforce page and Flow concepts.
Hi Rakesh,
Thanks for this guide. I am doing something similar but I am only creating when there is no team member with that role already in place. When there is one, I update the user on the team. My problem is my Fast Update does not work, I am checking the values I am passing to the SObject and it looks correct but update is not working. Insert works great.
Any thoughts?
Send me an email with details and screenshots here – info@automationchampion.com
Hello, great article! I read both this blog and part 80 on how to add multiple users to account teams – but I was wonder if it is possible to add multiple users from the user object, rather than the account object. So when a new user is created using “abc” profile, automatically add every user with “abc” profile to that users account team, while also adding the new user to the other users account team?
This is my current use case that takes me way longer than needed, especially when there are 30+ users with that profile.
Yes it is possible to achieve it using Flow and Process Builder. Can you provide a screenshot of what you’re seeing or error message you are getting?
I don’t have any examples or errors as I don’t know where to begin with this task. I am very new when it comes to flows so my knowledge is really minimal. I attempted to follow your instructions from this blog modifying the object to user rather than account and had no luck. No error of any kind, just didn’t work. Any help you could provide I would greatly appreciate!
Try something like this:
1. Create a Flow which will process your logic. Create a variable to store newly created userId (We will pass the value into it from Process Builder)
2. Using a Fast Loop find all users with the same profile
2.Now you have to use Loop and assignment and add all users into a specific list of type (https://developer.salesforce.com/docs/atlas.en-us.api.meta/api/sforce_api_objects_useraccountteammember.htm)
4. Then use the Fast element to insert it
5. Create a Process Builder on the user object (Condition – when a record is created)
6. Then using an immediate action to launch a Flow (Autoaluanched Flow) and pass the value to variable UserId
Thanks for the reply – didn’t have much luck, but I’m assuming I’m doing something wrong. I’m not sure how to post screen shots so I’ll add steps to what I did:
Created UserID Variable with Text Data Type Input/Output
Created the “PinnacleProfile” formula based on the profile ID I created as a label
Created SObject TeamMembersVar which should be the list of Account Team Members
Created SObject UsersWithPinnacleProfileVAR which should be a list of users with the matching ProfileID “PinnacleProfile”
Created Collection Variable TeamMembers
Created Collection Variable UsersWithPinnacleProfile
Start >
Fast Lookup – User
IsActive = True
ProfileID = {!PinnacleProfile}
Variable: {!UsersWithPinnacleProfile}
Fields: Id
Next > Loop
Loop through {UsersWithPinnacleProfile} in Ascending order
Loop Variable {!UsersWithPinnacleProfileVar}
Next > Assignment – Name: Add users to TeamVar
{!TeamMembersVar.UserId} equals {!UserID}
{!TeamMembersVar.AccountAccessLevel} equals Edit
{!TeamMembersVar.ContactAccessLevel} equals Edit
{!TeamMembersVar.OpportunityAccessLevel} equals Edit
{!TeamMembersVar.CaseAccessLevel} equals Edit
Next > Assignment – Name: Collection to Variable
{!TeamMembers} add {TeamMembersVar}
> points back to loop
Loop to >
Fast Create:
Variable: {!TeamMembersVar}
Process Builder:
User Object
When Record is Created or edited
Formula evaluates to true:
ISNEW()
&&
[User].Profile.Name = “Pinnacle”
>
Initiate Flow
Flow Vaiable: UserID Field Reference [User].Id
Upon creating a new user with the Pinnacle Profile, I get the following error:
Unable to Access Page
The value of a parameter contains a character that is not allowed or the value exceeds the maximum allowed length. Remove the character from the parameter value or reduce the value length and resubmit. If the error still persists, report it to our Customer Support team. Provide the URL of the page you were requesting as well as any other related information.
Any ideas?
Sorry for your inconvenience. Please mail me here at info@automationchampion.com
Thank you for sharing great article related to salesforce. i want to contribute a article related to salesforce.