

Last Updated on May 30, 2024 by Rakesh Gupta
Big Idea or Enduring Question:
- How do you write a validation rule using before-save record-triggered flow without creating extra metadata?
Objectives:
After reading this blog, you’ll be able to:
- Understand validation rule
- User record-triggered before-save flow to create a validation rule
- Show the error message at the Top of the Page
- And much more
👉 Previously, I’ve penned several posts on the validation and Salesforce Flow. Why not check them out while you are at it?!
- Adding Validation to Flow Screen Components
- Validation Rule using a before-save Flow? Yes!
- How to Fix FIELD_CUSTOM_VALIDATION_EXCEPTION Error)
Business Use case
Benjamin Moore, a Salesforce Administrator at Gurukul On Cloud (GoC), has been tasked with a specific requirement. He must restrict users from creating a new opportunity within the account if an open opportunity exists. The following text should be utilized for the error message:
Please utilize the existing open opportunity within this account. If you need further assistance or have questions about managing opportunities, please contact IT support.
What is Validation Rule?
A Validation Rule allows a System Administrator to define custom logic and error messages to ensure data integrity. The Rule can contain a formula, or an expression, that evaluates the data in one or more fields and returns a True or False value. For instance, the Rule includes an error message that displays when it returns a True value indicating that inaccurate data is being entered. Remember, a Validation rule only fires when a record is created or edited.What is Before Save Flow?
The Before-save Flow is a trigger that is performed before an operation – such as an insert, update, delete, etc. You can use such a Flow to check or change values before data is updated or inserted in the database. A Before-save is much faster because each record is not saved to the database again. Avoiding that extra save procedure means skipping another round of Assignment rules, Auto-response rules, Workflow rules, and other customizations that take time to execute. Use a Before-save Flow on the following use cases:
- Update fields on new or changed records – means that you want to update the fields on record that started the Flow
- Trigger a Validation rule (Not needed after the winter’24 release)
Read this article to learn more about when to use before-flow vs after-save flow.
Automation Champion Approach (I-do):
 Before discussing the solution, let me show you a diagram of the process at a high level. Please spend a few minutes going through the following Flow diagram to understand it.
  Let’s begin building this automation process.
Guided Practice (We-do):
There are 5 steps to solve Benjamin’s business requirement using Record-Triggered Before-Save Flow and the newly introduced Custom Error element. We must:- Define flow properties for record-triggered flow
- Add a decision element to check if the record was created or updated
- Add a get records element to find related open opportunities
- Add a decision element to check if the open opportunities were found or not
- Add a Custom Error element to show custom error messages.
Step 1: Define Flow Properties
- Click Setup.
- In the Quick Find box, type Flows.
- Select Flows, then click on the New Flow.
- Select the Record-Triggered Flow option, click on Create
- Object: Opportunity
- Trigger the Flow When: A record is created or updated
- Set Entry Conditions: None
- Optimize the Flow For: Fast Field Updates
- Click the X at the top to save your changes.


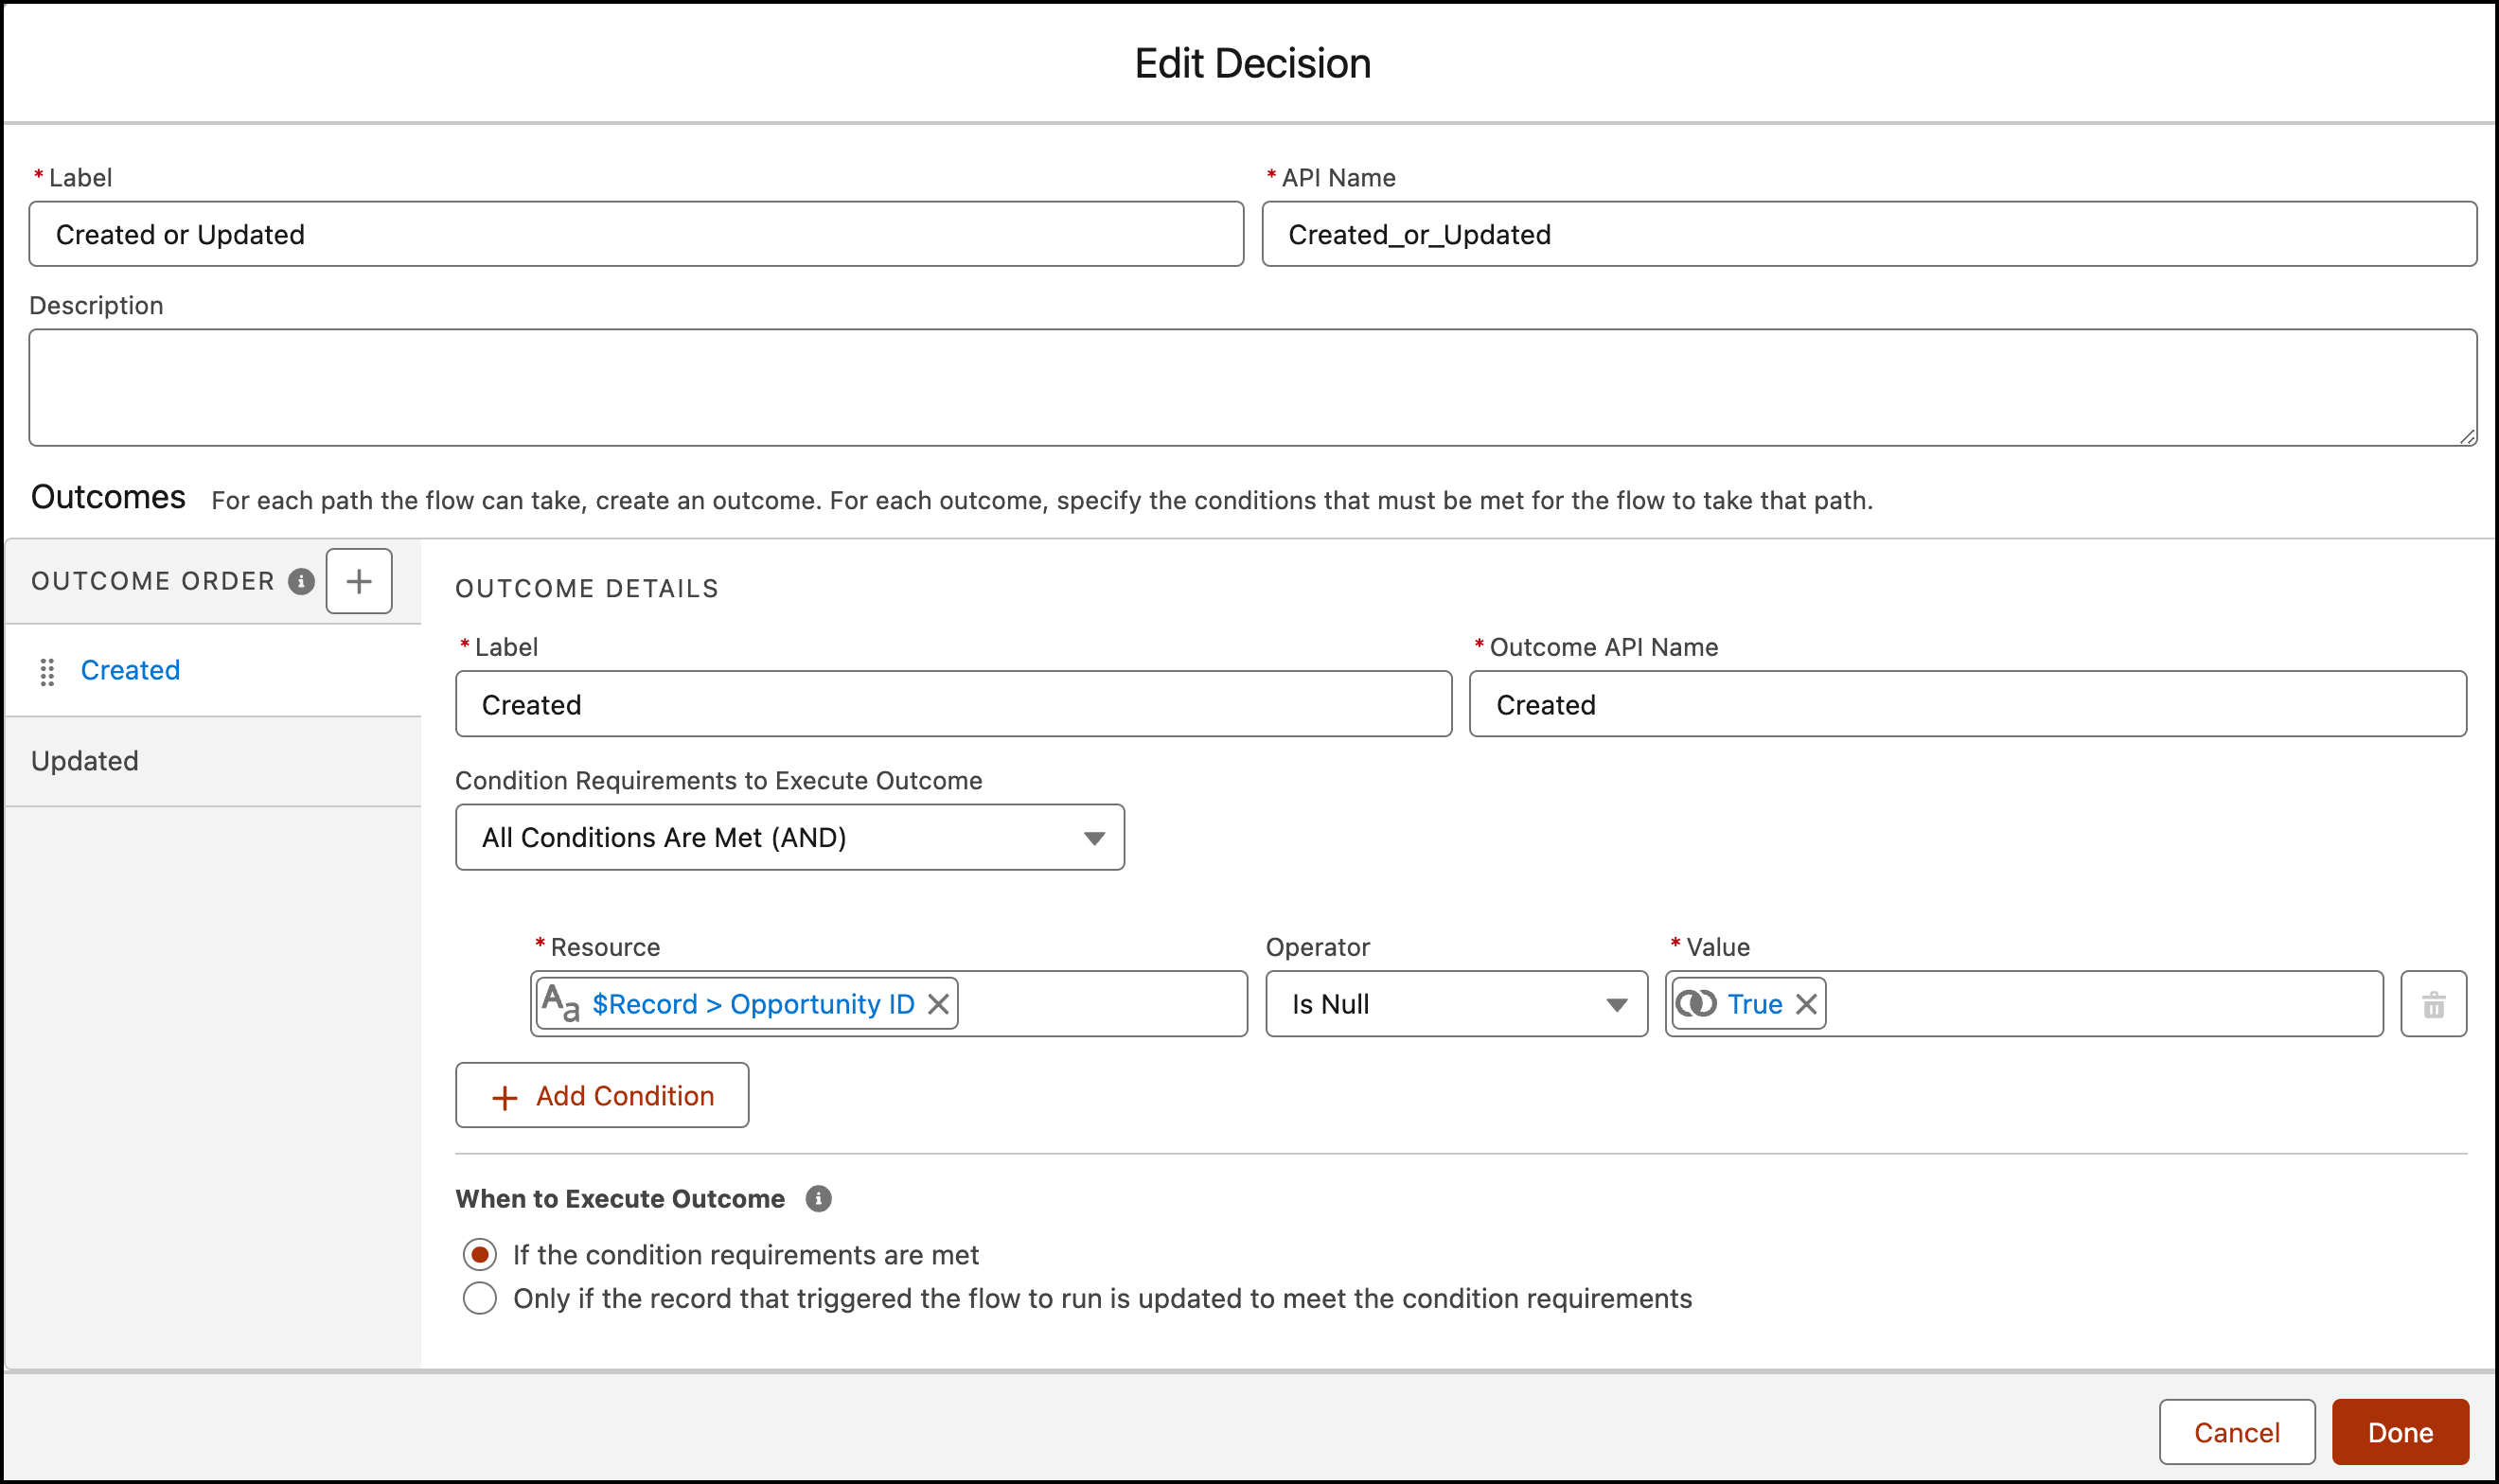
Step 2: Using Decision Element to Check if the Opportunity Was Created or Updated
Now we will use the Decision element to check if the opportunity record was created or updated.
- On Flow Designer, click on the +icon and select the Decision element.
- Enter a name in the Label field; the API Name will auto-populate.
- Under Outcome Details, enter the Label the API Name will auto-populate.
- Condition Requirements to Execute Outcome: All Conditions Are Met (AND)
- Row 1:
- Resource: {!$Record.Id}
- Operator: Is Null
- Value: {!$GlobalConstant.True}
- Row 1:
- When to Execute Outcome: If the condition requirements are met
- Click the X at the top to save your changes.

Step 3: Adding a Get Record Element to Find Related Open Opportunities
The next step is to use the Get Records element to find related open opportunities on the account.
- On Flow Designer, below the Decision node, click on the +icon and select the Get Records element.
- Enter a name in the Label field; the API Name will auto-populate.
- Select the Opportunity object from the dropdown list.
- Select All Conditions Are Met (AND).
- Set Filter Conditions
- Row 1:
- Field: AccountId
- Operator: Equals
- Value: {!$Record.AccountId}
- Click Add Condition
- Row 1:
- Field: IsClosed
- Operator: Equals
- Value: {!$GlobalConstant.False}
- Row 1:
- Row 1:
- How Many Records to Store:
- select All records
- select All records
- How to Store Record Data:
- Choose the option to Automatically store all fields.
- Click the X at the top to save your changes.


Step 4: Using Decision Element to Check If Open Opportunity was Found or Not
Now, we will use the Decision element to check if the previous Get Records element returns open opportunities record.
- On Flow Designer, click on the +icon and select the Decision element.
- Enter a name in the Label field; the API Name will auto-populate.
- Under Outcome Details, enter the Label the API Name will auto-populate.
- Condition Requirements to Execute Outcome: All Conditions Are Met (AND)
- Row 1:
- Resource: {!Get_Related_Opportunity}
- Operator: Is Null
- Value: {!$GlobalConstant.False}
- Row 1:
- When to Execute Outcome: If the condition requirements are met.
- Click Done.

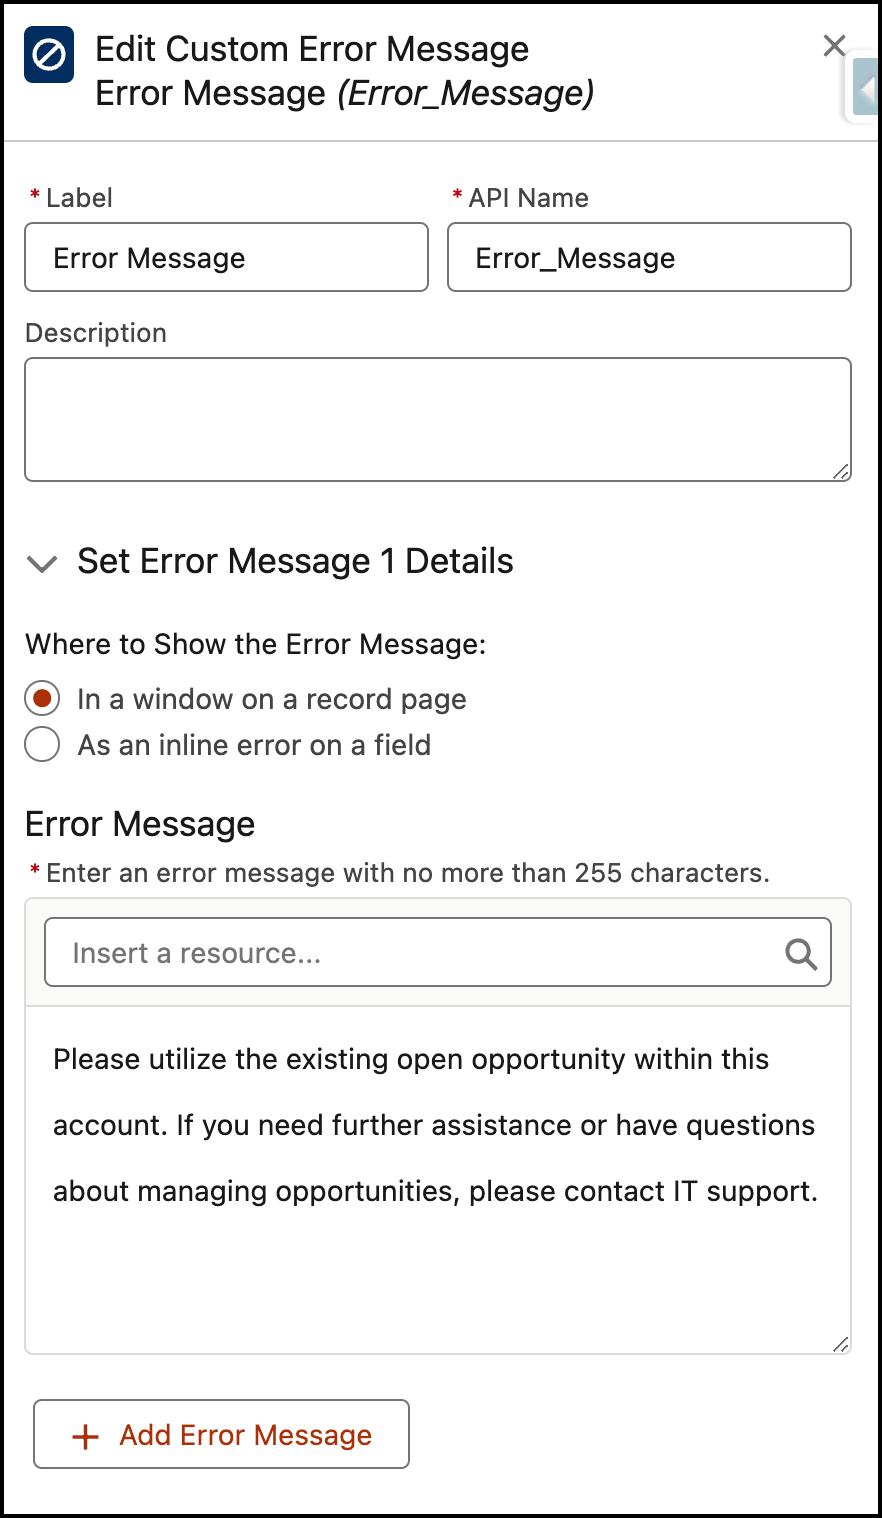
Step 5: Adding a Custom Error Element to Show Error Messages
- Under the Yes node, select Custom Error element.
- Enter a name in the Label field; the API Name will auto-populate.
- Set Error Message 1 Details
- Where to Show the Error Message: In a window on a record page
- Error Message:
- Please utilize the existing open opportunity within this account. If you need further assistance or have questions about managing opportunities, please contact IT support.
- Click the X at the top to save your changes.

In the end, Benjamin’s Flow will look like the following screenshot:

Once everything looks good, perform the steps below:
- Click Save.
- Enter Flow Label the API Name will auto-populate.
- Click Show Advanced.
- API Version for Running the Flow: 59
- Interview Label: Custom validation Rule Using Flow {!$Flow.CurrentDateTime}
- Click Save.

Almost there! Once everything looks good, click the Activate button.
👉 Check out the video for step-by-step instructions.
Things to Remember
- The limit for the error message field is 255 characters.
- You’re only allowed to add one error message for a page.
- You’re only allowed to add one error message per field.
- it is not possible to use the link with your error message.
- escape parameter Indicates whether any HTML markup in the custom error message should be escaped (true) or not (false). This parameter is ignored in both Lightning Experience and the Salesforce mobile app, and the HTML is always escaped. The escape parameter only applies in Salesforce Classic. Read this article for more information.
Proof of Concept

Formative Assessment:
I want to hear from you!What is one thing you learned from this post? How do you envision applying this new knowledge in the real world? Feel free to share in the comments below.


Thank you so much for this post! Does “You’re only allowed to add one error message per field” mean that you can make only one validation per record? For example, if I would like 5 fields to be filled in before closing an Opp, would I have to create 5 flows? Maybe it is a bad example, but I hope you understand what mean…
You have a few options:
1. Add 5 Custom Error elements to a Flow to display an error message below a field.
2. Use one Custom Error element on a flow but use a variable to populate the error message.
“Great blog! You covered the topic comprehensively and provided valuable insights. Thanks for sharing your expertise!” Keep sharing more good content.