

Last Updated on February 10, 2022 by Rakesh Gupta
As a marketer, you need a stress-free way of qualifying future customers by quickly asking for more information within the same form. With dependent form fields, you can easily ask further qualifying questions based on previous answers. For example, if a prospect belongs to the country United States then you can ask State or Company.
Until now, we created a form (If you missed the blog post then refer to this) and implemented Progressive profiling in Pardot hosted form. In this blog, I will go one step further and show you why we should, and how we can, add a dependent field on a Pardot form.
Prerequisite
Please go through these articles first:
- Getting Started with Pardot – Part 7 (How to create a Form that prospects actually want to fill out)
- Getting Started with Pardot – Part 8 (How progressive profiling is not as bad as you think)
Business Use Case
Let us start with a business use case. David Haditsch is working as Content Marketing Manager at GurukulOnCloud. At GurukulOnCloud, they are running their first campaign to promote their products and track activities of visitors and prospects on the corporate website.
To capture prospects’ data, GurukulOnCloud created a form in Pardot with the following fields:
- First name
- Last Name
- Company
Company field is of not much help to GurukulOnCloud – to qualify prospects – if the value in the Country field is anything other than United States or Canada. As a result, GurukulOnCloud is looking for a way to make the Company – a ‘Dependent’ – field based on the value populated in the Country – a ‘Controlling’ – field. So, only if the value in the Country field is United States or Canada, then display Company field; or else, do not display Company field at all.
Solution for the above business requirement
We will modify our existing Form i.e. Brand Awareness. To add a dependent field on the form, perform the following steps:
- Click on Marketing | Forms | Brand Awareness
- Then click on the Edit button, as shown in the following screenshot:

- Navigate to Step 2 i.e. Fields on the Form Wizard – and click on the + Add New Field button, as shown in the following screenshot:

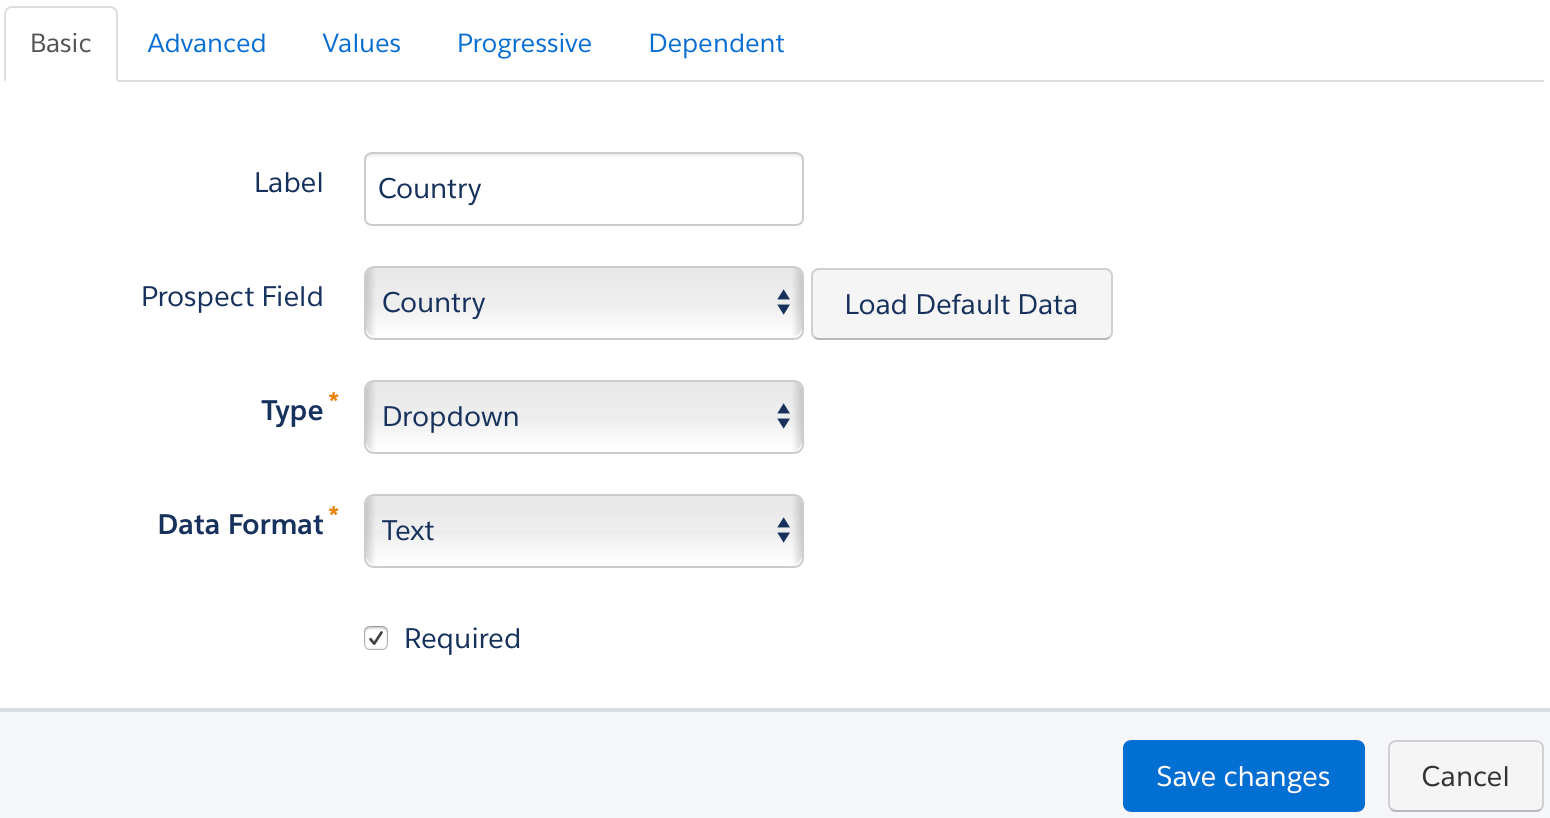
- This will open a pop-up for you, where you have to select Country for Prospect Field, and Dropdown for Type field. Once done, Label and Data Format fields will be auto-populated based on information in the Prospect Field, as shown in the following screenshot:

- We also want to add all countries to the dropdown. To do so, navigate to Values tab and select Countries in the Prefill With drop-down field. This will pop-up a window, make sure to click on OK button and Pardot will do the rest. At the end, it will look likes the following screenshot:
 If you want to display only country codes then select Country Codes for dropdown Prefill With drop-down field. It is also possible to show US States or US States Codes etc.
 - The next step is to make Company field dependent based on Country. To do so, navigate to Dependent tab and select Display other fields in this form based on the value of this field checkbox.
- Now configure controlling field value and dependent field. To do this follow these steps:
- Repeat the steps 7.1 and 7.2 to add country Canada. Finally, it will look like the following screenshot:

- Once you are done, click on the Save changes button.
- When finished, click on the Confirm & Save button to save your form.


It’s time to test the Process
- To see a sample, you can access my form by navigating to this URLhttp://www2.automationchampion.com/l/84462/2017-05-31/7wp8sx
- Let us open the above form, it will look like the following screenshot:

Initial Form - Now select either United States or Canada as values in the Country Field and see the magic, as shown in the following screenshot:

Dependent Field – Demo


Additional Concepts
- If you want to change the default error message – that displays if the field is either left blank, or if the field is populated with an invalid value – then, perform the following steps:
- Click on Marketing | Forms | Brand Awareness
- Then click on the Edit button
- Navigate to Step 2 i.e. Fields on the Form Wizard
- Then click on the Pencil icon, as shown in the following screenshot:

- Navigate to the Advanced tab, and update the Error Message field, as shown in the following screenshot:

- There may be some fields in which you may always want to make sure that the data populated in the fields is up to date. For Example, Phone field. If you always want to display such fields on a form then select, Always display even if previously completed checkbox, available under the Advanced tab.

- Use Do not prefill (refer preceding screenshot) checkbox for fields such as comments where the prospects may want to submit a value more than once (and you would not want to display their previous response).
- Use Maintain the initial value upon subsequent form submissions checkbox to retains the initial field value even if the prospect has submitted additional forms with other values for the same field.


In my next blog, I will take a deeper dive by showing you how to create your first automation rule in Pardot.
Proofreader: - Munira Majmundar


2 thoughts on “How to Use Dependent Form Fields in Pardot”