

Last Updated on December 5, 2020 by Rakesh Gupta
As a part of the new user onboarding process, the organization allows its users to fill in a few details on the user detail page (Or some other object) like Date of birth, etc. As these are the key fields related to their employee insurance policies, the organization doesn‘t want to allow their users to change the data for these fields once they are done with the onboarding process. In this article, I am going to discuss, how you can use Permission Sets, Flow, and Process Builder to manage it. Let’s start with a business use case.
Business Use Case
Pamela Kline is working as a System administrator at Universal Containers (UC). She has received a requirement to make a field Date of birth read-only based on the value of the fields. If the field is populated by the user (Profile: – Sales Reps EMEA), then they are not able to edit this field anymore.
Automation Champion Approach (I-do):
There are a few possible solutions for the above business scenario, but I’ll use Permission Sets, Process Builder and Flow to solve the above business requirement. Before proceeding you have to understand PermissionSetAssignment objects in Salesforce.
PermissionSetAssignment: – This object represents an association between a User and a PermissionSet.
| Field Name | Details |
| AssigneeId | The Id of the user to assign the permission set. |
| PermissionSetId | The Id of the PermissionSet to assign to the user. |
Follow the below instructions to solve the above business requirement
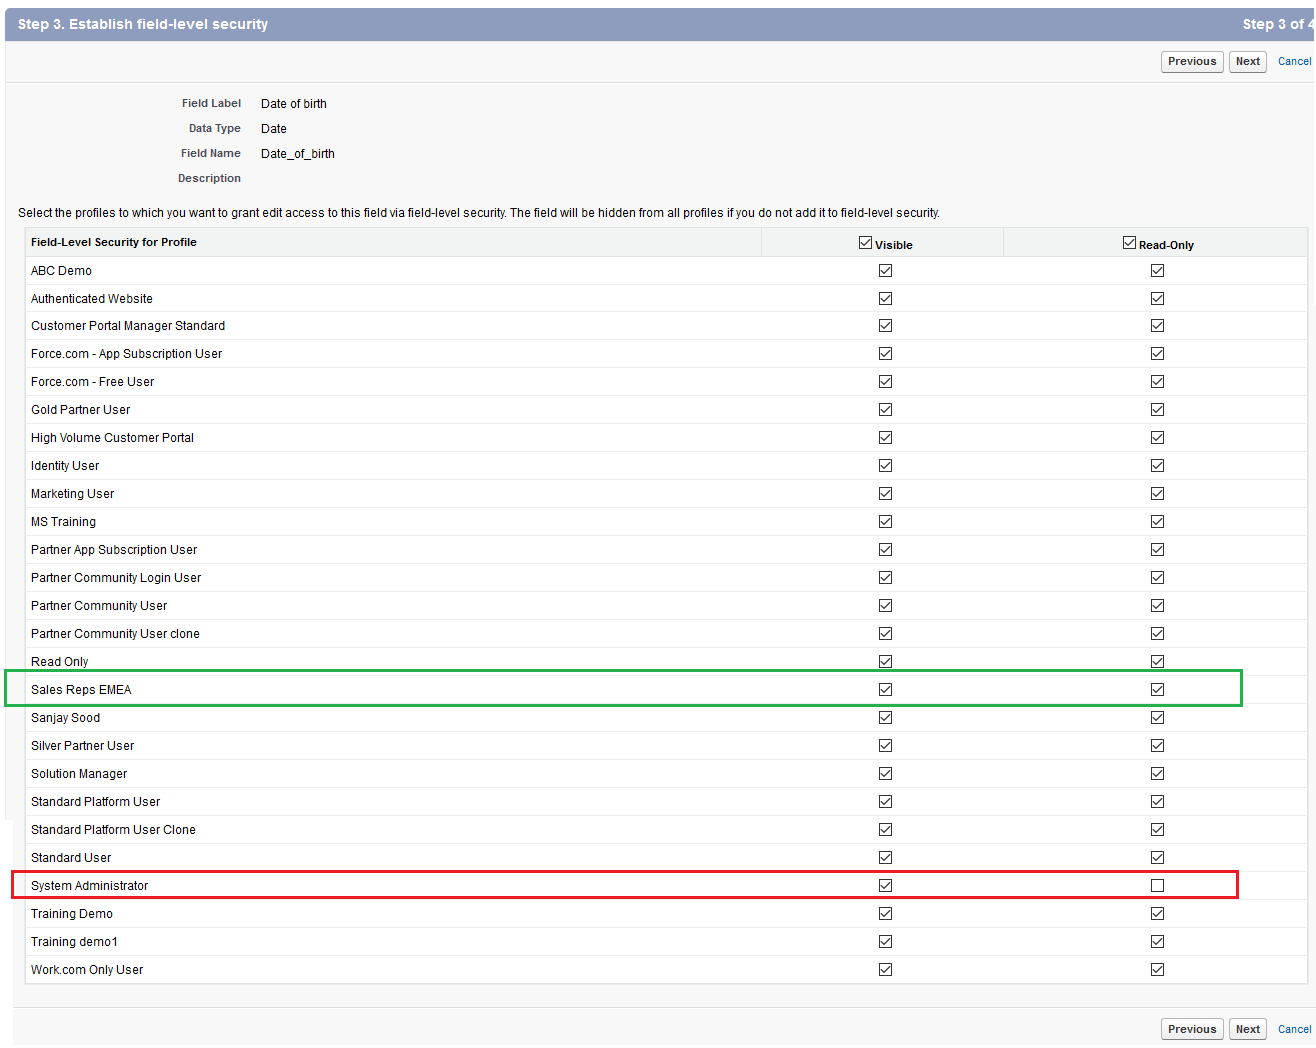
1. First of all create a custom field Date of birth (Data Type: – Date) on User object, as shown in the following screenshot

Grant field Read only access to all profiles and edit permission to System Administrator profile only, as shown in the following screenshot
2. Now we will create a Permission Set (Grant Date of birth Edit access) to grant custom field Date of birth edit access, as shown in the following screenshot

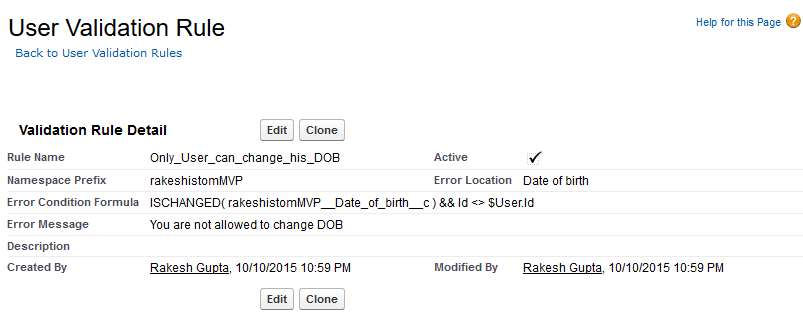
3. Create a validation rule on the User object so no one can change the Date of birth field on his/her behalf. It means only a user can change his/her Date of birth.
ISCHANGED(Date_of_birth__c ) && Id <> $User.Id
4. Click on Name | Setup | App Setup | Create | Workflows & Approvals | Flows
5. Click on New Flow, it will open the Flow canvas for you. Now create few Text variables VarT_UserId, VarT_DateOfBirth, VarT_PermissionSetId to store the user’s Id, Date of birth, and Permission Set ID (we will pass the user Id, Date of birth through Process Builder).
6. The next step is to get the Permission Set ID, for this, we will use the record lookup element. To do this drag-and-drop Record Lookup element (Enter the name Get the Permission Set ID) onto the canvas and map the fields according to the below details
- Select Object PermissionSet
- For criteria, select Name = Grant_Date_of_birth_Edit_access
- Save the Permission Set ID in {!VarT_PermissionSetId} variable, as shown in the following screenshot

7. Now we will use the Decision element to check the Text Variable {!VarT_DateOfBirth}. If the Text Variable Is Null equal to True, then we will go ahead and assign the Permission Set to the user. You can take help from the following screenshot to create a Decision Element

8. The next step is to assign the permission set to the user. For this, we will use Record Create element. Drag-and-drop Record Create element (Enter the name Add Permission Set) onto the canvas and map the fields according to the following screenshot

9. In case if the Date of birth field is populated by the user (Sales Reps EMEA Profile), then we have to remove the Permission Set from the User record. For this, we will use Record Delete element. Drag-and-drop Record Delete element (Enter the name Remove Permission Set) onto the canvas and map the fields according to the following screenshot

Finally, your Flow will look like the following screenshot

10. Save your flow with the name Conditionally make a field read-only and close the canvas. Don’t forget to Activate the Flow.
Launch a Flow from Process Builder
Our next task is to create a Process Builder on the User object to launch a Flow. To create a Process Builder on the User object follow the below instructions
1. Click on Name | Setup | App Setup | Create | Workflows & Approvals | Process Builder and click on the New button, Enter Name, API Name, and then click on the Save button

2. The next step is to add entry criteria. For this click on Add Object, select User object and for the entry criteria, Select when a record is created or edited, as shown in the below screenshot, once you are done click on the Save button

3. The next task is to add Process Criteria, To do this click on Add Criteria, enter Name, Type of action and set filter conditions (In this case set [User].Date_of_birth__c Is Changed True OR [User].CreatedDate Equals [User].LastModifiedDate, as shown in the following screenshot

4. The next step is to add an Immediate action to the Process. Click on Add Action (Under Immediate actions), Select the type of action to create (In our case Flows), and then fill out the fields to define the action, as shown in the following screenshot

5. Once you are done, click on the Save button, it will redirect you to Process canvas. Finally, the Process will look like the following screenshot

Don’t forget to active the Process by clicking on the Activate button.
Proof of Concept
- For the new user, it will work as per our designed no additional setup is required, but for the existing users (Profile: – Sales Reps EMEA) you have to assign the Permission Set (Grant Date of Birth Edit access).
- Once you are done with permission set assignment to existing users, the next step is to logged-In as another user. Currently, I logged-In as user Tushar Gupta’s (Profile: – Sales Reps EMEA) account. Try to update the Date of birth field as shown in the following screenshot:

- Once you are done, click on the Save button.
- Now edit the user record again and check out the Date of birth field


Formative Assessment:
I want to hear from you!
What did you learn from this post, is it relevant to you, and how will you modify the concepts taught in the post for your own business processes?
Make a post and tag me on Twitter @automationchamp, using #AutomationChampionPB.


Essential article to keep data clean along the Salesforce way!
Hi Rakesh, the process is working find when I try to edit the field after updating DOB. However, it is not assigning the permission set to new users.
Thanks,
I have update the “Process Criteria”. Thanks you 🙂
Good one! Will try this.
🙂