

Last Updated on April 16, 2022 by Rakesh Gupta
Big Idea or Enduring Question:
How do you @mentioned related users in a Post to Chatter Salesforce Flow action?
Objectives:
After reading this blog, you’ll be able to:
- Use the post to chatter action in the record-triggered flow
- Use Get element to avoid hard coding of Id
- Use the decision element to validate the get records outcome
- How to @mention the related user in a chatter post
- and much more
Business Use case
Brandon Schaefer is working as a System Administrator at Gurukul on Cloud (GoC). He has received a requirement to post Opportunity details to the UC Internal Announcements Chatter group whenever an Opportunity gets created or updated with an amount greater than 100,000 and also mentions related users Opportunity Owner and Account Owner in the post.
Automation Champion Approach (I-do):
In Salesforce Chatter Group represent a group of people. It’s a great way to boost collaboration in your organization. You can add unlimited members to Chatter Group, but a user can join a maximum of 100 Groups. In this article Auto Post a Message to Chatter When an Event is Created, I had discussed whenever an event is created for the public calendar post its detail to a Chatter Group using the Salesforce Flow. This article goes a step ahead and explains, how to @mention related users in a Post to Chatter action using the Salesforce Flow.While this can be solved using various automation tools like Apex Trigger, or Flow, we will use After-save Record-Triggered Flow. Check out this article to understand why we are using after-save record-triggered flow for this scenario.
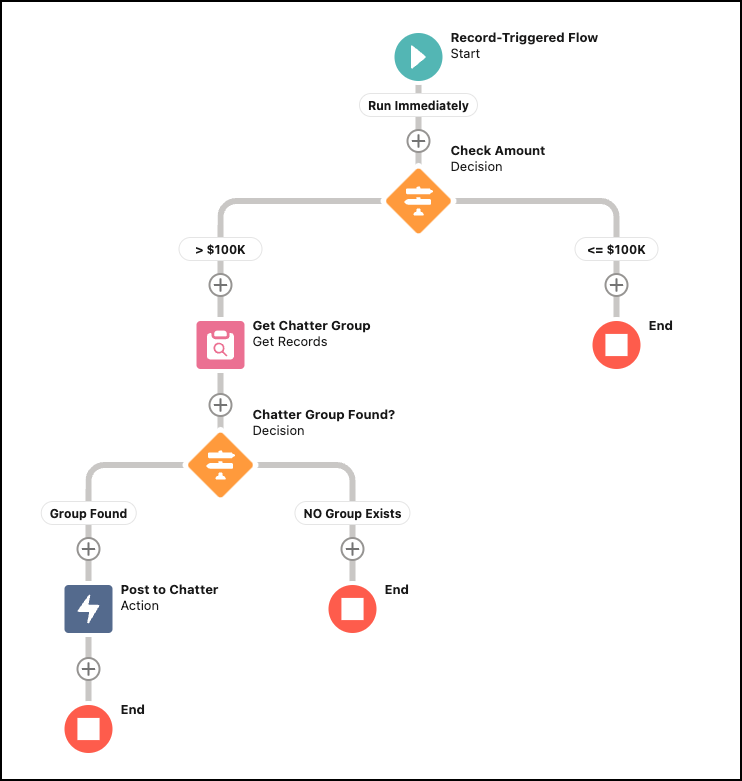
Before discussing the solution, let me show you a diagram of a Process Flow at a high level. Please spend a few minutes going through the following Flow diagram and understand it.
 Let’s begin building this automation process.
Guided Practice (We-do):
There are 2 steps to solve Brandon’s business requirement using Record-Triggered Flow. We must:
- Create a chatter group
- Salesforce flow
- Define flow properties for record-triggered flow
- Add a Text Template to construct the chatter post message body
- Add a decision element to check the opportunity amount is greater than $100K
- Add a get records element to find the chatter group details (UC Internal Announcements)
- Add a decision element to check if chatter group was found or not
- Add action post to chatter – to post a message to chatter group
Step 1: Create a Chatter Group
- Navigate to App Launcher and click on the Groups.
- Clicks on the New button.
- Name the Group and make sure to select the Private Access Type.
- Click Save.

Step 2.1: Define Flow Properties
- Click Setup.
- In the Quick Find box, type Flows.
- Select Flows then click on the New Flow.
- Select the Record-Triggered Flow option, click on Create and configure the flow as follows:
- Object: Opportunity
- Trigger the Flow When: A record is created or updated
- Set Entry Criteria
- Condition Requirements: None
- Optimize the Flow For Action and Related Records
- Click Done.

Step 2.2: Add a Text Template to Construct Chatter Post Message
Now we’ll create an email template using the Text Template. The text template allowed you to specify the multi-line messages. It also allows you to use HTML code.
- Under Toolbox, select Manager, then click New Resource to create a text template.
- Input the following information:
- Resource Type: Text Template
- API Name: textT_MessageBody
- Select View as Plain Text
- Body
- An opportunity is created or updated with an amount {!$Record.Amount}. @[{!$Record.OwnerId}] @[{!$Record.Account.OwnerId}]
- Click Done.

Step 2.3: Using Decision Element to Check if Opportunity Amount is Greater Than $100K
Now we will use the Decision element to check if the opportunity amount is greater than $10000K.
- On Flow Designer, click on the +icon and select the Decision element.
- Enter a name in the Label field; the API Name will auto-populate.
- Under Outcome Details, enter the Label the API Name will auto-populate.
- Condition Requirements to Execute Outcome: All Conditions Are Met (AND)
- Row 1:
- Resource: {!$Record.Amount}
- Operator: Greater Than
- Value: 100000
- Row 1:
- When to Execute Outcome: Only if the record that triggered the flow to run is updated to meet the condition requirements
- Click Done.

Step 2.4: Adding a Get Record Element to Find Chatter Group – UC Internal Announcements
The next step is to use the Get Records element to find chatter group UC Internal Announcements details.- On Flow Designer, below the >$100K node, click on the +icon and select the Get Records element.
- Enter a name in the Label field; the API Name will auto-populate.
- Select the Group (CollaborationGroup) object from the dropdown list.
- Select All Conditions Are Met (AND).
- Set Filter Conditions
- Row 1:
- Field: Name
- Operator: Equals
- Value: UC Internal Announcements
- Row 1:
- How Many Records to Store:
- select Only the first record
- How to Store Record Data:
- Choose the option to Automatically store all fields.
- Click Done.

Step 2.5: Using Decision Element to Check If Chatter Group was Found or Not
Now we will use the Decision element to check the Record Variable from step 2.4 to find if it returns the Chatter group UC Internal Announcements or not.
- On Flow Designer, click on the +icon and select the Decision element.
- Enter a name in the Label field; the API Name will auto-populate.
- Under Outcome Details, enter the Label the API Name will auto-populate.
- Condition Requirements to Execute Outcome: All Conditions Are Met (AND)
- Row 1:
- Resource: {!Get_Chatter_Group}
- Operator: Is Null
- Value: {!$GlobalConstant.False}
- Row 1:
- When to Execute Outcome: If the condition requirements are met.
- Click Done.

Step 2.6: Add Post to Chatter Action to Post a Message to Chatter Group
Now we will use the Post to Chatter static action to post a message to the chatter group UC Internal Announcements.
- On Flow Designer, below the Group Found node, click on the +icon and select the Action element.
- Search and select the Post to Chatter from the dropdown menu
- Enter a name in the Label field; the API Name will auto-populate.
- Set Input Values
- Message: {!textT_MessageBody}
- Target Name or ID: {!Get_Chatter_Group.Id}
- Click Done.

In the end, Brandon’s Flow will look like the following screenshot:
Once everything looks good, perform the steps below:
- Click Save.
- Enter Flow Label the API Name will auto-populate.
- Click Show Advanced.
- API Version for Running the Flow: 54
- Interview Label: Post a message to Related User {!$Flow.CurrentDateTime}
- Click Save.

Almost there! Once everything looks good, click the Activate button.
Proof of Concept
Now onwards, if a business user updates the opportunity which has an amount greater than 100,000, then record-triggered flow will automatically trigger and create a post in chatter group UC Internal Announcements.
- Currently, Deer Valley Corp opportunity amount value is 1000, as shown in the following screenshot:

- Let’s update the amount to 110,000, then navigate to the Chatter group UC Internal Announcements and check out the Chatter group wall for the automated post:


Formative Assessment:
I want to hear from you!
What is one thing you learned from this post? How do you envision applying this new knowledge in the real world? Feel free to share in the comments below.


@Rakesh, This is for another user from user object
Dear Rakesh,
How do I use the user field in @ mention? in the chatter post, could you please provide some examples?
Do you mean user’s manager or another user (Hierarchical) field from user object?
What can be the best practice if we want to use the user field dynamically? For eg: There are two user field and based on a condition we want to use user field in @ mention.
Use formula (resource) in flow to dynamically tag user.
Can it notify users of a new chatter post (via email) at the same time.
You can – use send email static action.
Is there a way to control the header of the chatter post? In some automated posts, the header is “‘User name’ added a file” whereas in your example it seems to be auto generated – ‘UC Internal Announcement – Rakesh Gupta”
AFAIK, we can’t control the chatter header
Is there a way to control the header of the chatter post? In some automated posts, the header is “‘User name’ added a file” whereas in your example it seems to be auto generated – ‘UC Internal Announcement – Rakesh Gupta”
You’re simply awesome Rakesh!
🙂