

Last Updated on May 30, 2024 by Rakesh Gupta
Big Idea or Enduring Question:
- How can you leverage Salesforce Trust API to proactively monitor your instance for real-time downtime and maintenance notifications?
Objectives:
After reading this blog, you’ll be able to:
- Create Named Credentials for outbound requests.
- Create a Text Template in the Flow.
- Use the Send Email core action to send a formatted rich text email.
- Understand Salesforce Trust API request and response structure
- Initiate an outbound HTTP GET request (to Salesforce Trust API) utilizing Salesforce Flow without needing code.
- Manage the outbound request response and implement appropriate actions.
- Validate the integration and ensure the data flow works correctly.
- Run a Flow in regular intervals (for example, every 15 minutes, Hourly, Every four hours, etc.)
- and much more
👉 Previously, I’ve penned several posts on the topic of interfacing Salesforce with a diverse range of systems. Why not check them out while you are at it?!
Business Use case
Benjamin Moore, the Salesforce Architect at Gurukul On Cloud (GoC), has been tasked with implementing a monitoring system for detecting downtime of the production instance (NA107). Whenever the status falls under any of the following listed below, an email alert should be sent to all system administrators:
- MAJOR_INCIDENT_CORE
- MINOR_INCIDENT_CORE
- MAINTENANCE_CORE
- MAJOR_INCIDENT_NONCORE
- MINOR_INCIDENT_NONCORE
- MAINTENANCE_NONCORE
Benjamin wants to run the automation to run every 60 minutes to check the Sandbox status.

What is Salesforce Trust Site?
Trust.salesforce.com is Salesforce’s website to provide transparency around service availability, performance, security, privacy, and compliance in order to instill trust and confidence in Salesforce service. Information on this site includes live and historical data on system performance, information about planned maintenance, and system health.
Monitoring Salesforce downtime is crucial for businesses that rely on Salesforce for their everyday operations. One of the key reasons is to ensure business continuity. Salesforce often serves as the operational backbone for various departments, including sales, customer service, and marketing. Any disruption or downtime can significantly impact these operations and cause delays or even loss of revenue.
You may need to monitor the Salesforce downtime status for a number of reasons:
- Business Continuity:- Salesforce often forms the backbone of a company’s operations, especially for sales, customer service, and marketing departments. Downtime could potentially disrupt these operations.
- Customer Experience:- Downtime can affect customer interactions and overall experience. For instance, customer service representatives might not be able to access critical customer data during a service interruption, affecting the quality and efficiency of customer support.
- Planning and Preparation:- Monitoring can help businesses anticipate and prepare for potential disruptions. For example, if a company knows that maintenance is scheduled, they can plan around this to minimize the impact on their operations.
- SLA Compliance:- like many service providers, Salesforce has a Service Level Agreement (SLA) that guarantees a certain level of uptime. Monitoring downtime can help ensure that Salesforce meets its SLA obligations.
Different Ways to Monitor Salesforce Downtime
Monitoring Salesforce downtime is vital to maintaining smooth business operations and ensuring customer satisfaction. There are several ways to stay informed about possible disruptions or system downtimes. These include:
- Salesforce Trust Site:- As mentioned, Salesforce’s own Trust site provides real-time and historical data on system performance.
- Email Notifications: Salesforce also offers email notifications that can alert users to potential system disruptions.

- Third-Party Monitoring Services:- Several third-party services offer Salesforce monitoring, such as ThusandEyes, AppDynamics, New Relic, and Dynatrace. These tools provide real-time monitoring and alerts; some offer more detailed performance analytics.
- In-house Monitoring Solutions:- You can also develop your own in-house solutions to monitor Salesforce downtime, using Salesforce’s Trust APIs to gather performance data. This blog post will teach you how to do this via Salesforce Flow.

What is Salesforce Trust API?
The Salesforce Trust API lets developers retrieve information about various Salesforce services and components’ performance, availability, and security. It provides real-time data on system status, including information about maintenance activities, service disruptions, and security incidents. The Trust API helps developers and administrators stay informed about the overall health and reliability of the Salesforce platform.
By integrating the Trust API into your applications or monitoring systems, you can retrieve real-time status updates, subscribe to notifications, and automate processes based on the current state of Salesforce services. It enables users to make data-driven decisions, proactively address potential issues, and stay informed about disruptions or incidents affecting their Salesforce implementation.
https://api.status.salesforce.com/v1/instances/Na107/status?childProducts=false
Here is a sample response in JSON format that the API might return:
{
  "key": "NA107",
  "location": "NA",
  "environment": "production",
  "releaseVersion": "Summer '23 Patch 11.4",
  "releaseNumber": "244.11.4",
  "status": "OK",
  "isActive": true,
  "city": "",
  "stateName": "",
  "stateCode": "",
  "countryName": "",
  "countryCode": "",
  "maintenanceWindow": "Saturdays 07:00 PM - 11:00 PM PST",
  "Services": [
    {
      "key": "EinsteinBots",
      "order": 110,
      "isCore": false
    },
    {
      "key": "Communities",
      "order": 200,
      "isCore": false
    },
    {
      "key": "Customer360Audiences",
      "order": 500,
      "isCore": false
    },
    {
      "key": "coreService",
      "order": 1,
      "isCore": true
    },
    {
      "key": "liveAgent",
      "order": 20,
      "isCore": false
    },
    {
      "key": "search",
      "order": 5,
      "isCore": false
    },
    {
      "key": "analytics",
      "order": 10,
      "isCore": false
    },
    {
      "key": "CPQandBilling",
      "order": 100,
      "isCore": false
    },
    {
      "key": "SalesforceCMS",
      "order": 1200,
      "isCore": false
    },
    {
      "key": "ServiceCloudVoice",
      "order": 600,
      "isCore": false
    },
    {
      "key": "SALESFORCEORDERMANAGEMENT",
      "order": 1210,
      "isCore": false
    },
    {
      "key": "B2BCommerce",
      "order": 1300,
      "isCore": false
    },
    {
      "key": "B2B2CCommerce",
      "order": 1400,
      "isCore": false
    },
    {
      "key": "SalesforceUnifiedMessaging",
      "order": 1450,
      "isCore": false
    }
  ],
  "Products": [
    {
      "key": "Salesforce_Services",
      "order": 0,
      "isActive": true,
      "name": "Salesforce Services",
      "altDisplayName": "Sales and Service",
      "url": "/products/Salesforce_Services"
    }
  ],
  "Incidents": [],
  "Maintenances": [
    {
      "id": 528193,
      "message": {
        "maintenanceType": "release",
        "availability": "unavailable",
        "eventStatus": "resolved"
      },
      "externalId": "a3GEE0000005Sq82AE",
      "name": "Summer '23 Major Release",
      "plannedStartTime": "2023-06-10T16:00:00.000Z",
      "plannedEndTime": "2023-06-10T16:05:00.000Z",
      "additionalInformation": null,
      "isCore": true,
      "affectsAll": false,
      "createdAt": "2022-07-12T21:37:07.667Z",
      "updatedAt": "2022-07-12T21:37:07.667Z",
      "MaintenanceImpacts": [
        {
          "id": 16561,
          "startTime": "2023-06-10T16:00:12.000Z",
          "endTime": "2023-06-10T16:01:35.000Z",
          "type": "deployingRelease",
          "severity": "maintenance",
          "createdAt": "2023-06-10T16:00:18.050Z",
          "updatedAt": "2023-06-10T16:01:41.181Z",
          "startTimeCreatedAt": "2023-06-10T16:00:18.050Z",
          "startTimeModifiedAt": null,
          "endTimeCreatedAt": "2023-06-10T16:01:41.181Z",
          "endTimeModifiedAt": null
        }
      ],
      "MaintenanceEvents": [
        {
          "id": 189760,
          "type": "majorReleaseReleaseIsLive",
          "message": "The Salesforce major release is live, and you can already use a subset of its features. Other new features are being enabled gradually as Release Updates (RUs) complete, and you can expect all features to be available within the next 24 hours. For information about the Release Updates, see the release notes.",
          "createdAt": "2023-06-10T16:01:50.332Z",
          "updatedAt": "2023-06-10T16:01:50.332Z"
        },
        {
          "id": 189721,
          "type": "majorRelease10MinutesToZdt",
          "message": "The release is about to begin.",
          "createdAt": "2023-06-10T15:58:01.515Z",
          "updatedAt": "2023-06-10T15:58:01.515Z"
        },
        {
          "id": 186226,
          "type": "reminder",
          "message": "This maintenance will happen in 10 days.",
          "createdAt": "2023-05-30T16:06:51.743Z",
          "updatedAt": "2023-05-30T16:06:51.743Z"
        },
        {
          "id": 179527,
          "type": "scheduled",
          "message": "This maintenance is scheduled.",
          "createdAt": "2023-04-10T16:03:26.004Z",
          "updatedAt": "2023-04-10T16:03:26.004Z"
        }
      ],
      "instanceKeys": [
        "NA107"
      ],
      "serviceKeys": [
        "coreService"
      ]
    },
    {
      "id": 621500,
      "message": {
        "maintenanceType": "release",
        "availability": "unavailable",
        "eventStatus": "confirmed"
      },
      "externalId": "a3GEE0000007Y3Q2AU",
      "name": "Winter '24 Major Release",
      "plannedStartTime": "2023-10-14T16:00:00.000Z",
      "plannedEndTime": "2023-10-14T16:05:00.000Z",
      "additionalInformation": null,
      "isCore": true,
      "affectsAll": false,
      "createdAt": "2022-12-08T22:04:06.239Z",
      "updatedAt": "2022-12-08T22:04:06.239Z",
      "MaintenanceImpacts": [],
      "MaintenanceEvents": [],
      "instanceKeys": [
        "NA107"
      ],
      "serviceKeys": [
        "coreService"
      ]
    },
    {
      "id": 634955,
      "message": {
        "maintenanceType": "release",
        "availability": "unavailable",
        "eventStatus": "confirmed"
      },
      "externalId": "a3GEE0000009lPY2AY",
      "name": "Spring '24 Major Release",
      "plannedStartTime": "2024-02-10T16:00:00.000Z",
      "plannedEndTime": "2024-02-10T16:05:00.000Z",
      "additionalInformation": null,
      "isCore": true,
      "affectsAll": false,
      "createdAt": "2023-03-03T01:37:50.025Z",
      "updatedAt": "2023-04-18T05:32:00.094Z",
      "MaintenanceImpacts": [],
      "MaintenanceEvents": [],
      "instanceKeys": [
        "NA107"
      ],
      "serviceKeys": [
        "coreService"
      ]
    },
    {
      "id": 636026,
      "message": {
        "maintenanceType": "release",
        "availability": "fullyAvailable",
        "eventStatus": "resolved"
      },
      "externalId": "a3GEE0000009zQr2AI",
      "name": "Health Cloud - Summer '23 - Major Release",
      "plannedStartTime": "2023-06-10T16:00:00.000Z",
      "plannedEndTime": "2023-06-12T03:00:00.000Z",
      "additionalInformation": "Active Orgs upgrade will happen during the window time. Orgs whose status is not active will be upgraded during 11 Jun (Sunday) late PST hours.",
      "isCore": true,
      "affectsAll": false,
      "createdAt": "2023-03-13T07:25:57.258Z",
      "updatedAt": "2023-03-13T07:25:57.258Z",
      "MaintenanceImpacts": [
        {
          "id": 16731,
          "startTime": "2023-06-10T16:00:00.000Z",
          "endTime": "2023-06-10T21:08:16.445Z",
          "type": "featuresActivated",
          "severity": "maintenance",
          "createdAt": "2023-06-10T21:08:16.977Z",
          "updatedAt": "2023-06-10T21:08:16.977Z",
          "startTimeCreatedAt": "2023-06-10T21:08:16.977Z",
          "startTimeModifiedAt": null,
          "endTimeCreatedAt": "2023-06-10T21:08:16.977Z",
          "endTimeModifiedAt": null
        }
      ],
      "MaintenanceEvents": [
        {
          "id": 186209,
          "type": "reminder",
          "message": "This maintenance will happen in 10 days.",
          "createdAt": "2023-05-30T16:06:50.416Z",
          "updatedAt": "2023-05-30T16:06:50.416Z"
        },
        {
          "id": 179662,
          "type": "scheduled",
          "message": "This maintenance is scheduled.",
          "createdAt": "2023-04-10T16:03:32.482Z",
          "updatedAt": "2023-04-10T16:03:32.482Z"
        }
      ],
      "instanceKeys": [
        "NA107"
      ],
      "serviceKeys": [
        "coreService"
      ]
    },
    {
      "id": 636028,
      "message": {
        "maintenanceType": "release",
        "availability": "fullyAvailable",
        "eventStatus": "resolved"
      },
      "externalId": "a3GEE0000009zPF2AY",
      "name": "Financial Services Cloud - Summer '23 - Major Release",
      "plannedStartTime": "2023-06-10T16:00:00.000Z",
      "plannedEndTime": "2023-06-12T03:00:00.000Z",
      "additionalInformation": "Active Orgs upgrade will happen during the window time. Orgs whose status is not active will be upgraded during 11 Jun (Sunday) late PST hours.",
      "isCore": true,
      "affectsAll": false,
      "createdAt": "2023-03-13T07:25:57.411Z",
      "updatedAt": "2023-03-13T07:25:57.411Z",
      "MaintenanceImpacts": [
        {
          "id": 16715,
          "startTime": "2023-06-10T16:00:00.000Z",
          "endTime": "2023-06-10T20:36:20.404Z",
          "type": "featuresActivated",
          "severity": "maintenance",
          "createdAt": "2023-06-10T20:36:20.907Z",
          "updatedAt": "2023-06-10T20:36:20.907Z",
          "startTimeCreatedAt": "2023-06-10T20:36:20.907Z",
          "startTimeModifiedAt": null,
          "endTimeCreatedAt": "2023-06-10T20:36:20.907Z",
          "endTimeModifiedAt": null
        }
      ],
      "MaintenanceEvents": [
        {
          "id": 186302,
          "type": "reminder",
          "message": "This maintenance will happen in 10 days.",
          "createdAt": "2023-05-30T16:06:58.890Z",
          "updatedAt": "2023-05-30T16:06:58.890Z"
        },
        {
          "id": 179660,
          "type": "scheduled",
          "message": "This maintenance is scheduled.",
          "createdAt": "2023-04-10T16:03:32.388Z",
          "updatedAt": "2023-04-10T16:03:32.388Z"
        }
      ],
      "instanceKeys": [
        "NA107"
      ],
      "serviceKeys": [
        "coreService"
      ]
    },
    {
      "id": 639943,
      "message": {
        "maintenanceType": "release",
        "availability": "fullyAvailable",
        "eventStatus": "eventStatusCanceled"
      },
      "externalId": "a3GEE000000BPKr2AO",
      "name": "REV Summer '23 Major Release (244) - R2b",
      "plannedStartTime": "2023-06-10T16:30:00.000Z",
      "plannedEndTime": "2023-06-12T17:30:00.000Z",
      "additionalInformation": "All orgs running CPQ versions 208.x and above on the listed instances will be upgraded to CPQ Spring '22 (236.x) package.\r\nThe Billing package, if installed, will also be upgraded to Billing Spring '22 (236.x) package along with the relevant payment gateways.\r\nThe Advanced Approvals package, if installed, will also be upgraded to the latest version.",
      "isCore": false,
      "affectsAll": false,
      "createdAt": "2023-05-20T00:52:26.811Z",
      "updatedAt": "2023-06-05T20:28:47.837Z",
      "MaintenanceImpacts": [],
      "MaintenanceEvents": [
        {
          "id": 187463,
          "type": "cancelled",
          "message": "Due to unforeseen issues, this activity has been canceled.",
          "createdAt": "2023-06-05T20:28:47.796Z",
          "updatedAt": "2023-06-05T20:28:47.796Z"
        },
        {
          "id": 186521,
          "type": "reminder",
          "message": "This maintenance will happen in 10 days.",
          "createdAt": "2023-05-30T16:30:56.536Z",
          "updatedAt": "2023-05-30T16:30:56.536Z"
        },
        {
          "id": 184249,
          "type": "scheduled",
          "message": "This maintenance is scheduled.",
          "createdAt": "2023-05-20T01:00:28.719Z",
          "updatedAt": "2023-05-20T01:00:28.719Z"
        }
      ],
      "instanceKeys": [
        "NA107"
      ],
      "serviceKeys": [
        "CPQandBilling"
      ]
    },
    {
      "id": 641218,
      "message": {
        "maintenanceType": "release",
        "availability": "fullyAvailable",
        "eventStatus": "eventStatusCanceled"
      },
      "externalId": "a3GEE000000Bhxh2AC",
      "name": "REV Summer '23 Major Release (244) - R2b",
      "plannedStartTime": "2023-06-10T21:30:00.000Z",
      "plannedEndTime": "2023-06-12T17:30:00.000Z",
      "additionalInformation": "All orgs running CPQ versions 208.x and above on the listed instances will be upgraded to CPQ Summer '23 (244.x) package.\r\nThe Billing package, if installed, will also be upgraded to Billing Summer '23 (244.x) package along with the relevant payment gateways.\r\nThe Advanced Approvals package, if installed, will also be upgraded to the latest version.",
      "isCore": false,
      "affectsAll": false,
      "createdAt": "2023-06-05T20:28:30.803Z",
      "updatedAt": "2023-06-09T19:28:00.715Z",
      "MaintenanceImpacts": [],
      "MaintenanceEvents": [
        {
          "id": 189143,
          "type": "cancelled",
          "message": "Due to unforeseen issues, this activity has been canceled.",
          "createdAt": "2023-06-09T19:28:00.675Z",
          "updatedAt": "2023-06-09T19:28:00.675Z"
        },
        {
          "id": 187776,
          "type": "scheduled",
          "message": "This maintenance is scheduled.",
          "createdAt": "2023-06-05T20:36:23.931Z",
          "updatedAt": "2023-06-05T20:36:23.931Z"
        }
      ],
      "instanceKeys": [
        "NA107"
      ],
      "serviceKeys": [
        "CPQandBilling"
      ]
    },
    {
      "id": 641657,
      "message": {
        "maintenanceType": "release",
        "availability": "fullyAvailable",
        "eventStatus": "confirmed"
      },
      "externalId": "a3GEE000000BnNB2A0",
      "name": "REV Summer '23 Major Release (244) - R2b",
      "plannedStartTime": "2023-06-10T21:45:00.000Z",
      "plannedEndTime": "2023-06-12T17:30:00.000Z",
      "additionalInformation": "All orgs running CPQ versions 208.x and above on the listed instances will be upgraded to CPQ Summer '23 (244.x) package.\r\nThe Billing package, if installed, will also be upgraded to Billing Summer '23 (244.x) package along with the relevant payment gateways.\r\nThe Advanced Approvals package, if installed, will also be upgraded to the latest version.",
      "isCore": false,
      "affectsAll": false,
      "createdAt": "2023-06-09T19:27:52.878Z",
      "updatedAt": "2023-06-09T19:27:52.878Z",
      "MaintenanceImpacts": [],
      "MaintenanceEvents": [
        {
          "id": 189282,
          "type": "scheduled",
          "message": "This maintenance is scheduled.",
          "createdAt": "2023-06-09T19:35:41.105Z",
          "updatedAt": "2023-06-09T19:35:41.105Z"
        }
      ],
      "instanceKeys": [
        "NA107"
      ],
      "serviceKeys": [
        "CPQandBilling"
      ]
    },
    {
      "id": 642676,
      "message": {
        "maintenanceType": "release",
        "availability": "unavailable",
        "eventStatus": "confirmed"
      },
      "externalId": "a3GEE000000BwTk2AK",
      "name": "Summer '24 Major Release",
      "plannedStartTime": "2024-06-15T16:00:00.000Z",
      "plannedEndTime": "2024-06-15T16:05:00.000Z",
      "additionalInformation": "",
      "isCore": true,
      "affectsAll": false,
      "createdAt": "2023-06-20T20:40:08.381Z",
      "updatedAt": "2023-06-20T20:40:08.381Z",
      "MaintenanceImpacts": [],
      "MaintenanceEvents": [],
      "instanceKeys": [
        "NA107"
      ],
      "serviceKeys": [
        "coreService"
      ]
    },
    {
      "id": 644696,
      "message": {
        "maintenanceType": "release",
        "availability": "fullyAvailable",
        "eventStatus": "confirmed"
      },
      "externalId": "a3GEE000000C7yb2AC",
      "name": "Health Cloud - Winter '24 - Major Release",
      "plannedStartTime": "2023-10-14T16:00:00.000Z",
      "plannedEndTime": "2023-10-16T03:00:00.000Z",
      "additionalInformation": "Active Orgs upgrade will happen during the window time. Orgs whose status is not active will be upgraded during October 15 (Sunday) late PST hours.",
      "isCore": true,
      "affectsAll": false,
      "createdAt": "2023-07-03T04:38:37.171Z",
      "updatedAt": "2023-07-03T04:38:37.171Z",
      "MaintenanceImpacts": [],
      "MaintenanceEvents": [],
      "instanceKeys": [
        "NA107"
      ],
      "serviceKeys": [
        "coreService"
      ]
    },
    {
      "id": 644698,
      "message": {
        "maintenanceType": "release",
        "availability": "fullyAvailable",
        "eventStatus": "confirmed"
      },
      "externalId": "a3GEE000000C7wz2AC",
      "name": "Financial Services Cloud - Winter '24 - Major Release",
      "plannedStartTime": "2023-10-14T16:00:00.000Z",
      "plannedEndTime": "2023-10-16T03:00:00.000Z",
      "additionalInformation": "Active Orgs upgrade will happen during the window time. Orgs whose status is not active will be upgraded during October 15 (Sunday) late PST hours.",
      "isCore": true,
      "affectsAll": false,
      "createdAt": "2023-07-03T04:38:37.324Z",
      "updatedAt": "2023-07-03T04:38:37.324Z",
      "MaintenanceImpacts": [],
      "MaintenanceEvents": [],
      "instanceKeys": [
        "NA107"
      ],
      "serviceKeys": [
        "coreService"
      ]
    }
  ],
  "Tags": []
}
Status Enums can be one of the following:
- OK
- MAJOR_INCIDENT_CORE
- MINOR_INCIDENT_CORE
- MAINTENANCE_CORE
- MAJOR_INCIDENT_NONCORE
- MINOR_INCIDENT_NONCORE
- MAINTENANCE_NONCORE
Run Autolaunchable Flow More Frequently
An Event on the data does not trigger scheduled Flows; they run when a scheduled time arrives. Scheduled Flows run as follows:
- Once (On a particular date and time)
- Daily (On a particular date and time)
- Weekly (On a particular date and time)
Yet, there may be instances where it’s necessary to run an autolaunchable flow more frequently than what’s needed. For such scenarios, either a familiarity with Apex or the use of an AppExchange app, Schedul-o-matic 9000, is required.

The Schedul-o-matic 9000 app offers the flexibility of custom repeat intervals. Whether it’s running a job once, every 5 minutes indefinitely, or any time frame in between, the choice lies in your hands.
Prerequisite
Before you start using the Salesforce Trust API, you need to spend some time understanding request and response parameters, including various options. 
Last but not least, install the Schedul-o-matic app from AppExchnage.
Automation Champion Approach (I-do):
While this can be solved using various automation tools like Schedule Apex, Third Party App, and others, we will use Autolanunched Flow and the newly introduced HTTP Callout (GET)flow feature.
HTTP Callout pulls or sends data between the Salesforce database and an external system via Flow Builder without using code. You can set up direct integrations as needed without having to work with a developer or call a middleware tool, such as Mulesoft. After configuring the HTTP callout action in a flow, Flow Builder auto-generates an external service registration, an invocable action, and Apex Class that you can use to create an Apex-defined resource for flows. You can then use the data output of the API request as input within Flow Builder and across Salesforce.
You can use HTTP Callout to connect a flow to a variety of APIs.
- Get address information using a map API
- Get weather conditions with a weather service API
- Generate the barcode with a barcode service API
- Get payment authorization information with a payment processing API
- and much more
Before discussing the solution, let me show you a diagram of the process at a high level. Please spend a few minutes going through the following Flow diagram to understand it.

Let’s begin building this automation process.
Guided Practice (We-do):
There are 3 steps to solve Benjamin’s business requirement using Autolaunched Flow. We must:
- Create a Named Credential
- Salesforce Flow
- Define flow properties for autolaunched flow
- Configure an HTTP GET callout for Trust API
- Add a Decision element to check the response code and status enum
- Add a Get Records element to find the System Administrator profile
- Add a Get Records element to find the users with a System Administrator profile
- Add a Decision element to check if users with the profile System Administrator were found or not (from step 5)
- Add a loop element to retrieve records from the record collection variable (from step 5)
- Add an Assignment element to collect all System Administrators’ email
- Add a Text Template to Construct Email Body
- Use action to send out email alerts to all System Administrators
- Schedule autolaunched flow using Schedul-o-matic to run every hour.
Step 1: Create a Named Credential
- Click Setup.
- In the Quick Find box, enter Named Credentials, and then select Named Credentials.
- Click New Legacy.
- Fill out the page with the callout endpoint’s URL and authentication parameters.
- Click Save.

Step 2.1: Define Flow Properties
- Click Setup.
- In the Quick Find box, type Flows.
- Select Flows, then click on the New Flow.
- Select the Autolaunched Flow (No Trigger)option.
- Click on Create.

Step 2.2: Configure an HTTP GET Callout Action
HTTP Callout guides you through entering the details about the HTTP web-based service or REST API endpoint that you’re connecting to. After you complete the configuration, you invoke the action in a flow.
- Click the + icon, and select Action.
- Click + Create HTTP Callout.
- Configure the external service that connects Salesforce to the HTTP-based API.
- Enter a Name for the external service.
- Select the named credential that you created in Step 1.
- Click Next.

- The next step is to configure the invocable action that you can use in Flow Builder or across Salesforce.
- For Label, enter the action that the callout performs.
- Method: GET
- Add the URL endpoint for the request.
- URL Path: /v1/instances/{InstanceKey}/status
- Key: InstanceKey
- Data Type: String
- URL Path: /v1/instances/{InstanceKey}/status
- Add query parameter keys if the API you’re calling has them. When you use this action in a flow, you input values for the defined keys.
- Click Add Key
- Key: productKey
- Data Type: String
- Required: False
- Click Add Key
- Key: childProducts
- Data Type: Boolean
- Required: False
- Key: childProducts
- Click Add Key
- Key: locale
- Data Type: String
- Required: False

- Click Add Key
- Provide a sample API response body. Salesforce generates a data structure from the sample response.
- Navigate to Provide Sample Response section.
- Click New.
- Paste a sample JSON response.
{ "Products": [{ "altDisplayName": "sample string", "name": "sample string", "isActive": true, "url": "sample string", "key": "sample string", "order": 1 }], "city": "sample string", "releaseVersion": "sample string", "Incidents": [{ "createdAt": "sample string", "additionalInformation": "sample string", "serviceKeys": ["sample string"], "IncidentEvents": [{ "createdAt": "sample string", "id": 1, "message": "sample string", "type": "sample string", "updatedAt": "sample string" }], "isCore": true, "externalId": "sample string", "instanceKeys": ["sample string"], "id": 1, "message": "sample string", "affectsAll": true, "updatedAt": "sample string", "IncidentImpacts": [{ "createdAt": "sample string", "startTime": "sample string", "serviceIssue": "sample string", "endTime": "sample string", "id": 1, "endUserImpact": "sample string", "type": "sample string", "updatedAt": "sample string" }] }], "isActive": true, "maintenanceWindow": "sample string", "Services": [{ "isCore": true, "key": "sample string", "order": 1 }], "environment": "sample string", "stateName": "sample string", "countryCode": "sample string", "stateCode": "sample string", "Maintenances": [{ "additionalInformation": "sample string", "serviceKeys": ["sample string"], "isCore": true, "externalId": "sample string", "instanceKeys": ["sample string"], "message": { "eventStatus": "sample string", "availability": "sample string", "maintenanceType": "sample string" }, "affectsAll": true, "createdAt": "2017-07-21T17:32:28Z", "plannedStartTime": "2017-07-21T17:32:28Z", "plannedEndTime": "2017-07-21T17:32:28Z", "name": "sample string", "MaintenanceImpacts": [{ "severity": "sample string", "startTimeCreatedAt": "2017-07-21T17:32:28Z", "createdAt": "2017-07-21T17:32:28Z", "endTimeModifiedAt": "2017-07-21T17:32:28Z", "startTime": "2017-07-21T17:32:28Z", "startTimeModifiedAt": "2017-07-21T17:32:28Z", "id": 1, "endTimeCreatedAt": "2017-07-21T17:32:28Z", "endTime": "2017-07-21T17:32:28Z", "type": "sample string", "updatedAt": "2017-07-21T17:32:28Z" }], "MaintenanceEvents": [{ "createdAt": "2017-07-21T17:32:28Z", "id": 1, "message": "sample string", "type": "sample string", "updatedAt": "2017-07-21T17:32:28Z" }], "id": 1, "updatedAt": "2017-07-21T17:32:28Z" }], "location": "sample string", "countryName": "sample string", "releaseNumber": "sample string", "key": "sample string", "status": "sample string" } - Click Review and confirm that the Apex data structure is correct.
- To make changes, edit the text in Sample JSON Response or select data types from the data structure.
- Click Review.
- Click Done.

- Click Save.
-
Flow Builder creates the action and external service. The action is available in the Actions window in the flow.
-
The next step is to add the apex action generated by the HTTP Callout setup in the previous steps. We will use the Action element.
-
Label the new action Get Salesforce Status.
-
Set Input Values
- InstanceKey: NA107
- childProducts: {!$GlobalConstant.False}
-
- Click Done.


Step 2.3: Using Decision Element to Check the Trust API Callout Response Code
Now we will use the Decision element to check the Salesforce Trust API response code.
- On Flow Designer, click on the+icon and select the Decision element.
- Enter a name in the Label field; the API Name will auto-populate.
- Under Outcome Details, enter the Label the API Name will auto-populate.
- Condition Requirements to Execute Outcome: All Conditions Are Met (AND)
- Row 1:
- Resource: {!Get_Salesforce_Status.responseCode}
- Operator: Equals
- Value: 200
- Click Add Condition
- Row 2:
- Resource: {!Get_Salesforce_Status.2XX.status}
- Operator: Equals
- Value: OK

- Resource: {!Get_Salesforce_Status.2XX.status}
- Row 1:
- Add a new OUTCOME ORDER by clicking on the + icon to check the reported Major and Minor incidents.
- Condition Requirements to Execute Outcome: Custom Conditions Logic is Met
- Condition Logic: 1 AND (2 OR 3 OR 4 OR 5 OR 6 OR 7)
- Row 1:
- Resource: {!Get_Salesforce_Status.responseCode}
- Operator: Equals
- Value: 200
- Resource: {!Get_Salesforce_Status.responseCode}
- Click Add Condition
- Row 2:
- Resource: {!Get_Salesforce_Status.2XX.status}
- Operator: Equals
- Value: MAJOR_INCIDENT_CORE
- Resource: {!Get_Salesforce_Status.2XX.status}
- Click Add Condition
- Row 3:
- Resource: {!Get_Salesforce_Status.2XX.status}
- Operator: Equals
- Value: MINOR_INCIDENT_CORE
- Resource: {!Get_Salesforce_Status.2XX.status}
- Click Add Condition
- Row 4:
- Resource: {!Get_Salesforce_Status.2XX.status}
- Operator: Equals
- Value: MAINTENANCE_CORE
- Resource: {!Get_Salesforce_Status.2XX.status}
- Click Add Condition
- Row 5:
- Resource: {!Get_Salesforce_Status.2XX.status}
- Operator: Equals
- Value: MAJOR_INCIDENT_NONCORE
- Resource: {!Get_Salesforce_Status.2XX.status}
- Click Add Condition
- Row 6:
- Resource: {!Get_Salesforce_Status.2XX.status}
- Operator: Equals
- Value: MINOR_INCIDENT_NONCORE
- Resource: {!Get_Salesforce_Status.2XX.status}
- Click Add Condition
- Row 7:
- Resource: {!Get_Salesforce_Status.2XX.status}
- Operator: Equals
- Value: MAINTENANCE_NONCORE
- Resource: {!Get_Salesforce_Status.2XX.status}
- Condition Logic: 1 AND (2 OR 3 OR 4 OR 5 OR 6 OR 7)
- Click Done.


Step 2.4: Adding a Get Record Element to Find System Administrator Profile
We will use the Get Recordselement to find the System Administratorprofile details.
-
- On Flow Designer, below the Major/Minor Incident node, click on the +icon and select the Get Recordselement.
- Enter a name in the Label field; the API Name will auto-populate.
- Select the Profile object from the dropdown list.
- Select All Conditions Are Met (AND).
- Set Filter Conditions
- Row 1:
- Field: Name
- Operator: Equals
- Value: System Administrator
- Row 1:
- How Many Records to Store:
- Select Only the first record
- How to Store Record Data:
- Choose the option to Automatically store all fields.
- Click Done.


Step 2.5: Adding a Get Record Element to Find Active Users with Profile System Administrator
Now we will use the Get Records element to find Active System Administrators.
- On Flow Designer, click on the +icon and select the Get Records element.
- Enter a name in the Label field; the API Name will auto-populate.
- Select the User object from the dropdown list.
- Select All Conditions Are Met (AND).
- Set Filter Conditions
- Row 1:
- Field: IsActive
- Operator: Equals
- Value: {!$GlobalConstant.True}
- Click Add Condition
- Row 2:
- Resource: ProfileId
- Operator: Equals
- Value: {!Get_Profile.Id}
- Row 1:
- How Many Records to Store:
- select All record
- How to Store Record Data:
- Choose the option to Automatically store all fields.
- Click Done.


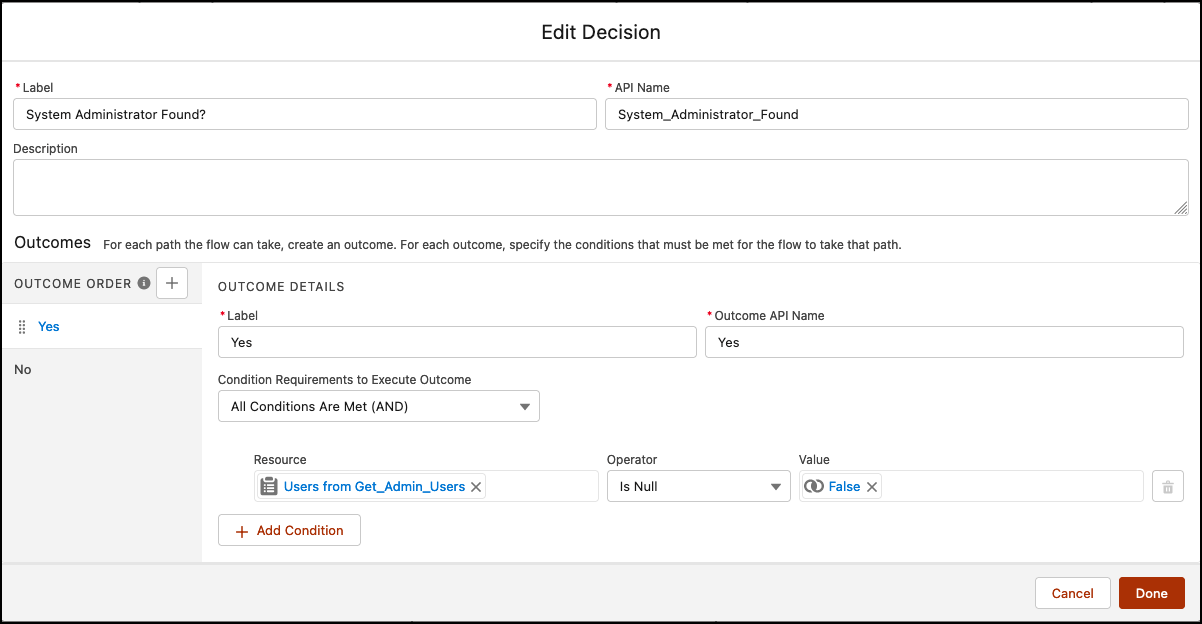
Step 2.6: Using Decision Element to Check If Users with Profile System Administrator Were Found or Not
We will use the Decision element to check whether the previous Get Records element returns a user record or not.
- On Flow Designer, click on the+icon and select the Decision element.
- Enter a name in the Label field; the API Name will auto-populate.
- Under Outcome Details, enter the Label the API Name will auto-populate.
- Condition Requirements to Execute Outcome: All Conditions Are Met (AND)
- Row 1:
- Resource: {!Get_Admin_Users}
- Operator: Is Null
- Value: {!$GlobalConstant.False}
- Row 1:
- When to Execute Outcome: If the condition requirements are met.
- Click Done.

Step 2.7: Add a Loop Element to Retrieve Records from Record Collection Variable (from Step 2.5)
- On Flow Designer, below the Yes node, click on the +icon and select the Loop element.
- Enter a name in the Label field; the API Name will auto-populate.
- For Collection Variable, select {!Get_Admin_Users}.
- For Specify Direction for Iterating Over Collection, select First item to last item.
- Click Done.


Step 2.8: Adding an Assignment Element to Collect System Administrators Email Address
The next step is to store the email addresses of all system administrators. For this, we will use the Assignment element.
- Create a Variable (Collection) varT_Email type Text to store the email addresses of the system administrators.

- On Flow Designer, click on the +icon and select the Assignment element.
- Enter a name in the Label field; the API Name will auto-populate.
- Set Variable Values
- Row 1:
- Field: {!varT_Email}
- Operator: Add
- Value: {!Loop_Through_Users.Email}
- Row 1:
- Click Done.


Step 2.9: Add a Text Template to Construct Email Body
Now we’ll create an email template using the Text Template. Text template allowed you to specify the multi-line messages. It also allows you to use HTML code.
- Under Toolbox, select Manager, then click New Resource to create a text template.
- Input the following information:
- Resource Type: Text Template
- API Name: ttEmailBody
- Select View as Rich Text
- Body: {!Get_Salesforce_Status.2XX.key}&”- “&{!Get_Salesforce_Status.2XX.environment}&”- “&{!Get_Salesforce_Status.2XX.status}
- Click Done.


Step 2.10: Add Send Email Core Action to Send Out an Email
Now we will use the Send Email static action to send out an e-mail to Recipient.
- Under Toolbox, select Element.
- Drag-and-drop Action element onto the Flow designer.
- Select send Email out-of-the-box action.
- Enter a name in the Label field; the API Name will auto-populate.
- Set Input Values
- Body: {!ttEmailBody}
- Subject: {!ttEmailBody}
- Email Addresses Collection: {!varT_Email}
- Rich-Text Formatted Body: {!$GlobalConstant.True}
- Click Done.


In the end, Benjamin’s Flow will look like the following screenshot:

Once everything looks good, perform the steps below:
- Click Save.
- Enter Flow Label the API Name will auto-populate.
- Click Show Advanced.
- API Version for Running the Flow: 58
- Interview Label: Salesforce – Status Integration
- Click Save.


Almost there! Once everything looks good, click the Activate button.
Step 3: Schedule Autolaunched Flow via Schedul-o-matic 9000 App to Run Every Hour
We will now utilize the Schedul-o-matic 9000 application to execute our flow on an hourly basis.
- From the App Launcher, find and select Schedul-o-matic 9000 app.
- Click on the Schedule-o-matic tab.
- Click on the A flow subtab.
- Enter the following information:
- What flow would you like to schedule?: Salesforce – Status Integration
- When would you like the job to start?: Enter Start Time
- How often (in minutes) would you like to repeat this job? (enter 0 to run once): 60
- What flow would you like to schedule?: Salesforce – Status Integration
- Click Schedule Confirm.


Monitor Your Schedule Flow
To monitor Flows that are scheduled, navigate to the following path:
- Navigate to Setup | Environments | Jobs | Scheduled Jobs.
- Now look for your Scheduled Flow displaying information as shown in the following screenshot:

- Use the Del link to delete the Scheduled Flow job from the queue.

👉 Check out the video for step-by-step instructions.
Formative Assessment:
I want to hear from you!
What is one thing you learned from this post? How do you envision applying this new knowledge in the real world? Feel free to share in the comments below.


