

Last Updated on May 30, 2024 by Rakesh Gupta
Big Idea or Enduring Question:
- How can you leverage Google’s Time Zone API to automatically update a lead’s time zone information based on their geo-coordinates?
Objectives:
After reading this blog, you’ll be able to:
- Create Named Credentials for outbound requests.
- Set up Google Maps API Key to retrieve timezone information based on geo-coordinates using Google’s Time Zone API.
- Initiate an outbound HTTP GET request utilizing Salesforce Flow without the need for code.
- Manage the outbound request response and implement appropriate actions.
- Validate the integration and ensure the data flow works correctly.
- and much more
👉 Previously, I’ve penned several posts on the topic of interfacing Salesforce with a diverse range of systems. Why not check them out while you are at it?!
Business Use case
Jestilla Zetkin is currently serving as a Salesforce Architect at Gurukul On Cloud (GoC). The Sales Director has entrusted Jestilla with a unique challenge. The aim is to make certain that upon creation, Salesforce Leads (Created through Web-to-lead) are infused with exact time zone details, which are determined based on their respective geo-coordinates.
- The business use case requires us to use Google’s Time Zone API to update four specific fields on leads automatically:
- dstOffset (the offset for daylight-saving time in seconds)
- rawOffset (the offset from Coordinated Universal Time for the given location’s time zone)
- timeZoneId (a string that uniquely identifies the time zone)
- and timeZoneName (the long form name of the time zone)
- In the event of a failed response, institute a contingency action to create a task for the lead’s designated owner.

What is Google’s Time Zone API?
Chances are high that your customer base is spread across multiple time zones. This factor can greatly influence your interactions with them, especially when scheduling calls, meetings, or sending out automated messages. The Salesforce platform offers a highly adaptable environment to store and manage customer data, but by default, it doesn’t provide a way to automatically record the timezone of the lead based on their geographic coordinates.
Google’s Time Zone API is a service offered by Google as part of its Google Maps platform. The API provides time zone data for any location worldwide based on latitude and longitude coordinates. This service can be particularly useful for developers who need to adjust communication according to a lead’s or contact’s geographical location or for businesses operating across different time zones.
The Time Zone API provides the following information:
- The time zone’s ID, as defined by the IANA Time Zone Database (for example, America/New_York).
- The time zone’s name (for example, Eastern Daylight Time).
- The time offset from Coordinated Universal Time (UTC) without considering Daylight Saving Time (rawOffset).
- The time offset due to Daylight Saving Time (dstOffset).
Note that the Google Time Zone API is subject to charges, so it’s important to understand the cost implications before implementing it.
How Google’s Time Zone API Works?
Google’s Time Zone API works by taking latitude and longitude coordinates and returning time zone data in JSON format. Here is a basic example of how to use it.
The following HTTP GET request gets time zone information for a location at latitude 40.712776 and longitude -74.005974 (New York City), and assumes you are making the request at a certain timestamp (UNIX timestamp).
https://maps.googleapis.com/maps/api/timezone/json?location=40.712776,-74.005974×tamp=1458000000&key=YOUR_API_KEY
In the request URL above, replace YOUR_API_KEY with your actual API key.
Here is a sample response in JSON format that the API might return:
{
   "dstOffset" : 3600,
   "rawOffset" : -18000,
   "status" : "OK",
   "timeZoneId" : "America/New_York",
   "timeZoneName" : "Eastern Daylight Time"
}
The response includes the following information:
- dstOffset: The offset for daylight-savings time in seconds. This will be zero if the time zone is not in daylight-savings time during the specified timestamp.
- rawOffset: The offset from UTC (not counting daylight savings time) in seconds.
- status: A string indicating the status of the request. “OK” means that the request was successful.
- timeZoneId: A string containing the “tz” ID of the time zone (e.g., “America/New_York”).
- timeZoneName: A string containing the long form name of the time zone (e.g., “Eastern Daylight Time”).
Remember, in the request URL, the timestamp parameter is required, and the location parameter expects latitude and longitude coordinates.
- Timestamp: The desired time as seconds since midnight, January 1, 1970 UTC. The Time Zone API uses the timestamp to determine whether or not Daylight Savings should be applied based on the location’s time zone.
- Location: A comma-separated latitude, longitude tuple, location=40.712776,-74.005974, representing the location to look up.
Also, don’t forget to include your API key.
Benefits of Using Google’s Time Zone API
Google’s Time Zone API offers a number of significant benefits, especially for developers and businesses that need to operate across different time zones. Here are some of the key benefits:
- Accuracy: Google’s Time Zone API provides accurate time zone data for any location worldwide. It takes into account both the ‘raw’ time zone and daylight savings time, ensuring you always have the correct local time.
- Ease of Use: The API is straightforward to use, requiring only latitude and longitude as inputs. It returns data in a structured JSON format, which is easy to parse and use in various applications.
- Global Coverage: The API provides time zone data for locations worldwide, making it useful for global businesses and applications with international user bases.
- Reliability: As a service provided by Google, it’s highly reliable, ensuring you have consistent access to time zone data when you need it.
- Integration: It can be integrated into a variety of applications and platforms, including mobile apps, web services, and CRM platforms like Salesforce. This allows for functionalities such as scheduling communications in different time zones, etc.
- Up-to-Date Information: Google continuously updates its databases, ensuring that the data returned by the Time Zone API, such as daylight savings changes, are always current.
By leveraging these benefits, businesses can enhance the customer experience, increase operational efficiency, and ensure accurate data logging, among other advantages.
Prerequisite
Before you start using the Time Zone API, you need a project with a billing account and the Time Zone API enabled. Here is a step-by-step guide to setting up your Google Cloud project and enabling the Time Zone API:
Step 1: Create or Select Your Project
- Navigate to the Google Cloud Console.
- If you have previously created a project, you can select it from the drop-down list at the top. If not, click on New Project at the top right.

- Give your project a name, and optionally, you can also edit the Project ID.
- Click Create to create the project.

Step 2: Set Up a Billing Account
You need to link a billing account to your project to use Google’s Time Zone API. Here’s how:
- In the Google Cloud Console, open the console left side menu and click Billing.
- If you have one or more billing accounts, choose an account and associate it with your project. If not, click on Create Account, fill out the form to create a new billing account, and then associate it with your project.
Step 3: Enable the Time Zone API
Once you have your project and billing account set up, you can enable the Time Zone API.
- In the Google Cloud Console, open the console left side menu and navigate to APIs & Services | Library.
- In the API Library, search for Time Zone API and select it.
- On the Time Zone API page, click Enable.


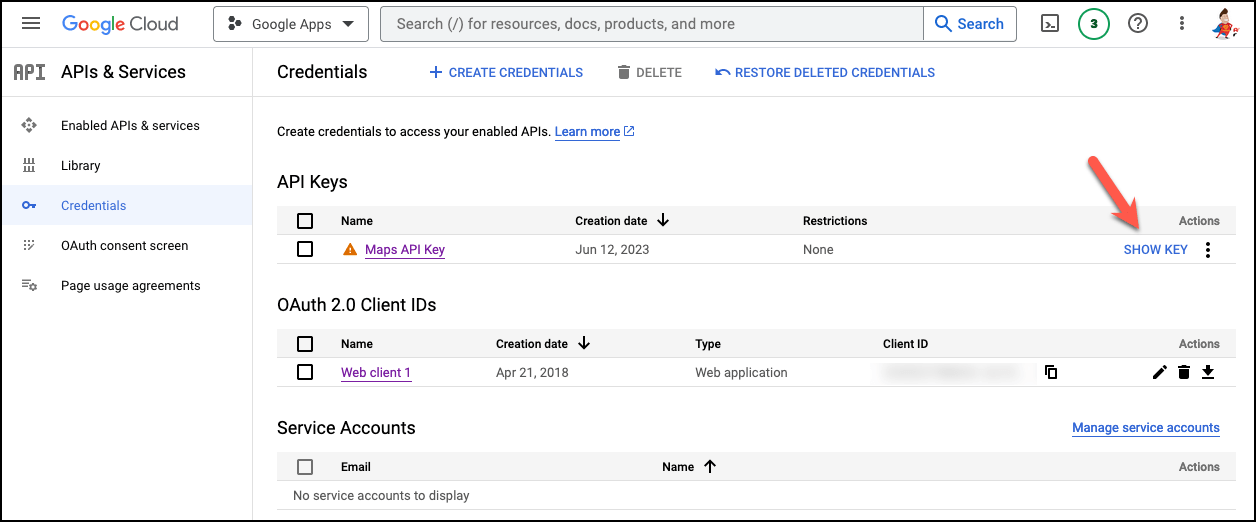
Step 4: Generate Your API Key
Finally, you need an API key to authenticate your requests to the Time Zone API.
- In the Google Cloud Console, open the console left side menu and navigate to APIs & Services | Credentials.
- Click on the + CREATE CREDENTIALS button at the top and select API Key.
- Your new API key will be created and displayed. Copy it and store it securely. You’ll need this key to make requests to the Time Zone API.

Now, your Google Cloud project is all set up, and you can start using the Google Time Zone API.
👉 While the Time Zone API supports OAuth 2.0 and Service Account for authentication, this guide focuses on the simpler API Key method for brevity. If you need a more secure or complex authentication method, please refer to Google’s official authentication documentation.
Automation Champion Approach (I-do):
While this can be solved using various automation tools like Apex Trigger and others, we will use Salesforce Flow and newly introduced HTTP Callout (GET) flow feature.
HTTP Callout pulls or sends data between the Salesforce database and an external system via Flow Builder without using code. You can set up direct integrations as needed without having to work with a developer or call a middleware tool, such as Mulesoft. After you configure the HTTP callout action in a flow, Flow Builder auto-generates an external service registration, an invocable action, and Apex Class that you can use to create an Apex-defined resource for flows. You can then use the data output of the API request as input within Flow Builder and across Salesforce.
You can use HTTP Callout to connect a flow to a variety of APIs.
- Get address information using a map API
- Get weather conditions with a weather service API
- Generate the barcode with a barcode service API
- Get payment authorization information with a payment processing API
- and much more
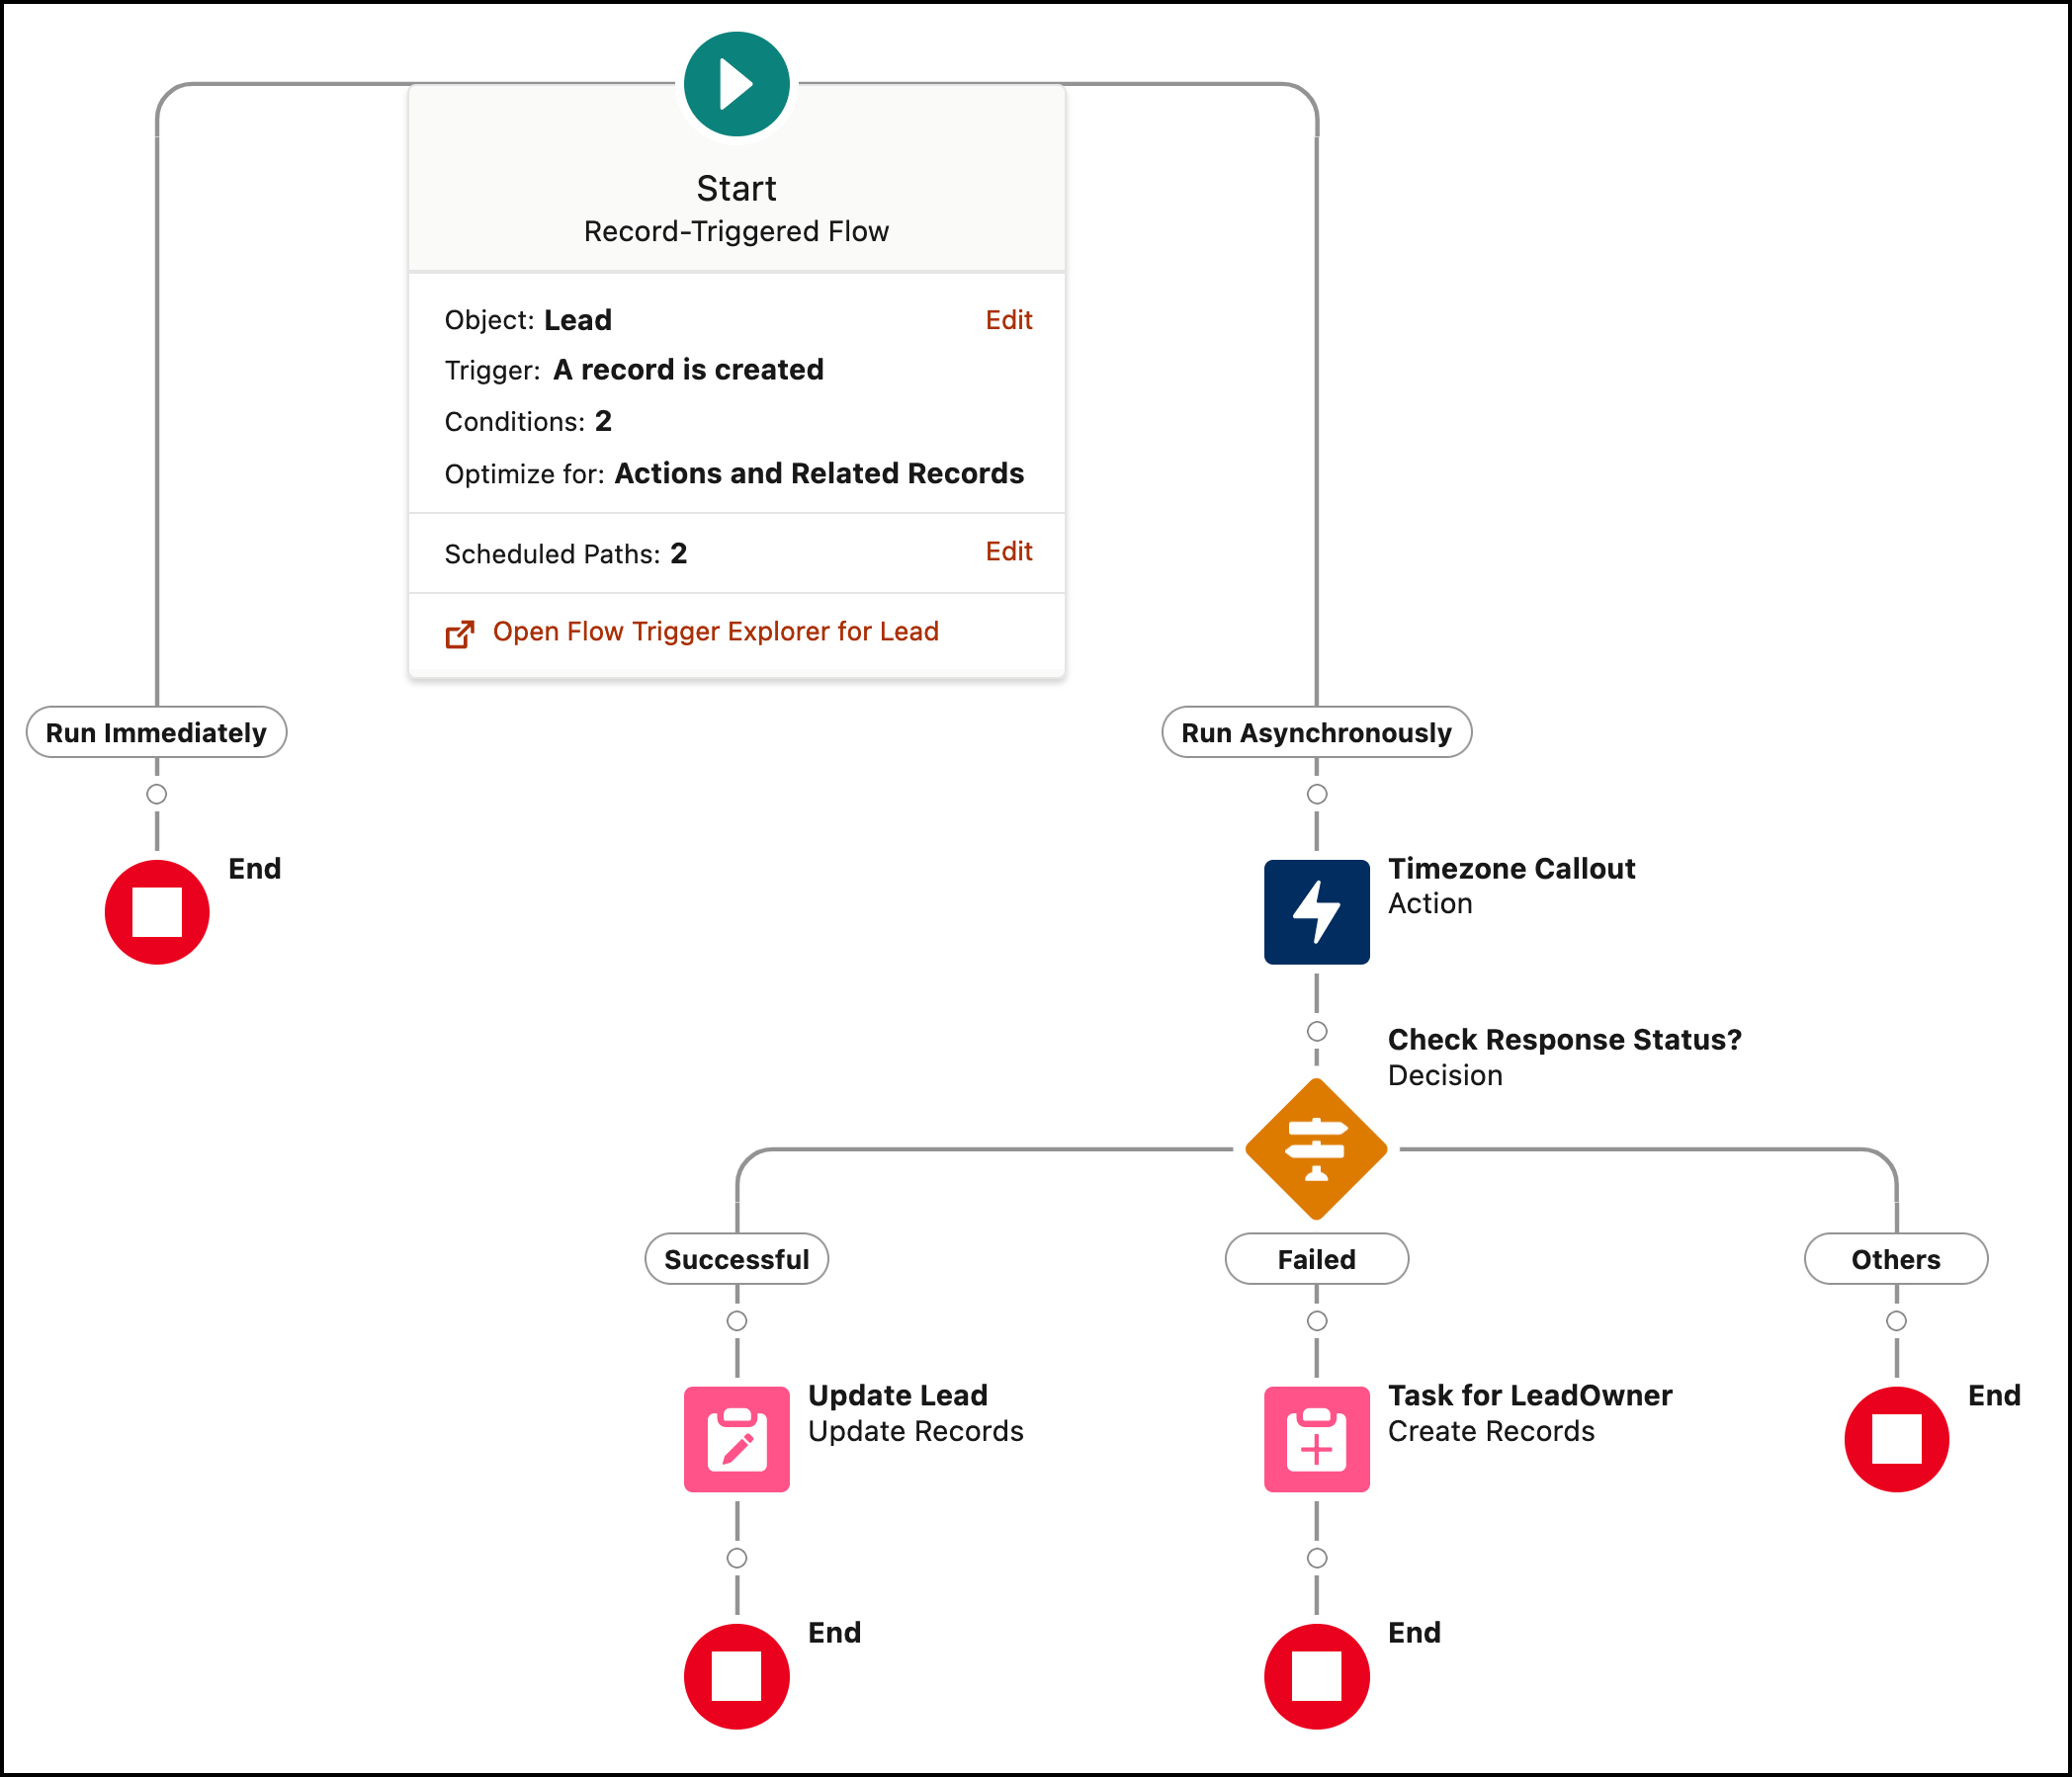
Before discussing the solution, let me show you a diagram of the process at a high level. Please spend a few minutes going through the following Flow diagram to understand it.

Let’s begin building this automation process.
Guided Practice (We-do):
There are 3 steps to solve Jestilla’s business requirement using Record-Triggered After-Save Flow. We must:
- Create custom fields on the Lead to store the response
- Create a Named Credential
- Salesforce Flow
- Define flow properties for record-triggered flow
- Add a formula to calculate timestamp
- Configure an HTTP GET callout for Time Zone API
- Add a Decision element to check the response code
- Add an Update Records element to update the lead
- Add a Create Records element to create a Task for the Lead owner to handle error response
Step 1: Create Custom Fields on the Lead Object to Store the Response
In this step, we’ve established custom fields within the Lead Object. These will serve as repositories for the response data from the Google’s Time Zone API.
| Field Label | Field API Name | Data Type |
| dstOffset | dstOffset__c | Number (18,0) |
| rawOffset | rawOffset__c | Number (18,0) |
| Current Position | Current_Position__c | Geolocation |
| Time Zone Id | Time_Zone_Id__c | Text (255) |
| Time Zone Name |
Time_Zone_Name__c | Text (255) |
Step 2: Create a Named Credential
- Click Setup.
- In the Quick Find box, enter Named Credentials, and then select Named Credentials.
- Click New Legacy.
- Fill out the page with the callout endpoint’s URL and authentication parameters.
- Click Save.


Step 3.1: Define Flow Properties
- Click Setup.
- In the Quick Find box, type Flows.
- Select Flows, then click on the New Flow.
- Select the Record-Triggered Flow option, click on Create
- Object: Lead
- Trigger the Flow When: A record is created
- Set Entry Conditions: All Conditions Are Met (AND)
- Row 1:
- Field: Current_Position__Latitude__s
- Operator: Is Null
- Value: {!$GlobalConstant.False}
- Click + Add Condition
- Row 2:
- Field: Current_Position__Longitude__s
- Operator: Is Null
- Value: {!$GlobalConstant.False}
- Optimize the Flow For: Action and Related Records
- Choose the Option to Include a Run Asynchronously path to access an external system after the original transaction for the triggering record is successfully committed.
- Click Done.

Step 3.2: Formula to Calculate Timestamp
- Under Toolbox, select Manager, then click New Resource to calculate the seconds since the Unix epoch (January 1, 1970, 00:00:00).
- Input the following information:
- Resource Type: Formula
- API Name: forN_Timestamp
- Data Type: Number
- Decimal Places: 0
- Formula: ROUND((NOW() – DATETIMEVALUE(“1970-01-01 00:00:00”)) * 24 * 60 * 60, 0)
- Click Done.

Step 3.3: Configure an HTTP GET Callout Action
HTTP Callout guides you through entering the details about the HTTP web-based service or REST API endpoint that you’re connecting to. After you complete the configuration, you invoke the action in a flow.
- Under Run Asynchronously node, select Action.
- Click + Create HTTP Callout.
- Configure the external service that connects Salesforce to the HTTP-based API.
- Enter a Name for the external service.
- Select the named credential that you created in the step 2.
- Click Next.

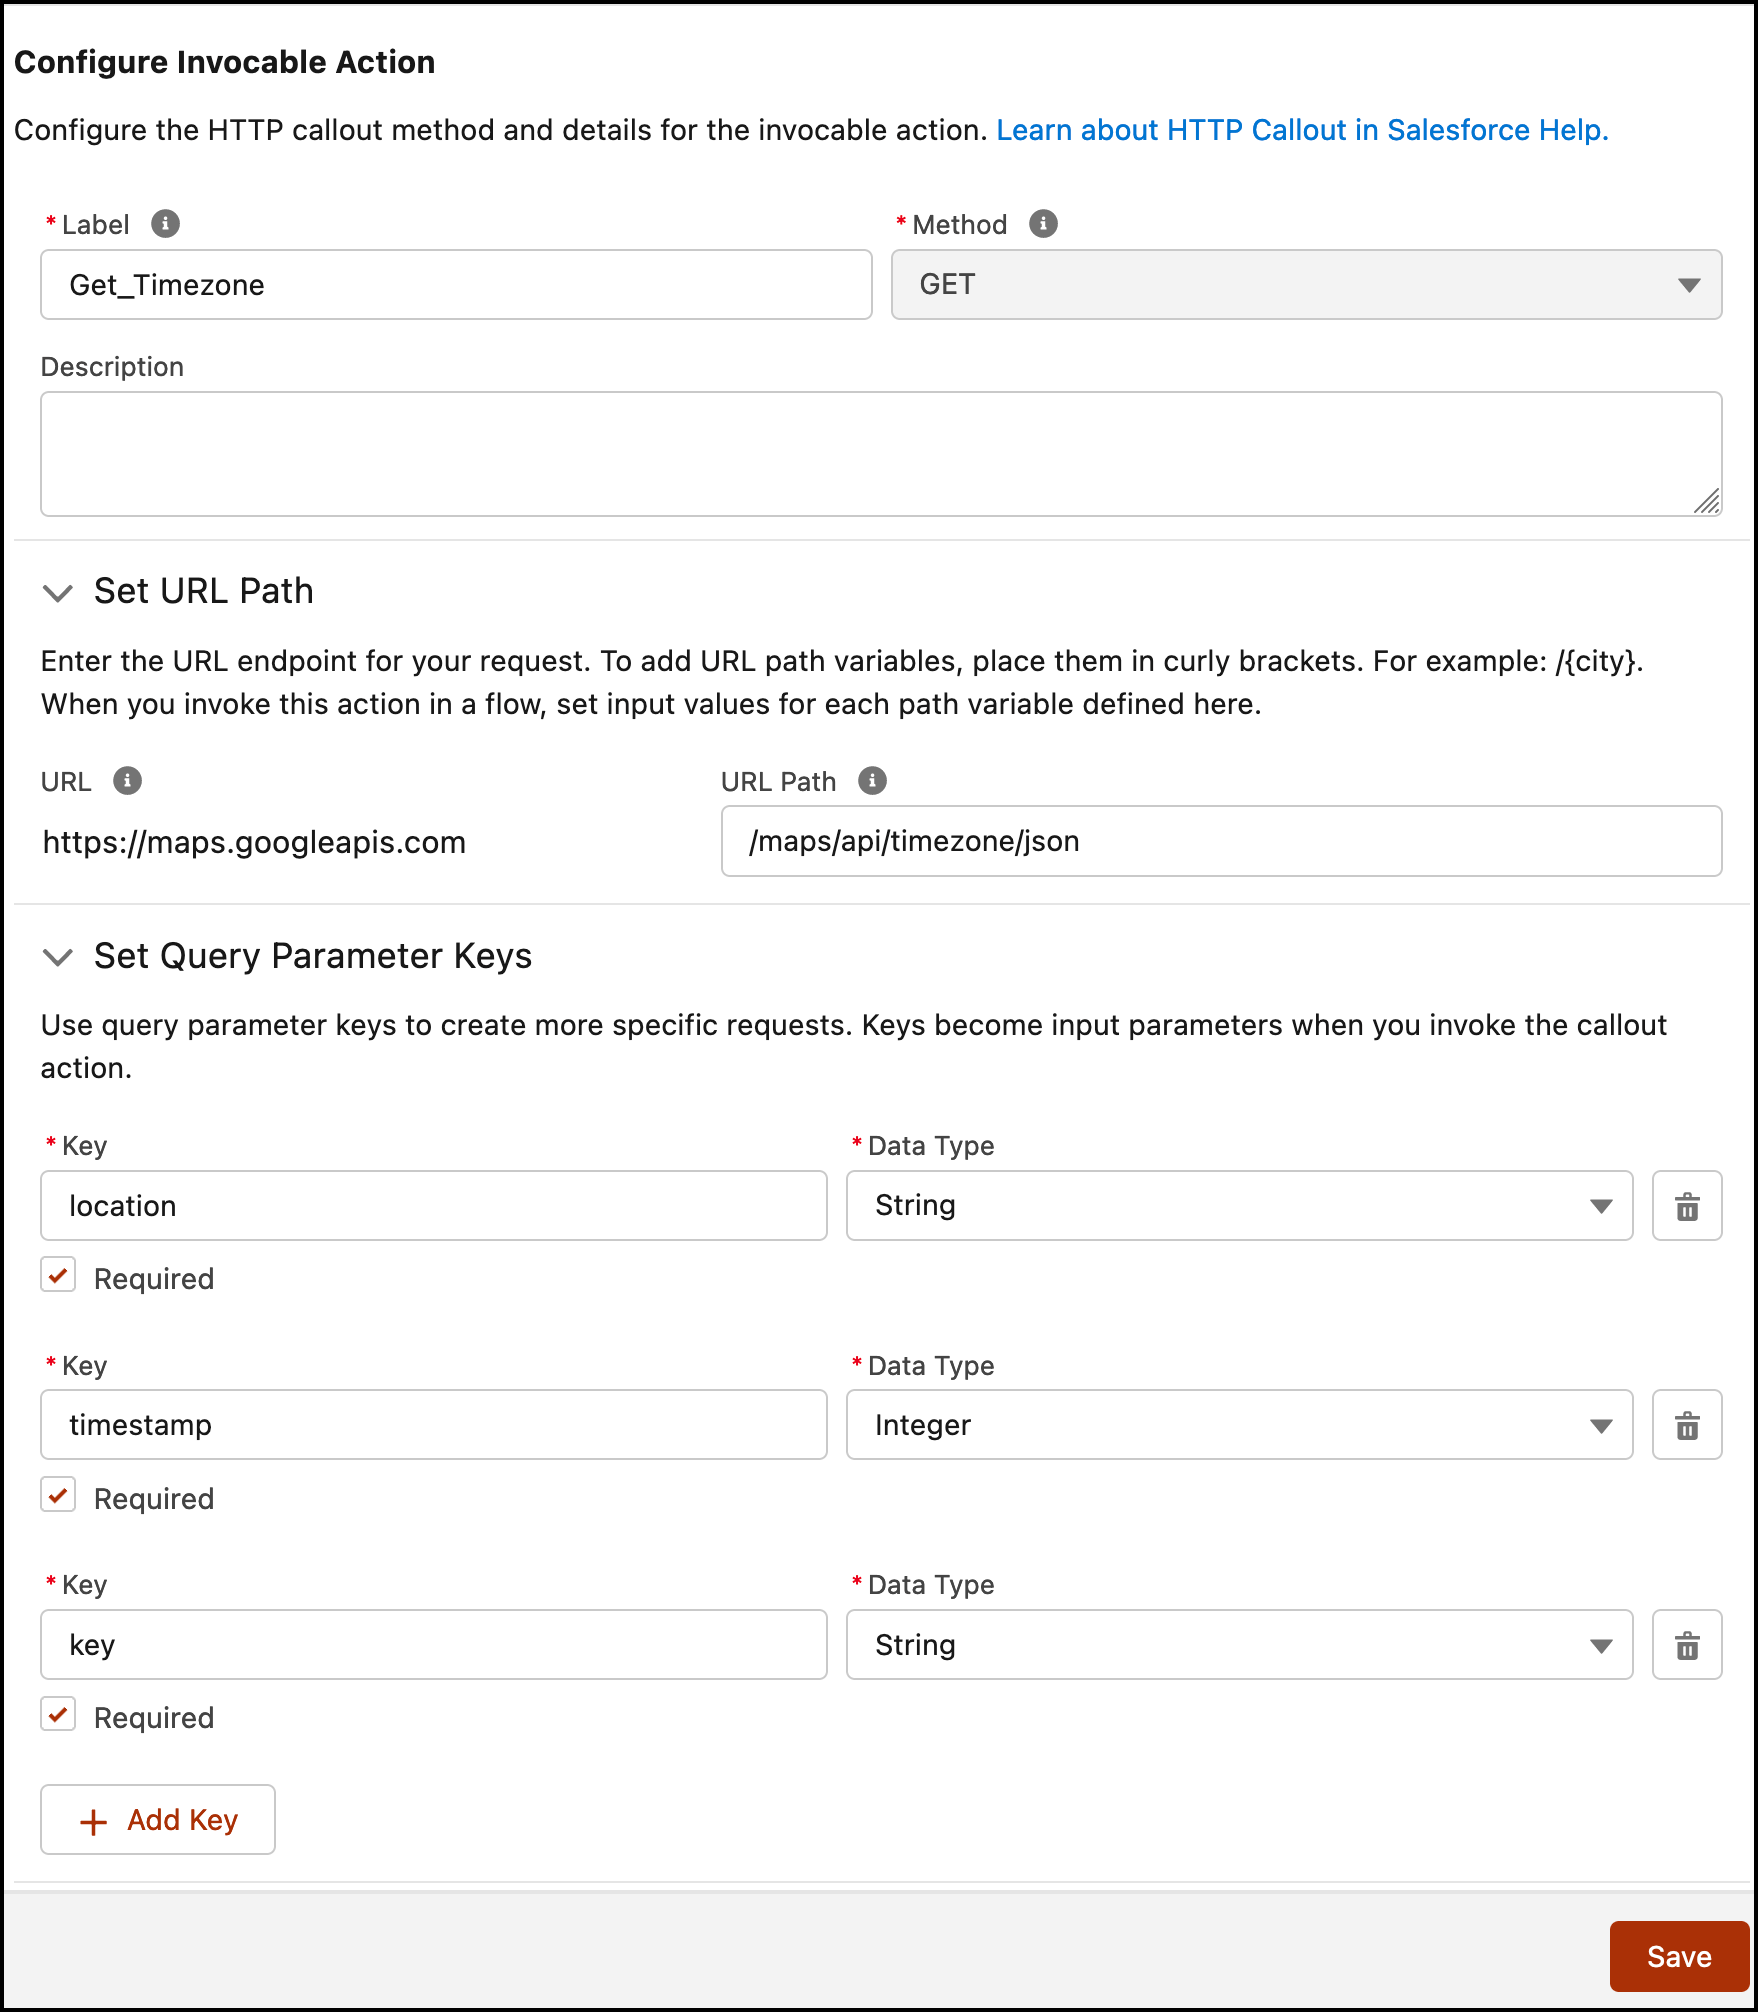
- The next step is to configure the invocable action that you can use in Flow Builder or across Salesforce.
- For Label, enter the action that the callout performs.
- Method: GET
- Add the URL endpoint for the request.
- URL Path: /maps/api/timezone/json
- Add query parameter keys if the API you’re calling has them. When you use this action in a flow, you input values for the defined keys.
- Click Add Key
- Key: location
- Data Type: String
- Required: True
- Click Add Key
- Key: timstamp
- Data Type: Integer
- Required: True
- Key: timstamp
- Click Add Key
- Key: key
- Data Type: String
- Required: True

- Click Add Key
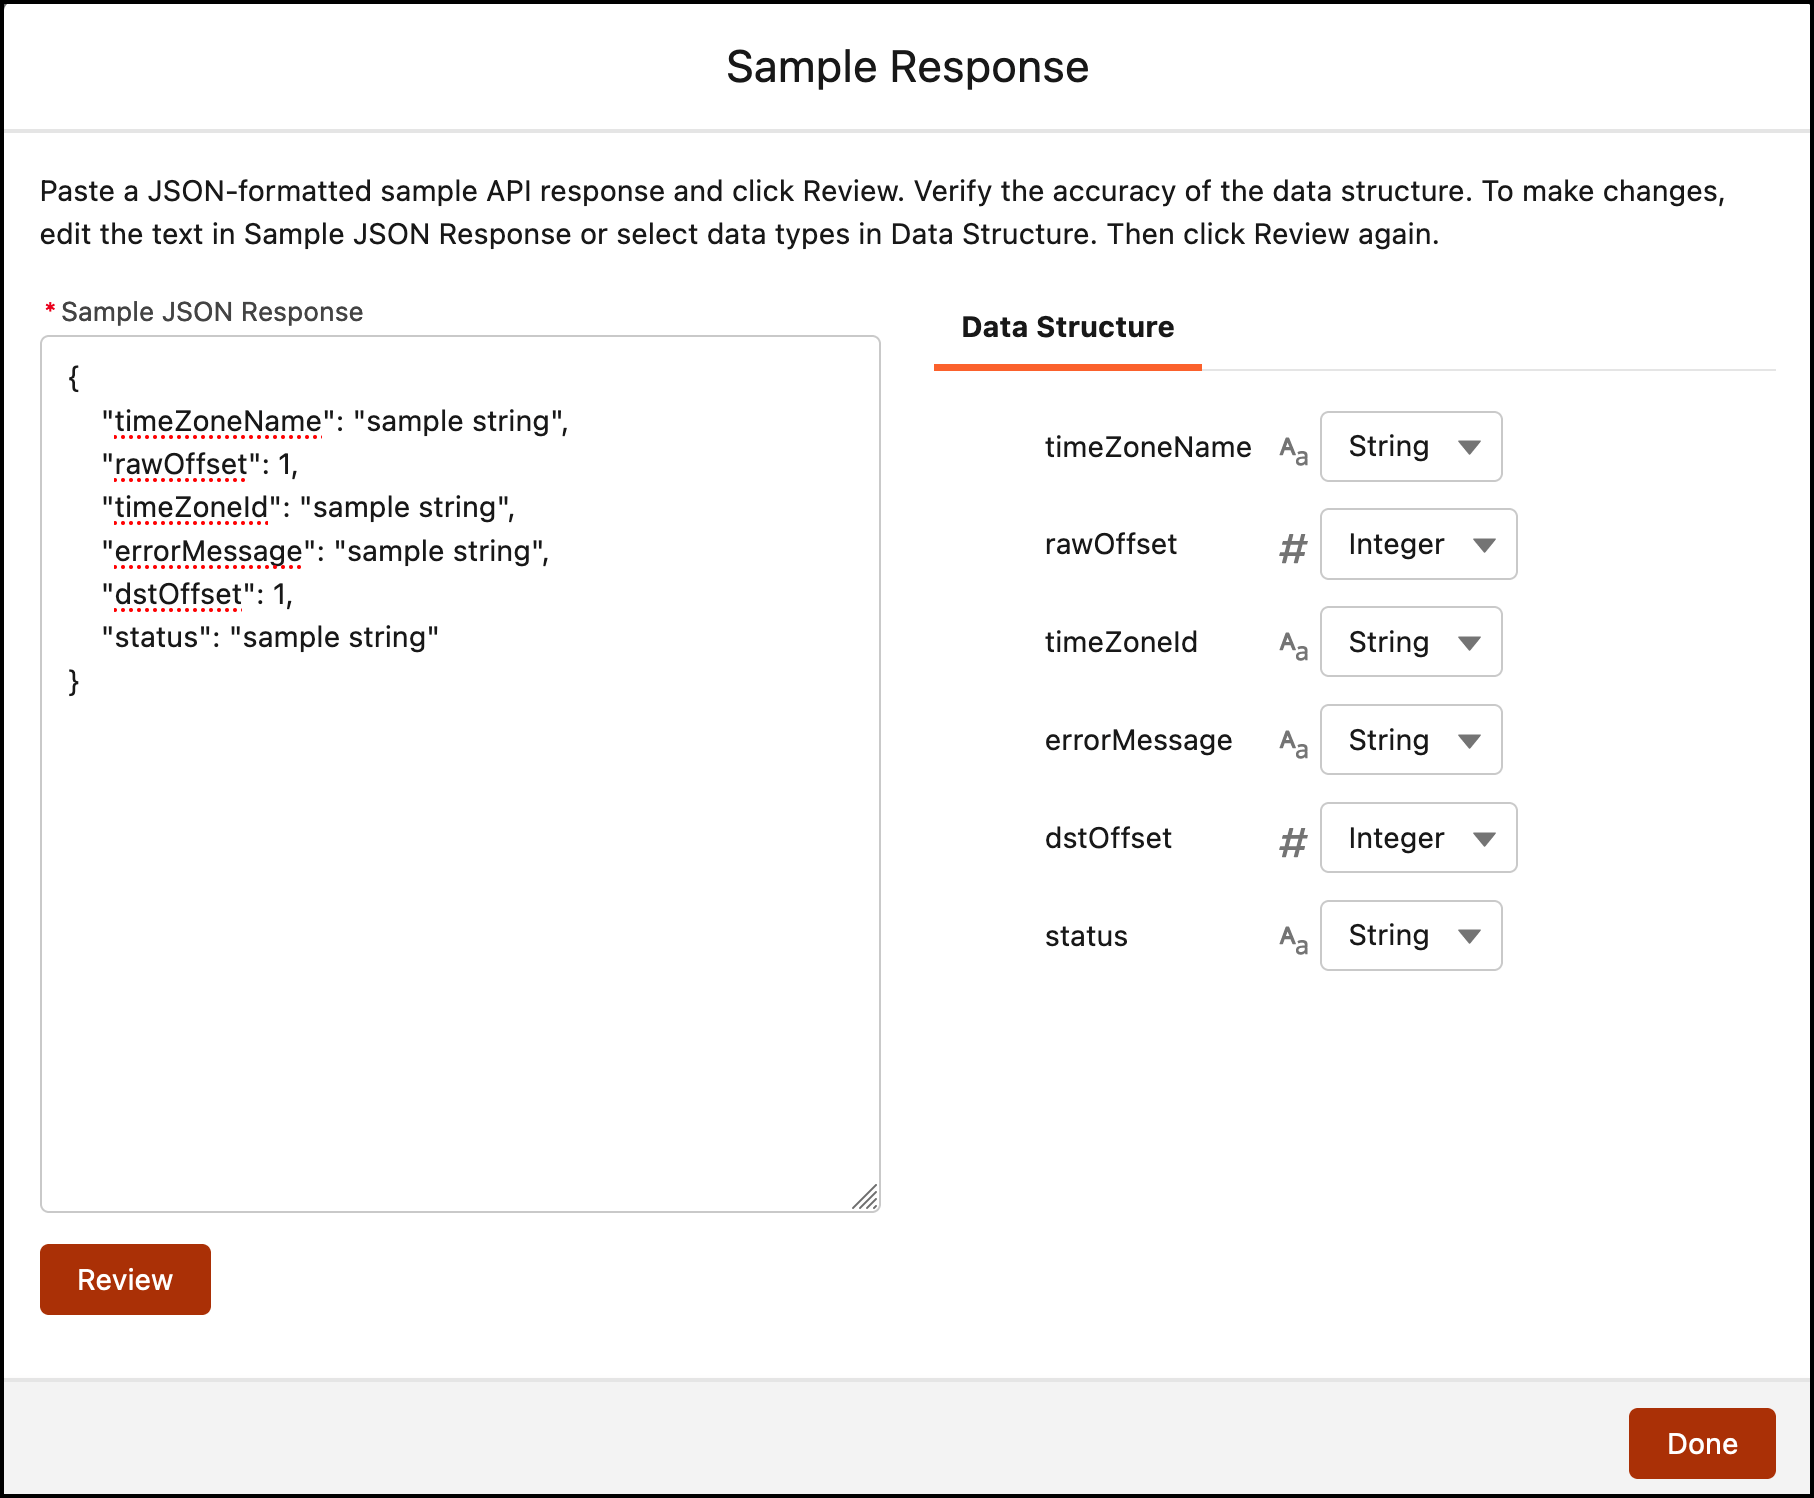
- Provide a sample API response body. Salesforce generates a data structure from the sample response.
- Navigate to Provide Sample Response section.
- Click New.
- Paste a sample JSON response.
{ "timeZoneName": "sample string", "rawOffset": 1, "timeZoneId": "sample string", "errorMessage": "sample string", "dstOffset": 1, "status": "sample string" } - Click Review and confirm that the Apex data structure is correct.
- To make changes, edit the text in Sample JSON Response or select data types from the data structure.
- Click Review.
- Click Done.

- Click Save.
-
Flow Builder creates the action and external service. The action is available in the Actions window in the flow.
-
The next step is to add apex action generated by HTTP Callout setup in the previous steps. We will use the Action element.
-
Label the new action OpenWeather Callout.
-
Set Input Values
- key: YOUR_OpenWeather_API_KEY
- location: {!$Record.Current_Position__Latitude__s},{!$Record.Current_Position__Longitude__s}
- timestamp: {!forN_Timestamp}
-
- Click Done.


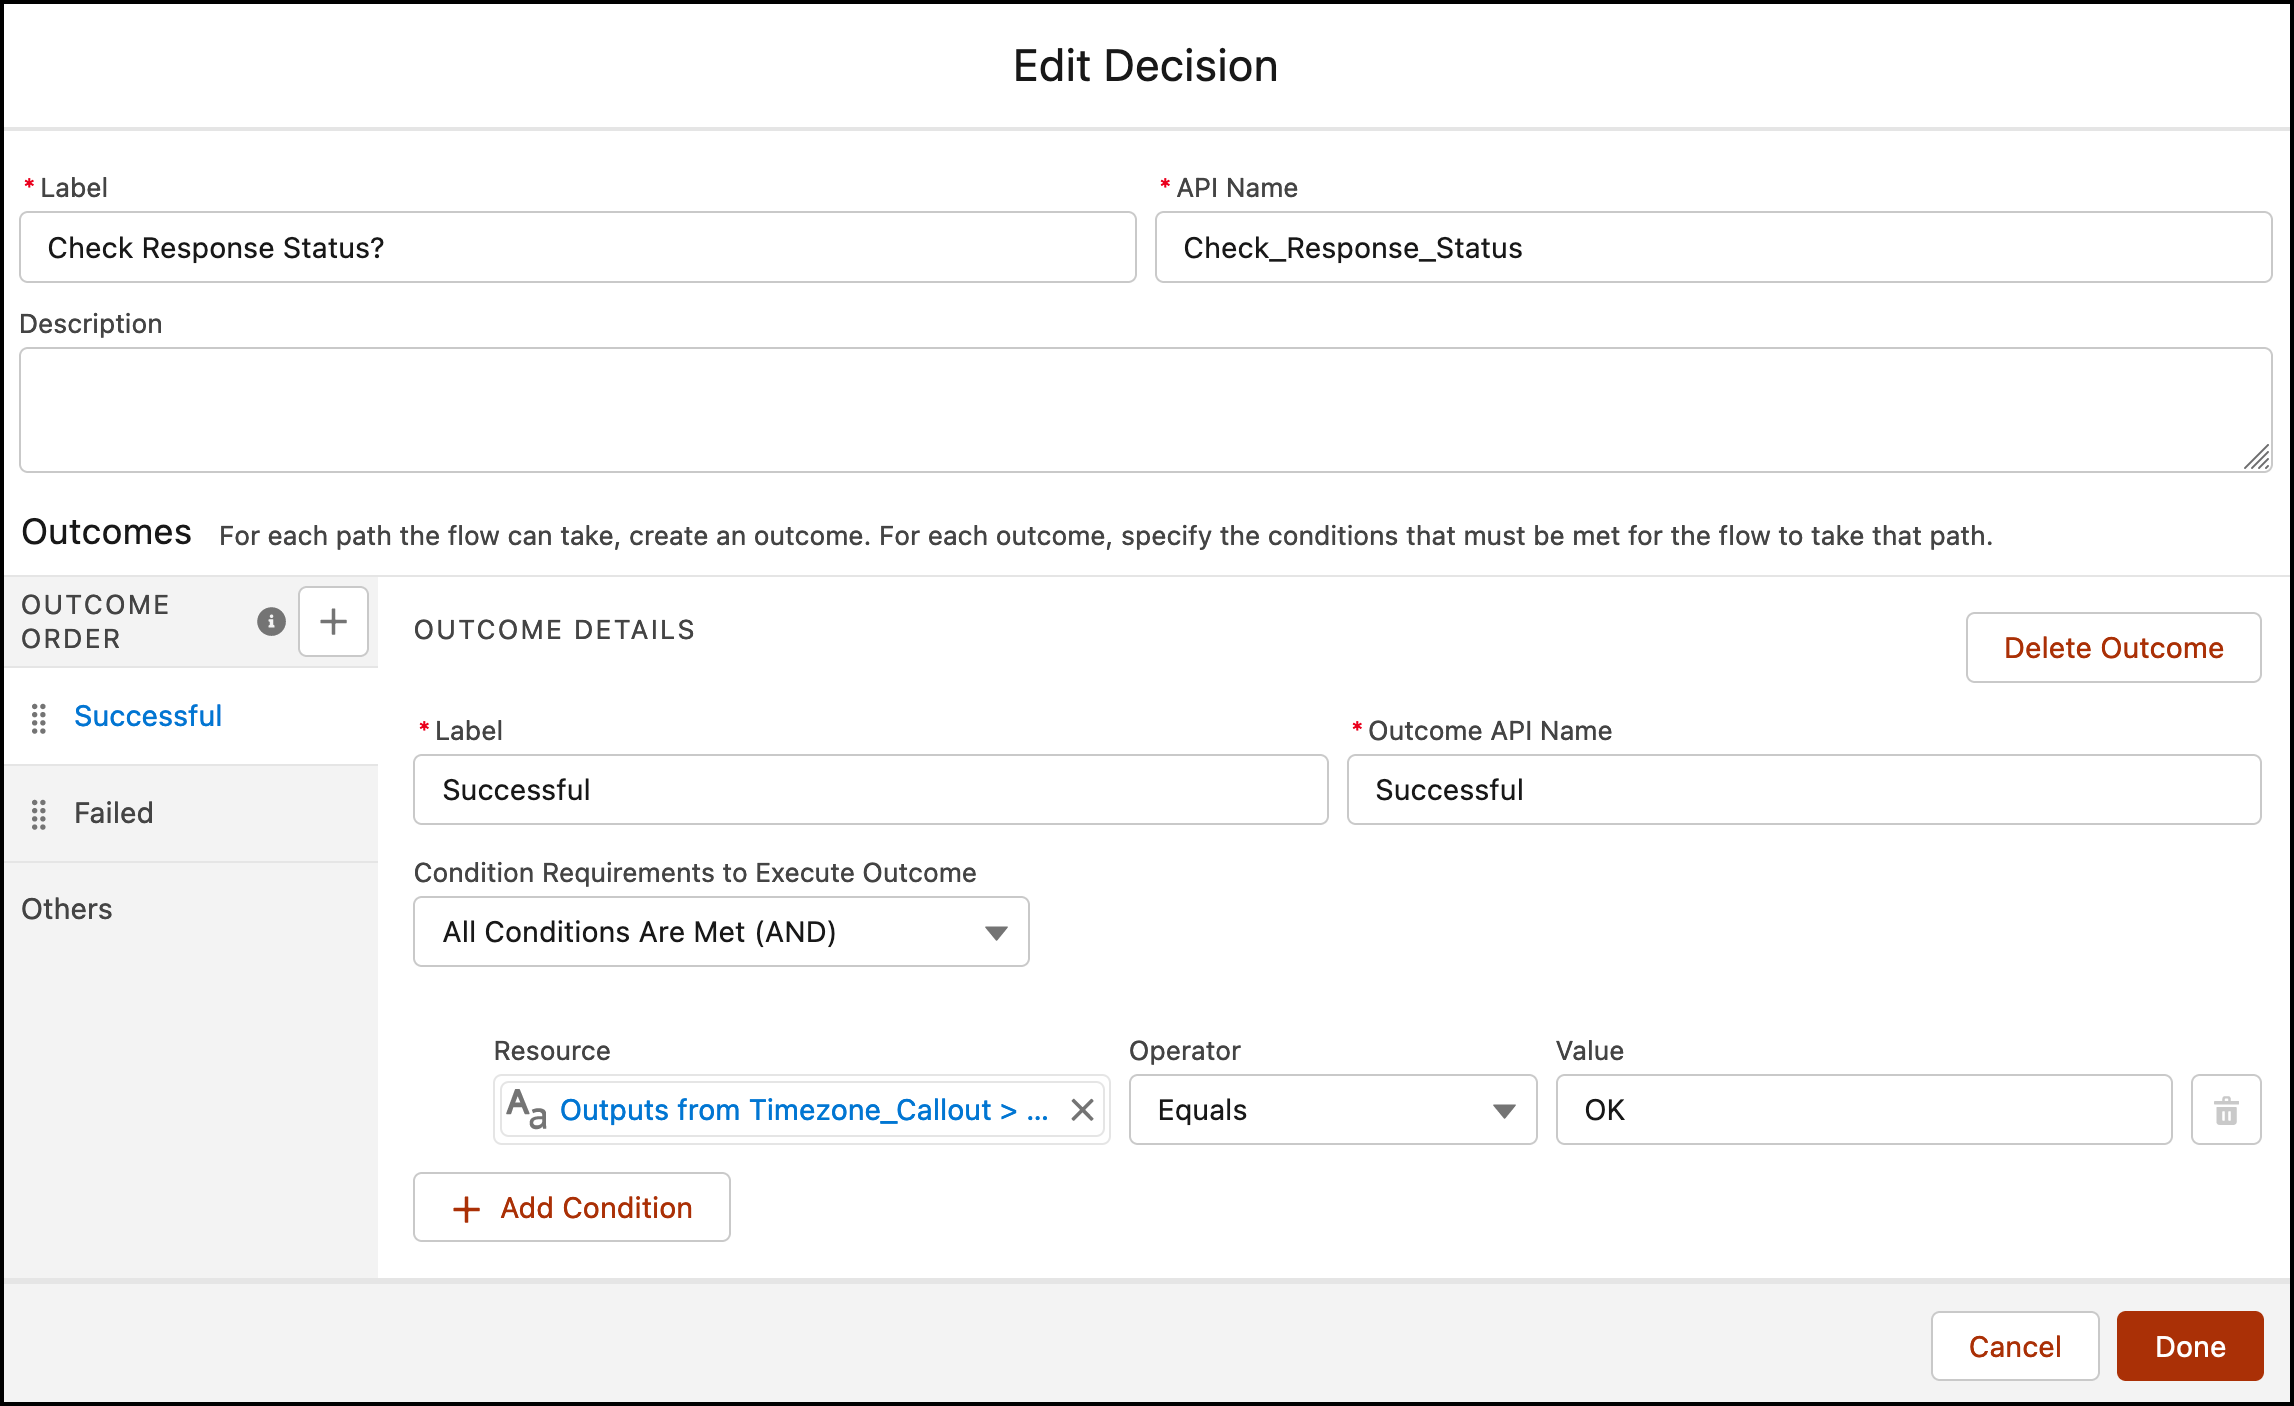
Step 3.4: Using Decision Element to Check the Time Zone API Callout Response Code
Now we will use the Decision element to check the Time Zone API response code.
- On Flow Designer, click on the +icon and select the Decision element.
- Enter a name in the Label field; the API Name will auto-populate.
- Under Outcome Details, enter the Label the API Name will auto-populate.
- Condition Requirements to Execute Outcome: All Conditions Are Met (AND)
- Row 1:
- Resource: {!Timezone_Callout.2XX.status}
- Operator: Equals
- Value: OK

- Add a new OUTCOME ORDER by clicking on the + icon to check Contact Provider response.
- Condition Requirements to Execute Outcome: Any Conditions Is Met (OR)
- Row 1:
- Resource: {!Timezone_Callout.2XX.status}
- Operator: Equals
- Value: INVALID_REQUEST
- Resource: {!Timezone_Callout.2XX.status}
- Row 2:
- Resource: {!Timezone_Callout.2XX.status}
- Operator: Equals
- Value: OVER_DAILY_LIMIT
- Resource: {!Timezone_Callout.2XX.status}
- Row 3:
- Resource: {!Timezone_Callout.2XX.status}
- Operator: Equals
- Value: OVER_QUERY_LIMIT
- Resource: {!Timezone_Callout.2XX.status}
- Row 4:
- Resource: {!Timezone_Callout.2XX.status}
- Operator: Equals
- Value: REQUEST_DENIED
- Resource: {!Timezone_Callout.2XX.status}
- Row 5:
- Resource: {!Timezone_Callout.2XX.status}
- Operator: Equals
- Value: UNKNOWN_ERROR
- Resource: {!Timezone_Callout.2XX.status}
- Row 6:
- Resource: {!Timezone_Callout.2XX.status}
- Operator: Equals
- Value: ZERO_RESULTS

- Resource: {!Timezone_Callout.2XX.status}
- Row 1:
- Row 1:
- Click Done.

Step 3.5: Adding an Update Records Element to Update the Lead
The next step is to update the lead’s fields to store the callout response. We will use the Update Records element.
- On Flow Designer, below the Successful node, click on the +icon and select the Update Records element.
- Enter a name in the Label field; the API Name will auto-populate.
- For How to Find Records to Update and Set Their Values select Use the account record that triggered the flow
- Set Filter Conditions: None – Always Update Record
- Set Field Values for the Lead Records
- Row 1:
- Field: Time_Zone_Id__c
- Value: {!Timezone_Callout.2XX.timeZoneId}
- Field: Time_Zone_Id__c
- Click Add Field
- Row 2:
- Field: Time_Zone_Name__c
- Value: {!Timezone_Callout.2XX.timeZoneName}
- Field: Time_Zone_Name__c
- Click Add Field
- Row 3:
- Field: dstOffset__c
- Value: {!Timezone_Callout.2XX.dstOffset}
- Field: dstOffset__c
- Click Add Field
- Row 4:
- Field: rawOffset__c
- Value: {!Timezone_Callout.2XX.rawOffset}
- Field: rawOffset__c
- Row 1:
- Click Done.

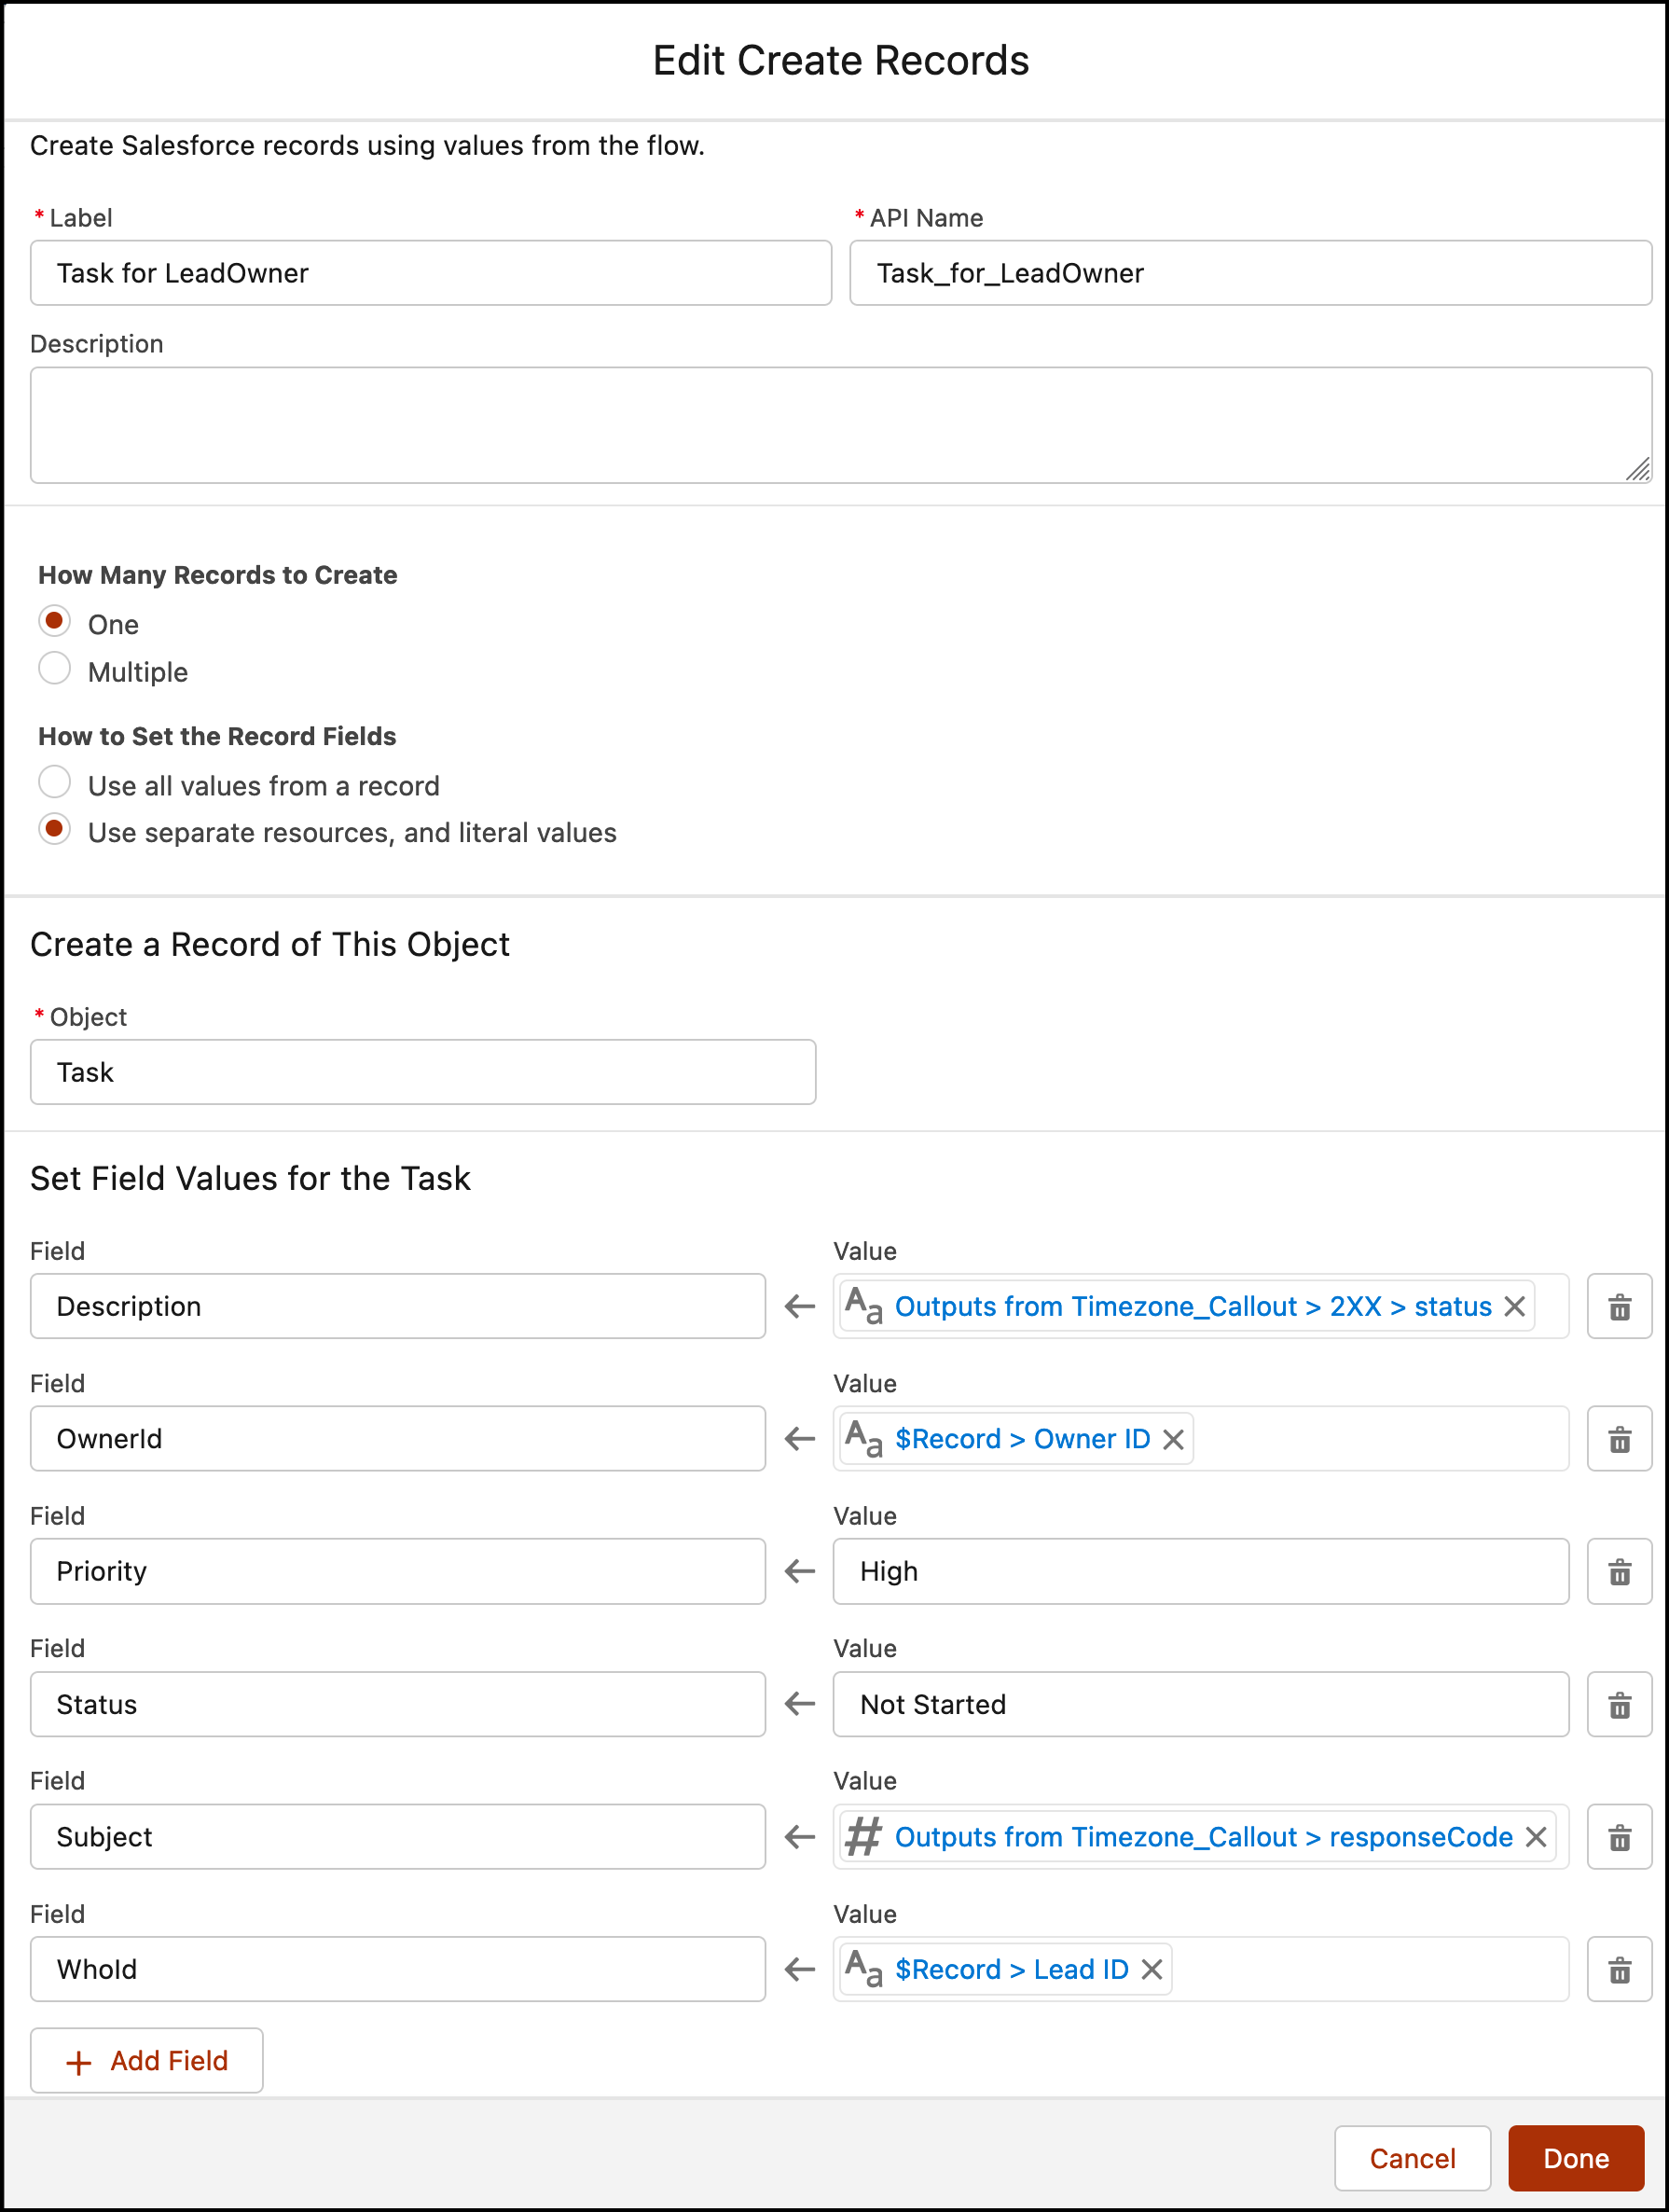
Step 3.6: Add Action – Create a Record to Handle Error Response
The next step is to create a task, for this, we will use the Create Records element.
- On Flow Designer, below the Failed node, click on the +icon and select the Create Records element.
- Enter a name in the Label field; the API Name will auto-populate.
- Input the following information:
- Enter Label the API Name will auto-populate.
- How Many Records to Create: One
- How to Set the Record Fields: Use separate resources, and literal values
- Object: Task
- Set Field Values for the Case
- Row 1:
- Field: Description
- Value: {!Timezone_Callout.2XX.status}
- Click Add Field
- Row 2:
- Field: OwnerId
- Value: {!$Record.OwnerId}
- Click Add Field
- Row 3:
- Field: Priority
- Value: High
- Click Add Field
- Row 4:
- Field: Status
- Value: Not Started
- Click Add Field
- Row 5:
- Field: Subject
- Value: {!Timezone_Callout.responseCode}
- Click Add Field
- Row 6:
- Field: WhatId
- Value: {!$Record.Id}
- Click Done.
In the end, Jestilla’s Flow will look like the following screenshot:
Once everything looks good, perform the steps below:
- Click Save.
- Enter Flow Label the API Name will auto-populate.
- Click Show Advanced.
- API Version for Running the Flow: 58
- Interview Label: Get Timezone Info {!$Flow.CurrentDateTime}
- Click Save.

Almost there! Once everything looks good, click the Activate button.
👉 Check out the video for step-by-step instructions.
Proof of Concept
Going forward, whenever leads are generated through web-to-lead or any other method that includes the Current Position field (geo-coordinates), the record-triggered flow will be triggered to retrieve the timezone information using the Time Zone API.
Formative Assessment:
I want to hear from you!
What is one thing you learned from this post? How do you envision applying this new knowledge in the real world? Feel free to share in the comments below.


I am getting a Syntax error for the formula:
ROUND((NOW() – DATETIMEVALUE(“1970-01-01 00:00:00”)) * 24 * 60 * 60, 0)
Also, what is this variable you used:
varT_Key
1. A syntax error may occur when you’ve pasted code from WordPress
2. varT_Key – Is your API Key for Time Zone
while implementing this do we need to add payment card details?
Yes