

Last Updated on May 30, 2024 by Rakesh Gupta
Big Idea or Enduring Question:
- How do you pass data from the lightning web component to the parent screen flow?
Objectives:
After reading this blog, you’ll be able to:
- Embed a lightning web component inside the screen flow
- Pass the data from the lightning web component to a flow variable
- Interact with the lightning web component and screen flow elements on the same screen
- and much more
In the past, I have written a few articles on Lightning Web Component. Why not check them out while you are at it?!
- Using Lightning Web Component to Show an Alert Banner
- Get Record Id and Object API Name in Lightning Web Component
Business Use case
Janel Parrish is working as a Junior Developer at Gurukul on Cloud (GoC). Janel has a business requirement to do the following:
- Develop an LWC component capable of accepting latitude and longitude inputs.
- Pass the entered values to the corresponding screen flow component(s).
Build Screens with Reactive Components
Using the Build Screens with Interactive Components feature (currently in Beta), you can now enable direct interaction between a Lightning Web Component and other flow elements on the same screen.
Previously, there was no direct provision for Dynamic Interaction between a Lightning Web Component and Flow Elements. As a result, users had to navigate to the subsequent screen to view the data passed by the Lightning Web Component in Screen Flow.
Automation Champion Approach (I-do):
While creating the Lightning Web Component, we will also utilize the FlowAttributeChangeEvent event. This will enable a component to control flow navigation and notify the flow of changes in attribute values.
The FlowAttributeChangeEvent events are supported only in components where the target is lightning__FlowScreen.
Guided Practice (We-do):
There are 2 steps to solve Janel’s business requirement using Lightning Web Component and Screen Flow. We must:
- Create an Input Location lightning web component for Screen Flow
- Salesforce Flow Steps
- Define flow properties for screen flow
- Add a Screen to display the Input Location Custom Component
- Add an Input Number Component to Display Latitude from Input Location LWC Component
- Add an Input Number Component to Display Longitude from Input Location LWC Component
Step 1: Create an Input Location lightning web component for Screen Flow
First of all, create an Input Location Lightning Web Component using the code below. The lightning-input-location component represents a compound geolocation field that accepts user-entered latitude and longitude values, both being geographical coordinates expressed in decimal degrees. It allows you to identify locations using these coordinates.
The acceptable range for latitude is between -90 and 90, while longitude accepts values from -180 to 180. Any input beyond these specified ranges triggers an error message. This example showcases a compound geolocation field, displaying a latitude of 27.70750 and a longitude of -122.3948370.

If you don’t know how to create a lightning component, please review this developer guide, Create a Lightning Web Component.
lwcToScreenFlow.html
We will utilize the lightning-input-location component to accept latitude and longitude values. Let’s break down the code:
- In LWC, every component’s HTML file must be wrapped with a <template> tag.
- latitude={latitude}:- This binds the latitude property of the LWC’s JavaScript class to the latitude attribute of the component.
- longitude={longitude}:- Similar to latitude, this binds the longitude property of the LWC’s JavaScript class to the longitude attribute of the component.
- onchange={handleChange}:- This sets up an event listener on the component. Whenever the value of the component changes (either latitude or longitude), the handleChange method from the LWC’s JavaScript class is called.
<template>
    <lightning-input-location label="Default coordinates" latitude={latitude} longitude={longitude} onchange={handleChange}>
    </lightning-input-location>
</template>
lwcToScreenFlow.js
This sample JavaScript code uses the @api decorator to create public properties, i.e., accessible from other components or used in HTML templates. For example, @api latitude and @api longitude declare two public properties.
- FlowAttributeChangeEvent creates and dispatches the custom event that passes data from the Lightning web component to a flow.
- handleChange(event) is an event handler method that is called when a change event occurs on the lightning-input-location component in the LWC’s HTML template.
- this.latitude = event.target.latitude and this.longitude = event.target.longitude, these lines update the latitude and longitude properties with the values from the event target (the lightning-input-location component).
- [“latitude”, “longitude”].forEach((loc) => this.dispatchEvent(new FlowAttributeChangeEvent(loc, this[loc]))), This line loops over an array containing latitude and longitude strings, and for each of these, it dispatches a new FlowAttributeChangeEvent.
import { LightningElement, api } from 'lwc';
import {FlowAttributeChangeEvent} from 'lightning/flowSupport';

export default class LwcToScreenFlow extends LightningElement {
    @api latitude;
    @api longitude;

    handleChange(event){
        this.latitude = event.target.latitude;
        this.longitude = event.target.longitude;

        ["latitude", "longitude"].forEach((loc) =>
        this.dispatchEvent(new FlowAttributeChangeEvent(loc, this[loc]))
      );
    }
}
lwcToScreenFlow.js-meta.xml
The isExposed element is set to true, which makes the component available for use in tools like the Lightning App Builder or Flow Builder. The targets element is used to specify where your component can be used. In this case, the lightning__FlowScreen tag means that this component is intended to be used in Salesforce Flow screens.
The targetConfigs and targetConfig elements allow you to define properties that can be set in the builder context. In this case, the properties are latitude and longitude. Both are set to be of the Integer type and have the role of outputOnly, meaning they can be set in the Flow, but cannot be modified by the user within the component. These properties can be used to pass data from the LWC to the Flow.
<?xml version="1.0" encoding="UTF-8"?>
<LightningComponentBundle xmlns="http://soap.sforce.com/2006/04/metadata">
    <apiVersion>58.0</apiVersion>
    <isExposed>true</isExposed>
    <targets>
        <target>lightning__FlowScreen</target>
    </targets>
    <targetConfigs>
        <targetConfig targets="lightning__FlowScreen">
            <property label="Latitude" name="latitude"  type="Integer" role="outputOnly"/>
            <property label="Longitude" name="longitude" type="Integer" role="outputOnly"/>
        </targetConfig>
    </targetConfigs>
</LightningComponentBundle>
Step 2.1: Define Flow Properties
- Click Setup.
- In the Quick Find box, type Flows.
- Select Flows, then click on the New Flow.
- Select the Screen Flow option and click on Create and Configure the flow.

- It will open the flow designer for you.

Step 2.2: Add a Screen to display the Input Location Custom Component
- On Flow Designer, click on the +icon and select the Screen element.
- Input the following information:
- Enter Label the API Name will auto-populate.
- Click Done.


Step 2.3: Add an Input Number Component to Display Latitude from Input Location LWC Component
- Under the Input section on Screen Element, drag and drop the Number component onto the screen.
- Input the following information:
- Enter Label the API Name will auto-populate.
- Default Value: {!lwcToFlow.latitude}
- Click Done.


Step 2.4: Add an Input Number Component to Display Longitude from Input Location LWC Component
- Under the Input section on Screen Element, drag and drop the Number component onto the screen.
- Input the following information:
- Enter Label the API Name will auto-populate.
- Default Value: {!lwcToFlow.longitude}
- Click Done.


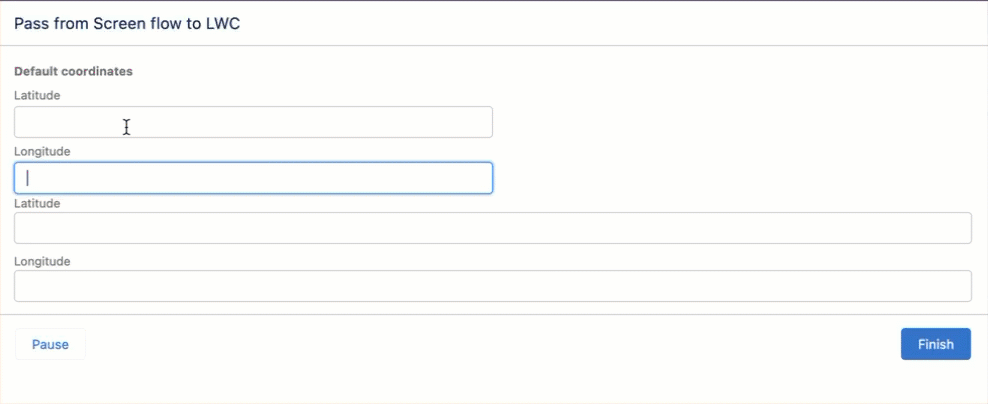
In the end, Janel’s Flow will look like the following screenshot:

Once everything looks good, perform the steps below:
- Click Save.
- Enter Flow Label the API Name will auto-populate.
- Click Show Advanced.
- API Version for Running the Flow: 58
- Interview Label: Pass from Screen Flow to LWC {!$Flow.CurrentDateTime}
- Click Save.
Proof of Concept
Formative Assessment:
I want to hear from you!
What is one thing you learned from this post? How do you envision applying this new knowledge in the real world? Feel free to share in the comments below.


I’m encountering the same error as Vlad.
When I try referencing attribute through {!lwcToFlow.latitude}
It then says its invalid component and refuses to save Flow overall