

Last Updated on February 10, 2022 by Rakesh Gupta
Big Idea or Enduring Question:
A warm welcome goes a long way in solidifying a company’s culture! If so then, why not provide existing users an ability to auto-follow new users in chatter?
Chatter is a great way to boost collaboration in your organization. You can Post Status, Links, Files, and Comments on others’ posts, etc. The benefits of following the new users in Chatter are the following:
- Keep up with what new users are doing; your guidance will expedite, and streamline their on-boarding journey!
- Following new users will enable you to track their chatter activities; use this ‘crystal ball’ to help them to improve their productivity!
In the past, I have written a few articles related to User, Chatter, and automation. Why not check them out while you are at it?!
-
- Getting Started with Salesforce Flow – Part 26 (Automatically Add a Record to Chatter Group)
- Getting Started with Salesforce Flow – Part 37 (Auto Remove Followers From Closed Opportunity)
- Getting Started with Salesforce Flow – Part 36 (Automatically Add New Users to a Chatter Group)
- Getting Started with Salesforce Flow – Part 30 (Reminder Email to Upload Chatter Profile Photo)
On the Trailblazer community, several people have been wondering how to allow their users to auto-follow new users. Salesforce doesn’t have any out-of-the-box feature for this; so, I decided to take a crack at it. This article shows how to develop an app that allows your users to auto-follow news users without code.
Objectives:
After reading this blog post, the reader will be able to:
- What is a MIXED DML error and how to avoid it?
- Add a Time-dependent action in After-save Record-Triggered Flow
- Get the list of user who has opted to follow new users in Chatter
- Use a Loop element to work with multiple records
- Use After-save Record-Triggered Flow to create a record (Bulk Safe)
- Monitor Time-based flow queue
Business Use Case
Warren Mason, Gurukul on Cloud‘s (GoC) awesome System Administrator, received the following requirement – allow users to auto-follow new users in Chatter. And, make this an optional feature.
Automation Champion Approach (I-do):
While this can be solved using various automation tools like Apex, etc, but we’ll use After-save Record-Triggered Flow to solve it. Check out this article to understand why we are using after-save record-triggered flow for this scenario.
Before proceeding ahead, you have to understand the EntitySubscription object. The object represents a user‘s subscription – whether the user follows a record or other users.
| Field Name | Details |
| SubscriberId | The Id of the User who is following the record or user. |
| ParentId | The Id of the record or user which the user is following. |
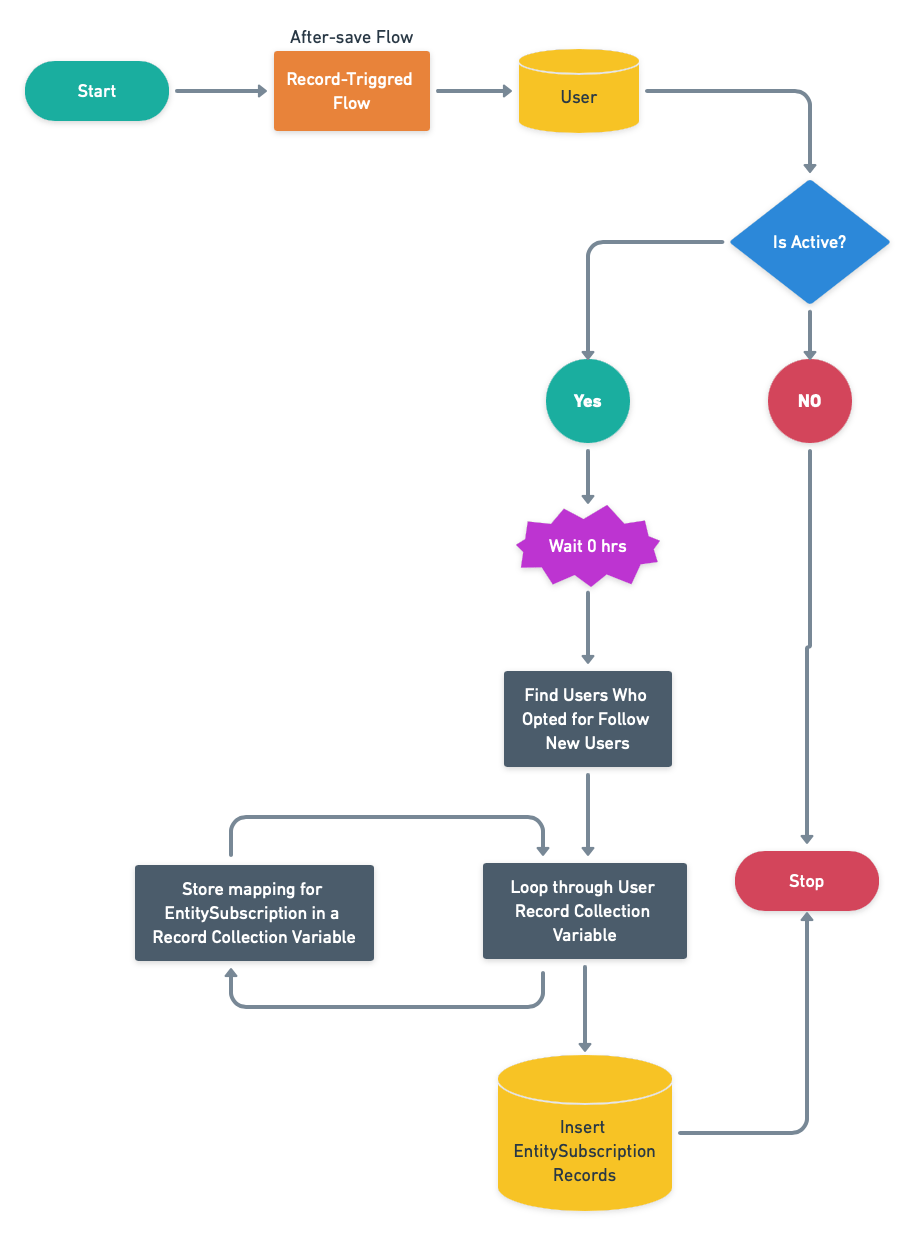
Before discussing the solution, let me show you a diagram of a Process Flow at a high level. Please spend a few minutes to go through the following Flow diagram and understand it.
Let’s begin building this automation process.
Guided Practice (We-do):
There are 2 steps to solve Warren’s business requirement using After-save Record-Triggered Flow. We must:
- Create a custom checkbox field (Follow New Users) on the user object
- Salesforce Flow
- Define flow properties for record-triggered flow
- Add a scheduled path
- Add a get record element to find the users who opted to follow new users
- Add a decision element to check the record collection variable (from step 2.3)
- Add a loop element to extract a record from the record collection variable (from step 2.3)
- Add an assignment element to Assign the values into the record variable (of EntitySubscription type)
- Add an assignment element to add the record variable to a record collection variable (of EntitySubscription type)
- Add a create records element to insert data from the record collection variable (from step 2.7)
Step 1: Creating a Custom Checkbox FIeld on User Object
- Click Setup.
- In the Object Manager, type User.
- Select Fields & Relationships, then click New.
- Select Checkbox as Data Type, then click Next.
- Enter Field Label and click the tab key, the API Name will populate.
- As a best practice, always input a description.
- Set the Field-level Security for the profiles, make sure to grant field access to all users.
- Add this field to Page Layout.
- Click Save.

Step 2.1: Salesforce Flow – Define Flow Properties
- Click Setup.
- In the Quick Find box, type Flows.
- Select Flows then click on the New Flow.
- Select the Record-Triggered Flow option and click on Next and configure the flow as follows:
- How do you want to start building: Freeform
- Trigger the Flow When: A record is created
- Run Flow: After the record is saved

- Object: User
- Select All Conditions Are Met (AND).
- Set Condition
- Row 1
- Field: User | IsActive
- Operator: Equals
- Value: True
- Row 1
- Set Condition
- Click Done.


Step 2.2: Salesforce Flow – Add Scheduled Paths
When DML operations on certain sObjects sometimes referred to as setup objects (such as a User Object), along with, on the non-setup object (such as Accounts, CollaborationGroupMember), in the same transaction, then, a Mixed DML error is thrown at a User.
The Mixed DML error is generated – when a User performs DML actions on Setup and non-Setup Objects in the same transaction -because some sObjects affect the user’s access to records in the org. Therefore, a user must insert or update these types of sObjects in different transactions to prevent operations from happening with incorrect access-level permissions. For example, a user cannot update an account, and a user role, in a single transaction. However, deleting a DML operation has no restrictions (reference Salesforce help).
That’s why we are going to add time delays to avoid MIXED DML Errors.
- Under Start, select Add Scheduled Paths (Optional).

- Under SCHEDULED PATHS, click on the New Scheduled Path.
- Under Scheduled Path Details, enter the Label the API Name will auto-populate.
- Time Source: User: Created Date
- Offset Number: 0
- Offset Options: Hours After
- Click Done.


Step 2.3: Lightning Flow – Adding a Get Record Element to Find Users Who Opted for Follow New Users
The next step is to use the Get Records element to find the users who select the checkbox Follow_new_users__c on the user object.
- Under Toolbox, select Element.
- Drag-and-drop Get Records element onto the Flow designer.
- Enter a name in the Label field; the API Name will auto-populate.
- Select the User object from the dropdown list.
- Select All Conditions Are Met (AND).
- Set Filter Conditions
- Row 1:
- Field: Follow_New_Users__c
- Operator: Equals
- Value: {!$GlobalConstant.True}
- Click Add Condition
- Row 1:
- Field: Id
- Operator: Does Not Equal
- Value: {!$Record.Id}
- Row 1:
- How Many Records to Store:
- select All records
- How to Store Record Data:
- Choose the option to Automatically store all fields
- Click Done.

Step 2.4: Salesforce Flow – Using Decision Element to Check the Record Collection Variable (from step 2.3)
Now we will use the Decision element to check the Record Collection Variable from step 2.2 to find if it returns the record or not.
- Under Toolbox, select Element.
- Drag-and-drop Decision element onto the Flow designer.
- Enter a name in the Label field; the API Name will auto-populate.
- Under Outcome Details, enter the Label the API Name will auto-populate.
- Condition Requirements to Execute Outcome: All Conditions Are Met (AND)
- Row 1:
- Resource: {!Find_Opted_Users}
- Operator: Is Null
- Value: {!$GlobalConstant.False}
- Row 1:
- Click Done.

Step 2.5: Salesforce Flow – Add a Loop Element to Retrieve Records from Record Collection Variable
- Drag-and-drop the Loop element onto the Flow designer.
- Enter a name in the Label (Extract Ids) field – the API Name will auto-populate.
- For Collection Variable select {!Find_Opted_Users}.
- For Specify Direction for Iterating Over Collection select the option First item to last item.
- Click Done.

Step 2.6: Salesforce Flow – Adding an Assignment Element to Assign the Values into a Record Variable
- Create a Record Variable varREntitySubscription type Entity Subscription to store a follower for the new user.

- Drag-and-drop the Assignment element onto the Flow designer.
- Enter a name in the Label field – the API Name will auto-populate.
- Set Variable Values
- Row 1:
- Field: {!varREntitySubscription.ParentId}
- Operator: Equals
- Value: {!$Record.Id}
- Add Assignment
- Row 2:
- Field: {!varREntitySubscription.SubscriberId}
- Operator: Equals
- Value: {!Extract_Reocrds.Id}
- Row 1:
- Click Done.


Step 2.7: Salesforce Flow – Adding an Assignment Element to Add the Record Variable to Record Collection Variable
- Create a Record Collection Variable varREntitySubscriptions type Entity Subscription to store record variable (created in step 2.6) for the bulk process.

- Drag-and-drop the Assignment element onto the Flow designer.
- Enter a name in the Label field – the API Name will auto-populate.
- Set Variable Values
- Row 1:
- Field: {!varREntitySubscriptions}
- Operator: Add
- Value: {!varREntitySubscription}
- Row 1:
- Click Done.


Step 2.8: Salesforce Flow – Adding a Create Records Element to Add Followers To New Users
- Under Toolbox, select Element.
- Drag-and-drop the Create Records element onto the Flow designer.
- Enter a name in the Label field- the API Name will auto-populate.
- For How Many Records to Create select Multiple.
- Map Record Collection: {!varREntitySubscriptions}
- Click Done.

In the end, Warren’s Flow will look like the following screenshot:

Once everything looks good, perform the steps below:
- Click Save.
- Enter Flow Label the API Name will auto-populate.
- Click Show Advanced.
- Type: Record-Triggered Flow
- API Version for Running the Flow: 51
- Interview Label: Auto Follow New Users in Chatter {!$Flow.CurrentDateTime}
- Click Save.

Almost there! Once everything looks good, click the Activate button.
Proof of Concept
From now onwards, when a user account is created, Salesforce Flow will automatically. It will then add followers to a new user if the existing users have selected Follow_new_users__c checkbox on their user’s record.
- To test this functionality, select the follow_new_users__c checkbox to Yes for Few Users.

- Now create a new user via the UI.

- Wait for time-dependent action to execute. Once the user is created, Flow already added the above users (refer step 1) as followers of the new user, as shown in the following screenshot:


Monitor Your Schedule Flow
To monitor Flows that are scheduled, navigate to the following path:
- Navigate to Setup (Gear Icon) | Environments | Monitoring | Time-Based Workflow.
- Now look for your Scheduled Flow job displaying information as shown in the following screenshot:

- Use the Delete button to delete the time-based Flow job from the queue.

Formative Assessment:
I want to hear from you!
What is one thing you learned from this post? How do you envision applying this new knowledge in the real world?
Let me know by Tweeting me at @automationchamp, or find me on LinkedIn.


Ah I got it! I was putting MY user ID in the admin section of the flow rather than the PROFILE ID. Love your blogs and how to’s by the way!!
I am glad to hear that things worked out for you, Stacey!
Is there an updated process to this via process builder? I don’t have an immediate workflow action to launch a flow and I’ve been trying to use Process Builder but can’t get this to work. I think I am entering the wrong flow variables/values in the Set Flow Variables step of process builder.
Map Variable ParentID to the UserID not record ID
Still not working for me. I have User Object (when a record is created or edited), then criteria as No criteria – just execute, then the flow selected with Flow Variable ParentID referencing User.ID.
Few checkpoints
1) Make sure that you have selected “Input and Output” for ParentID variable
2) reference [User].Id to Parent Id
Meanwhile, can you please send me the complete error log ?
Is there a way to handle existing follow record errors? I want to create a button where my users can “Follow Everyone” but when I attempt to use your process I am running into the issue of existing duplicate records in EntitySubscription because I am already following some people.
Yes you can, please share the screenshot of your Flow with me 🙂
Here are my changes from your process above:
1. Changed ParentID variable to SubscriberID
2. Query tweaked – remove profile filter so we get all active users.
3. On the first Assignment module I changed the assignments to:
FollowerDetail.ParentID = UserID.Id
FollowerDetail.SubscriberID = SubscriberID
These changes generate a collection that has all users being subscribed to by the user that starts the flow. This works but I can’t get around the issue of existing duplicate records existing in EntitySubscription.
FYI,I don’t have the ability to post files or pics on your blog so typing this out was the only way to go.
You have to modify the Flow to remove “existing duplicate records in EntitySubscription” error. Something like this
After step 2
1. Add one Fast Lookup element to get the list of User’s Id, those are already followed by LoggedIn User
2. Add one Loop element to extract the Id’s from the SObject Collection Variable
3. Use Decision element to compare the values {!Sov_SubscriberList.ParentId} != {!User.Id}, then go ahead else skip the Assignment process
Check out the attached file for more details
https://www.dropbox.com/s/4n9gs1x2bkujv92/Follow%20Users%20in%20a%20single%20click.pdf?dl=0
One of my first proper attempts at flow. Any idea what I need to do with this error when i create a new user for this:
“21:01:08:617 FLOW_ELEMENT_ERROR UPSERT — UPSERT FAILED — ERRORS : (MIXED_DML_OPERATION) DML operation on setup object is not permitted after you have updated a non-setup object (or vice versa): EntitySubscription, original object: User — for SFDC record with ID : null, |FlowRecordCreate|Auto_Follow_New_Users”
Thank you for pointing out my mistake. Just now I have updated the blog post and it’s working. Thanks again 🙂
Good article!
Thanks Rahul 🙂
Awesome post!— Sent from Mailbox
On Mon, Sep 15, 2014 at 4:44 PM, Rakesh Gupta’s Blog
Thank you:)