

Last Updated on May 30, 2024 by Rakesh Gupta
Big Idea or Enduring Question:
- How to integrate Salesforce with Google’s Address Validation API to validate an address via Salesforce Flow?
Objectives:
After reading this blog, you’ll be able to:
- Create Named Credentials for outbound requests.
- How Google’s Address Validation works.
- Benefits of using Address Validation.
- Initiate an outbound HTTP POST request utilizing Salesforce Flow without the need for code.
- Manage the outbound request response and implement appropriate actions.
- and much more
👉 Previously, I’ve penned several posts on the topic of interfacing Salesforce with a diverse range of systems. Why not check them out while you are at it?!
Business Use case
Jestilla Zetkin is currently serving as a Salesforce Architect at Gurukul On Cloud (GoC). In the course of her engagement with Sales Cloud implementation, she was entrusted with the responsibility of creating a mechanism to validate an Account’s Shipping Address, inclusive of the ability to automatically detect imprecise addresses or those with incomplete or unconfirmed components. The detailed requirements included:
- Incorporating an option to manually initiate Address Validation from the account.
- Ability to detect inaccurate addresses by identifying missing or unconfirmed address component and auto provide correct address.
- Additionally bring:
- County details
- Indication of a PO Box address
- Identification of a Business Address
- Designation of a Residential Address
- In the event of a failed response, institute a contingency action to create a task for the account’s designated owner.

What is Google’s Address Validation API?
Addresses play an essential role in locating individuals and places, delivering goods, and sometimes facilitating banking transactions. However, erroneous or misspelled addresses, although difficult to identify, can significantly complicate these processes. While addresses may appear simple due to their everyday use, uncorrected and improperly formatted ones can result in subpar user experiences, unsuccessful deliveries, and costly, time-consuming customer support.
The Address Validation API empowers developers to enhance the accuracy of address data. It provides detailed insights into the validity of the various components of an address, along with a geocode and an assessment of the address’s deliverability. This tool enhances user experience by streamlining processes like account creation or checkout and promotes business efficiency by mitigating the consequences of incorrect addresses on operational procedures.
How Address Validation Works?
Address Validation is a powerful tool that allows developers to pinpoint inaccurate addresses by highlighting unconfirmed or absent address components. Leveraging the extensive Places data of the Google Maps Platform and a comprehensive understanding of local address formats, the API refines the input. It offers a broad range of corrective measures from fixing typos and completing street names, to implementing locality-specific formatting, and beyond.
Moreover, Address Validation generates beneficial metadata about the reviewed address, including individual address components each assigned with an accuracy confirmation level, Plus Code, geocode, and the Place ID. In specific regions, it can discern between a residential and a commercial address, a crucial distinction for package delivery during business hours. Address Validation draws from a multitude of sources, including postal service data. The Address Validation API has earned the prestigious CASS Certification™ from USPS®, signifying that developers can cross-verify with U.S. Postal Service® data.
Use this link to explorer and see how the API responds to common address mistakes.

Benefits of Using Address Validation
Utilizing Address Validation offers numerous advantages across a variety of industries and use cases. Here are some exemplary instances
- Address Validation enables the verification of address existence during account creation, while also serving as a tool for risk assessment through address verification.
- It aids in eliminating costly issues that arise from incorrect address entries, such as failed deliveries, order cancellations, and chargebacks. These improvements ultimately bolster customer retention and enhance customer lifetime value.
- Improve your delivery success rate with better awareness of address validity and location.
- Address Validation streamlines the customer checkout process by offering address corrections and suggestions, ensuring timely deliveries to accurate locations.
- It provides more than just postal service data, augmenting addresses with additional useful information for a comprehensive understanding.
Understand the Validation Response
The Address Validation API takes an address as input. The API then returns a response that contains:
- The verdict for the validation of the entire address and for the validation of each address component (street number, street name, city, etc.).
- A single string containing the complete address as determined by the API.
- Individual properties containing each component of the address as determined by the API.
- A list of any missing address components, of any unconfirmed address components, and of any address components that could not be resolved.
- The geocode of the address.
- For the “US” and “PR” regions, the USPS data for the address.
Using the API response, you can ensure that the address exists and is of the quality necessary for your needs. If the response from the API indicates that an address is incomplete or incorrect, you can prompt the user to update the address. After the user completes the update, use the API to validate the updated address.
To validate an address using the Address Validation API, call the validateAddress method (REST) or ValidateAddress method (gRPC). Validate an address by sending a POST request to the validateAddress method:
https://addressvalidation.googleapis.com/v1:validateAddress?key=YOUR_API_KEY
Pass a JSON body to the request defining the address to validate. Here’s an illustrative example of a request body.
{
  "address": {
    "regionCode": "US",
    "locality": "Mountain View",
    "administrativeArea": "CA",
    "postalCode": "94043",
    "addressLines": ["1600 Amphitheatre Pkwy"]
  },
  "enableUspsCass": true
}
The United States Postal Service® (USPS®)1 maintains the Coding Accuracy Support System (CASS™) to support and certify address validation providers. A CASS Certified™ service, such as the Address Validation API, has been confirmed for its ability to fill in information missing from an address, standardize it, and update it to give you the most current and most accurate address.
Here’s an illustrative example of a response obtained from invoking the Google’s Address validation API:
{
  "result": {
    "verdict": {
      "inputGranularity": "PREMISE",
      "validationGranularity": "PREMISE",
      "geocodeGranularity": "PREMISE",
      "addressComplete": true,
      "hasInferredComponents": true
    },
    "address": {
      "formattedAddress": "1600 Amphitheatre Parkway, Mountain View, CA 94043-1351, USA",
      "postalAddress": {
        "regionCode": "US",
        "languageCode": "en",
        "postalCode": "94043-1351",
        "administrativeArea": "CA",
        "locality": "Mountain View",
        "addressLines": [
          "1600 Amphitheatre Pkwy"
        ]
      },
      "addressComponents": [
        {
          "componentName": {
            "text": "1600",
            "languageCode": "en"
          },
          "componentType": "street_number",
          "confirmationLevel": "CONFIRMED"
        },
        {
          "componentName": {
            "text": "Amphitheatre Parkway",
            "languageCode": "en"
          },
          "componentType": "route",
          "confirmationLevel": "CONFIRMED"
        },
        {
          "componentName": {
            "text": "Mountain View",
            "languageCode": "en"
          },
          "componentType": "locality",
          "confirmationLevel": "CONFIRMED"
        },
        {
          "componentName": {
            "text": "USA",
            "languageCode": "en"
          },
          "componentType": "country",
          "confirmationLevel": "CONFIRMED"
        },
        {
          "componentName": {
            "text": "94043"
          },
          "componentType": "postal_code",
          "confirmationLevel": "CONFIRMED",
          "inferred": true
        },
        {
          "componentName": {
            "text": "CA",
            "languageCode": "en"
          },
          "componentType": "administrative_area_level_1",
          "confirmationLevel": "CONFIRMED",
          "inferred": true
        },
        {
          "componentName": {
            "text": "1351"
          },
          "componentType": "postal_code_suffix",
          "confirmationLevel": "CONFIRMED",
          "inferred": true
        }
      ]
    },
    "geocode": {
      "location": {
        "latitude": 37.4223878,
        "longitude": -122.0841877
      },
      "plusCode": {
        "globalCode": "849VCWC8+X8"
      },
      "bounds": {
        "low": {
          "latitude": 37.4220699,
          "longitude": -122.084958
        },
        "high": {
          "latitude": 37.4226618,
          "longitude": -122.0829302
        }
      },
      "featureSizeMeters": 116.538734,
      "placeId": "ChIJj38IfwK6j4ARNcyPDnEGa9g",
      "placeTypes": [
        "premise"
      ]
    },
    "metadata": {
      "business": false,
      "poBox": false,
      "residential": false
    },
    "uspsData": {
      "standardizedAddress": {
        "firstAddressLine": "1600 AMPHITHEATRE PKWY",
        "cityStateZipAddressLine": "MOUNTAIN VIEW CA 94043-1351",
        "city": "MOUNTAIN VIEW",
        "state": "CA",
        "zipCode": "94043",
        "zipCodeExtension": "1351"
      },
      "deliveryPointCode": "00",
      "deliveryPointCheckDigit": "0",
      "dpvConfirmation": "Y",
      "dpvFootnote": "AABB",
      "dpvCmra": "N",
      "dpvVacant": "N",
      "dpvNoStat": "Y",
      "carrierRoute": "C909",
      "carrierRouteIndicator": "D",
      "ewsNoMatch": false,
      "postOfficeCity": "MOUNTAIN VIEW",
      "postOfficeState": "CA",
      "fipsCountyCode": "085",
      "county": "SANTA CLARA",
      "elotNumber": "0103",
      "elotFlag": "A",
      "poBoxOnlyPostalCode": false,
      "addressRecordType": "S"
    }
  },
  "responseId": "de22bed8-7f52-44cb-8526-faceac57150a"
}
Read Address Validation API documentation to understanding about different parameters and capabilities.
Prerequisite
Before you start using the Address Validation API, you need a project with a billing account and the Address Validation API enabled. This help article shows how to set up your Google Cloud project before using the Google Maps Platform API.
While the Address Validation API does support OAuth 2.0 and Service account for authentication, I will not be covering it in this article to keep it concise.
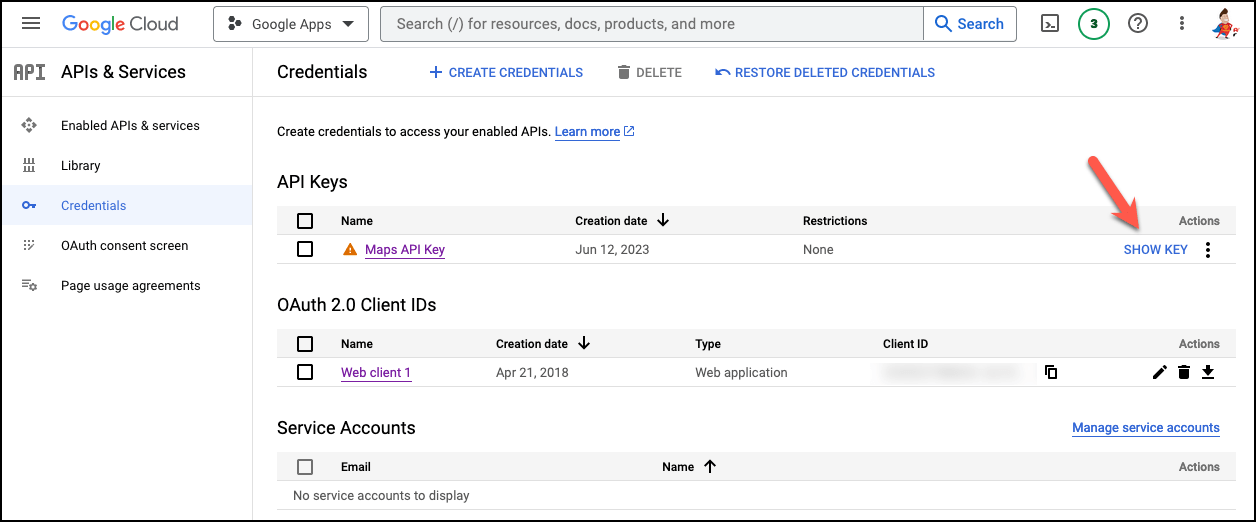
Before taking the next step, make sure that you have API key handy to work with Salesforce Flow.
Automation Champion Approach (I-do):
While this can be solved using various automation tools like Apex Code, AppExchange Apps and others, we will use Salesforce Flow and newly introduced HTTP POST Callout flow feature.
HTTP Callout pulls or sends data between the Salesforce database and an external system via Flow Builder without using code. You can set up direct integrations as needed without having to work with a developer or call a middleware tool, such as Mulesoft. After you configure the HTTP callout action in a flow, Flow Builder auto-generates an external service registration, an invocable action, and Apex class that you can use to create an Apex-defined resource for flows. You can then use the data output of the API request as input within Flow Builder and across Salesforce.
You can use HTTP Callout to connect a flow to a variety of APIs.
- Get address information using a map API
- Get weather conditions with a weather service API
- Generate the barcode with a barcode service API
- Get payment authorization information with a payment processing API
- and much more
Before discussing the solution, let me show you a diagram of the process at a high level. Please spend a few minutes going through the following Flow diagram to understand it.

Let’s begin building this automation process.
Guided Practice (We-do):
There are 4 steps to solve Jestilla’s business requirement using Screen Flow. We must:
- Create custom fields on the Account to store the response
- Create a Named Credential
- Salesforce Flow
- Define flow properties for Screen Flow
- Add a text variable to store the record Id
- Add a collection variable text to store the shippingStreets
- Add a Get Records element to find the current account
- Configure an HTTP POST callout for Address Validation API
- Add an Apex-Defined variable to store request body
- Add an Assignment element to construct the HTTP POST request body
- Add action – Make an HTTP POST callout
- Add a Decision element to check the response code
- Add a screen to display the response received from Address Validation API
- Add a Decision element to check the user-selected option (from step 3.9)
- Add an Update Records element to update the account
- Add a Create Records element to create a Task for the Account owner to handle error response
- Create a Quick Action to Launch the Flow.
Step 1: Create Custom Fields on the Account Object to Store the Response
- Click Setup.
- In the Object Manager, type Account.
- Select Fields & Relationships, then click New.
- Now create few custom fields as shown in the screenshot below:
- Click Save.

Step 2: Create a Named Credential
- Click Setup.
- In the Quick Find box, enter Named Credentials, and then select Named Credentials.
- Click New Legacy.
- Fill out the page with the callout endpoint’s URL and authentication parameters.
- Click Save.

Step 3.1: Define Flow Properties
- Click Setup.
- In the Quick Find box, type Flows.
- Select Flows, then click on the New Flow.
- Select the Screen Flow option and click on Create and configure the flow.
- It will open the flow designer for you.
Step 3.2: Add a Text Variable to Store Account Id
- Under Toolbox, select Manager, then click New Resource to store the account Id.
- Input the following information:
- Resource Type:Variable
- API Name: recordId
- Data Type: Text
- Default Value: {!$GlobalConstant.EmptyString}
- Check Available for Input
- Check Available for Output
- Click Done.

Step 3.3: Add a Collection Variable Text to Store ShippingStreets
- Under Toolbox, select Manager, then click New Resource to store the ShippingStreets
- Input the following information:
- Resource Type:Variable
- API Name:varT_ShippingStreet
- Data Type: Text
- Check Allow multiple values (collection)
- Check Available for Input
- Check Available for Output
- Click Done.

Step 3.4: Adding a Get Record Element to Find the Current Account
The next step is using the Get Records object to find the current account.
- On Flow Designer, click on the +icon and select the Get Records element.
- Enter a name in the Label field; the API Name will auto-populate.
- Select the Account object from the drop-down list.
- Select All Conditions Are Met (AND).
- Set Filter Conditions
- Row 1:
- Field: Id
- Operator: Equals
- Value: {!recordId}
- Row 1:
- How Many Records to Store:
- Select Only the first record
- Select Only the first record
- How to Store Record Data:
- Choose the option to Automatically store all fields.
- Click Done.

Step 3.5: Configure an HTTP POST Callout Action
HTTP Callout guides you through entering the details about the HTTP web-based service or REST API endpoint that you’re connecting to. After you complete the configuration, you invoke the action in a flow.
- On Flow Designer, click on the +icon and select the Action.
- Click + Create HTTP Callout.
- Configure the external service that connects Salesforce to the HTTP-based API.
- Enter a Name for the external service.
- Select the named credential that you created in the step 2.
- Click Next.

- The next step is to configure the invocable action that you can use in Flow Builder or across Salesforce.
- For Label, enter the action that the callout performs.
- Method: POST
- Add the URL endpoint for the request.
- URL Path: /v1:validateAddress
- Add query parameter keys if the API you’re calling has them. When you use this action in a flow, you input values for the defined keys.
- Click Add Key
- Key: key
- Data Type: String
- Required: True

- Key: key
- Click Add Key
- Provide a sample API request body. Salesforce generates a data structure from the sample request.
- Click New.
- Paste a sample JSON request.
- Click Review and confirm that the Apex data structure is correct.
- To make changes, edit the text in Sample JSON Request or select data types from the data structure.
- Click Review.
- Click Done.

- Provide a sample API response body. Salesforce generates a data structure from the sample response.
- Navigate to Provide Sample Response section.
- Click New.
- Paste a sample JSON response.
- Click Review and confirm that the Apex data structure is correct.
- To make changes, edit the text in Sample JSON Response or select data types from the data structure.
- Click Review.
- Click Done.

- Click Save.
- Click Done.


Step 3.6: Add an Apex-Defined Variable to Store Request Body
- Under Toolbox, select Manager, then click New Resource to store the request body.
- Input the following information:
- Resource Type:Variable
- API Name:address
- Data Type: Apex-Defined
- Apex Class: ExternalService__GoogleAddressValidationAPI_Verifyx20Address_IN_body
- Check Available for Input
- Check Available for Output
- Click Done.

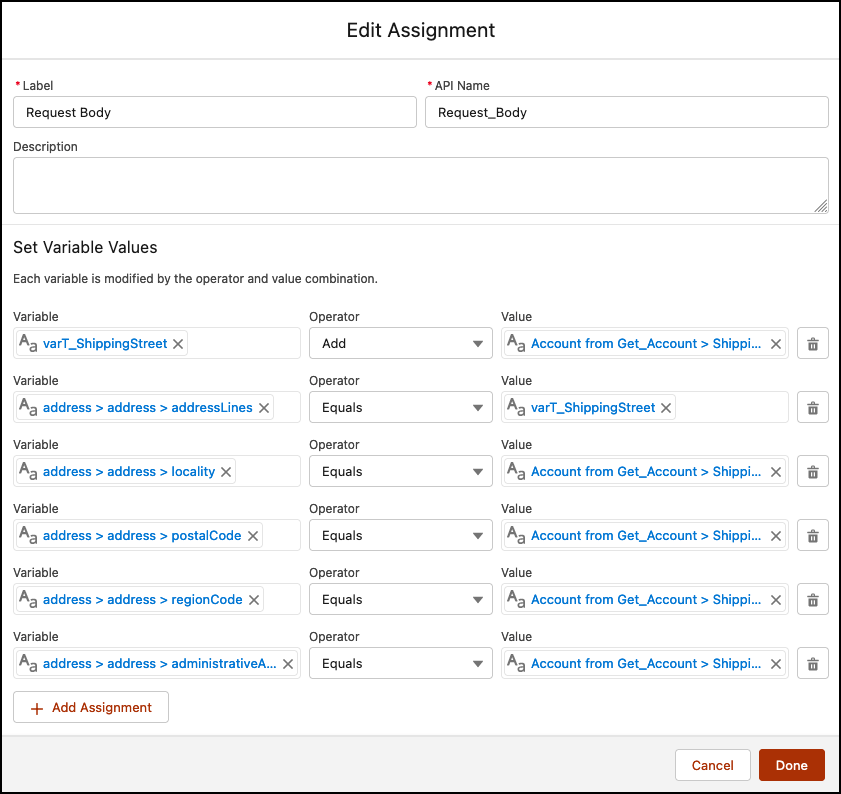
Step 3.7: Adding an Assignment Element to Construct the HTTP POST Request Body
The next step is to construct the HTTP POST request body. For this, we will use an Assignment element.
- On Flow Designer, click on the +icon and select the Assignment element.
- Enter a name in the Label field; the API Name will auto-populate.
- Set Variable Values
- Row 1:
- Field: {!varT_ShippingStreet}
- Operator: Add
- Value: {!Get_Account.ShippingStreet}
- Click Add Assignment
- Row 2:
- Field: {!address.address.addressLines}
- Operator: Equals
- Value: {!varT_ShippingStreet}
- Click Add Assignment
- Row 3:
- Field: {!address.address.locality}
- Operator: Equals
- Value: {!Get_Account.ShippingCity}
- Click Add Assignment
- Row 4:
- Field: {!address.address.postalCode}
- Operator: Equals
- Value: {!Get_Account.ShippingPostalCode}
- Click Add Assignment
- Row 5:
- Field: {!address.address.regionCode}
- Operator: Equals
- Value: {!Get_Account.ShippingCountry}
- Click Add Assignment
- Row 6:
- Field: {!address.address.administrativeArea}
- Operator: Equals
- Value: {!Get_Account.ShippingState}
- Click Add Assignment
- Row 1:
- Click Done.
Step 3.8: Adding an Action to Make an HTTP POST Callout
- On Flow Designer, click on the + icon and select the Action element.
- Select the VerifyAddress External Service Invocable Apex class.
- Enter a name in the Label field- the API Name will auto-populate.
- Set Input Values:
- body: {!address} (This is Apex-Defined Variable)
- key: YOUR_API_KEY
- body: {!address} (This is Apex-Defined Variable)
- Click Done.

Step 3.9: Using Decision Element to Check the Address Validation API Callout Response Code
Now we will use the Decision element to check the Google’s Address Validation API response code.
- On Flow Designer, click on the +icon and select the Decision element.
- Enter a name in the Label field; the API Name will auto-populate.
- Under Outcome Details, enter the Label the API Name will auto-populate.
- Condition Requirements to Execute Outcome: All Conditions Are Met (AND)
- Row 1:
- Resource: {!HTTPS_POST_Callout.responseCode}
- Operator: Equals
- Value: 200
- Row 1:
- Click Done.

Step 3.10: Add a Screen Element to Display the Response Received from Google’s Address Validation API
- Under Success Node, click on the +icon and select the Screen element on Flow Designer.
- Input the following information:
- Enter Label the API Name will auto-populate.
- Check out the video for step-by-step instructions and some tips.
Step 3.11: Using Decision Element to Check the User Selected Option (from Step 3.9)
Now we will use the Decision element to check, if the user wants to update Google’s provided address or keep using the previously entered address.
- On Flow Designer, click on the +icon and select the Decision element.
- Enter a name in the Label field; the API Name will auto-populate.
- Under Outcome Details, enter the Label the API Name will auto-populate.
- Condition Requirements to Execute Outcome: All Conditions Are Met (AND)
- Row 1:
- Resource: {!Confirm}
- Operator: Equals
- Value: {!$GlobalConstant.True}
- Row 1:
- Click Done.

Step 3.12: Adding an Update Records Element to Update the Account
The next step is to update the accounts fields to store the callout response. We will use the Update Records element.
- On Flow Designer, below the Use Verified Address node, click on the +icon and select the Update Records element.
- Enter a name in the Label field; the API Name will auto-populate.
- For How to Find Records to Update and Set Their Values select Specify conditions to identify records, and set fields individually
- Object: Account
- Select All Conditions Are Met (AND).
- Set Filter Conditions
- Row 1:
- Field: Id
- Operator: Equals
- Value: {!recordId}
- Row 1:
- Set Field Values for the Account Records
- Row 1:
- Field: ShippingCity
- Value: {!HTTPS_POST_Callout.2XX.result.address.postalAddress.locality}
- Field: ShippingCity
- Click Add Field
- Row 2:
- Field: ShippingCountry
- Value: {!HTTPS_POST_Callout.2XX.result.address.postalAddress.regionCode}
- Field: ShippingCountry
- Click Add Field
- Row 3:
- Field: ShippingPostalCode
- Value: {!HTTPS_POST_Callout.2XX.result.address.postalAddress.postalCode}
- Field: ShippingPostalCode
- Click Add Field
- Row 4:
- Field: ShippingState
- Value: {!HTTPS_POST_Callout.2XX.result.address.postalAddress.administrativeArea}
- Field: ShippingState
- Click Add Field
- Row 5:
- Field: ShippingStreet
- Value: {!HTTPS_POST_Callout.2XX.result.uspsData.standardizedAddress.firstAddressLine}
- Field: ShippingStreet
- Click Add Field
- Row 6:
- Field: County__c
- Value: {!HTTPS_POST_Callout.2XX.result.uspsData.county}
- Field: County__c
- Click Add Field
- Row 7:
- Field: PO_Box__c
- Value: {!HTTPS_POST_Callout.2XX.result.metadata.poBox}
- Field: PO_Box__c
- Click Add Field
- Row 8:
- Field: Business_Address__c
- Value: {!HTTPS_POST_Callout.2XX.result.metadata.business}
- Field: Business_Address__c
- Click Add Field
- Row 9:
- Field: Residential_Address__c
- Value: {!HTTPS_POST_Callout.2XX.result.metadata.residential}
- Field: Residential_Address__c
- Row 1:
- Click Done.

Step 3.13: Add Action – Create a Record to Handle Error Response
The next step is to create a task, for this, we will use the Create Records element.
- On Flow Designer, below the Error node, click on the +icon and select the Create Records element.
- Enter a name in the Label field; the API Name will auto-populate.
- Input the following information:
- Enter Label the API Name will auto-populate.
- How Many Records to Create: One
- How to Set the Record Fields: Use separate resources, and literal values
- Object: Task
- Set Field Values for the Case
- Row 1:
- Field: Description
- Value: {{!HTTPS_POST_Callout.defaultExc}
- Click Add Field
- Row 2:
- Field: OwnerId
- Value: {!$Record.OwnerId}
- Click Add Field
- Row 3:
- Field: Priority
- Value: High
- Click Add Field
- Row 4:
- Field: Status
- Value: Not Started
- Click Add Field
- Row 5:
- Field: Subject
- Value: {!HTTPS_POST_Callout.responseCode}
- Click Add Field
- Row 6:
- Field: WhatId
- Value: {!$Record.Id}
- Click Done.

In the end, Jestilla’s Flow will look like the following screenshot:

Once everything looks good, perform the steps below:
- Click Save.
- Enter Flow Label the API Name will auto-populate.
- Click Show Advanced.
- API Version for Running the Flow: 58
- Interview Label: Verify Address {!$Flow.CurrentDateTime}
- Click Save.

Almost there! Once everything looks good, click the Activate button.
Step 4: Create a Quick Action to Launch the Flow
The next step is to create a Quick Action on the Account object to launch the Screen Flow. Salesforce will automatically pass the Account Id to the recordId variable.
- Click Setup.
- In the Object Manager, type Account.
- Select Buttons, Links, and Action, then click New Action.
- Input the following information:
- Select Flow as Action Type.
- Select Verify Address as Flow.
- Enter Label (Verify Address) the Name will auto-populate.
- Click Save.

-
Make sure to update the Account’s Lightning Record Pages to incorporate filter conditions for the custom action (Verify Address), ensuring that it is only visible when the Shipping Address field is filled out.

👉 Check out the video for step-by-step instructions.
Proof of Concept
- From now on, users can utilize the Verify Account button to confirm their shipping address and access additional information.

- In an error response, the flow will create a task and assign it to Account Owner.


Formative Assessment:
I want to hear from you!
What is one thing you learned from this post? How do you envision applying this new knowledge in the real world? Feel free to share in the comments below.


Hi, thanks for writing this article, but instead of creating custom fields, can we go with standard Account fields?
Please feel free to use standard fields if they are more suitable for your use case.
Hi Rakesh, Thanks for this great post. I noticed a minor typo here:
Step 3.3: Add a Collection Variable Text to Store ShippingStreets
…
Default Value: {!$GlobalConstant.EmptyString} … this won’t be available if you select “multiple values”
Check Allow multiple values (collection) …
Your screenshot is correct, however.
Thank you so much, Peter! I have updated step 3.3.
Can we use USPS instead of Google APIs?
For this blog, I used Google, but you can use USPS in the same way.
I implemented a version of this flow for a client and it works great. However, they want to restrict the requests to only come from certain websites. Do you know how to find the URL where the request would be coming from when the flow is run in their org?
I am glad you were able to implement it. Please let me know if you still need help.
Sorry for such a basic question, but what is the cost of using the Google address validation API? Thanks!
The pricing structure for Google’s APIs follows a pay-as-you-go model. You can utilize this calculator to estimate your monthly cost:
https://developers.google.com/maps/billing-and-pricing/pricing
The sequence of steps is a bit messed up in the article I believe, i.e. you are creating Apex-Defined variable of type ExternalService__GoogleAddressValidationAPI_Verifyx20Address_IN_body way before actually configuring POST action.
In other words, ExternalService__GoogleAddressValidationAPI_Verifyx20Address_IN_body apex class will be generated by SF only after POST callout is configured.
Thank you for bringing that to my attention. I’ve also noticed that the instructions were not in the correct order. I have now made the necessary updates to the blog post. I appreciate your help once again. 🙏
Hi, thanks for writing this article, but I am running into a problem.
At Step 3.6: Adding an Assignment Element to Construct the HTTP POST Request Body. Where does this variable come from: {!address.address.addressLines}
Kindly review step 3.4, please.