

Last Updated on May 30, 2024 by Rakesh Gupta
Big Idea or Enduring Question:
- How can one present a customized error message(s) when record-triggered flow fails and prevent users from saving a record?
Objectives:
After reading this blog, you’ll be able to:
- Understand the recently introduced Custom Error element.
- Display a custom error message for record-triggered before-save flow.
- Display a custom error message for record-triggered after-save flow.
- Display the error message at the Top of the Page.
- Display the error message below a specific field.
- And much more
Business Use case
Benjamin Moore currently serves as a Salesforce Administrator at Gurukul On Cloud (GoC). He has created a record-triggered after-save flow to change related open opportunities to closed lost whenever an account goes out of business.
While the automation functions according to its design, there have been instances when Benjamin observed a failure in the after-save flow. This failure, caused by a validation rule, has led to increased support tickets for the IT team. To address this issue, Benjamin is considering the exploration of displaying a custom error message to the user if there is a failure in a record-triggered flow. He wants to present the following custom error messages when the flow has failed.
- Error message to show at the top of the Page
- {!$Flow.FaultMessage}
Error in updating opportunities as lost due to lack of description. Here are the steps to correct this:
1. Update the open opportunity referred by the partner.
2. Update the description to include a reason.
- {!$Flow.FaultMessage}
- Error message to show below to Account Name
- If the problem persists after following all the steps mentioned above, please reach out to the IT team.
Prerequisite
Before we move further and discuss how to add a custom error message in the record-triggered flow, let’s take a step back and complete the Prerequisite.
Step 1: Create a Validation Rule on Opportunity
Create a validation rule on the opportunity that restricts sales reps from changing the status of a partner-referred opportunity to Closed Lost if the description field is not filled in.

Step 2: Create a Custom Field – Out of Business (on Account)
- Click Setup.
- In the User Interface, clicks on Object Manager.
- Navigate to Account | Fields & Relationships and click on the Newbutton.
- Click on the Checkbox data type.
- Enter the Field LabeltheField Name will auto-populate.
- Click on the Unchecked for the Default Value.
- Add a field on the Page Layout and grant field access to the desired profiles.
- Click Save.

Step 3.1: Define Flow Properties
- Click Setup.
- In the Quick Find box, type Flows.
- Select Flows, then click on the New Flow.
- Select the Record-Triggered Flow option, click on Create
- Object: Account
- Trigger the Flow When: A record is created or updated
- Set Entry Conditions: All Conditions Are Met (AND)
- Row 1:
- Field: Out_of_Business__c
- Operator: Equals
- Value: {!$GlobalConstant.True}
- When to Run the Flow for Updated Records: Only when a record is updated to meet the condition requirements
- Optimize the Flow For: Action and Related Records
- Click the X at the top to save your changes.

Step 3.2: Adding an Update Records Element to Update Related Opportunities
The next step is to update the related open opportunities to close lost.
- On Flow Designer, click the +icon and select the Update Records element.
- Enter a name in the Label field; the API Name will auto-populate.
- For How to Find Records to Update and Set Their Values select Update records related to the account record that triggered the flow
- Records Related to Account: {!$Record.Opportunities}
- Set Filter Conditions:
- Row 1:
- Field: IsClosed
- Operator: Equals
- Value: {!$GlobalConstant.False}
- Field: IsClosed
- Row 1:
- Set Field Values for the Opportunity Records
- Row 1:
- Field: StageName
- Value: Closed Lost
- Field: StageName
- Row 1:
- Click the X at the top to save your changes.

In the end, Benjamin’s Flow will look like the following screenshot:

Once everything looks good, perform the steps below:
- Click Save.
- Enter Flow Label the API Name will auto-populate.
- Click Show Advanced.
- API Version for Running the Flow: 59
- Interview Label: Display Custom Error {!$Flow.CurrentDateTime}
- Click Save.

Almost there! Once everything looks good, click the Activate button.
The flow generates the error message when the opportunity validation rule, which we created in step #1, prevents it.

Automation Champion Approach (I-do):
The previous error message is unclear, leading most business users to create a ticket for the IT team. However, with the Winter’24 release, it’s now possible to show a custom error message when using record-triggered flow, either for before-save or after-save flow.

If your Flow contains an element that interacts with the Salesforce database—such as an Update Records element or Create Records element – it can fail. You can modify the default behavior by adding fault paths to all elements that may fail.
- Show customized error messages using Custom Error.
- Send an email alert containing an error message to a group of people.
Before discussing the solution, let me show you a diagram of the process at a high level. Please spend a few minutes going through the following Flow diagram to understand it.

Let’s begin building this automation process.
Guided Practice (We-do):
There are 3 steps to solve Benjamin’s business requirement using Record-Triggered After-Save Flow and the newly introduced Custom Error element. We must:
- Clone Existing Flow
- Add Fault Path
- Add a Custom Error element to show custom error messages.
Step 1: Clone Existing Flow
- Click Setup.
- In the Quick Find box, type Flows.
- Select Flows, then click on the Flow Name that will be modified. In this instance, click on the Display Custom Error flow, which we previously created as part of the prerequisite.
- Click the Save As button at the top right of the Flow builder.
- Click Save.


Step 2: Adding a Fault Path
It is recommended to configure the fault connectors in your flow so that you always receive an email when a flow fails and display a custom error message to users.
- On Flow Designer, click on the Update Records element.
- Select the Add Fault Path option from the list.

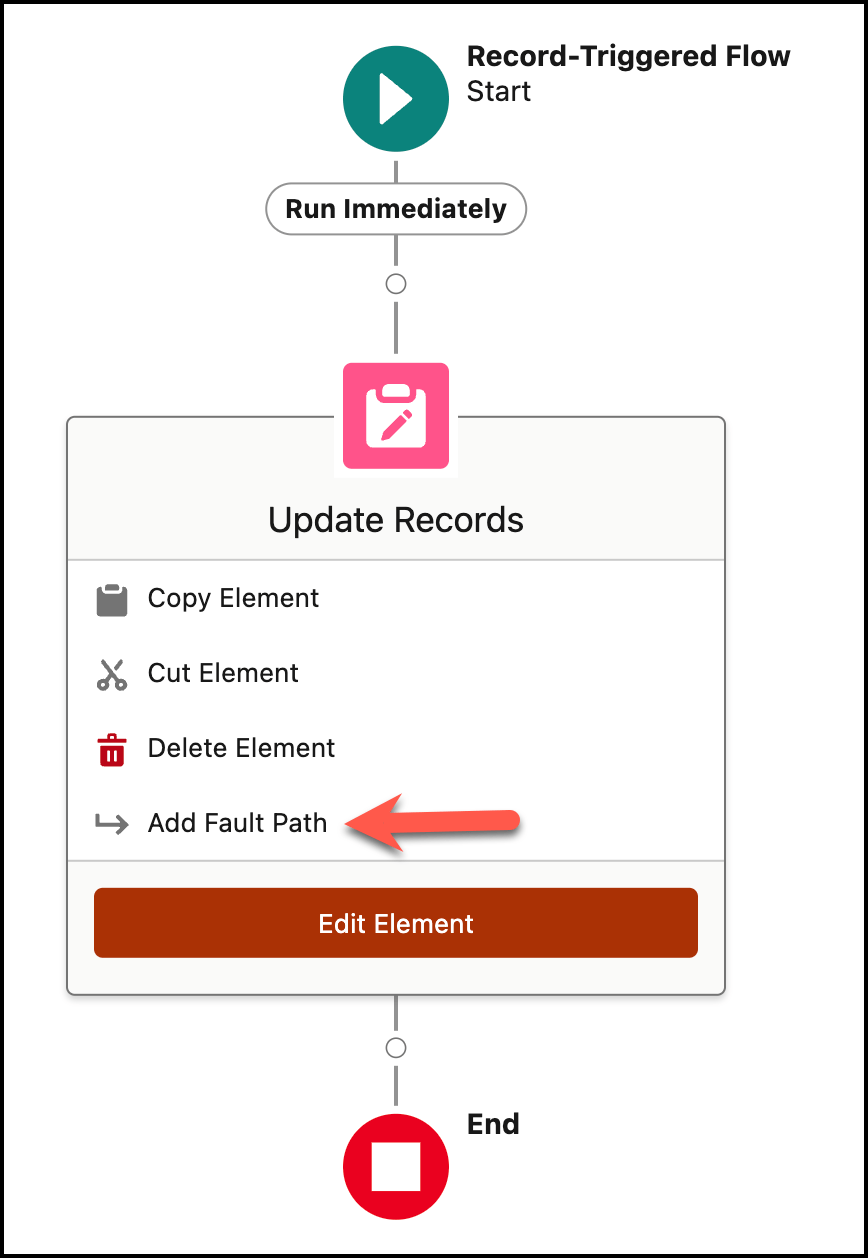
Step 3: Adding a Custom Error Element to Show Custom Error Messages
- Under the Fault node, select Custom Error element.
- Enter a name in the Label field; the API Name will auto-populate.
- Set Error Message 1 Details
- Where to Show the Error Message: In a window on a record page
- Error Message: (Limit 255 characters)
- {!$Flow.FaultMessage}
Error in updating opportunities as lost due to lack of description. Here are the steps to correct this:
1. Update the open opportunity referred by the partner.
2. Update the description to include a reason.
- {!$Flow.FaultMessage}
- Click Add Error Message
- Set Error Message 2 Details
- Where to Show the Error Message: As an inline error on a field
- Select a field for the inline error message: Account Name
- Error Message:
- If the problem persists after following all the steps mentioned above, please reach out to the IT team.

- If the problem persists after following all the steps mentioned above, please reach out to the IT team.
- Where to Show the Error Message: As an inline error on a field
- Click the X at the top to save your changes.


In the end, Benjamin’s Flow will look like the following screenshot:

Once everything looks good, Save the Flow and Activate it.
👉 Check out the video for step-by-step instructions.
Things to Remember
- The limit for the error message field is 255 characters.
- You’re only allowed to add one error message for a page.
- You’re only allowed to add one error message per field.
- it is not possible to use the link with your error message.
- escape parameter Indicates whether any HTML markup in the custom error message should be escaped (true) or not (false). This parameter is ignored in both Lightning Experience and the Salesforce mobile app, and the HTML is always escaped. The escape parameter only applies in Salesforce Classic. Read this article for more information.
Proof of Concept
Moving forward, if the flow we created, named Display Custom Error, fails at run time, then the custom error message that we defined within the fault path using Custom Error will be displayed.

Keep in mind you will still receive the flow error email from Salesforce.

Formative Assessment:
I want to hear from you!
What is one thing you learned from this post? How do you envision applying this new knowledge in the real world? Feel free to share in the comments below.


One thing I learned from this post is how to implement custom error messages for record-triggered flows in Salesforce, enhancing user experience by providing clear guidance on resolving issues. I envision applying this knowledge to reduce support tickets and improve user satisfaction by offering immediate, actionable feedback when errors occur.
It’s nice article.As an add on for user experience we can trim the fault Error message using formula field and use that in custom error message resource picker, so that users will not see the long error message like ‘we can’t save due to flow….’ instead it displays the validation message on screen.
I really enjoyed reading this blog. Your writing style is engaging, and the content is informative. Looking forward to more posts!