

Last Updated on June 7, 2022 by Rakesh Gupta
Big Idea or Enduring Question:
- How can you automatically create a case from a Chatter post if it includes a specific keyword?
Objectives:
After reading this blog, you’ll be able to:
- Understand what is custom metadata types and when should one use it
- Work with custom metadata types in salesforce flow
- Avoid hard code of Id using the get records element
- Use decision element to check record values
- Work with the loop to bulkify your flow
- Implement While Loop logic in flow
- and much more
Business Use Case
Pamela Kline is working as a System Administrator at Gurukul on Cloud (GoC). At GoC they are using Chatter extensively for internal communication to manage Sales and Support. Business Users are often using Chatter to ask for help from the Internal Salesforce team regarding how to use some features.
Pamela has received a requirement to auto-create a case whenever a new Chatter post (not a comment) contains a keyword word. She received a list of keyword words (almost 11 words) from her manager. Pamela’s task is to ensure that only a single case is created even if Chatter posts contain numerous keyword words.
List of Keywords:
- Ohana
- Salesforcehelp
- help
- TrailheaDX
- MidwestDreamin
- SoutheastDreamin
- IndiaDreamin
- TDX17
- SalesforceOhana
- JDF17
- dreamOlé
What is a Custom Metadata Type?
What is a Custom Metadata Type? Why should one use it? How should one use it? And, last but not least, how is Custom Metadata Type related to, or different than, Custom Object? Well, let us explore these concepts together!
Custom Metadata Type is similar to a custom object – it allows application developers to create custom sets of data, as well as to create and associate custom data with an organization. All custom metadata type data is available in the application cache. As a result, it allows efficient access to the data without the cost of repeated queries (SOQL) to a database. Custom Metadata Type is mainly used to store information that will be frequently accessed from Apex code.
Custom Metadata Type performs better than a custom object because it is available in cache; and therefore, it does not have to be queried. The other difference, which you will notice between the custom metadata type and a custom object, is the difference in the suffix. Custom Metadata type has __mdt suffix at the end of the custom metadata type, as opposed to the usual __c for custom objects.
Automation Champion Approach (I-do):
There are various ways to solve the preceding business requirements. A few of them are the following:
- Create an Apex Trigger on the FeedItem object – We will work on this option in our upcoming Apex Series.
- Use all 11 keywords in a Record-Triggered Flow (On feedItem object) entry criteria and use the Create a Record action to auto-create a case. The problem with this approach, however, is that if, after a few days, the business wants to add or remove a few keywords, then you have to start from scratch again.
- Use Custom Setting to store the keywords and then use Record-Triggered Flow to manage your logic.
- Use Custom Metadata Type to store the keywords and then use a Record-Triggered Flow to manage your logic. Custom metadata provides the flexibility to add or remove keywords without having to change your Flow.
To solve the preceding business requirement, we will take the 4th approach. We will use – (i) custom metadata type to store the keywords; use (ii) Flow to compare the keywords with the Chatter post body, and create a case.
Before discussing the solution, let me show you a diagram of a Process Flow at a high level. Please spend a few minutes going through the following Flow diagram and understanding it.  Let’s begin building this automation process.
Guided Practice (We-do):
There are 2 steps to solve Pamela’s business requirement using Record-triggered Flow. We must:
- Create custom metadata types to store the keywords
- Salesforce Flow
- Define flow properties for record-triggered flow
- Formula to determine whether the record is created or updated
- Add a Decision element to check whether the chatter post is created or edited
- Add a get records element to find the keywords from the custom metadata type
- Add a decision element to check whether the record collection variable contains any keywords or not (from step 2.4)
- Add a loop element to retrieve records from the record collection variable (from step 2.4)
- Add a decision element to check whether the chatter post contains any keywords or not
- Add an Assignment element to Indicate the end of the Loop
- Add a decision element to check Boolean EndLoop Variable to find if we want to create a case or not
- Add a Create Records element to create a case
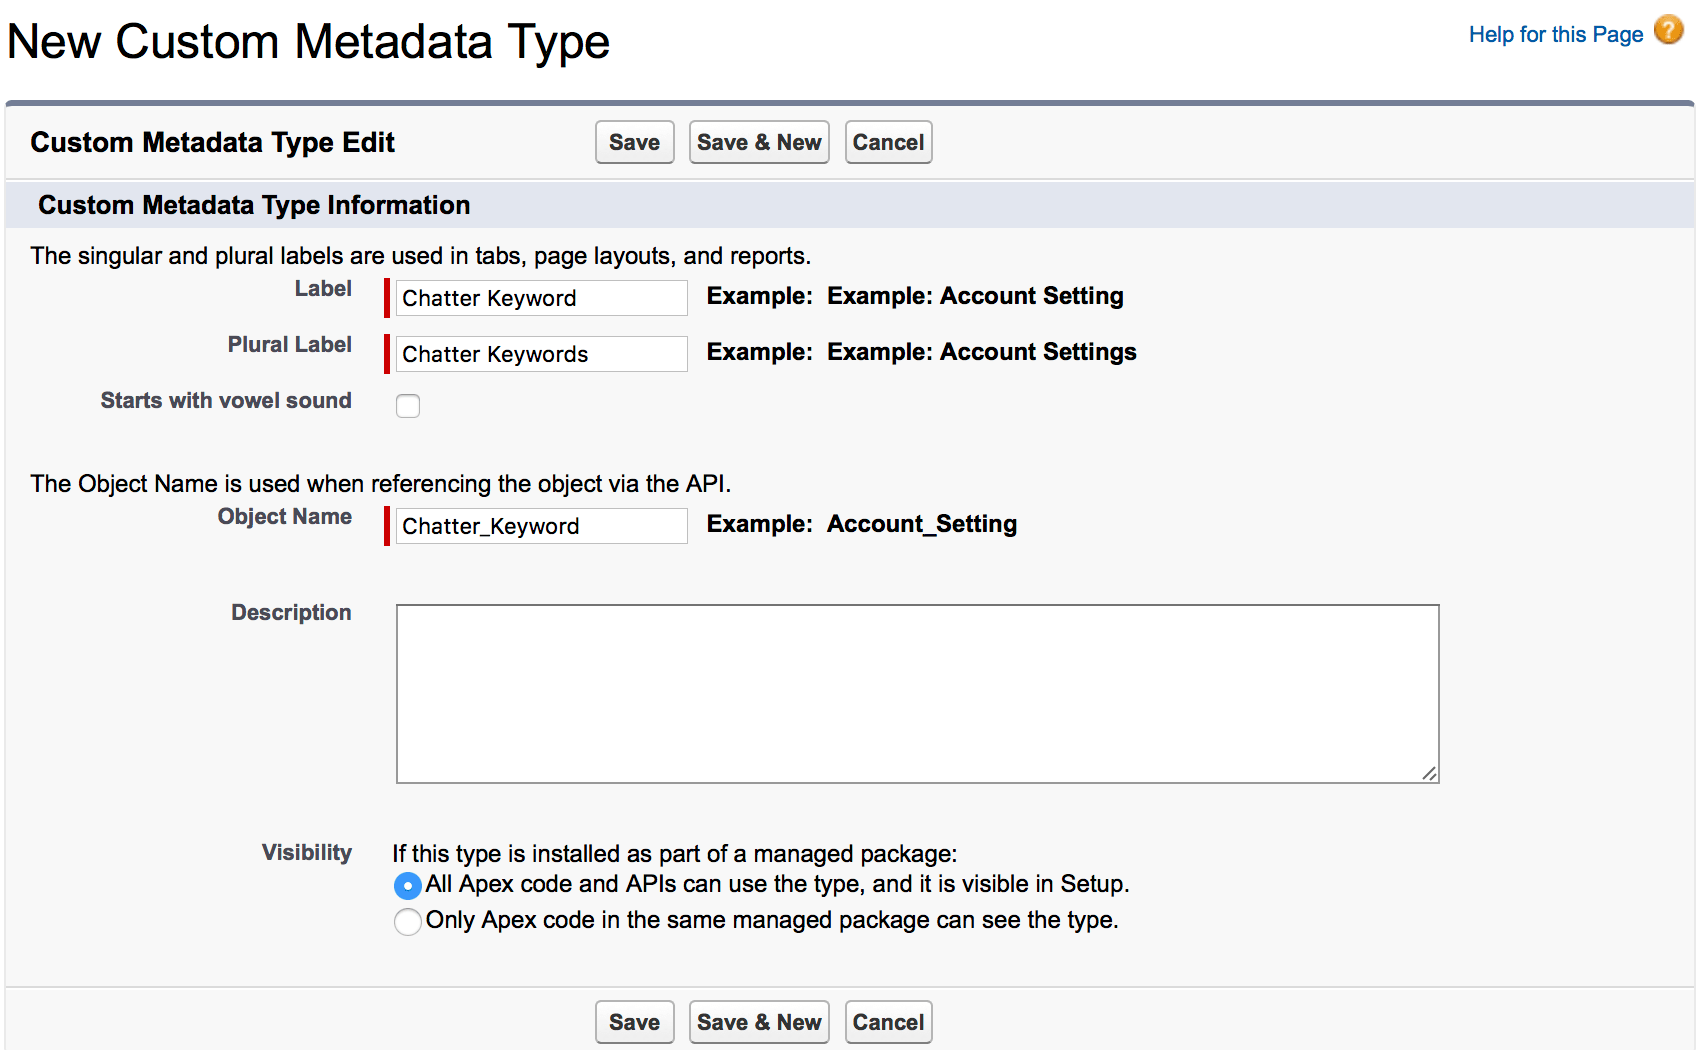
Step 1: Create Custom Metadata Types to store Keywords
- First, we will create a Custom Metadata Type to store keywords.
- To create a new custom metadata type, navigate to Setup | Custom Code | Custom Metadata Types and click on the New Custom Metadata Type button. Now populate the form as shown in the following screenshot:

- Once you are done, click on the Save button.
- Create a Text field Keyword to store the words that you want to track in a Chatter post and make this field a required field. At the end, the Chatter Keyword custom metadata type should look like what is shown in the following screenshot:

- The next step is to insert a few records into the custom metadata type. To do that, click on the Manage Chatter Keywords button on the custom metadata type detail page, and then click on New to insert some records, as shown in the following screenshot:


Step 2.1: Define Flow Properties
The next step is to create a Flow to implement the business requirement, i.e. create a case from keyword word used in a Chatter post.
- Click Setup.
- In the Quick Find box, type Flows.
- Select Flows then click on the New Flow.
- Select the Record-Triggered Flowoption, click on Create and configure the flow as follows:
- Object: FeedItem
- Trigger the Flow When: A record is created and updated
- Set Entry Criteria
- Condition Requirements: None
- Optimize the Flow For Action and Related Records
- Click Done.

Step 2.2: Formula to Determine Whether the record is Created or Updated
- Under Toolbox, select Manager, then click New Resource to determine whether the record is created or updated.
- Input the following information:
- ResourceType:Formula
- API Name: forB_IsNew
- Data Type: Boolean
- Formula: IsNew()
- Click Done.

Step 2.3: Using Decision Element to Check Whether the Chatter Post is Created or Edited
Now we will use the Decision element to check whether the chatter post is created or edited by a user.
- On Flow Designer, below the Run Immediately node, click on the +icon and select the Decision element.
- Enter a name in the Label field; the API Name will auto-populate.
- Under Outcome Details, enter the Label the API Name will auto-populate.
- Condition Requirements to Execute Outcome: All Conditions Are Met (AND)
- Row 1:
- Resource: {!forB_IsNew}
- Operator: Equals
- Value: {!$GlobalConstant.True}
- Row 1:
- When to Execute Outcome: If the condition requirements are met.
- Click Done.

Step 2.4: Adding a Get Record Element to Find the keywords from the Custom Metadata Type
The next step is to get all the keywords from the custom metadata type. For this, we will use the Get Records element.
- On Flow Designer, below the Created node, click on the +icon and select the Get Records element.
- Enter a name in the Label field; the API Name will auto-populate.
- Select the Chatter_Keyword__mdt object from the dropdown list.
- Select All Conditions Are Met (AND).
- Set Filter Conditions
- Row 1:
- Field: Keyword__c
- Operator: Does Not Equal
- Value: {!$GlobalConstant.EmptyString}
- Row 1:
- How Many Records to Store:
- Select All records
- How to Store Record Data:
- Choose the option to Automatically store all fields.
- Click Done.

Step 2.5: Using Decision Element to Check Whether the Record Collection Variable Contains Any Keywords or Not (from step 2.4)
The next task is to check whether the Record Collection variable contains any Keywords or not. It might be possible, there is no record inserted to custom metadata type yet. To check this, we will use the Decision element.
- On Flow Designer, click on the +icon and select the Decision element.
- Enter a name in the Label field; the API Name will auto-populate.
- Under Outcome Details, enter the Label the API Name will auto-populate.
- Condition Requirements to Execute Outcome: All Conditions Are Met (AND)
- Row 1:
- Resource: {!Get_Keywords}
- Operator: Is Null
- Value: {!$GlobalConstant.False}
- Row 1:
- When to Execute Outcome: If the condition requirements are met.
- Click Done.

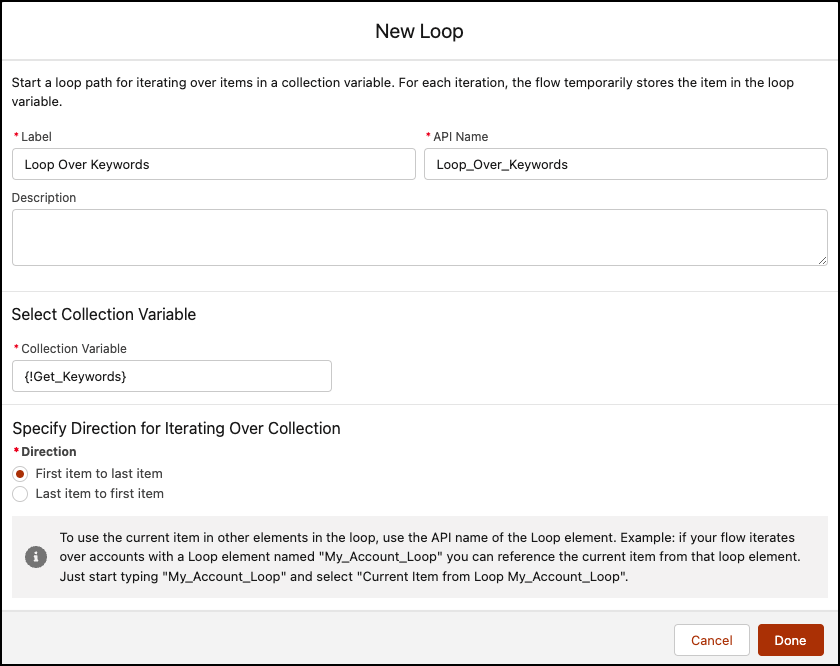
Step 2.6: Add a loop element to retrieve records from the record collection variable (from step 2.4)
If the Record Collection variable is not null, that means that it contains some banned words. We will use the Loop element to extract records from the Record Collection variable and store it to the Record variable. For this, we will use the Loop element.
- On Flow Designer, below the Yes node, click on the +icon and select the Loop element.
- Enter a name in the Label field; the API Name will auto-populate.
- For Collection Variable select {!Get_Keywords}.
- For Specify Direction for Iterating Over Collection select the option First item to last item.
- Click Done.
Step 2.7: Using Decision Element to Check Whether the Chatter Post Contains Any Keywords or Not
The next task is to check whether the Chatter post – contains any keywords or not. To check this, we will use the Decision element.
- On Flow Designer, below the For Each node, click on the +icon and select the Decision element.
- Enter a name in the Label field; the API Name will auto-populate.
- Under Outcome Details, enter the Label the API Name will auto-populate.
- Condition Requirements to Execute Outcome: All Conditions Are Met (AND)
- Row 1:
- Resource: {!$Record.Body}
- Operator: Contains
- Value: {!Loop_Over_Keywords.rakeshistomMVP__Keyword__c}
- Row 1:
- When to Execute Outcome: If the condition requirements are met.
- Click Done.

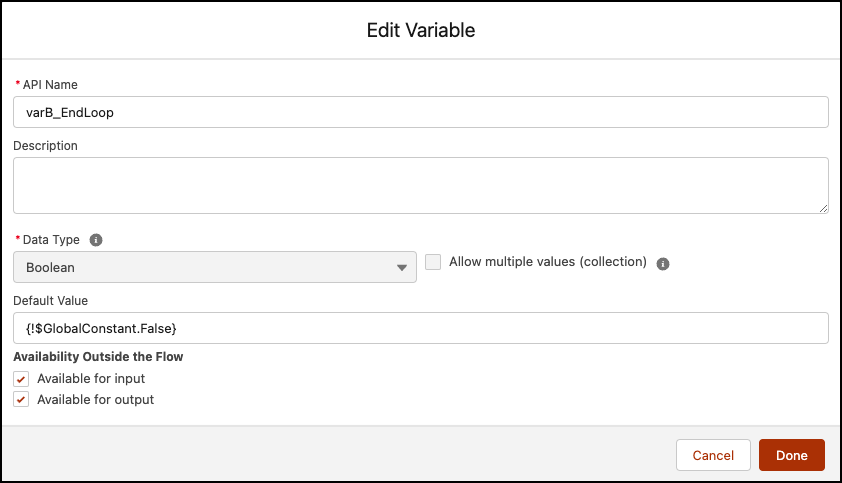
Step 2.7.1: Adding an Assignment Element to Indicate the end of the Loop
- Create a Variable varB_EndLoop type Boolean to indicate end of the loop.

- On Flow Designer, click on the +icon and select the Assignment element.
- Enter a name in the Label field; the API Name will auto-populate.
- Set Variable Values
- Row 1:
- Field: {!varB_EndLoop}
- Operator: Equals
- Value: {!$GlobalConstant.True}
- Row 1:
- Click Done.

Step 2.8: Using Decision Element to Check Boolean EndLoop Variable to See if We Want to Create a Case or Not
The next step is to check the boolean variable created in step 2.7.1. if it is true, we want to create a case; otherwise, we want to end the flow here. To check this, we will use the Decision element.
- On Flow Designer, below the After Last node, click on the +icon and select the Decision element.
- Enter a name in the Label field; the API Name will auto-populate.
- Under Outcome Details, enter the Label the API Name will auto-populate.
- Condition Requirements to Execute Outcome: All Conditions Are Met (AND)
- Row 1:
- Resource: {!varB_EndLoop}
- Operator: Equals
- Value: {!$GlobalConstant.True}
- Row 1:
- When to Execute Outcome: If the condition requirements are met.
- Click Done.

Step 2.9: Add Create Records Element to Create a Case
The final step is to create a case. For this, we will use Create Records element.
- On Flow Designer, below the Proceed to Case Creation node, click on the +icon and select the Create Records element.
- Enter a name in the Label field; the API Name will auto-populate.
- Input the following information:
- How Many Records to Create: One
- How to Set the Record Fields: Use separate resources, and literal values
- Object: Case
- Set Field Values for the Case
- Row 1:
- Field: Origin
- Value: Chatter
- Click Add Field
- Row 2:
- Field: Status
- Value: New
- Click Add Field
- Row 3:
- Field: Type
- Value: Other
- Click Add Field
- Row 4:
- Field: Description
- Value: Check this Post {!$Record.Id}
- Click Done.


Once everything looks good, perform the steps below:
- Click Save.
- Enter Flow Label the API Name will auto-populate.
- Click Show Advanced.
- API Version for Running the Flow: 55
- Interview Label: Create a Case from Chatter Post {!$Flow.CurrentDateTime}
- Click Save.

Almost there! Once everything looks good, click the Activate button.
Proof of Concept
Now, if someone makes a post on Chatter and it contains a keyword, from the Keyword List mentioned above, Flow will auto-create a case for it, as shown in the following screenshot:

Screenshot of the newly created case.

Formative Assessment:
I want to hear from you!
What is one thing you learned from this post? How do you envision applying this new knowledge in the real world? Feel free to share in the comments below.


Very helpful walkthrough! Thank you!!!
I’m happy it helped 🙂
Thanks for this very helpful walk-through. I have a use-case where I’m performing some logic on Case in Process Builder and before the process goes through several decision nodes, I want it to check whether the case Origin is one of several origins stored in custom metadata. If the output of that check is TRUE, then the process should proceed through the decision nodes. I think this is not possible however as it does not appear that Visual Workflow supports passing output variables back to Process Builder. Any alternative ideas for handling this use-case without code?
You are right, it is not possible to pass the output variables back to Process Builder. How about implementing your logic in the Visual Workflow, after Decision element.
Would that not be hardcoding.
I created one more Custom field
1. Keyword
2.Service Keyword
FeedTags are:
1. Label=Sales, Keyword= Sales; Service Keyword= Null
2. Label=Service, Keyword= Null; Service Keyword= Service
Now I am using it in Flow Decision LookForFeeds, I created two separate outcomes –> which will have different case creation.
Still no case are getting created
As I said earlier you do not need Flow or anything else except Process Builder. As you are using Custom Metadata Types, you do not need to hardcore any thing.
Can we create different types of cases using different keywords using same process.
For example:
1. Keyword Sales : Create Case of Type Sales
2.Keyword Support: Create Case of Type Support
Yes, it is possible to create different types of cases using Process Builder and Custom Metadata Types.
Create another branch in the same process that’s it.
For example,
Criteria Node 1:- if Keyword Sales: Create Case of Type Sales
Criteria Node 2:- if Keyword Support: Create Case of Type Support
Also, check out this article Getting Started with Process Builder – Part 72 (Execute Actions on More Than One Criteria)