

Salesforce Flow is like a double-edge sword – on the one hand, it is one of the most powerful tools provided by Salesforce to implement business automation declaratively; on the other hand, if one implements Salesforce Flow sloppily then, it may turn into a nightmare by flashing errors like SOQL 101 error, CPU timeout, etc.
Let us first understand the role Salesforce Flow plays in streamlining business processes and procedures.
First and foremost, Salesforce Flow can help businesses to save implementation time, as well as money. Implementation of Salesforce Flow is straightforward – you create a Flow, test it and then, use Change Set or Deployment tool (For example, Copado), to deploy it to Production. The best part is, you do not have to write test classes for your Flows.
I have written a few articles on Flow Deployment. Why not check them out while you are at it?!
- Getting Started with Salesforce Flow – Part 75 (Deploy Flow(s) or Process(es) Using Workbench)
- Getting Started with Salesforce Flow – Part 74 (Deploy Flow(s) or Process(es) Using the Visual Studio Code)
- Getting Started with Salesforce Flow – Part 73 (Distribute Flow(s) or Process(es) Using Packages)
- Getting Started with Salesforce Flow – Part 72 (Deploy Flow(s) or Process(es) Using Change Sets)
We all desire to be on the right side of the sword! The question is, how? How can one learn to adhere to best practices to implement process automation declaratively?
Well, look no further! For, 100+ blogs, on Salesforce Flows, are on Automation Champion alone.
This is a two series article that will help you to design Salesforce Flow for an Enterprise Implementation:
- Salesforce Flow Design Patterns – from Fundamentals to Mastery. YouTube video – Coming Soon).
- Implement one Flow per object and build subflow(s) to enhance the original Flow’s scope.
So, let us walk through the best practice steps:
#1 Always! Plan before you build
The key to successful project implementation is – design first and then implement. Salesforce Flow is no different – the same logic applies here too. I have seen many cases where people start working on building Flows as soon as they get requirements – a bad idea! But, as we all know, habits die hard. And, as a result, more often than not, users end-up getting some weird error messages or get stuck in a loop of trails and errors to fix the errors that inevitably erupt because the solution was not thought through thoroughly before they started building.
I am a seasoned coach. Time and again, I have to remind my trainees not to rush into implementing a Flow as soon as I give them requirements! Furthermore, I get a number of requests from the community to help them identify errors in their Flows. My first question to them – please show me your design. Almost always, their response is – Design? Huh? What? I can show you my flow, why do you need to see a design?
Try to avoid forming a bad habit – of trying to implement Flow without designing first. If the habit is already formed, take a deep breath. Because, it is going to take some work to undo the ‘damage’. When you get a requirement, do not log into Salesforce to create a Flow! Instead, open a Text Editor and design first! Please, save time and sanity – Design first!

So, now that you have repeatedly ‘heard’/read my advice 🙂 please follow my suggestions listed below – once you get the requirements:
Create a Flow diagram using Draw.io or LucidChart – this will ultimately help you in implementation and testing.
- Explore your Salesforce org and see if you can incorporate the requirement in one of the existing Flows.
- If you are able to find a related Flow, use it as a starting point and save yourself time from having to build a Flow from scratch on a blank canvas! Then, think how you can incorporate the current requirement(s) in one of the existing actions – Don’t add anything unnecessary until it’s required.
- Focus on reusability by implementing subflow(s).
#2 Flow is NOT a Solution for Every Requirement
With a hammer in your hand, everything looks like a nail!! Take a step back! Ask yourself – is Flow the right tool or is it better to explore other tools? For instance, if it is possible to achieve a solution through Formula or a Report then, don’t create automation for it! Basically, use automation sparingly!! For example, if you want to display an Account Site on Contact detail page then use Formula field, not Flow.
 Image Source – WWW
At the same time, if there is something that can be better handled through Apex then, don’t try to use Salesforce Flow. For example, use Apex to handle duplicate platform event message in the same transaction.
#3 Build a Flow in a test Environment
Just because Flows can be created or updated in a Production environment, don’t do it! I have seen people make changes directly into Production org – don’t! Without testing your Flow in a Developer Org or Sandbox, creating or editing Flows in a Production environment ‘may’ (read, certainly will!) lead to data loss or trigger some unwanted emails or end-up creating too many test records.

For example, to test whether a Flow is working properly, you must activate it. Build and test your Flows in a Sandbox environment, so that you can identify any issues without affecting your Production data. As with all customizations in Salesforce, it’s important to test your work. Make sure that you test as many permutations and combinations as you can think of before deploying the Flow to your Production org.
#4 The “One Record-Triggered Flow” Per Object – Per Type
Once you understand the requirement and create a Flow diagram, do not rush to implement it by creating a new Flow. As I said earlier, try to find an existing Flow or Sub-Flow(s) and see if you can tweak that to incorporate current requirement(s).
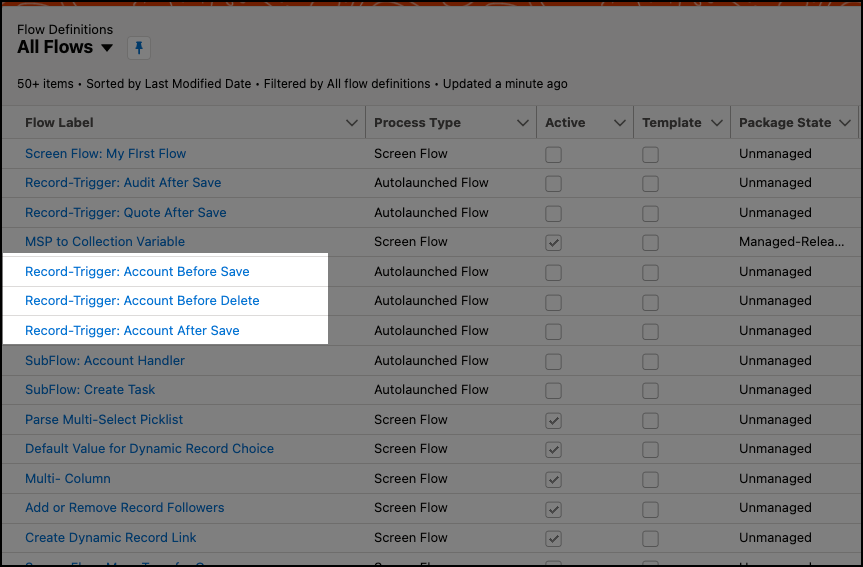
In any case, do not create more than one Flow on any object – per type. This idea comes from Apex Trigger best practice and design pattern. Creating one Flow per object will enable you to achieve flexibility, create reusable Flows, and manage all your Flows for a given object in one place. For, when you have just one Flow per object – per type, it is less likely to hit limits – such as number of SOQL queries; furthermore, adhering to the one Flow per object rule will also allow you to avoid generating infinite loops.
In my next article, I will talk about design patterns to manage one Flow per object – per type using Flow and Subflow.
#5 Use the Advanced Technique to Merge Nodes
Once you start thinking about one Flow per object – you may wonder, how can I handle a process/action which needs to be fired only at the time of creation? The answer is very simple – use formula ISNEW() while defining the criteria! Similarly, if some automation applies only to cloned records then use ISCLONE() function.
For example, create one After Save Record-Triggered Flow on any given object when a record is created or updated and then use formula (1) to branch decision element for Create and Update node (2).

I strongly recommend using the formula in Flow to handle logic better. Let me give you another example:
- Take a look at the following screenshot. Now, you may wonder – what is wrong with it? If that question crossed your mind then you are right, there is nothing wrong with the Flow! However, there is a better way to design it!

- I’ve used this technique to minimize the complexity in a few of my enterprise mission critical projects.
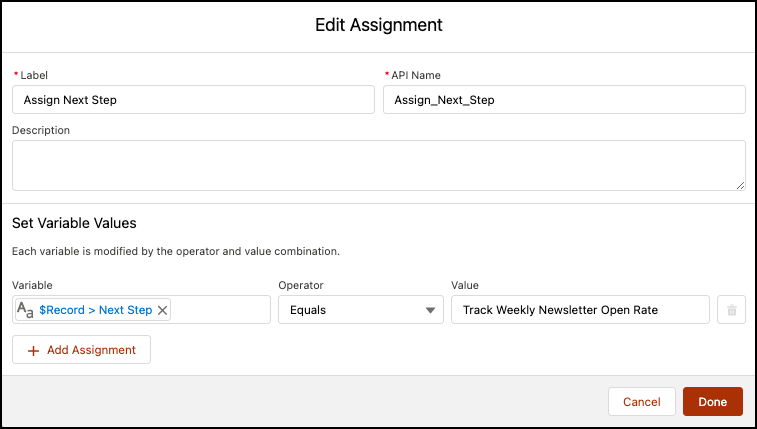
- Instead of using Decision element, if possible, use a Formula and then use Assignment element to assign the value to field(s)!


- Instead of using Decision element, if possible, use a Formula and then use Assignment element to assign the value to field(s)!
- Now look at the final version of Flow. Woohoo, we have only one element in the Flow! Doesn’t it look much cleaner? Now you get the point? Good!


In the aforementioned examples, I shared a few techniques that will significantly improve your knowledge of Salesforce Flow. Once you master the art of leveraging formulas in Salesforce Flow(s), you will be able to easily create an optimized Flow!
You may want to check the following articles to find real use cases about how to leverage formulas in Salesforce Flow:
- Getting Started with Salesforce Flow – Part 11 (Count Number of records in a Record Collection Variable)
- Getting Started with Salesforce Flow – Part 64 (Upskill on Flow – Learn How to Use DOESN’T CONTAINS Operator – and Show-Off!)
#6 Use Subflow – Make Your Flows Reusable Scalable!
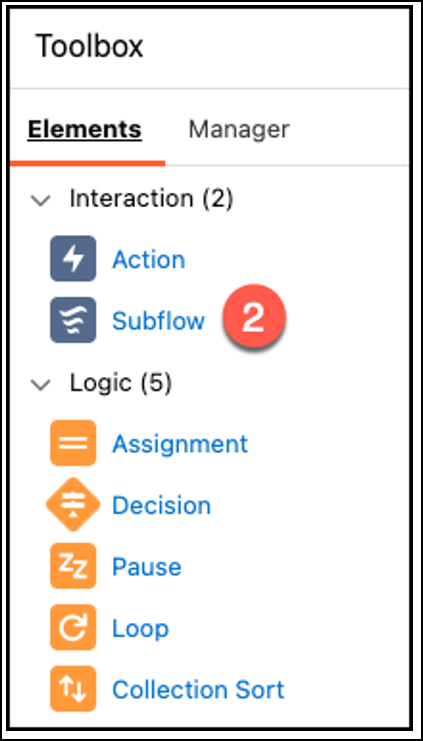
Some Flow actions are always reusable – for example, email alerts, quick actions, Invocable Apex. But, how do you reuse other types of actions in multiple Flows? Well, spoiler alert! – Subflow is the answer.
Subflows are a sequence of reusable actions that one can use in a Flow. You can create subflows to perform common processes specific to a custom application. Subflows consist of:
- Subflow inputs to pass variables to the actions in the subflow.
- A sequence of actions, Flow logic, and subflows.
- Subflow outputs to create data (variables) for use by other Flow actions or subflows.
- Subflow is an Autolaunched Flow.
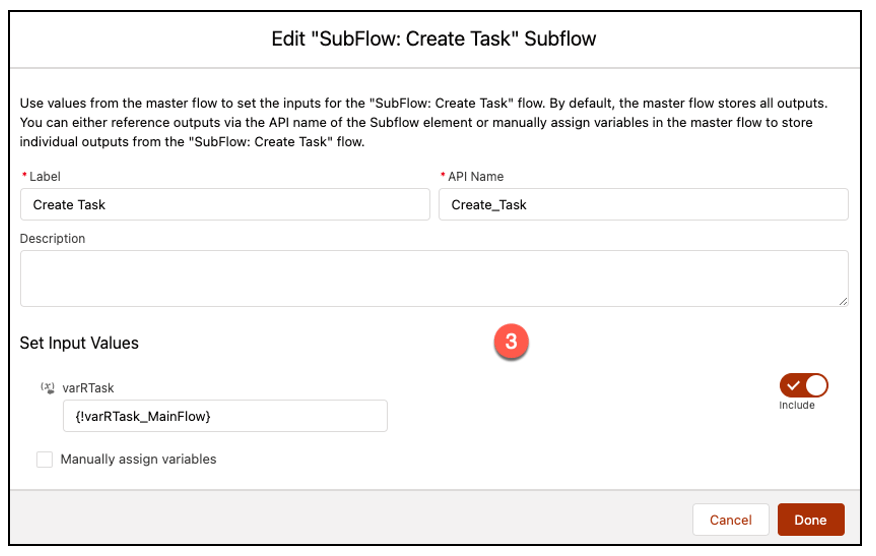
To learn more about a Subflow Flow, let us take an example of creating a Task. This is a very common business use case applicable to cases like after closing an Opportunity or creating a task to follow-up with the client before a Contract expires. As a Flow developer, you don’t want to repeat the task of creating a process for multiple Flows. So, to avoid repetition, let us handle the use case by taking the following steps:
- Create a subflow. As mentioned, a subflow is always an Autolaunched Flow! So, let us create a subflow to create a task and handle post Task creation logic.

- You can call a subflow from either a Screen Flow, After-Save Flow, Before-Delete Flow or a Scheduled Flow.

- Subflow allows you to pass a value to a variable from a master flow to referenced Flow.


#7 Supercharge Flow with Invocable Apex
Salesforce Flow comes with a lot of functionality but, sometimes you may want to do more than what default elements allow. In that case, call an Apex class from your Flow by using an Apex action to achieve your target. For example,
- Flow still doesn’t have a variable to handle Blob data type.
- Generate Quote PDF.
- Find a list of Opportunities by passing Account Ids.
Define your invocable methods in Apex with the @InvocableMethod annotation to use it with Flow. When writing an Apex class for Flow, remember the following:
- Limit 1x @InvocableMethod annotation per Apex class.
- Support inputs/outputs: Primitives, SObjects, Apex-defined classes, lists.
- Must be bulk safe. Input and output are always lists.
👉 Sample Apex code to generate Quote PDF via Salesforce Flow.

Check out the following article to learn how one can use Apex with Salesforce Flow.
- Getting Started with Salesforce Flow – Part 71 (Now, Generating a Quote PDF is a breeze! Learn how!)
- Getting Started with Salesforce Flow – Part 44 (Auto Convert Marketing Qualified Leads)
#8 No hardcoding IDs!!
Yes, it is sometimes a good idea to hard-code values (for example, while learning Apex or Salesforce Flow you may hard code value of Pie – 3.14). But there are no simple rules as to when it is a good idea to hardcode something – it all depends on a specific scenario.
For instance, if you hardcode the value of earth’s gravitational constant then, that would be a good use case for hard coding. But, god forbid, if you hard code a record ID (Queue, Group or Salesforce record Id, etc.) then, you just invited trouble! Time and time again, I see Apex code, Flows or Processes that contains hard-coded Ids – whether it’s a User ID, or a Group ID.
The problem with hard coding IDs is that if any changes need to be made to the Flow then, you will have to test again and then deploy to Production org. The record IDs can change, for example between a Sandbox and a Production environment; or, it may be that a queue (Dupe Management) has a different ID in a Sandbox and in a Production org. So, now you know – and, hopefully agree – that, it is not that hard to understand, is it? NoHardCoding!!
So what is next? How to avoid Hard coding of IDs in Flows? Some of the ways to avoid hard-coding are as follows
- Use Custom Metadata Types or Custom Label to stores Ids
- Use Get Records to Query them

Custom Metadata Type is similar to a custom object – it allows application developers to create custom sets of data, as well as to create and associate custom data with an organization. All custom metadata type data is available in the application cache. As a result, it allows efficient access to the data without the cost of repeated queries (SOQL) to a database.
Custom Metadata Type is mainly used to store information that will be frequently accessed from Apex code. Custom Metadata Type performs better than a custom object because, as mentioned, it is available in the cache; and therefore, it does not have to be queried.
Checkout previous articles to learn how you can use Custom label and Custom Metadata Types in Salesforce Flow.
- Getting Started with Salesforce Flow – Part 43 (Dynamic Approval Routing in Salesforce)
- Getting Started with Salesforce Flow – Part 26 (Automatically Add a Record to Chatter Group)
#9 Don’t Set Entry Criteria for Record-Triggered Flow
Never try to set Entry criteria for Record-triggered Flow, if possible – there are many reasons for this as explained below:
- Entry criteria have some limitations
- It doesn’t support dynamic date field.

- It doesn’t support RecordTypeName.

- and much more
- It doesn’t support dynamic date field.
- By selecting the criteria means you are limiting its reusable capability – i.e., you can’t use it for another business use case.


Now suppose you somehow manage to use entry criteria – Option 1 – as follows:

Now, let me propose another solution – Option 2 – i.e. to use a Decision element.

What do you prefer? Option 1 or Option 2? As you may agree, Option 2 is better. This is because:
- Option 2 is certainly easier to read.
- Furthermore, Option 2 is not only easier to manage but, it also supports filters:Dynamic Date RecordTypeNameand much more
While building the Flow, keep one thing in mind – your Flow should be easy enough to read by anyone.
#10 Don’t Deactivate – Use Custom Permission to Bypass Flows at Runtime
Record-Triggered Flows will execute as soon as they meet set criteria. There are some situations, however, when a business may want to bypass a Flow!
It is best practice to add a bypass condition in your Flow instead of deactivating the Flow. By adding bypass conditions into your Flow, you can easily toggle between users and bypass a Flow for selected individuals or situations.
For example, when mass updating Accounts or Opportunity records, you may want to deactivate a Flow so that it will not trigger any email alerts. To handle it, do the following:
- Create a Custom Permission

- Check custom permission in the Flow before sending email alert.


In the runtime, when you want to bypass a Flow for a specific user, assign the custom permission via Permission Set.
#11 Don’t Put DML Statements inside of a Loop
Mind your limits! A Cardinal sin of Apex development – putting queries or DML statements inside a ‘For loop’! This also applies to Flows.

There is a governor limit that enforces a maximum number of SOQL queries. There is another one that enforces a maximum number of DML statements (create, update, delete). When these operations are placed inside a ’For loop’, database operations are invoked once per iteration of the loop; this makes it very easy to reach these governor limits.
Check out the following articles to see how I have bulkified my Flows:
- Getting Started with Salesforce Flow – Part 53 (Clone a User with their associated Public Group, Queue Membership and Permission Sets)
- Getting Started with Salesforce Flow – Part 56 (Merge Chatter Topics with the Help of Salesforce Flow)
- Getting Started with Salesforce Flow – Part 39 (Out of Office Notification For Chatter Post)
- Getting Started with Salesforce Flow – Part 65 (Auto Follow Records Based on Criteria)
#12 Handle Errors with Fault Paths
From time-to-time, things don’t work exactly as you expected in your Flow — that’s where error handling comes in. With error handling, you can define any number of steps to run after the failure of an action.

If your Flow contains an element that interacts with the Salesforce database—such as an Update Records element or Create Records element – it can fail. You can modify the default behavior by adding fault paths to all elements that may fail.
- Show customized error message for Screen Flow.
- Send an email alert containing an error message to a group of people.
#13 Use Debug Log to Check Why a Flow Fails at Runtime
Salesforce Flow is a powerful tool for System Administrators and developers to implement business processes without writing code. However, with great power comes great responsibility. If a user starts creating a new Flow for each requirement – or creating Flows without understanding Salesforce limitations – then, a user may encounter many issues, either in future or, while testing/deployment phase.

Now, if you encounter an error message don’t panic – you are not the only one who has ever gotten error messages; furthermore, this may be your first but, it certainly will not be the last time you will encounter an error message! So, the best thing to do is to learn how to tackle it! First, take a deep breath! Then, use Debug Log to find the root cause behind the error message. Once you have the root cause – or you understand why you encountered error messages – 50% of the time you can easily solve it; if more help is needed then, google it and you will get some solution for it.
Check out the following articles to see how I have used Debug log to solve a problem:
- Getting Started with Salesforce Flow – Part 15 (Learn About the New, Built-in, Debug Tool in the Flow Builder!)
- Getting Started with Process Builder – Part 64 (How to fix MIXED_DML_OPERATION error)
- Getting Started with Process Builder – Part 65 (Resolve ALL_OR_NONE_OPERATION_ROLLED_BACK error)
- Getting Started with Process Builder – Part 66 (How to fix FIELD_INTEGRITY_EXCEPTION error)
- Getting Started with Process Builder – Part 67 (How to fix MALFORMED_ID error)
#14 Perform DML Operations at the End of the Flow
Last but not the least, if possible, perform the insert, update or delete logic at the end. Don’t try to put DML statement in the middle of a Flow.

For example, in the above image of After Save Record-Triggered Flow, I used the Update statement with each decision node. This, however, is consuming resources unnecessarily to update the record. I have seen such Flows in many of my customers’ orgs. So please, DON’T, and I repeat DON’T, do such things! Save yourself, and your organization, unnecessary headaches.
Let me show you a better way to handle it.
- Use Assignment element to assign a value to a variable – in this case current record.

- At the end, use the Update Records element to update the record in a single shot.


Your Flow will looks like this: 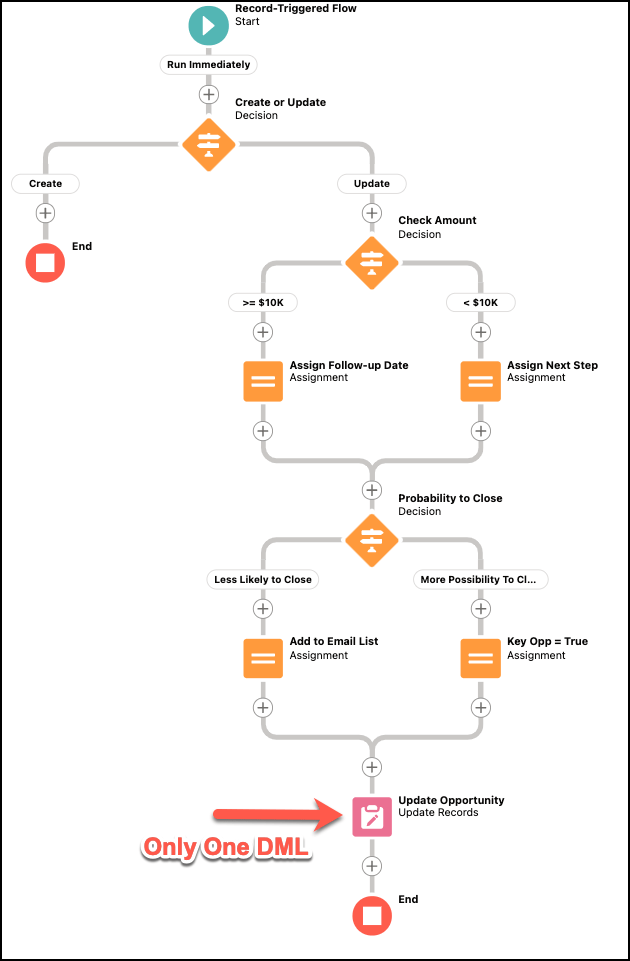
Using the above technique will help you with following:
- Optimize resource utilization.
- Bulkify your Flow.
So, what next, Rakesh? You ask eagerly! Well, as always, watch out for my next article. There, I plan to discuss how to manage one Flow per object – per type in any implementation.
Have your own Salesforce Flow secret sauce? Great! Share it!
Formative Assessment:
I want to hear from you!
Have you taken the User Experience Designer exam? Are you preparing for the exam now? Share your tips in the comments!
Make a post and tag me on Twitter @automationchamp using #AutomationChampionFlow.
Proofreader: - Munira Majmundar


8 thoughts on “Salesforce Flow Design Patterns – from Fundamentals to Mastery”