

Last Updated on May 30, 2024 by Rakesh Gupta
Big Idea or Enduring Question:
- How do you automatically assign newly-created leads to a Sales Engagement Cadence?
Objectives:
After reading this blog, you’ll be able to:
- Work with the ActionCadence object to find out about a Cadence.
- Assign a Sales Engagement Cadence to a lead or contact.
- And much more.
👉 Previously, I’ve penned several posts on the Sales Engagement Cadence. Why not check them out while you are at it?!
- Have You Traversed the Yellow Brick Road of Sales Cadence, Yet?
- Never Miss a Beat: Notifications for Prospect Removal in Sales Engagement Cadence
Business Use case
Benjamin Moore is a Salesforce Administrator at Gurukul On Cloud (GoC). The Sales Director has assigned him the task of automatically assigning the “Follow Up on Interested Prospects” cadence to any newly created lead with “Web” as its LeadSource.
Automation Champion Approach (I-do):
Save your sales reps from taking an extra step. To automatically add lead, contact, or person account records to a cadence when the records are created using record-triggered after-save flow. While this can be solved using various automation tools like Apex Trigger and others, we will use Salesforce Flow to solve it.
Before discussing the solution, let me show you a diagram of the process at a high level. Please spend a few minutes going through the following Flow diagram to understand it.  Let’s begin building this automation process.
Guided Practice (We-do):
- Create and Activate a Sales Engagement Cadence
- Salesforce Flow
- Define flow properties for record-triggered flow.
- Create a formula to determine whether the record has been created or updated.
- Add a Decision element to check the LeadSource.
- Add a Get Record element to find the Cadence based on its name.
- Add a Decision element to determine whether the Cadence has been found or not.
- Add Assign Target to Cadence core action – to assign cadence to the lead.
Things to Note
Assuming the reader has already given Sales Engagement permissions to the target assignee (i.e. lead owner in this scenario), this article will be short. If the lead owner (our target assignee) doesn’t have these permissions, the user creating the lead will encounter an error:
The target assignee doesn’t have any Sales Engagement permissions.
To avoid this:
- Ensure everyone managing cadences has Sales Engagement permissions.
- Before assigning a cadence, verify if the lead owner (our target assignee) has the necessary permissions. If not, grant them before proceeding.
Helpful Articles
- Profile? So Yesterday! – Auto Assign Permission Set Group to a User
- Automatically Assign Permission Sets to New User
Step 1: Create and Activate a Sales Engagement Cadence
- In the Sales Engagement app, choose Cadences from the Navigation menu.
- From the Actions menu, choose New.
- Enter a unique name and a description for the cadence. Click Save.

Step 2.1: Define Flow Properties
- Click Setup.
- In the Quick Find box, type Flows.
- Select Flows then click on the New Flow.
- Select the Record-Triggered Flow option, and click on Create and configure the flow as follows:
- Object: Lead
- Trigger the Flow When: A record is created or updated
- Set Entry Criteria: None
- Optimize the Flow For Action and Related Records
- Click the X at the top to save your changes.


Step 2.2: Create a Formula to Determine Whether the Record Has Been Created or Updated
- Under Toolbox, select Manager, then click New Resource to determine whether the record is new or old.
- Input the following information:
- Resource Type: Formula
- API Name: forB_IsNew
- Data Type: Boolean
- Formula: IsNew()
- Click Done.

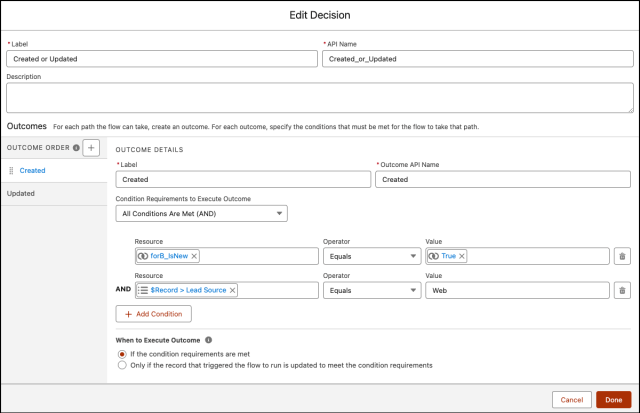
Step 2.3: Using Decision Element to Check the LeadSource
Now we will use the Decision element to determine whether the LeadSource is Web or not.
- On Flow Designer, click on the +icon and select the Decision element.
- Enter a name in the Label field; the API Name will auto-populate.
- Under Outcome Details, enter the Label the API Name will auto-populate.
- Condition Requirements to Execute Outcome: All Conditions Are Met (AND)
- Row 1:
- Resource: {!$Record.LeadSource}
- Operator: Equals
- Value: Web
- Add Condition
- Row 2
- Resource: {!forB_IsNew}
- Operator: Equals
- Value: {!$GlobalConstant.True}
- Row 1:
- When to Execute Outcome: If the condition requirements are met.
- Click Done.

Step 2.4: Adding a Get Record Element to Find the Cadence Based on Its Name
The next step is to find the Cadence ID we created in Step #1. Follow up on interested prospects using the Get Record element.
- On Flow Designer, below the Created node, click on the +icon and select the Get Records element.
- Enter a name in the Label field; the API Name will auto-populate.
- Select the Record ActionCadence object from the dropdown list.
- Select All Conditions Are Met (AND).
- Set Filter Conditions
- Row 1:
- Field: Name
- Operator: Equals
- Value: Follow Up on Interested Prospects
- Row 1:
- How Many Records to Store:
- select Only the first record
- How to Store Record Data:
- Choose the option to Automatically store all fields.
- Click the X at the top to save your changes.


Step 2.5: Using Decision Element to Check Whether the Cadence Has Been Found or Not
Now, we will use the Decision element to check the Get element from step 2.4 to determine if it returns the cadence.
- On Flow Designer, click on the +icon and select the Decision element.
- Enter a name in the Label field; the API Name will auto-populate.
- Under Outcome Details, enter the Label the API Name will auto-populate.
- Condition Requirements to Execute Outcome: All Conditions Are Met (AND)
- Row 1:
- Resource: {!Get_Cadence}
- Operator: Is Null
- Value: {!$GlobalConstant.False}
- Click Done.

- Row 1:

Step 2.6: Adding Assign Target to Cadence Core Action – to Assign Cadence to the Lead.
- On Flow Designer, below the Yes node, click on the +icon and select the Action element.
- Select the Assign Target to Cadence core action.
- Enter a name in the Label field- the API Name will auto-populate.
- Set Input Values:
- Cadence Name or Id: {!Get_Cadence.Id}
- Target Id: {!$Record.Id}
- User Id: {!$Record.OwnerId}
- Cadence Name or Id: {!Get_Cadence.Id}
- Click Done.


In the end, Benjamin’s Flow will look like the following screenshot:Once everything looks good, perform the steps below:

- Click Save.
- Enter Flow Label the API Name will auto-populate.
- Click Show Advanced.
- API Version for Running the Flow: 59
- Interview Label: Lead After – Save Flow {!$Flow.CurrentDateTime}
- Click Save.

Almost there! Once everything looks good, click the Activate button.
Proof of Concept
From now on, when a lead is created with the leadSource as Web, a Record-triggered Flow will automatically be triggered and will assign the cadence to it. Let’s test it out
- Now create a new lead via the UI

- Navigate to the Sales Engagement component to verify the assigned Cadence.


Formative Assessment:
I want to hear from you!
What is one thing you learned from this post? How do you envision applying this new knowledge in the real world? Feel free to share in the comments below.


One thought on “Automatically Assign New Leads to a Sales Engagement Cadence”