

Last Updated on April 2, 2023 by Rakesh Gupta
Big Idea or Enduring Question:
How do you schedule multiple emails with Salesforce Flow?
Objectives:
In this article, the reader will learn the following:
- How to use Salesforce Flow to send multiple email alerts using Scheduled Paths
- and much more
Business Use case
Pamela Kline is working as a System Administrator at Gurukul on Cloud (GoC). At GoC they are using Salesforce Flow to streamline Sales Processes. Pamela received a requirement – as soon as a Case is closed, do the following tasks:
- Send a follow-up email to the customer 2 days after the Case Closed Date is populated.
- Send a satisfaction survey to the customer 15 days after the Case Closed Date.
Automation Champion Approach (I-do):
Salesforce Flow is one of the most powerful tools provided by Salesforce to implement business requirements declaratively. By using it, one can minimize usage of codes in their Salesforce org. The best part is, you do not have to write test classes for your Flows! Implementation of Salesforce Flow is very easy – you create a Flow, test it, and then use a Change Set to deploy it to Production. To achieve mastery of Salesforce Flow, you have to understand its capabilities – such as, calling an Apex class, etc. Today we will discuss one of Salesforce Flow’s features – Scheduled Paths.

With Scheduled Paths, it is easier to – (1) optimize sales responsiveness; (2) automate follow-up actions on important Cases and Opportunities; and (3) support your business needs – all within a single process!
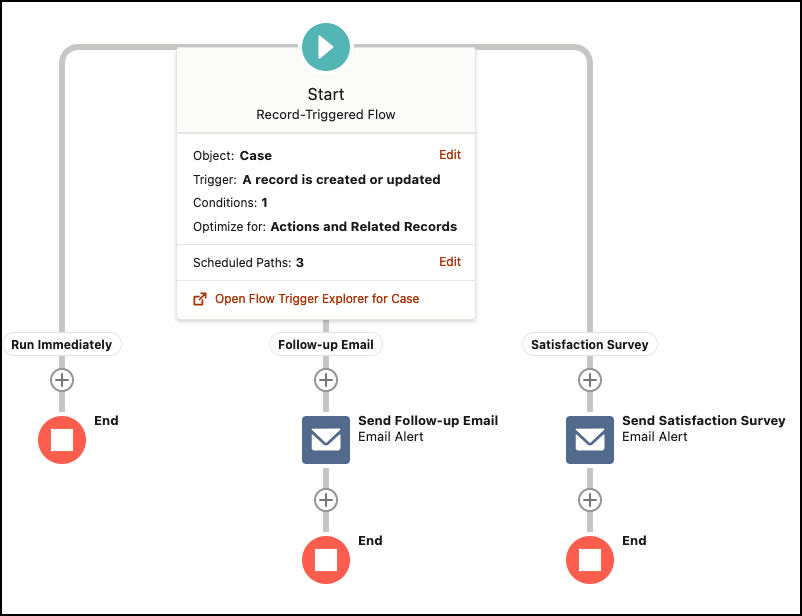
Before discussing the solution, let me show you a diagram of the process at a high level. Please spend a few minutes going through the following Flow diagram to understand it.

It is quite easy to create two processes to solve the above business requirement; however, in this case, we will use one process to incorporate both the requirements!
Let’s begin building the automation process.
Guided Practice (We-do):
There are 5 steps to solve Brenda’s business requirement using After-Save Record-Triggered Flow. We must:
- Create an email template for follow-up email
- Create an email alert for follow-up email
- Create an email template for satisfaction survey email
- Create an email alert for satisfaction survey email
- Salesforce Flow Steps:
- Define flow properties for record-triggered flow
- Add a scheduled path
- Add action – follow-up email alert
- Add action – satisfaction survey email alert
Step 1: Create an Email Template for Follow-up Email
- In the App Launcher, type Email Templates.
- Clicks on the New Email Template button.
- Name the Email Template and,
- Select the Public folder to store it in.
- Select Case for the Related Entity Type.
- Select the Public folder to store it in.
- Add a Subject line and other relevant information for your recipients.
- Click Save.

Step 2: Create an Email Alert for Follow-up Email
- Click Setup.
- In the Quick Find box, type Email Alerts.
- Select Email Alerts, click on the New Email Alert button.
- Name the Email Alert and click the Tab button. The Unique Name will populate.
- For Object select Case.
- For the Email Template choose Follow-up Email.
- For Recipient Type select Email Field: Contact Email.
- Click Save.

Step 3: Create an Email Template for Satisfaction Survey Email
- In the App Launcher, type Email Templates.
- Clicks on the New Email Template button.
- Name the Email Template and,
- Select the Public folder to store it in.
- Select Case for the Related Entity Type.
- Select the Public folder to store it in.
- Add a Subject line and other relevant information for your recipients.
- Click Save.

Step 4: Create an Email Alert for Satisfaction Survey Email
- Click Setup.
- In the Quick Find box, type Email Alerts.
- Select Email Alerts, click on the New Email Alert button.
- Name the Email Alert and click the Tab button. The Unique Name will populate.
- For Object select Case.
- For the Email Template choose Follow-up Email.
- For Recipient Type select Email Field: Contact Email.
- Click Save.

Step 5.1: Define Flow Properties
- Click Setup.
- In the Quick Find box, type Flows.
- Select Flows then click on the New Flow.
- Select the Record-Triggered Flow option, click on Create and configure the flow as follows:
- Object: Case
- Trigger the Flow When: A record is created or Updated
- Set Entry Criteria
- Condition Requirements: All Conditions Are Met (AND)
- Row 1:
- Field: IsClosed
- Operator: Equals
- Value: {!$GlobalConstant.True}
- Field: IsClosed
- Row 1:
- Condition Requirements: All Conditions Are Met (AND)
- When to Run the Flow for Updated Records: Only when a record is updated to meet the condition requirements
- Optimize the Flow For Action and Related Records
- Click Done.

Step 5.2: Salesforce Flow – Add Scheduled Paths
The purpose of using a scheduled path to send email alerts in different days.
- Under Start, select Add Scheduled Paths (Optional).
- Under Scheduled Path Details, enter the Label the API Name will auto-populate.
- Input the following information
- Time Source: Case: Closed Date
- Offset Number: 2
- Offset Options: Days After
- Click the + in the left-side panel to add a second Scheduled Path, and repeat Step 2.
- Enter the Label the API Name will auto-populate.
- Input the following information
- Time Source: Case: Closed Date
- Offset Number: 15
- Offset Options: Days After
- Advanced Options
- Batch Size: 200
- Click Done.

Step 5.3: Add Action – Follow-up Email Alert
The next step is to add follow-up email alert to the Flow. We will use the Action element.
- Under Follow-up Email node, select Action.
- Below Filter By, select Type.
- Select the Email Alert.
- Select the Email Alert – Follow-Up to Customer from the drop-down menu (the email alert which we created in Step #2)
- Label the new action Send Follow-up Email.
- Set Input Values
- {!$Record.Id}
- Click Done.

Step 5.4: Add Action – Satisfaction Survey Email Alert
The next step is to add satisfaction survey email alert to the Flow. We will use the Action element.
- Under Satisfaction Survey node, select Action.
- Below Filter By, select Type.
- Select the Email Alert.
- Select the Email Alert – Satisfaction Survey from the drop-down menu (the email alert which we created in Step #4)
- Label the new action Send Satisfaction Survey.
- Set Input Values
- {!$Record.Id}
- Click Done.

In the end, Pamela’s Flow will look like the following screenshot:
Once everything looks good, perform the steps below:
- Click Save.
- Enter Flow Label the API Name will auto-populate.
- Click Show Advanced.
- API Version for Running the Flow: 57
- Interview Label: Case Close Notifications {!$Flow.CurrentDateTime}
- Click Save.

Almost there! Once everything looks good, click the Activate button.
Proof of Concept
Now onwards, when a support agent closes a case the processes will fire and schedule two actions.
- Navigate to Setup (Gear Icon) | Environments | Monitoring | Time-Based Workflow.
- Click Search.
- Now look for your Scheduled Flow job displaying information as shown in the following screenshot:

- Use the Delete button to delete the time-based Flow job from the queue.

Formative Assessment:
I want to hear from you!
What is one thing you learned from this post? How do you envision applying this new knowledge in the real world? Feel free to share in the comments below.


I don’t see a way to have multiple criteria that contain scheduled actions. For example, I want to one schedule action for a criteria and if that I was to move on to the next criteria and schedule a different action for this criteria. Am I right?
As an alternative, even if I call a different process in the second criteria, I can’ schedule an action in a ‘called’ process. Can I?
I think in such scenario leverage Flow with Process Builder to make life easier.
P.S.:- Read this article to get some understanding with Flow and Time-based action https://automationchampion.com/2018/06/27/getting-started-with-process-builder-part-89-time-based-action-for-anytime-record-is-created-or-edited/
HI Rakesh,
i have small doubt. is it possible Creating recurring time-based actions in workflow or process builder. i want fire the my workflow rule every day. is it possible or not?
Thanks,
Venkat.
Yes it is possible to create a recurring process that fire everyday. To implement it you have to use Workflow Rule and Process Builder both, please refer this article https://automationchampion.com/2014/07/18/auto-follow-and-auto-unfollow-records-based-on-criteria-part1/
Hi Rakesh,
Thanks for your quick reply.
My requirement is i have one object on that one filed is picklist it contains the yes or no values and also another field that is end date. when ever end-date is cross automatically my picklist value change into no. I tried with work-flows but some times it is failed updating picklist value is no.
can you please help me on this, if it is possible.
Thanks,
Venkat
You do not need a recurring process. Here is my suggestion for you
– Create a process that will fire when end-date is greater than today, while updating a record Update pick-list value.