

Last Updated on April 2, 2022 by Rakesh Gupta
Big Idea or Enduring Question:
How do you automatically send an Onboarding email to new users with Salesforce Flow?
Objectives:
This blog post will help us to understand the following
- How to use Salesforce Flow to send out an email alert with attachments to new users
- How to use the email alerts action in Salesforce Flow
- Send email using the Send Email static flow action
Business Use case
Warren Mason is working as a System Administrator at Universal Containers (UC). His organization wants to send out a welcome email with onboarding documents to new users as soon as their accounts get created in Salesforce.
Automation Champion Approach (I-do):
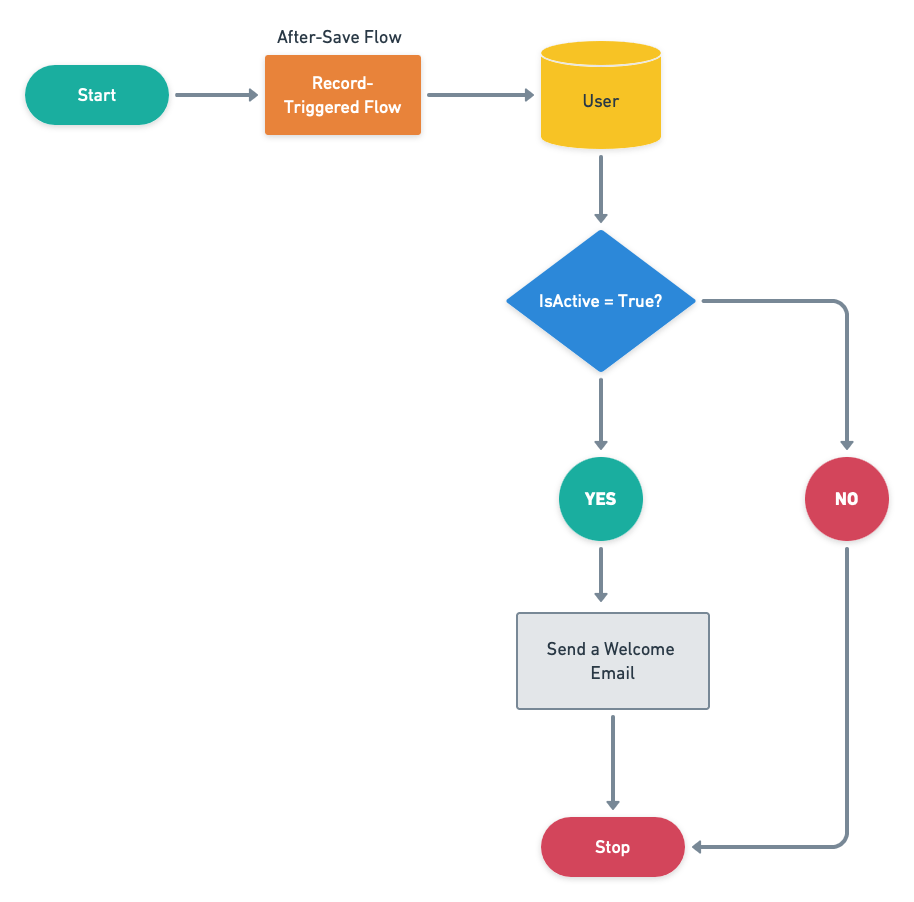
Before discussing the solution, let me show you a diagram of the process at a high level. Please spend a few minutes going through the following Flow diagram to understand it.
Let’s begin building this automation process.
Guided Practice (We-do):
There are 6 steps to solve Warren’s business requirement using Salesforce Flow. We must:
- Create an email template
- Create an email alert
- Define flow properties for record-triggered flow
- Create a formula to determine whether the user record is created or updated
- Add a decision element to check the IsActive field
- Add action – email alerts
Step 1: Create a Welcome Email Template
- Click Setup.
- In the Quick Find box, type Classic Email Templates.
- Clicks on the New button.
- Name the HTML Email Template and make sure to select the Available For Use checkbox.
- Click Next and create a template like the following screenshot:

Step 2: Create an Email Alert
- Click Setup.
- In the Quick Find box, type Email Alerts.
- Select Email Alerts, click on the New Email Alert button.
- Name the Email Alert and click the Tab button. The Unique Name will populate.
- For Object select User.
- For the Email Template choose New Employee Welcome Letter Template.
- For Recipient Type select Email Field: Email.
- Click Save.

Step 3: Salesforce Flow – Define Flow Properties
- Click Setup.
- In the Quick Find box, type Flows.
- Select Flows then click on the New Flow.
- Select the Record-Triggered Flow option and click on Next and configure the flow as follows:
- How do you want to start building: Freeform
- Object: User
- Trigger the Flow When: A record is created or updated
- Set Entry Criteria
- Condition Requirements: None
- Optimize the Flow For: Action and Related Records
- Click Done.
 Tips: Never try to write entry criteria in a Record-Triggered Flow. Why? Check out this article.
Step 4: Salesforce Flow – Formula to Determine Whether the User Record is Created or Updated
- Under Toolbox, select Manager, then click New Resource to determine whether the record is new or old.
- Input the following information:
- Resource Type: Formula
- API Name: forB_IsNew
- Data Type: Boolean
- Formula: IsNew()
- Click Done.

Step 5: Salesforce Flow – Using Decision Element to Check the IsActive Field
Now we will use the Decision element to check the IsActive to ensure that it is equal to True and the record is New.
- Under Toolbox, select Element.
- Drag-and-drop Decision element onto the Flow designer.
- Enter a name in the Label field; the API Name will auto-populate.
- Under Outcome Details, enter the Label the API Name will auto-populate.
- Condition Requirements to Execute Outcome: All Conditions Are Met (AND)
- Row 1:
- Resource: {!forB_IsNew}
- Operator: Equals
- Value: {!$GlobalConstant.True}
- Click Add Condition
- Row 2:
- Resource: {!$Record.IsActive}
- Operator: Equals
- Value: {!$GlobalConstant.True}
- Row 1:

Step 6: Add Action – Email Alerts
The next step is to add an email alert to the Flow. We will use the Action element. To do this drag-and-drop Action element onto the canvas and map the fields according to the details below:
- Under Toolbox, select Elements.
- Drag and drop the Action element onto the Flow designer.
- Below Filter By, select Type.
- Select the Email Alert – Onboard Email from the dropdown menu (the email alert which we created in Step #2)
- Label the new action Send Onboarding Email
- Set Input Values
- {!$Record.Id}
- Click Done.

In the end, Warren’s Flow will look like the following screenshot (I turned on Auto-Layout) for this flow:

Once everything looks good, perform the steps below:
- Click Save.
- Enter Flow Label the API Name will auto-populate.
- Click Show Advanced.
- API Version for Running the Flow: 54
- Interview Label: Record-Trigger: Send Welcome Email to New User {!$Flow.CurrentDateTime}
- Click Save.

Almost there! Once everything looks good, click the Activate.
Proof of Concept
Now onwards, if a system administrator creates a new user, the Salesforce Flow will automatically trigger and send the Onboarding Email to new users.
- To test this out, create a new user via the UI.

- Once the user is created, the flow will automatically send a welcome email to them, as shown in the following screenshot:


Independent Practice (You-do):
Automatically send an email to users, when a user account gets deactivated.
Formative Assessment:
I want to hear from you!
What is one thing you learned from this post? How do you envision applying this new knowledge in the real world?
Let me know by Tweeting me at @automationchamp, or find me on LinkedIn.


How did the forB_IsNewgives the boolean True or False. We didn’t provide any parameter in isNew() function. On what basis it returns the value ?
Does it automatically picks the record that is triggering the flow ?
I’m using the outside of the ISNEW() formula.
IsNEW checks if the formula is running during the creation of a new record and returns TRUE if it is. If an existing record is being updated, this function returns FALSE. You can read more about it here: https://help.salesforce.com/s/articleView?id=sf.customize_functions_isnew.htm&type=5
Thanks Rakesh. Why are you using on ‘create and update’? This is for new users only. But I get that ISNEW() would handle this. What type use case can you imagine where ‘on update’ of a user record would be necessary?
To manage only one Flow (per type) per object
How do we get the Target_User field. Its the new user being created right? We dont have Target_User
It is syntax for workflow triggered emails
Workflow Target User Fields—Use these merge fields only in email templates for workflow rules on the User object. Merge fields named {!Target_User.field_name} return values from the user record that was created or updated to trigger the workflow rule.
The target user is defined from the standpoint that this is the User object, and the Id ($Record.Id) of the automation targets the user new user that you’re building (ie, creating a new $Record.Id). Hope it helps.
When defining when my process starts I have the following options
1. A record changes
2. A platform event occurs
3. It’s invoked by by another process
I don’t have the option of : When a record is created.
Is there something I’m doing wrong?
Hello again Rakesh,
I found the solution.
http://docs.releasenotes.salesforce.com/en-us/summer14/release-notes/rn_forcecom_process_workflow_user_merge_fields.htm
I’m glad you were able to sort it out! 😊
Hi Rakesh,
First of all, great blog with lots of advice.
I told you that I followed the instructions to implement a welcome mail. Step by step, however when I preview the template mail fields such as username, name, surname, etc. Always appear with my data although I advise you to do it with another.
I did another test,
I put the rule into operation and create a new user. Then the welcome mail arrived but also my data (username, name, surname, etc) appear.
In the template I am using the fields of the object “user”
In process builder I am using the object “user”
What could be happening?
Greetings and thanks for the help
i am also getting the same error message ..
My Sure that you have used (!Target_User.FirstName}, as mentioned in the email template.
Hi Rakesh, I have just automated a process using PB. I have created an email alert for all the Object Owners when the end date is before 90 days and 30 days. I dont have any immediate actions. My criteria is to fire if the name of the record is TRUE. I have tested in 2 SB which was succesfull. Well it is partially successful in the Prod as well. After activating the PB i have updated the records to meet the new criteria. Surprisingly, The users recieved emails immediately. But there are no immediate actions and the time triggers are for 90 days and 30 days. Please help ?
Lets take an example :- If a workflow rule has a time trigger set for a time in the past, Salesforce queues the associated time-dependent actions to start executing within one hour. I mean to say, if a workflow rule on opportunities is configured to update a field 7 days before the close date, and you create an opportunity record with the close date set to today, Salesforce starts to process the field update within an hour after you create the opportunity.