

Last Updated on February 10, 2022 by Rakesh Gupta
Big Idea or Enduring Question:
How can we develop declarative functionality to add or remove followers from a record?
In Salesforce, a user can follow Chatter groups or Records. Salesforce provides out-of-the-box functionality so that Chatter group managers can also add/remove people from the group. To manage a record’s followers/subscribers, Salesforce does not have any pre-built functionality to add or remove a follower/subscriber from object records.
Objectives:
After reading this article, you will be able to:
- Use Flow to manually add or remove users as subscribers from a record
- Understand the component visibility option to create a highly dynamic screen
- Learn how to use a Decision element to find whether a Record variable or a Record collection variable, contains a record
- And, last but not the least, discover how to add a Flow to Lightning Record Page and display it to a set of users
Business Use Case
Elise Shelley, a Lead System Administrator at Universal Containers (UC) receives a requirement from his management, they want to develop an application for the user with the role of Direct Sales Director so that they can use it to add or remove followers/subscribers to Account records.
Automation Champion Approach (I-do):
First of all, I want to say thanks to Andrew Johnson for sharing his idea (7 years ago) and flow (Add follower to record), which he shared in the success community. In this blog, we will use Salesforce Flow to solve the above business requirement. My main aim is to show the various ways to use Salesforce Flow in your organization.
While this can be solved using various automation tools like Apex, etc, we will use Screen Flow.
Before proceeding ahead, you have to understand the EntitySubscription object. The object represents a user‘s subscription – whether the user follows a record or other users. A user can subscribe to a record or to another user.
| Field Name | Details |
| SubscriberId | The Id of the User who is following the record or user. |
| ParentId | The Id of the record or user which the user is following. |
Before discussing the solution, let me show you a diagram of a Process Flow at a high level. Please spend a few minutes to go through the following Flow diagram and understand it.  Let’s begin building this automation process.
Guided Practice (We-do):
There are 3 steps to solve Elise’s business requirement using Screen Flow. We must:
- Salesforce Flow Steps: Define flow properties
- Create a text variable to store account Id
- Add a screen to capture the user’s input
- Add a radio buttons to show two options
- Add Follower
- Remove Follower
- Add a lookup component to display all Users
- Add component visibility to show lookup component for add follower option (from step 1.2.1.1)
- Add a picklist component to display the account followers
- Add component visibility to show picklist component for remove follower option (from step 1.2.1.1)
- Add a radio buttons to show two options
- Add a Decision element to check if a user has been selected to add or remove a follower
- Add a Get Records element to find the account subscriber detail
- Add a Decision element to check if the record variable (from step 1.4) is null or not
- Add a Create Records element to add a user to account follower
- Add a Delete Records element to remove a follower from the account
- Create a Quick action to launch the flow
- Add quick action to the lightning account record page and add filter criteria
Step 1: Salesforce Flow – Define Flow Properties
- Click Setup.
- In the Quick Find box, type Flows.
- Select Flows then click on the New Flow.
- Select the Screen Flow option and click on Next and configure the flow as follows:
- How do you want to start building: Freeform
- It will open the flow designer for you.
Step 1.1: Salesforce Flow – Add a Text Variable to Store Account Id
- Under Toolbox, select Manager, then click New Resource to store the current account record Id
- Input the following information:
- Resource Type: Variable
- API Name: recordId
- Data Type: Text
- Default Value: {!$GlobalConstant.EmptyString}
- Check Available for Input
- Check Available for Output
- Click Done.


Step 1.2: Salesforce Flow – Add a Screen Element
- Under Toolbox, select Elements. Drag and drop Screen onto the canvas.
- Input the following information:
- Enter Label the API Name will auto-populate.
- Click Done.

Step 1.2.1: Salesforce Flow – Add a Radio Buttons Component to Capture the User Selection for Add Follower vs Remove Follower
- Under Input section on Screen Element. Drag and drop the Radio Buttons component onto the screen.
- Input the following information:
- Enter a name in the Label field; the API Name will auto-populate.
- Data Type: Text
- Under Select Choices
- Choice 1: Add Follower
- Click + New Resource, it will open a pop-up for you
- Resource Type: Choice
- API Name: AddFollower
- Choice Label: Add Follower
- Data Type: Text
- Choice Value: Add Follower
- Click Done.

- Add Choice
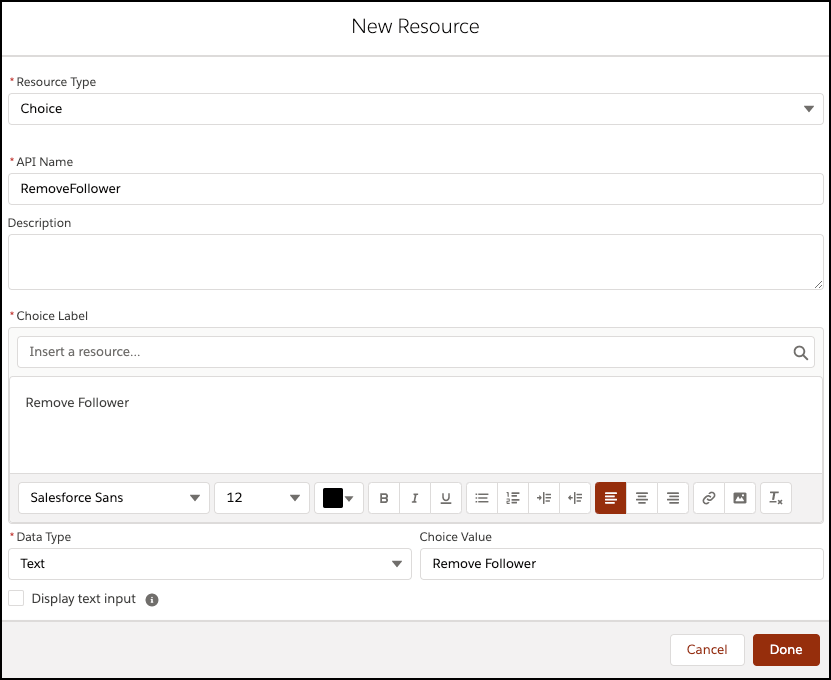
- Choice 2: Remove Follower
- Click + New Resource, it will open a pop-up for you
- Resource Type: Choice
- API Name: RemoveFollower
- Choice Label: Remove Follower
- Data Type: Text
- Choice Value: Remove Follower
- Click Done.

- Choice 1: Add Follower
- Click Done.


Step 1.2.2: Salesforce Flow – Add a Lookup Component to Display All Users
It’s time to add a Lookup Component to capture the user whom they want to make a follower of the record. For this, we will use the lookup component.
- Under Input section on Screen Element. Drag and drop Lookup onto the screen.
- Input the following information:
- Enter API Name.
- Field API Name: CreatedById (Enter the field API Name that will show up in the list box to represent a record.)
- Label: Select a Follower (Enter a label that appears next to the lookup control)
- Object API Name: Account ( Enter the object API name)
- Required: {!$GlobalConstant.True}
- Click Done.

Step 1.2.2.1: Salesforce Flow – Add Component Visibility to Conditionally Display Select User Lookup Component
You can control when screen components appear with conditional visibility. In the current scenario, we want to display the Select User lookup component only when the user has selected the Add Follower option.
- Under the Lookup Component expand the Set Component Visibility section.
- Now we will define the conditions for when the lookup component is visible.
- When to Display Component: Custom condition Logic Is Met
- The next step is to define the filter logic if you entered multiple conditions.
- Resource: Screen Component >> {!Select_Option}
- Operator: Equals
- Value: CHOICES >> {!$AddFollower}
- Click Done
- Click Done.
Check out this article Dynamic Flow Screen – What is Not to Love? to learn more about component visibility.

Step 1.2.3: Salesforce Flow – Add a Picklist Component to Display the Account Followers
- Under Input section on Screen Element. Drag and drop the Picklist component onto the screen.
- Input the following information:
- Enter a name in the Label field; the API Name will auto-populate.
- Under Select Choices
- Click + New Resource, it will open a pop-up for you
- Resource Type: Record Choice Set
- API Name: AccountFollowers
- Object: Entity Subscription
- Filter Entity Subscription Records
- Row 1:
- Field: ParentId
- Operator: Equals
- Value: {!recordId}
- Row 1:
- Configure Each Choice
- Choice Label: SubscriberId
- Data Type: Text
- Choice Value: Id
- Click Done
- Click Done.
Step 1.2.3.1: Salesforce Flow – Add Component Visibility to Conditionally Display Select Follower Picklist
You can control when screen components appear with conditional visibility. In the current scenario, we want to display the Select Follower Picklist component only when the user has selected the Remove Follower option.
- Under the Picklist Component expand the Set Component Visibility section.
- Now we will define the conditions for when the lookup component is visible.
- When to Display Component: Custom condition Logic Is Met
- The next step is to define the filter logic if you entered multiple conditions.
- Resource: Screen Component >> {!Select_Option}
- Operator: Equals
- Value: CHOICES >> {!$RemoveFollower}
- Click Done
- Click Done.

Step 1.3: Salesforce Flow – Using Decision Element to Check if a User has been Selected to Add Follower or Remove Follower Option
Now we will use the Decision element to check if the user who is using the Flow has been selected to add follower vs remove follower option. This will help us to branch out our logic for Add vs remove section.
- Under Toolbox, select Element.
- Drag-and-drop Decision element onto the Flow designer.
- Enter a name in the Label field; the API Name will auto-populate.
- Under Outcome Details, enter the Label (Add Follower) the API Name will auto-populate.
- Condition Requirements to Execute Outcome: All Conditions Are Met (AND)
- Row 1:
- Resource: {!Select_Option}
- Operator: Equals
- Value: {!AddFollower}
- Row 1:
- Under Outcome Details, click on the +
- Enter the Label (Remove Follower) the API Name will auto-populate.
- Condition Requirements to Execute Outcome: All Conditions Are Met (AND)
- Row 1:
- Resource: {!Select_Option}
- Operator: Equals
- Value: {!RemoveFollower}
- Row 1:
- Click Done.

Step 1.4: Salesforce Flow – Adding a Get Record Element to Find the Selected User Subscriber Details for Current Account
The next step is to use the EntitySubscription object to check whether the selected user is already following the current account or not.
- Under Toolbox, select Element.
- Drag-and-drop Get Records element onto the Flow designer.
- Enter a name in the Label field; the API Name will auto-populate.
- Select the Entity Subscription object from the dropdown list.
- Select All Conditions Are Met (AND).
- Set Filter Conditions
- Row 1:
- Id: SubscriberId
- Operator: Equals
- Value: {!Select_User.recordId}
- Row 1:
- How Many Records to Store:
- select Only the first record
- How to Store Record Data:
- Choose the option to Automatically store all fields.
- Click Done.

Step 1.5: Salesforce Flow – Using Decision Element to Check the Record Variable (from step 1.4)
Now we will use the Decision element to check the Record Variable from step 1.4 to find if it returns the record or not.
- Under Toolbox, select Element.
- Drag-and-drop Decision element onto the Flow designer.
- Enter a name in the Label field; the API Name will auto-populate.
- Under Outcome Details, enter the Label the API Name will auto-populate.
- Condition Requirements to Execute Outcome: All Conditions Are Met (AND)
- Row 1:
- Resource: {!Find_Subscriber}
- Operator: Is Null
- Value: {!$GlobalConstant.False}
- Row 1:
- Click Done.

Step 1.6: Salesforce Flow – Create Records – Add a Follower to Account
The next step is to create a new follower to account. For this will use the Create Records element.
- Under Toolbox, select Elements. Drag and drop Create Records onto the canvas.
- Input the following information:
- Enter Label the API Name will auto-populate.
- How Many Records to Create: One
- How to Set the Record Fields: Use separate resources, and literal values
- Object: EntitySubscription
- Set Field Values for the Entity Subscription
- Row 1:
- Field: ParentId
- Value: {!recordId}
- Add Field
- Row 2
- Field: SubscriberId
- Value: {!Select_User.recordId}
- Row 1:
- Click Done.

Step 1.7: Salesforce Flow – Add a Delete Records Element to Remove a Follower From the Account
- Drag-and-drop Delete Records element onto the Flow designer.
- Enter a name in the Label field; the API Name will auto-populate.
- For How to Find Records to Delete select Specify conditions.
- Select the Entity Subscription object from the dropdown list.
- Select All Conditions Are Met (AND).
- Set Filter Conditions
- Row 1:
- Field: Id
- Operator: Equals
- Value: {!Select_Follower}
- Row 1:
- Click Done.

In the end, Elise’s Flow will look like the following screenshot (I turned on Auto-Layout) for this flow:

Once everything looks good, perform the steps below:
- Click Save.
- Enter Flow Label the API Name will auto-populate.
- Click Show Advanced.
- How to Run the Flow: System Context Without Sharing-Access All Data
- Type: Screen Flow
- API Version for Running the Flow: 51
- Interview Label: Add or Remove Record Followers {!$Flow.CurrentDateTime}
- Click Save.

Almost there! Once everything looks good, click the Activate button.
Step 2: Create a Quick Action – Add/Remove Follower
The next step is to create a quick action Add/Remove Follower) on the Account object to call the Flow. Salesforce will automatically pass the value to recordId variable.
- Click Setup.
- In the Object Manager, type Account.
- Select Buttons, Links, and Action, then click New Action.
- Input the following information:
- Select Flow as Action Type.
- Select Add or Remove Record Followers as Flow.
- Enter Label (Add/Remove Follower) the Name will auto-populate.
- Click Save.

Step 3: Add Quick Action to Account Lightning Record Page and Add Filter Criteria
The next step is to distribute a flow to Lightning Experience or Salesforce app users, by embedding it in the Account Lightning record page.
- Click Setup.
- In the Object Manager, type Account.
- Select Lightning Record Pages, click on the Label to open the page.
- Click on the Edit button to open a Lightning page in the Lightning App Builder.
- Make sure to enable the Dynamic Action for Account.
- From the Highlights Panel
- Click Add Action
- In the Actions modal, choose an action i.e. Add/Remove Follower, as shown in the following screenshot:

- Set Filter Conditions
- Click + Add Filter
- Row 1:
- Field: Record > Account Owner > Role > Developer Name
- Operator: Equal
- Value: DirectorDirectSales

- Click Done.
- Once everything looks good, click the Save button.


Proof of Concept
Now Onwards, a user with the role of Direct Sales Director can use this application to add remove followers from the account record.
- To add a follower to the record, navigate to the Accounts tab and click on any Account Name to open its detail page
- Click on the Add/Remove Follower button and perform the steps, as shown in the video:

- The subscriber will be added as a Follower, and you will be redirected to the Account detail page.

Formative Assessment:
I want to hear from you!
What did you learn from this post, is it relevant to you, and how will you modify the concepts taught in the post for your own business processes?
Make a post and tag me on Twitter @automationchamp using #AutomationChampionFlow.


Does it work with Child Accounts too?
Remove Follower is not working
Hi Amit, Did you find a way to show the user name rather than the user Id in the “Remove Follower” step?
Can this be done for Mass Follow?
Yes, please read this article.
Great flow Rakesh!
Do note that it will not allow the active user to follow the record via the flow, only via the dedicated standard button on the record.
Also, looking for a way to show the User’s Full Name in the “Remove Followers” Choice Set instead of the ID.
Any help greatly appreicated.
Thanks!
Thanks, Amit! The button is designed for the Sales Manager or Sales Director so that they can add followers to Account records.
Hi Rakesh, I configured above flow for adding Followers. But my scenario is – There are multiple person having same name but different Profile. So on screen 2 along with User Name I also want to display users profile beside name. Plz suggest How to do it?
The easiest way – create a formula field in Salesforce, then use it as a display field.
Hey..
I was trying the adding follower option but getting error while creating records i.e. on step-4.
RECORD CREATE: Auto_Add_Follower_To_Record
Create one EntitySubscription record where:
ParentId = {!AccountID} (null)
SubscriberId = {!AddFollowerIDNew} (0056F000006DOkGQAW)
Result
Failed to create record.
I’m unable to figure out why AccountID/ParentId is coming out as NULL..
Please guide me for the same,
Make sure to pass record Id (In your case account Id)