

Last Updated on February 10, 2022 by Rakesh Gupta
Big Idea or Enduring Question:
If you do wonder then, know that you are not alone!

I often receive such requests either via email, as a comment on my website or, through Social Media.
So, let us get started and tackle the challenge by creating a business use case.
A few releases ago Salesforce introduced a new screen input component known as – File Upload. The component allows users to upload files – simple!
For example, you can build a Flow that allows your sales rep to create an Opportunity and then attach a Pre-sales Evaluation file through the Flow. You can check my previous article Enhance Productivity by Uploading Files Directly from a Flow! to learn more about how to use the File Upload component. Mostly, we put the File Upload component on a separate screen as it requires a Related Record ID (The Id of the record to associate the files with. If no value is passed, the component is disabled). In this article, I will discuss some common challenges you might face regularly via the following use case.
Objectives:
After reading this blog, you’ll be able to:
- Create a screen with few screen components
- Create a screen with a File component that allows users to upload multiple files
- Associate the files with the newly created record
Business Use Case
Automation Champion Approach (I-do):
There are a few possible solutions for the above business scenario. However, our purpose, in this blog, is to learn Flow and its advanced/new features. Therefore, we will use Flow and the Upload File Component to solve the above business requirement.
Maybe you too are wondering just like Sergio – Why does the above solution look so complex?! So, Sergio asked Rakesh – can’t we use something like this?: 
Unfortunately, the answer is NO. Sorry to disappoint you, Sergio, lamented Rakesh.
Did I disappoint you too? Oh, sorry again.
Are you still wondering why Sergio’s solution will not work? Well, let me cut the chase and explain to you why Sergio’s solution will not work.
Sergio’s process flow works in the following order:
- On the first step (screen element) users enter all the details and upload the files.
- Once users click on the Next button, the Flow will do two things:
- Insert Files into Content Document. This is so because the record Id (Lead Id) is not yet available. And therefore, the Flow will not be able to associate the files with the lead record.
- As a result, the Flow will not be able to pass the data to Insert Lead (Create Record Component)
- In the next step, it will create a Lead.
- Stop
I hope by now you understand why Rakesh is taking a little longer route in his solution. Before proceeding ahead, understand the functionality of a ContentDocumentLink (It represents a link between a Salesforce CRM Content document or Salesforce file and where it’s shared) object in Salesforce.
| Field Name | Details |
| ContentDocumentId | The ID of the document. |
| LinkedEntityId | The ID of the linked object. Can include Chatter Users, Groups, records (any object that supports Chatter feed tracking including custom objects), and Salesforce CRM Content libraries. |
| ShareType | The permission granted to the user of the shared file in a library. |
Let’s begin building this automation process.
Guided Practice (We-do):
There are 7 steps to solve Sergio’s business requirement using Salesforce Flow. First an overview:
- Create a variable to store content document IDs
- Create a screen that will allow users to enter Lead details and upload file(s)
- Add a create records element to insert Lead
- Add a loop element to extract records from collection variable (Content Document IDs)
- Add an assignment element to assign the values into the Content Document Link record variable
- Add an assignment element to adding content Document Link record variable to a record collection variable (Content Document Link)
- Add a create records element to insert data from the record collection variable (Content Document Link)
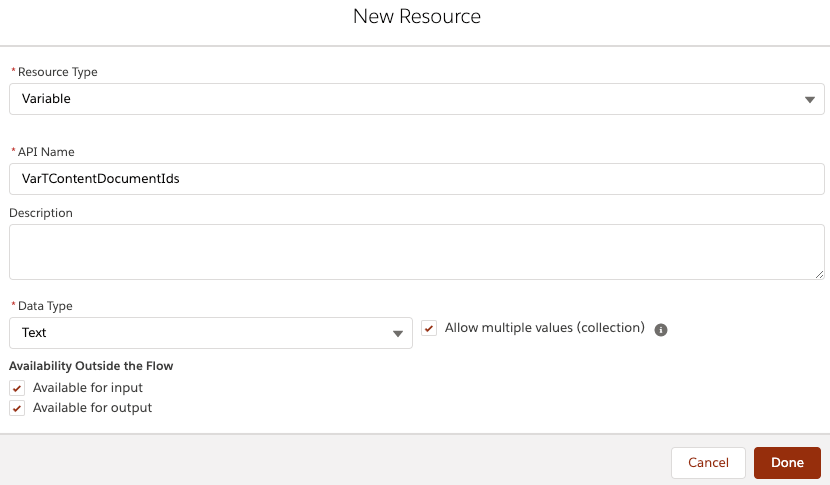
Step 1: Create a Variable to Store Content Document IDs
- Click Setup.
- In the Quick Find box, type Flows.
- Select Flows then click on the New Flow.
- Select the Screen Flow option and click on Create.
- Clicks on the Manager tab then click on the New Resource.
- Resource Type: Variable
- API Name: VarTContentDocumentIds
- Data type: Text
- Allow multiple values (collection): Yes
- Availability Outside the Flow
- Available for input
- Available for output
- Click Done.

Step 2: Adding Screen Component
- Drag-and-drop Screen element onto the Flow designer.
- Enter the Label (Lead Form) the API Name will auto-populate.
- On the Screen element, navigate to the Input section and double-click on the Name field to add it to the Screen element
- Enter the Label (Name) the API Name will auto-populate.
- On the Screen element, navigate to the Input section and double-click on the Text field to add it to the Screen element
- Enter the Label (Company) the API Name will auto-populate.
- On the Screen element, navigate to the Input section and double-click on the File Upload component to add it to the Screen element
- Enter the Label (Visiting Card) the API Name will auto-populate.
- Select Manually assign variables (advanced): Store Output Values to Select Variables
- Content Document IDs: {!VarTContentDocumentIds}
- Click Done.

Step 3: Salesforce Flow – Adding a Create Records Element to Create a Lead
- Drag-and-drop the Create Records element onto the Flow designer.
- Enter a name in the Label (Create a Lead) field; the API Name will auto-populate.
- For How Many Records to Create – select One.
- For How to Set the Record Fields – select Use separate resources, and literal values.
- Select the Lead object from the dropdown list.
- Set Field Values for the Lead
- Row 1:
- Field: Company
- Value: {!Company}
- Click Add Row
- Row 2:
- Field: LastName
- Value: {!Name.lastName}
- Click Add Row
- Row 3:
- Field: FirstName
- Value: {!Name.firstName}
- Row 1:
- Click Done.

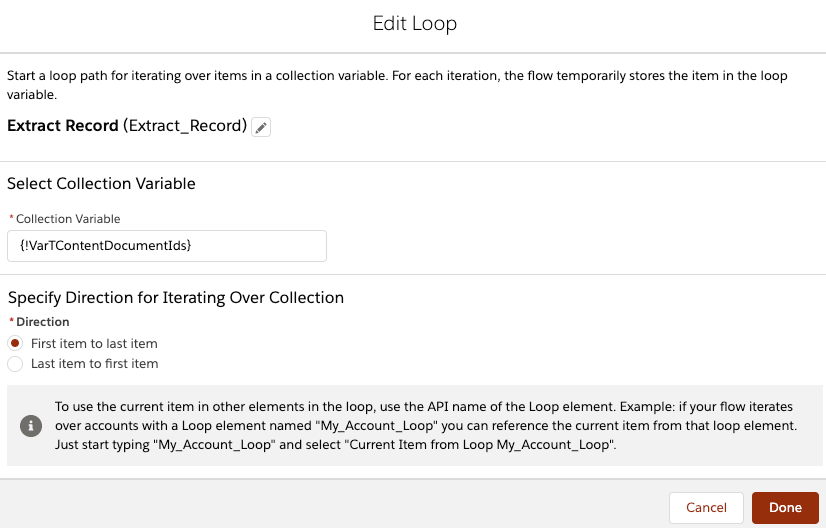
Step 4: Salesforce Flow – Add a Loop Element to Retrieve Records from Collection Variable
- Drag-and-drop the Loop element onto the Flow designer.
- Enter a name in the Label (Extract Record) field – the API Name will auto-populate.
- For Collection Variable select {!VarTContentDocumentIds}.
- For Specify Direction for Iterating Over Collection select the option First item to last item.
- Click Done.

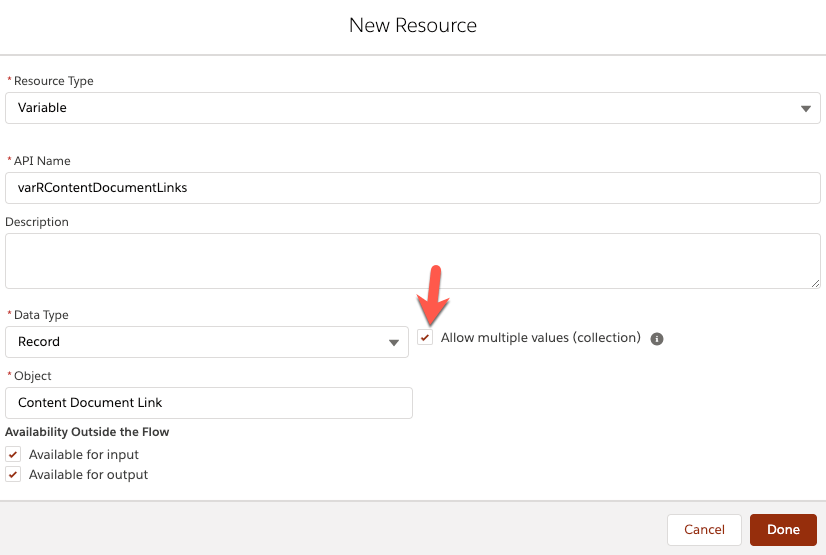
Step 5: Salesforce Flow – Adding an Assignment Element to Assign the Values into a Record Variable
- Create a Record Variable varRContentDocumentLink type Content Document Link to link the File with the lead record.

- Drag-and-drop the Assignment element onto the Flow designer.
- Enter a name in the Label (Link File and Lead Record) field – the API Name will auto-populate.
- Set Variable Values
- Row 1:
- Field: {!varRContentDocumentLink.ContentDocumentId}
- Operator: Equals
- Value: {!Extract_Record}
- Add Assignment
- Row 2:
- Field: {!varRContentDocumentLink.LinkedEntityId}
- Operator: Equals
- Value: {!Create_a_Lead}
- Row 1:
- Click Done.


Step 6: Salesforce Flow – Adding an Assignment Element to Add the Record Variable to Record Collection Variable
- Create a Record Collection Variable varRContentDocumentLinks type Content Document Link to store record variable (created in step 5.1) for the bulk process.

- Drag-and-drop the Assignment element onto the Flow designer.
- Enter a name in the Label (Add Records into a Collection) field – the API Name will auto-populate.
- Set Variable Values
- Row 1:
- Field: {!varRContentDocumentLinks}
- Operator: Add
- Value: {!varRContentDocumentLink}
- Row 1:
- Click Done.


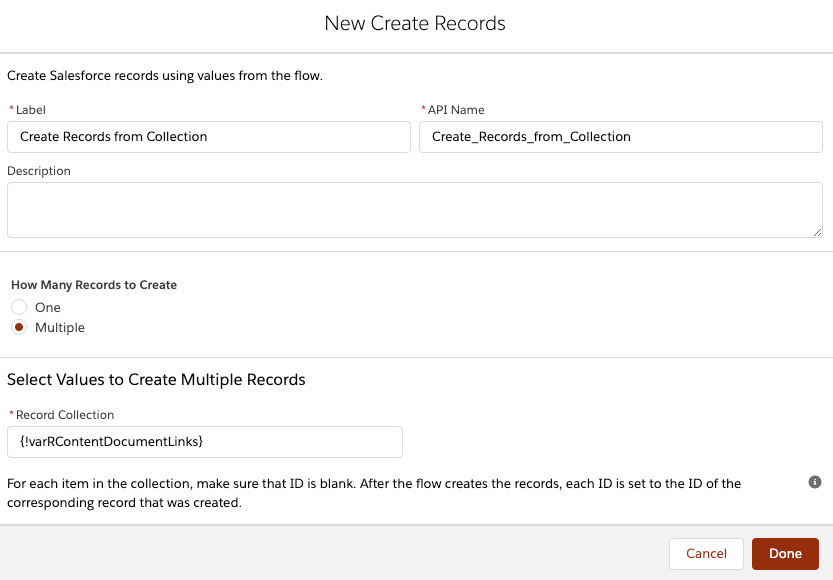
Step 7: Salesforce Flow – Adding a Create Records Element to Associate Files and Lead Record
- Drag-and-drop the Create Records element onto the Flow designer.
- Enter a name in the Label (Create Records from Collection) field- the API Name will auto-populate.
- For How Many Records to Create select Multiple.
- Map Record Collection: {!varRContentDocumentLinks}
- Click Done.

In the end, Sergio’s Flow will look like the following screenshot:

Whew! I know, the journey was a bit long! But, despair not, we are almost there!
Almost there! Once you’re done, Save the flow.
Do not forget to activate the Flow by clicking on the Activate button.
Note:- Before you activate your process, you will want to make sure that you have assigned data in the correct format. This is because Salesforce Flow obeys validation rules. If some fields are required by validation rules then, make sure you add those fields. Conversely, if some fields are required on the page layout, you can ignore those fields.
It’s time to test this feature
Next time, when a Sales rep creates leads using the above flow – they will not have to move screen by screen. Instead, the sales rep can enter all the details – including files – into a single screen. what a great way to boost users’ productivity.
If you have any problem with watching the video then, please click on it and open it in another tab.
Formative Assessment:
I want to hear from you!
What is one thing you learned from this post? How do you envision applying this new knowledge in the real world?
Let me know by Tweeting me at @automationchamp, or find me on LinkedIn.
Proofreader: - Munira Majmundar


Hi –
The flow seems to run fine in Debugger but when I send actual records, nothing happens. I am using a variation of your code, using email-to-case for certain Case Origins I want the attachment added to an existing record’s files. It doesn’t create the files, I even tried updating the ContentDocumentLink just to change the LinkedEntityID, I don’t need the files to stay on the case. Nothing happens but the debugger indicates it is working. Any suggestions?
{!NewContentDoc.ContentDocumentId} Equals {!Content_Doc_Links.ContentDocumentId}
{!NewContentDoc.LinkedEntityId} Equals {!ExpenseRecordID.Id}
Result
{!NewContentDoc.LinkedEntityId} = “a0UUT00000Cl3A12AJ”
{!NewContentDoc.ContentDocumentId} = “069UT00000CE6l2YAD”
{!NewContentDoc_Collection} Add {!NewContentDoc}
Result
{!NewContentDoc_Collection} = “[ContentDocumentLink (No ID),ContentDocumentLink (No ID)]”
End Loop.
Create ContentDocumentLink records using the values that are stored in {!NewContentDoc_Collection}.
Variable Values
[ContentDocumentId=069UT00000CE6l1YAD,LinkedEntityId=a0UUT00000Cl3A12AJ]
[ContentDocumentId=069UT00000CE6l2YAD,LinkedEntityId=a0UUT00000Cl3A12AJ]
Result
All records are ready to be created when the next screen, pause, or local action is executed or when the interview finishes.
I start debug the flow. Why am i required to fill the field before the screenflow. I leave it blank and the flow error out. Could you please help?
Input Variables
Enter values for the flow’s input variables. For each value left blank, the flow starts with the variable’s default value. You can’t enter values for collection variables or Apex-defined variables.
varRContentDocumentLink
Hello can ypu help me with this issue:
Componente Lightning: FacturaArchivo
Componente de pantalla: forceContent:fileUpload
Entradas:
label = (Archivo)
Salidas:
contentDocIds = VarTContentDocumentIds ([null])
Botón de navegación seleccionado: SIGUIENTE
CREAR REGISTROS: Crear Factura
Crear un registro Factura__c donde:
Email__c = {!emailalmacenado} ()
Emitido_a__c = {!ListaEmitidoa} (GENETHIC SERVICES 🧬)
FOLIO_FISCAL__c = {!Folio_fiscal} (0AB000CF-0000-000A-00CF-0000FD0000A3)
Factura_Estatus__c = Nuevo
RecordTypeId = {!Iddetipoderegistro} (012Rd000000XuEj)
Resultado
Un registro está listo para crearse cuando se ejecute la siguiente pantalla, pausa o acción local o cuando finalice la entrevista.
a4zRd0000004UtxIAE
BUCLE: Extraer registro
Bucle de paso: []
Iteración: 0
Elemento de iteración actual: null
ASIGNACIÓN: rchivo de enlace y registro de cliente potencial
{!varRContentDocumentLink.ContentDocumentId} Es igual a {!Extraer_registro}
{!varRContentDocumentLink.LinkedEntityId} Es igual a {!Crear_Factura}
Resultado
{!varRContentDocumentLink.LinkedEntityId} = “a4zRd0000004UtxIAE”
{!varRContentDocumentLink.ContentDocumentId} = “null”
ASIGNACIÓN: Agregar registros a una colección
{!varRContentDocumentLinks} Agregar {!varRContentDocumentLink}
Resultado
{!varRContentDocumentLinks} = “[ContentDocumentLink (Sin Id.)]”
BUCLE: Extraer registro
Finalizar bucle.
CREAR REGISTROS: Crear registros de la colección
Crear registros ContentDocumentLink empleando los valores que están almacenados en {!varRContentDocumentLinks}.
Valores de variable
[ContentDocumentId=null,LinkedEntityId=a4zRd0000004UtxIAE]
Resultado
Fallo al crear los registros.
Se produjo un error: Este error se produjo cuando el flujo intentó crear registros: INVALID_CROSS_REFERENCE_KEY: invalid cross reference id. Puede buscar los valores de ExceptionCode en la Guía del desarrollador de la API de SOAP.
INVALID_CROSS_REFERENCE_KEY means: The value of the lookup field is referencing an invalid id.
Please check mapping of varRContentDocumentLinks
Hi!
Did you know a way to show the files uploaded in the same screen? This component is fault because didn’t show the files and pass a feeling of something wrong.
If you know a way, please tell me
There isn’t a built-in component for displaying the file preview. You’ll need to develop a custom LWC to present the file preview.
Hi Rakesh, It’s Nice Explanation and good solution.
In this solution you created on lead record with attachment, But i want to create Multiple leads in one click, May be in that screen i need ADD button and another lead with attachment
Is that possible ? .
If Possible , please give me basic idea
Yes, it is possible, with few lines of LWC code.
Hi Rakesh, It’s Nice Explanation and good solution.
In this solution you created on lead record with attachment, But i want to create Multiple leads in one click, May be in that screen i need ADD button and another lead with attachment
Is that possible ? .
Yes, it is possible.
Is it allowed if we upload files one after another, without attaching multiple documents at a time in File upload standard component.
if we can upload files one after another, can u tell me the way how it’ll work
It will take the last one.
Similar to the above issue with SF Admin, using customer community plus license type get an INSUFFICIENT_ACCESS_ON_CROSS_REFERENCE_ENTITY: insufficient access rights on cross-reference id: xxxxx. Works fine as admin etc, but not sure what access the community plus user needs in addition as they have read,create,edit access on the linked record?
After uploading the file through ‘Custom Community User,’ it seems the like user lost access to it. There are a few ways to solve it:
1. Run your Flow in System mode, if it is not possible
2. Then store the contentDocumentIds into a field on Lead then use record-triggered flow
3. Split the screen flow into two screens, one to create a record, the second for uploading the file (and use related record Id, in the file component)
Thanks Rakesh, this is awesome, very clear instruction. I followed the step by step and got it working for an authenticated site. However it doesn’t work for a public site.
After the case was created. Below was what I have. Any idea why ?
***********************************************************************************************************************
LOOP: Extract File Records
Loop Through: []
Iteration: 0
Current iteration item: null
ASSIGNMENT: Link File and Case Record
{!vaRContentDocumentLink.ContentDocumentId} Equals {!Extract_File_Records}
{!vaRContentDocumentLink.LinkedEntityId} Equals {!Create_Case_Record}
Result
{!vaRContentDocumentLink.ContentDocumentId} = “null”
{!vaRContentDocumentLink.LinkedEntityId} = “XXXXXXXXx”
ASSIGNMENT: Add Records into a Collection
{!vaRContentDocumentLinks} Add {!vaRContentDocumentLink}
Result
{!vaRContentDocumentLinks} = “[ContentDocumentLink (No ID)]”
LOOP: Extract File Records
End Loop.
CREATE RECORDS: Create Records from Collection
Create ContentDocumentLink records using the values that are stored in {!vaRContentDocumentLinks}.
Variable Values
[ContentDocumentId=null,LinkedEntityId=XXXXXXXXx]
Result
Failed to create records.
Seems like Guest User doesn’t have access to create ContentDocumentLinks.
I got this issue when try to insert a record with Attachment files.
An error has occurred: This error occurred when the flow tried to create records: INSUFFICIENT_ACCESS_ON_CROSS_REFERENCE_ENTITY: You do not have the level of access necessary to perform the operation you requested. Please contact the owner of the record or your administrator if access is necessary.. You can look up ExceptionCode values in the
Check out this article to understand what is insufficient access rights on cross-reference id and how to fix it.
Hi,
Thanks for quick reply.
Yep, They are of same data Type (record)
Hi
Thank you putting it together.
I’m also i am getting this issue:
ASSIGNMENT: Add record to Collection
{!varContentDocumentLinks} Add {!varContentDocumentLink}
Error
The data type of the resource you entered isn’t compatible.
Note : vaRContentDocumentLink is a Record(Single) Variable and !varContentDocumentLinks is a Record Collection Varaiable
the second assignment isn’t working, how to resolve this ?
Ta!
Make sure that the data type of both variables are matching.
Hi
Thanks for this it has assisted me in getting the process to function.
However, it does work when I attempt to debug in flow builder but once embedded in a site VF page, the file upload process fails to complete work. It does allow for the file to be selected, but the modal page doesn’t come up showing the progress of the load. All the other parts of the process (a custom create case process) does work.
I suspect it is a Guest Permission issue but as the selection of the file to upload does function, I am not entirely sure.
Your thoughts?
Andrew, please send me the error log.
Hi. you are referring to the Debug logs?
The issue I have is that I can’t access this site on work computer and I am not able to send files outside of network.
It does create the case, but the file isn’t loaded. This is when the flow is initiated via a VF page as a GUEST. My understanding is that there is an issue with GUESTS not being able to upload files due to permission changes by Salesforce and limited or no access to Document object.
While the option to upload does appear and I can select the file to upload, it doesn’t give the progress box showing the file is being uploaded.
Is there something I should look for in the logs to indicate issue with file upload?
Hey
how are you
thanks for collaborate this information. it is really helps
i have an issue with public site to do with process. it should work also internally ?
also i am getting that issue:
ASSIGNMENT: Add record to Collection
{!varContentDocumentLinks} Add {!varContentDocumentLink}
Result
{!varContentDocumentLinks} = “[ContentDocumentLink (No ID)]”
the second assignment isn’t working
any reason why ?
thanks
It worked. The sharing was with all users. The issue was I was using “debug” feature, wherein the file was getting uploaded under “Admin” user (even though I selected “Log in as another user”).
Once I deployed to the portal it worked as you have done above.
Thanks for the elaborate explanation.
I am facing issues while doing the above with community users.
Error: Create Records from Collection “INSUFFICIENT_ACCESS_ON_CROSS_REFERENCE_ENTITY: insufficient access rights on cross-reference id. You can look up ExceptionCode values in the”
Reason: After we upload the document it gets auto created under “Content Document”.
When we try to add the linkedEntityId in “Create Records from Collection” , SF does not allow us update.
Note: The object sharing settings is public read write.
What is the user license type? Also, check the file share type. Can you share the complete error message with me?