

Last Updated on April 15, 2019 by Rakesh Gupta
Lighting Experience is one of the best user interfaces designed by Salesforce. It is faster, quicker and easier to maintain. If you are still using Salesforce Classic user interface, Spring’18 release will give you hundreds of reasons to switch to Lighting Experience. Some of the key features, that are now available in Lightning, include – Personalized Navigation, Boost Productivity with Quick Text and Macros, Faster Flow for Adding Campaign Members, Track Campaigns with Path, Opportunity Split, Price Book Selection, Zero Quantity Order Lines Allowed on Order Products, Chat Faster with Quick Text in Lightning Experience, Upload Files Directly from a Flow, etc.
Currently, Spring’18 release is available under the pre-release program. On the 5th and 6th of January, Sandboxes will be upgraded; as a result, your organization will get the look and feel of Spring’18 release.
If you have not read the entire 437 pages of Salesforce Spring’18 release notes, check out Spring’18 release quick summary written by me.
I combed through the release notes and highlighted the most exciting, interesting, and useful Lightning Experience features. Believe me, it was hard to stop at just ten! To kick things off, here is my take on the coolest Lightning features from Spring’18 release.
1) Create Pinned Region Pages for Your Console Apps:- A pinned region remains displayed as you navigate to subtabs in a Lightning console app. Three new page templates are available for Lightning console apps to make it easier for console users to work with records.

Pinned region templates are available only for record pages. To create a pinned region page, look for these templates in the Lightning App Builder.
- Console: Pinned Header
- Console: Pinned Header and Left Sidebar
- Console: Pinned Left Sidebar

When working in the Lightning App Builder, you add components to pinned regions the same way by dragging what you want to the page. A pin icon indicates that a region can be pinned.
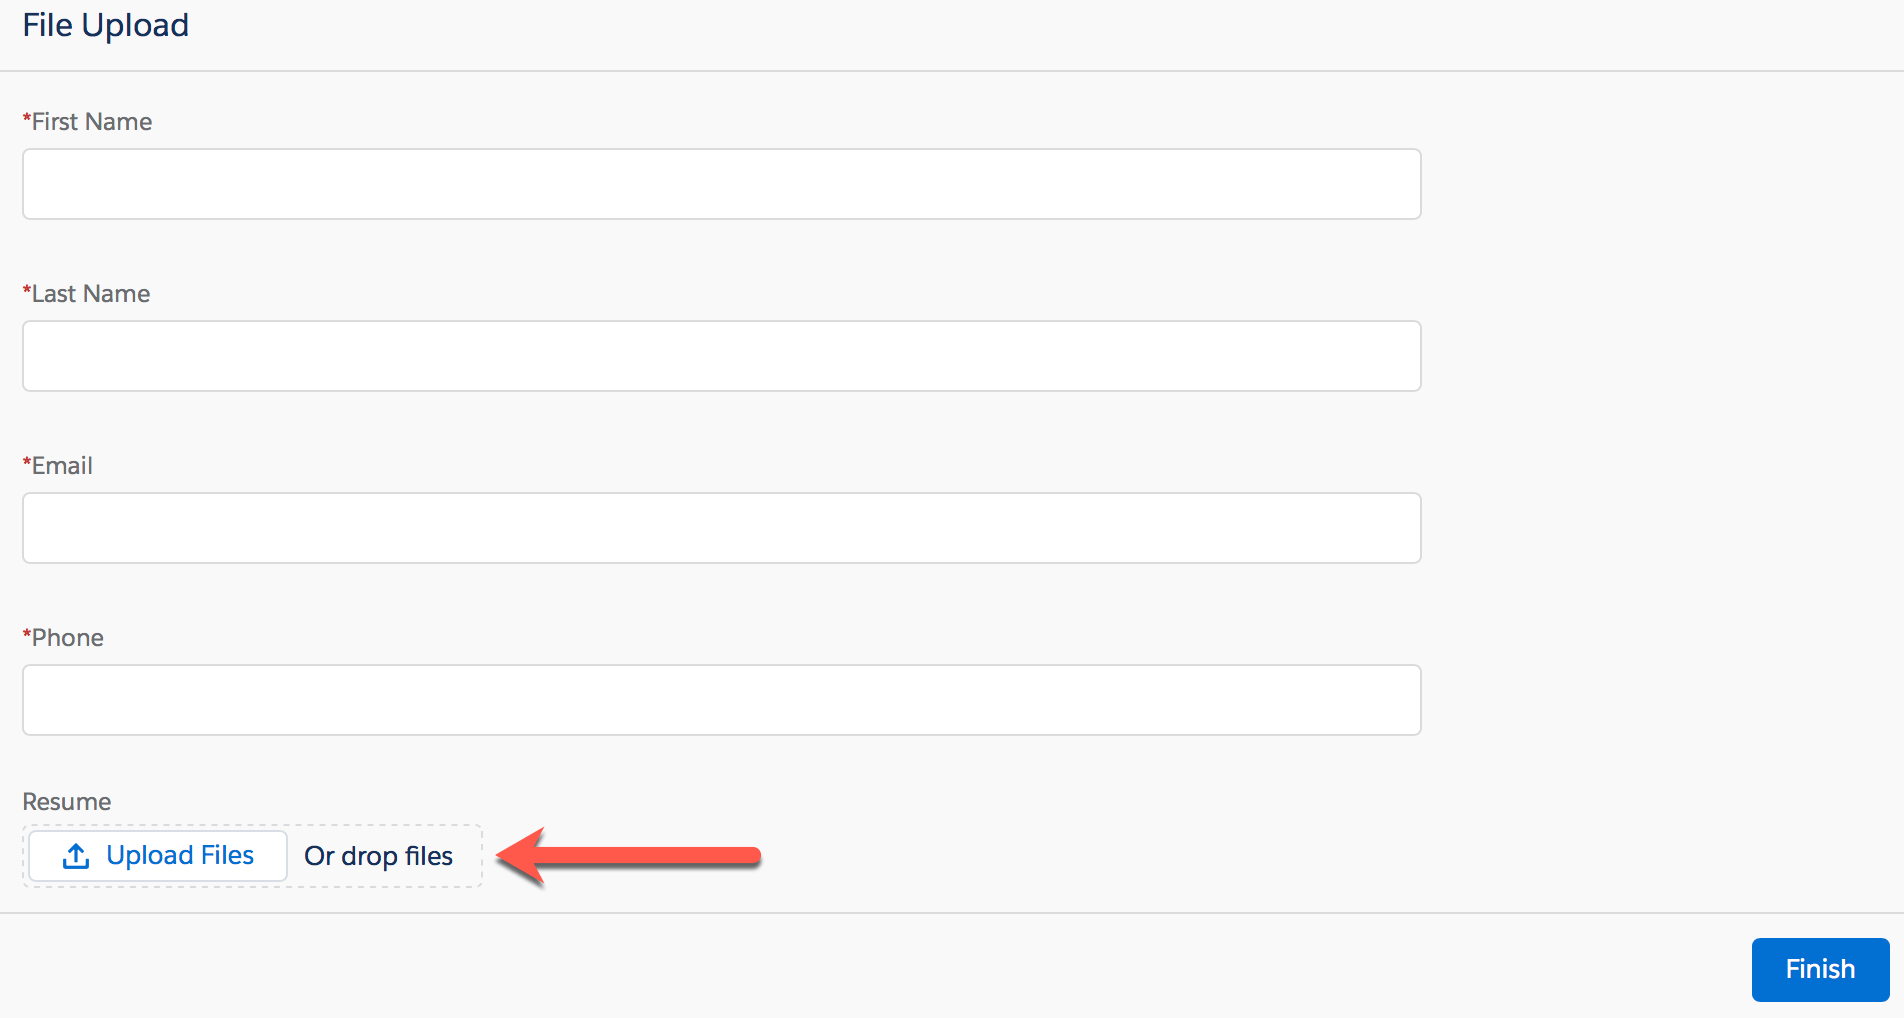
2) Upload Files Directly from a Flow:- You can upload files from a flow by adding the forceContent:fileUpload Lightning component to a flow screen.This change applies to Lightning Experience and Salesforce mobile web. However, it only works for the Lightning flow runtime.
3) Organize Lightning Page into Collapsible Sections: – Manage screen clutter by grouping components into collapsible sections. The new Accordion component is like the Tabs component, but vertically stacked. You can use the Accordion component on all record pages. This feature is new in Lightning Experience.

You can have up to 25 sections, but we recommend no more than 10. You can also embed multiple components in each section, each with its own heading.
4) Make Your Lightning App and Home Pages Dynamic: – Setting visibility conditions for components isn’t limited to record pages anymore. Now you can set visibility rules on the Lightning app and Home pages too.

App and Home pages are not associated with an object, so the filters you can use are limited to other contexts, such as User or Client. But that does not mean that they are less powerful. For instance, with a filter using you can display one component to users those belongs to India, etc.
5) Include Related Fields and Other Objects in Component Visibility Rules: – Before Spring’18 release, you could only define component visibility rules on Lightning record pages based on the fields directly on the record. Now you can create filters that are much more robust.

For example, on record pages, you can select fields from the record by clicking Record Field. Or click Advanced to expand your field selections to related fields, related objects, or fields from other objects such as Client and User.
6) Add Knowledge to Your App with the Knowledge Setup Flow:- The Lightning Knowledge Service Setup flow now adds Knowledge to the item menu in the Service Console app. If you have already enabled Lightning Knowledge, you can add Knowledge to the item menu using the App Manager in Setup.

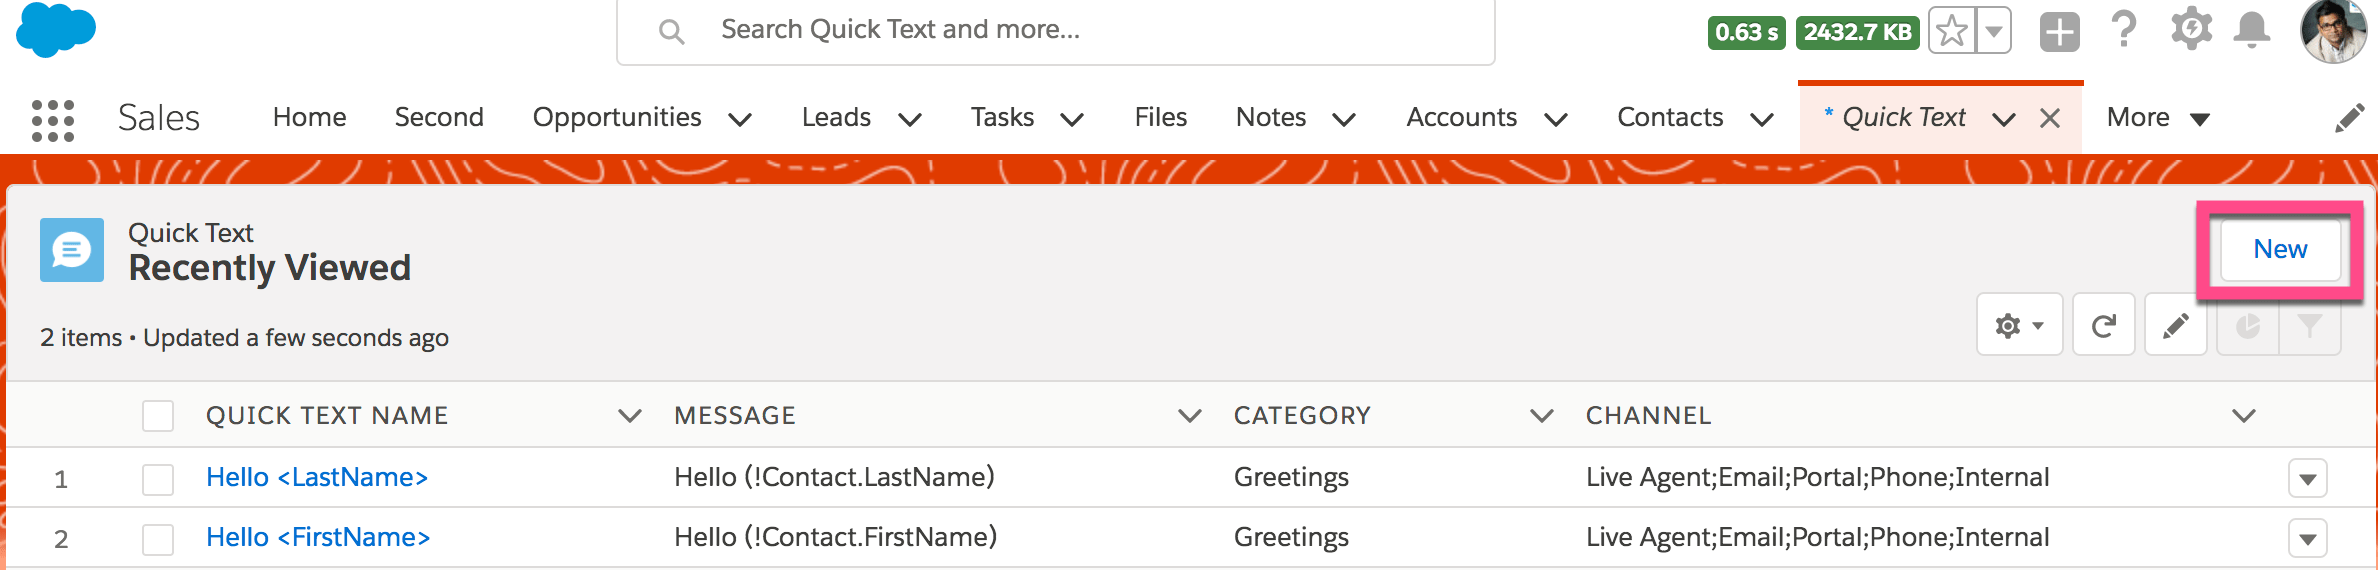
7) Increase Your Efficiency with Quick Text: – Why type the same message multiple times when you can insert predefined messages, like greetings, notes, and answers to common questions. You can use quick text on all standard and custom objects in the following supported quick actions: Email, Log a Call, Social, and Live Agent chats. Previously, Quick Text was available only in Salesforce Classic. Quick Text is enabled by default in Lightning Experience.
8) Mass Quick Actions in Lightning Experience: – You can now perform mass quick actions on up to 200 items in a list view for Cases, Leads, and custom objects. Not only is this a huge time saver for you, but you will love this because keeping clean data just got much easier.
- From a list view, agents can create or update multiple records to perform daily functions such as updating case comments or updating case status.
- Mass quick actions is available only in Lightning experience for standard and console navigation Apps.
- To enable your agents to use mass quick actions, go to the Search Layout for the appropriate object and edit the List View Search Layout.
For example, you have created a quick action Updated Lead on the Lead object, as shown in the following screenshot:

Now while using the list view you can now choose the above quick action to bulk update the lead records:

9) Reply and Forward Email: – You can now forward emails in the Case Feed! In addition, the Reply, Reply All, and Forward buttons are available in the Case Feed, Email Message record home, and Case Email Related List.

10) Filter Across Objects with Cross Filters:- Include or exclude records in your report results based on related objects and their fields. This feature is new in Lightning Experience.

To see which accounts have escalated cases, add a cross filter. Set the cross filter to show accounts with cases that have status equals escalated.
Additional enhancements worth noting!
1. Favorite a Report and Dashboard Folder to Find it Fast: – Got some report and dashboard folders you want to remember and return to later? You can now mark them as favorites in the same way you would for other Salesforce objects. This feature is new in Lightning Experience.

When you favorite a folder, it’s added as a global favorite, and also added to the All Favorites list in the Reports or Dashboards menu.
2. Keep Track of Events with Community Calendars: – Access Salesforce calendars from your Lightning community, and share your calendar with others. Use the new Calendar component to view your events and other users’ calendars directly from your community on your desktop or mobile device. You can set up a calendar to show details in the side panel or hide it by default. You can also share your My Events calendars with other team members and add their calendars to your view.

What are your favorite Spring’18 release note gems?


4 thoughts on “Top 10 Lightning Experience Gems of Salesforce Spring’18 Release!”