

Last Updated on February 26, 2023 by Rakesh Gupta
Big Idea or Enduring Question:
- When using the lookup Component, allow your users to select more than one record.
This blog is a sequel to my previous blog – What? Use Lookup Field into a Flow Screen Element?!!. In the previous blog, I discussed how to configure the lookup component for screen flow.
This article goes a step ahead and explains how to configure the Lookup flow screen component so that users can search and select more than one record.

Objectives:
After reading this blog, you’ll be able to:
- Create a Screen Flow and add a Screen element to it.
- Add a lookup component to your screen element
- Set the maximum selections for the lookup element
- Update multiple records using In operator
- And much more
Business Use case
Edward Backhouse is working as a System Administrator at Gurukul on Cloud (GoC). He has received the following requirement from the management:
- Add a screen flow on the home page that allows users to select multiple opportunities
- In the end, update the owner for selected opportunities to the logged-In users.

Automation Champion Approach (I-do):
After the Winter’23 release, users can search and select more than one record with the Lookup flow screen component. As a flow configurator, you can specify a selection maximum and one or more default records.
Before we proceed further, let us understand the characteristics of the Lookup component.
| Attribute | Description |
|---|---|
| API Name | An API name can include underscores and alphanumeric characters without spaces. It must begin with a letter and can’t end with an underscore. It also can’t have two consecutive underscores. |
| Field API Name | The API name of a lookup field on the source object. |
| Label | User-friendly text that displays to the left of the component. |
| Object API Name | The API name of the source object. |
| Maximum Selections | The maximum number of records that the user can select. The default value is 1. |
| Record Id | Initially, if Maximum Selections is 1 or Maximum Selections is greater than 1 and the Record ID Collection field is null, the record ID selected by default for the lookup.
When a user runs the flow, the value changes to the flow user’s selection. |
| Record Id Collection | Initially, if Maximum Selections is greater than 1, the default record IDs for the lookup.
If Maximum Selections is greater than 1 and the Record ID field is null, the first value is the record IDs selected by default for the lookup. You can specify any number of record IDs up to the Maximum Selections value. When a user runs the flow, the value changes to the flow user’s selections. |
| Require | Requires users to enter a value before they can move to the next screen. |
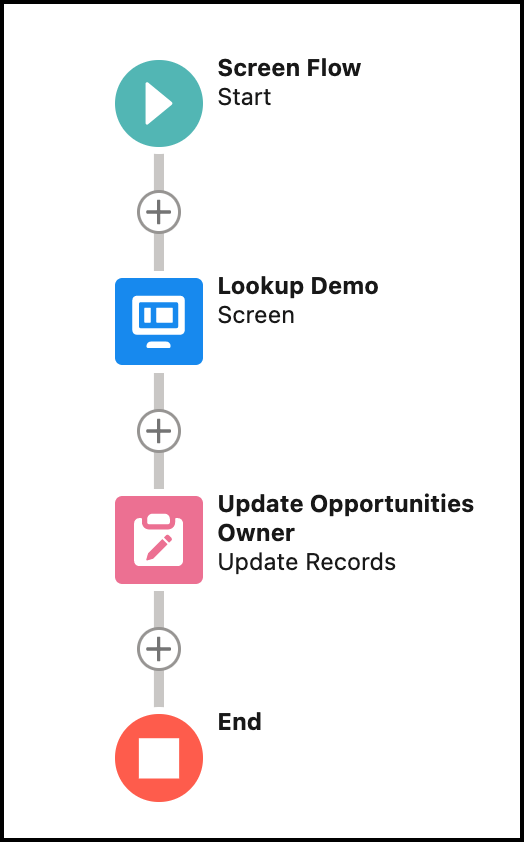
Before discussing the solution, let me show you a diagram of a Process Flow at a high level. Please spend a few minutes going through the following Flow diagram and understand it.

Let’s begin building this automation process.
Guided Practice (We-do):
There are 4 steps to solve Edward’s business requirement using Screen Flow. We must:
- Define flow properties for screen flow
- Add a Screen element
- Add a Lookup Component that allows users to select multiple opportunity records.
- Add an Update Records element to update the opportunities owner
- Add a screen flow to the lightning home page
Step 1: Define Flow Properties
- Click Setup.
- In the Quick Find box, type Flows.
- Select Flows, then click on the New Flow.
- Select the Screen Flow option and click on Create and configure the flow.
- It will open the flow designer for you.
Step 2: Add a Screen Element
- On Flow Designer, click on the +icon and select the Screen element.
- Input the following information:
- Enter Label the API Name will auto-populate.
- Click Done.

Step 2.1: Add a Lookup Component that Allow Users to Select Multiple Opportunity Records
- Under Input section on Screen Element. Drag and drop Lookup onto the screen.
- Input the following information:
- Enter API Name.
- Field API Name: OpportunityId
- Label: Select Opportunities (Enter a label that appears next to the lookup control)
- Object API Name: Quote ( Enter the object API name)
- Maximum Selection: 10
- Required: {!$GlobalConstant.True}
- Click Done.

Step 3: Add Action – Update Records
The next step is to update the selected opportunities owner. We will use the Update Records element.
- On Flow Designer, click on the +icon and select the Update Records element.
- Enter a name in the Label field; the API Name will auto-populate.
- For How to Find Records to Update and Set Their Values select Specify conditions to identify records, and set fields individually
- Object: Opportunity
- Select All Conditions Are Met (AND).
- Set Filter Conditions
- Row 1:
- Field: Id
- Operator: In
- Value: {!SelectOpportunities.recordIds}
- Click Add Condition
- Row 2:
- Field: OwnerId
- Operator: Does Not Equal
- Value: {!$User.Id}
- Row 1:
- Set Field Values for the Opportunity Records
- Row 1:
- Field: OwnerId
- Value: {!$User.Id}
- Field: OwnerId
- Row 1:
- Click Done.

In the end, Edward’s Flow will look like the following screenshot:
Once everything looks good, perform the steps below:
- Click Save.
- Enter the Flow Label the API Name will auto-populate.
- Click Show Advanced.
- API Version for Running the Flow: 56
- Interview Label: Select Multiple Records – Lookup Example {!$Flow.CurrentDateTime}
- Click Save.

Almost there! Once everything looks good, click the Activate button.
Step 4: Add a Screen Flow to the Lightning Home Page
The next step is to distribute a flow to Lightning Experience or Salesforce app users by embedding it on a Lightning home page.

Proof of Concept
Formative Assessment:
I want to hear from you!
What is one thing you learned from this post? How do you envision applying this new knowledge in the real world? Feel free to share in the comments below.


Selecting multiple records does not seem to work on the mobile app. Is there a Salesforce standard solution for this?
Can you please share few screenshots?
How would you modify this if you wanted to create records instead of update them?
Here are my high-level solutions for your business use case:
1️⃣ Use a Loop through {!SelectOpportunities.recordIds}
2️⃣ Populate fields using a Record Variable.
3️⃣ Add the Record Variable to a Collection Variable.
4️⃣ Finally, insert the records using Record Create.
Hi, great article, thanks. Question; I want to limit the number of records that a user can choose from, similar to how a lookup filter would work. But flow (1) shows me recent items (which I don’t want in my use case) and (2) the lookup filter that I applied on the source field doesn’t work in the flow. Any thoughts?
The lookup component doesn’t support such features. I just found that Salesforce is bringing another component, “Choice lookup (Beta),” which will support filtered list.
My bad. Another option is to hold community user data in a temporary table/object and later create another flow on that object to insert the user. You can also use the Apex approach here if you don’t want to create an unnecessary object.