

Last Updated on October 18, 2022 by Rakesh Gupta
Big Idea or Enduring Question:
- How to limit the number of concurrent sessions for a user?
Objectives:
After reading this blog, you’ll be able to:
- Understand concurrent sessions and how to identify them using Flow
- Limit the Number of Concurrent Sessions with Login Flows
- Use LoginFlow_ForceLogout variable
- Work with Get Records, Delete Records, Assignment, and Screen Elements
- And much more
Business Use case
Rachel Gillett is working as a Junior Developer at Gurukul on Cloud (GoC). She has received the following requirement from the management:
- Enforce the number of concurrent sessions per user to one.
- Provide an ability to kill their previous session and start a new session when login-In.
 👉 Demo
Automation Champion Approach (I-do):
User Concurrent sessions refer to the number of interactive, UI-based sessions an individual user can have open and active per user account. Users may create multiple user sessions as they log in to an account from different browser types and devices.
To enhance the security of the overall Salesforce org, an administrator can implement a Login Flow or use the Transaction Security Policy (Requires Salesforce Shield or Salesforce Event Monitoring add-on subscriptions) to limit the number of concurrent sessions for a user.
There are a few possible solutions for the above business scenario. We will use Screen Flow and Login Flow to solve the requirement.
Before we proceed further, let us understand the characteristics of an AuthSession object – It represents an individual user session in your organization.
| Field Name | Details |
| UserId | This user’s Salesforce user ID. |
| ParentId | The 18-character ID for the parent session, if one exists (for example, if the current session is for a canvas app). If the current session doesn’t have a parent, this value is the current session’s ID. |
| SessionType | The type of session. Common ones are UI, Content, API, and Visualforce. |
| UserType | The kind of user for this session. Types include Standard, Partner, Customer Portal Manager, High Volume Portal, and CSN Only. |
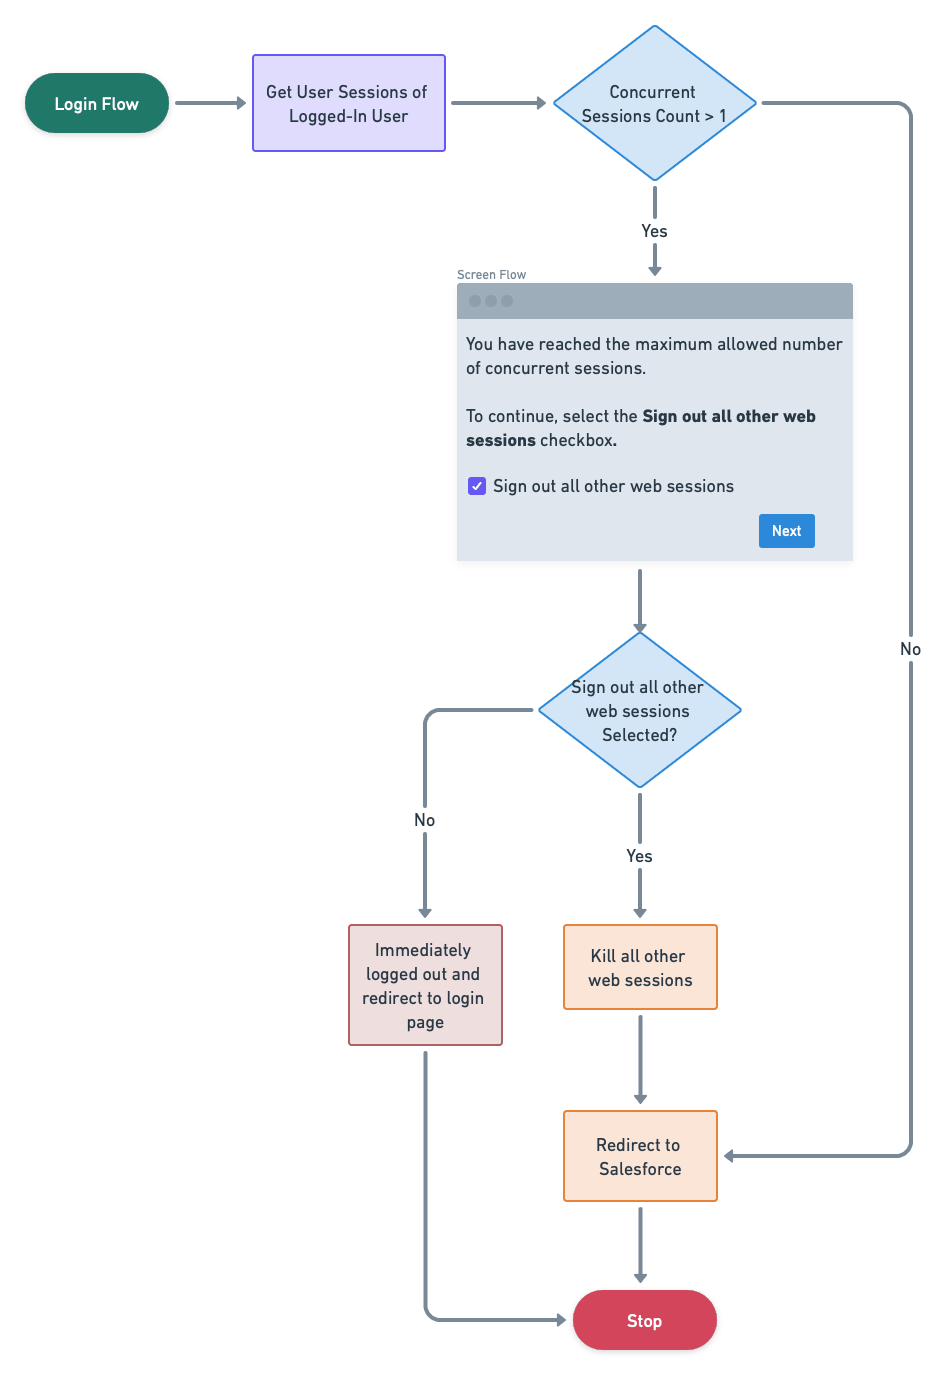
Before discussing the solution, let me show you a diagram of a Process Flow at a high level. Please spend a few minutes going through the following Flow diagram and understanding it.
 Let’s begin building this automation process.
Guided Practice (We-do):
There are 7 steps to solve Rachel’s business requirement using Screen Flow and Login Flow. We must:
- Define flow properties for screen flow
- Add a Get Records element to find the logged-in user’s sessions
- Add an Assignment element to get the count of logged-in user’s sessions
- Add a Decision element to check whether the count is greater than 1 or not
- Add a Screen element to display the message and the option to kill other sessions
- Add a Decision element to check if the user wants to kill other sessions
- If the option is selected:
- Add a Get Records element to find the logged-in user’s current session
- Add a Delete Records element to kill other sessions
- If the option NOT is selected:
- Add an Assignment element to force logout user
- If the option is selected:
- Configure Login Flow for Salesforce Platform licensed users
👉 Consider using custom metadata types to make the number of current sessions configurable.
Step 1: Define Flow Properties
- Click Setup.
- In the Quick Find box, type Flows.
- Select Flows, then click on the New Flow.
- Select the Screen Flow option and click on Create and configure the flow.
- It will open the flow designer for you.
Step 2: Adding a Get Record Element to Find the Logged-In User’s Sessions
The next step is using the AuthSession object to find the logged-in user’s sessions.
- On Flow Designer, click on the +icon and select the Get Records element.
- Enter a name in the Label field; the API Name will auto-populate.
- Select the Auth Session object from the dropdown list.
- Select All Conditions Are Met (AND).
- Set Filter Conditions
- Row 1:
- Field: UserId
- Operator: Equals
- Value: {!$User.Id}
- Click Add Condition
- Row 2:
- Field: ParentId
- Operator: Is Null
- Value: {!$GlobalConstant.True}
- Click Add Condition
- Row 3:
- Field: SessionType
- Operator: Does Not Equal
- Value: TempUIFrontdoor
- Click Add Condition
- Row 4:
- Field: SessionType
- Operator: Does Not Equal
- Value: InternalServiceCall
- Row 1:
- How Many Records to Store:
- Select All record
- How to Store Record Data:
- Choose the option to Automatically store all fields.
- Click Done.

Step 3: Adding an Assignment Element to Find the Count of Logged-In User’s Session
The next step is to get the logged-in user’s session count. For this, we will use an Assignment element.
- Create a Number Variable varN_SessionCount to store the count.

- On Flow Designer, click on the +icon and select the Assignment element.
- Enter a name in the Label field; the API Name will auto-populate.
- Set Variable Values
- Row 1:
- Field: {!varN_SessionCount}
- Operator: Equals
- Value: {!Get_Sessions}
- Row 1:
- Click Done.


Step 4: Add Decision Element to Check Whether the Session Count is Greater than 1 or Not
Now we will use the Decision element to check the number variable from step 3 to find if the count is greater than 1 or not.
- On Flow Designer, click on the +icon and select the Decision element.
- Enter a name in the Label field; the API Name will auto-populate.
- Under Outcome Details, enter the Label the API Name will auto-populate.
- Condition Requirements to Execute Outcome: All Conditions Are Met (AND)
- Row 1:
- Resource: {!varN_SessionCount}
- Operator: Greater Than
- Value: 1
- Row 1:
- Click Done.

Step 5: Add a Screen Element to Display the Message and Option to Kill Other Sessions
- Under Block Node, click on the +icon and select the Screen element on Flow Designer.
- Input the following information:
- Enter Label the API Name will auto-populate.
- Check out the video for step-by-step instructions and some tips.
Step 6: Add Decision Element to Check If the User Wants to Kill the Other Sessions or Not
Now we will use the Decision element to check if the user has selected Sign out all other web sessions checkbox in step 5 or not.
- On Flow Designer, click on the +icon and select the Decision element.
- Enter a name in the Label field; the API Name will auto-populate.
- Under Outcome Details, enter the Label the API Name will auto-populate.
- Condition Requirements to Execute Outcome: All Conditions Are Met (AND)
- Row 1:
- Resource: {!Sign_out_all_other_web_sessions}
- Operator: Equals
- Value: {!$GlobalConstant.True}
- Row 1:
- Click Done.

Step 6.1.1: Adding a Get Record Element to Find the Logged-In User’s Current Session
The next step is using the AuthSession object to find the logged-in user’s current session.
- Under Yes Node, click on the +icon and select the Get Records element on Flow Designer.
- Enter a name in the Label field; the API Name will auto-populate.
- Select the Auth Session object from the dropdown list.
- Select All Conditions Are Met (AND).
- Set Filter Conditions
- Row 1:
- Field: UserId
- Operator: Equals
- Value: {!$User.Id}
- Click Add Condition
- Row 2:
- Field: ParentId
- Operator: Is Null
- Value: {!$GlobalConstant.True}
- Click Add Condition
- Row 3:
- Field: SessionType
- Operator: Equals
- Value: UI
- Row 1:
- Sort Auth Session Records
- Sort Order: Descending
- Sort By: CreatedDate
- How Many Records to Store:
- Select Only the first record
- How to Store Record Data:
- Choose the option to Automatically store all fields.
- Click Done.

Step 6.1.2: Add a Delete Records Element to Kill Other Sessions
- On Flow Designer, click the +icon and select the Delete Records element.
- Enter a name in the Label field; the API Name will auto-populate.
- For How to Find Records to Delete, select Specify conditions.
- Select the Auth Session object from the dropdown list.
- Set Filter Conditions
- Row 1:
- Field: UserId
- Operator: Equals
- Value: {!$User.Id}
- Click Add Condition
- Row 2:
- Field: ParentId
- Operator: Does Not Equal
- Value: {!Get_Most_Recent_Session.Id}
- Click Add Condition
- Row 3:
- Field: Id
- Operator: Does Not Equal
- Value: {!Get_Most_Recent_Session.Id}
- Row 1:
- Click Done.

Step 6.2.1: Adding an Assignment Element to Force Logout User
The next step is to kill the user’s current session forcefully. For this, we will use an Assignment element.
- Create a Boolean Variable LoginFlow_ForceLogout. When this variable is set to
trueThe user is immediately logged out.
- Under No Node, click on the +icon and select the Assignment element on Flow Designer.
- Enter a name in the Label field; the API Name will auto-populate.
- Set Variable Values
- Row 1:
- Field: {!LoginFlow_ForceLogout}
- Operator: Equals
- Value: {!$GlobalConstant.True}
- Row 1:
- Click Done.

- Add a Screen element with no contents.


In the end, Rachel’s Flow will look like the following screenshot:

Once everything looks good, perform the steps below:
- Click Save.
- Enter Flow Label; the API Name will auto-populate.
- Click Show Advanced.
- API Version for Running the Flow: 56
- Interview Label: Concurrent Sessions Exceeded {!$Flow.CurrentDateTime}
- Click Save.

Almost there! Once everything looks good, click the Activate button.
Step 8: Configure Login Flow for Salesforce Platform Licensed Users
- Click Setup.
- In the Quick Find box, type Login Flows.
- Select Login Flows, then click on the New.
- Select the Type from the drop-down Flow.
- Enter Concurrent Sessions a Name.
- The next step is to select Flow, User license, and Profile. Follow the steps as shown in the following screenshot:
- Click Done.

Proof of Concept
Check out the video for a demo:
Formative Assessment:
I want to hear from you!
What is one thing you learned from this post? How do you envision applying this new knowledge in the real world? Feel free to share in the comments below.


Can we have this process for the community portal users? If yes I am getting an error when logged in portal with portal user credentials
Is concurrent sessions the same as controlling whether or not an admin can ‘login as’?
This flow is not working on Partner community license. Please help.
Please share the error message.
Very helpful. Thank you
🙏
This is awesome.