

Last Updated on May 9, 2022 by Rakesh Gupta
Currently, the Summer’22 release is available under the pre-release program. On the 06th and 07th of May, Sandboxes will be upgraded, as a result, your organization will get the look and feel of the Summer’22 release.
In this release, you will find lots of new features, as well as, new enhancements related to Lightning Experience, Salesforce Flow, Lightning Web Component, Apex, Experience Cloud, Einstein Automate, Salesforce CDP, Field Service, Pardot, Quip, CRM Analytics, myTrailhead, and APIs.

For example, some exciting features like Create Custom Address Fields (Beta), Get Scheduling Recommendations with Appointment Insights (Beta), Extract Structured Data from Custom Forms with Einstein OCR (Beta), Filter Your Stream of Change Events (Pilot), Securely Connect to Amazon Athena and Perform Interactive Queries from Salesforce (Pilot), and Run Sequential Recipes Faster with Staged Data (Beta) are coming to Salesforce.
Also, check out these beta and pilot features:
- Bring Data to Every Conversation with CRM Analytics for Slack (Beta): – CRM Analytics for Slack makes it easy to access your analytics right where collaboration happens in Slack. Seamlessly find, share, and collaborate on CRM Analytics insights within Slack. And with notifications and subscriptions in Slack, stay up to date on all of your data.
- The CRM Analytics app for Slack works with CRM Analytics in Lightning Experience and Salesforce Classic.

- The CRM Analytics app for Slack works with CRM Analytics in Lightning Experience and Salesforce Classic.
- Convert Dataflows to Recipes (Beta): – Turn dataflows into recipes with a click of a button. Upgrade your old dataflows to recipes to use the latest Data Prep features such as joins, aggregates, sentiment detection, and more within an improved user experience. With the new Convert to Recipe (Beta) option, you can create recipes from dataflows. Your original dataflows are untouched when new recipes are generated.

- Create Reports Based on Selected Salesforce Objects (Beta): – It can be time-consuming and distracting to search through report types that you don’t need. Now you can filter the report types list in the Create Report window to show only those that are based on your selected Salesforce objects.
- To use this feature, click on the Reports tab.
- In the Create Report window, click Filter. Search for and add one or more standard or custom Salesforce objects. When you apply the changes, the list of report types is updated to show only the report types that are based on all the selected objects.

- Connect Salesforce Events with Amazon EventBridge in AWS (Beta): – Use Event Bus Relay to send platform events and change data capture events from Salesforce to AWS without writing an integration app or using middleware. By using Event Bus Relay in Salesforce with Amazon EventBridge in AWS, your Salesforce event-driven apps can use AWS services to process events. You can also send platform events from AWS back to Salesforce, where subscribers can process them using Salesforce Platform capabilities.

- Explore the Impact of Optimization with Optimization Hub (Beta): – View the improvements that optimization makes across multiple territories in one unified hub. For example, track the improvement of resource utilization, response time, and travel time.

- Receive Answers to Your Questions, Not Just Article Links, Using Einstein Search Answers (Pilot): – Now you can solve your cases faster with more accurate answers delivered right to you. Reduce your search time by asking your question or entering a phrase in the global search bar. Einstein Search Answers instantly extracts the relevant text from your Salesforce Knowledge base articles to help answer your question.

- Build Components in Mixed Shadow Mode (Developer Preview): – With mixed shadow mode, Lightning web components can use native shadow DOM even when the synthetic shadow polyfill is applied.
- Mixed shadow mode is disabled by default. Contact Salesforce Customer Support to enable mixed shadow mode.
- Save Higher Volumes of Predictions More Quickly (Pilot): – For models that are deployed using automated prediction fields, customers are currently allowed up to 500,000 predictions per org per day. For companies that generate predictions that approach or exceed this limit, use high-volume writeback to quickly save larger quantities of predicted values. High-volume writeback decreases the time it takes to write predictions and avoids row locks related to other processes that might be going on. The default prediction limit is 2 million. Use Einstein Prediction Service to retrieve up to 30 days of prediction history.


Supported Browsers for Lightning Experience
Lightning Experience is supported by Apple® Safari®’s latest version on macOS. The most recent stable versions of Microsoft® Edge Chromium, Mozilla® Firefox®, and Google Chrome™ are also supported.

Customers / Administrator’s Point of View
- Enable Person Accounts Without Contacting Salesforce Support: – You can now enable Person Accounts without reaching out to Salesforce Support. Person accounts store information by combining certain account and contact fields into one record. This allows you to store information about a person in a record that can act like an account when necessary.

- Clean Up Inactive Picklist Values (Beta): – Manage your inactive picklist values and enforce limits on inactive values for custom picklists to improve system performance and overall health. You can now bulk delete inactive unused picklist values. Previously, custom picklists with many inactive values were difficult to maintain because you deleted inactive values one at a time.
- Opt in to Bulk Delete Inactive Picklist Values (beta) from the Picklist Settings page. From the Inactive Values section of the picklist field.

- Click Delete Unused Values. This feature is available only for custom picklists with predefined values.

- Opt in to Bulk Delete Inactive Picklist Values (beta) from the Picklist Settings page. From the Inactive Values section of the picklist field.
- Enable Permission Set Expiration and Enhanced UI: – With this update enabled, you can assign an expiration date to each permission set or permission set group. Permission set and permission set group assignments also use a new Lightning Experience interface and an improved workflow. Users can be assigned to permission sets or permission set groups with or without an expiration date. When a permission set or permission set group has an expiration date, users can lose access to functionality after the expiration date. By default, permission set and permission set group assignments don’t expire. This update was first available in Summer’22.

- Control Access to External Object Records with Restriction Rules: – Restriction rules allow certain users to access only the records that are essential to their work. To apply this layer of security to data that’s stored outside your Salesforce org, set a restriction rule on external object records.
- To create and manage restriction rules for external object records, add a restriction rule from the External Data Sources page in Setup.
- Discover the Objects and Fields Available to Users with Search Manager: – Easily view all searchable objects and the search status of each field with Search Manager. Save time and narrow your search using filters so that you can verify whether a field is searchable.

- Spot Overdue Tasks Right Away: – Due dates for overdue tasks now appear in red, making them easy to spot.

- Add Flexibility and Power with Messaging for In-App and Web: – Start a new conversation with customers on your mobile app or website. Messaging for In-App and Web delivers enhanced pre-chat support to pinpoint customer needs and access records before the agent connects in the Service Console. Custom branding options and mobile push notifications provide a modern experience.

- Monitor Critical User Permissions: – Create transaction security policies, now generally available, to monitor changes made in permission sets and permission set groups. If a change doesn’t comply with internal usage, compliance, or security policies, create policies to notify you and block changes. You can also track multi-factor authentication for user interface logins.
- You can now create transaction security policies to block these user assignments.
- Manage All Data
- View All Data
- Customize Application
- Manage Encryption Keys
- Reset User Passwords and Unlock Users
- Manage Password Policies
- Manage Profiles and Permission Sets
- Assign Permission Sets
- Password Never Expires
- Manage Roles
- Manage Internal Users
- Manage Users
- Author Apex
- Manage Sharing
- Multi-Factor Authentication for User Interface Logins
- You can now create transaction security policies to block these user assignments.
- Manage Your Knowledge Article Base Using Natural Language Search: – Natural language search (NLS) makes article management effortless. NLS navigates your Salesforce Knowledge base and identifies your most common article scenarios. NLS recognizes what you’re searching for as you filter articles by publication, status, creation date, or author. Specify what you’re looking for in the search bar, and NLS returns a relevant list of articles that match your criteria.

- Manage Your Reports and Dashboards in Analytics Home (Beta): – Analytics Home is the new home base for your Lightning reports and dashboards. The Analytics Home is where all your Salesforce analytics content is organized in a cohesive and seamless experience. You get the benefit of a powerful search experience, better organization, sharing, and more.
- From Setup, in the Quick Find box, enter Reports, and then select Reports and Dashboards Settings. Select Enable the Unified Experience for Analytics Home. From the App Launcher, select Analytics.

- From Setup, in the Quick Find box, enter Reports, and then select Reports and Dashboards Settings. Select Enable the Unified Experience for Analytics Home. From the App Launcher, select Analytics.
- Edit Multiple Fields on the Report Run Page (Generally Available):– Now you can update statuses and clean up data without rerunning your reports. Save time while staying up to date by editing multiple records inline on the report run page. Make inline changes in multiple rows or columns, and then save all the changes with a single click. This feature is now generally available.

- To opt out of this feature, contact Salesforce Customer Support.
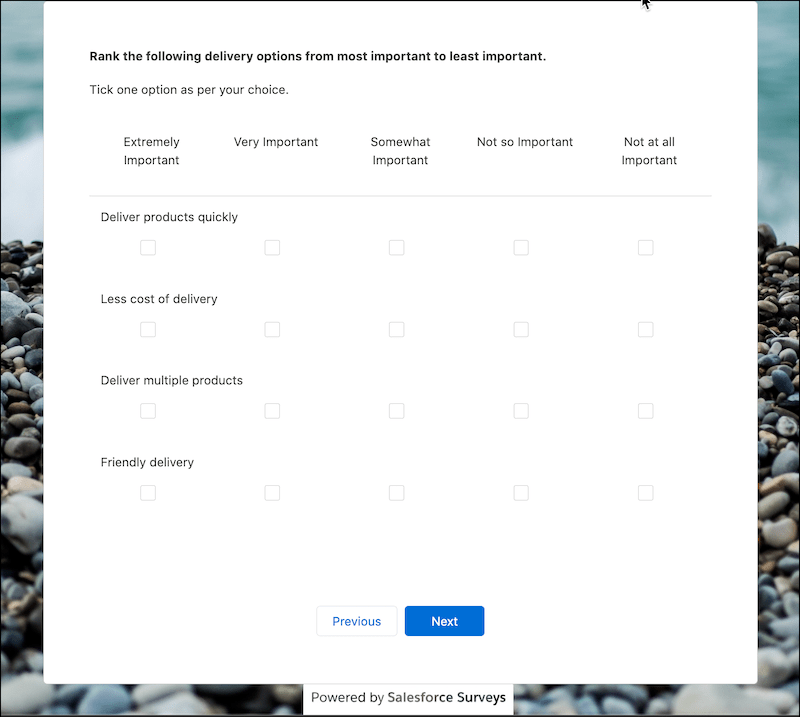
- Increase Survey Completion Rates with Matrix Questions: – Boost your survey completion rates by using matrix questions that allow participants to respond to multiple questions with the same set of choices. Create shorter surveys by grouping related questions and including one or more selection questions in a single matrix question. Participants can easily evaluate the common set of choices in a matrix question and complete surveys faster.

- View Shifts Schedule in a Calendar Format: – Service resources and service territory managers can now switch to Schedule view to view their shifts, holidays, and absences in a calendar format. In schedule view, you can view shifts by resources or by work type groups. You can create, edit, or clone a shift, and control the time zone where the shifts are shown. By default, the Schedule view shows the shifts in the time zone of the logged-in user. You can also color-code shifts, show user profile photos for each resource, and control which fields to show in shift cards and resource cards.

- Get the Improved Entitlements and Milestones Experience: – Improve your service-level agreement (SLA) reporting experience and provide excellent customer service with enhanced milestone timers and changes to the entitlement process entry and reentry behavior.
- The milestone timer now stops when a record exit in the entitlement process. It’s no longer necessary to stop the milestone timer manually by selecting Is Stopped.
- The milestone timer stops based on the first action taken to stop it and not the most recent one. For example, if a record exit the entitlement process, but a user clicks Is Stopped afterward, the milestone timer is stopped at the time that the entitlement exits and not when Is Stopped is selected. If the record reenters the entitlement process, the timer resumes from the time that the record exited the entitlement process.
- Use Service Cloud Voice with an Existing Amazon Connect Instance: – Service Cloud Voice with Partner Telephony from Amazon Connect users can now choose whether to create an Amazon Connect instance or reuse an existing one when you create a contact center in Salesforce.
- Make Smarter Routing Decisions by Checking Agent Availability: – Based on the specified routing rules–whether routing directly to an agent, a queue, or a skill–collect information about your organization’s capacity to handle new work requests at a given time. Add the Check Availability for Routing action to an Omni-Channel flow to determine the number of agents online and the number of work items waiting to be picked up for the specified routing requirements, including routing type and parameters. You can then build routing logic based on the results. For example, if the agent has more than five backlogged work items in their queue, you can route work to another queue.

- Manage Data Model Object (DMO) Relationships (Salesforce CDP): – All DMOs now have additional relationship status details so users can easily review and activate relationships during mapping or from the record home for each DMO. Previously, you had to delete relationships, but now you simply change the relationship status without worrying about manually re-creating relationships later.

- Ingest Data from More Sources with the Google Cloud Storage Connector (Salesforce CDP): – It’s now easier to ingest data from Google Cloud products such as Cloud Storage and Analytics 360 into the Customer Data Platform to enrich your segments, unified profiles, and more. Use the new Google Cloud Storage (GCS) connector to retrieve data with more automation and fewer manual steps. Previously, retrieving this data required additional connectors and complex custom configurations.

- Get More Accurate Travel Time Predictions with Travel Modes (Field Service Lightning): – Use travel modes to enhance predictive travel accuracy and improve the completion rate of service appointments. Define the travel mode per territory, per primary service territory member, or both, to take into account the transportation type (car, light truck, heavy truck, bicycle, or walking), the use of toll roads, and hazmat considerations. Travel modes are applied only to those territories where Enhanced Scheduling and Optimization is enabled.

- Schedule Multiple Flexible Breaks with Enhanced Work Rules (Field Service Lightning): – Add up to three breaks to your work rules so that service resources get their meals and breaks on time. At the start of the day, the system calculates the break times relative to the worker’s available hours. Use work rule entries to add the break duration and a time window to availability-based work rules. Then scheduling can optimize your appointments and break times.

- Customize Local Salesforce Field Metadata (CRM Analytics): – You can now configure the field metadata for local Salesforce data synced to CRM Analytics from Data Manager. From the Connect page, change properties such as field type, precision, date format, or default value. For example, update a text long field from 32,758 characters to the CRM Analytics-supported 32,000 characters so that it can sync successfully.


Additional Enhancements are Worth Noting!
- Create and Edit Records That a Restriction Rule Applies To: – Restriction rules no longer prevent users from creating or editing a record. Users can create a record that a restriction rule subsequently blocks their access to. A user can edit a record so that a restriction rule blocks subsequent access to the record based on the value they changed.
- Use Flows in LWR Sites: – Ready to automate your processes and use them on your lightning-fast sites? Flows are now available in LWR sites, across all LWR templates. With flows, you can harness the unlimited flexibility of Flow Builder to show screen flows on your site. To use flows in LWR, build them with Lightning web components. Flows built with Aura components can’t run in LWR sites.
- Preserve User Access to Personal Information Fields: – To ensure that the appropriate users can access personally identifiable information (PII) in Summer’22, update those users’ permissions. Users with broad permissions such as View All Data and View All Users can no longer view personal information. To give users access to personal information, assign the View Concealed Field Data permission, which replaces the View User Records with PII permission.
- Share Service Resource Availability Using an Invitation URL: – Salesforce Scheduler has two new flows: Generate Appointment Invitation and Book Appointment from Invitation. Service resources can use the Generate Appointment Invitation flow to generate the invitation URL with their availability. They can restrict the period for which invitation URLs are available for appointment booking using URL expiration dates. Users can use the Book Appointment from Invitation flow to book appointments by using the invitation URL generated using the Generate Appointment Invitation flow. The invitation URLs direct users to the time slot page that shows the resource’s availability so they can quickly book appointments. If invitation URL has an expiration date, users can book appointments using invitation URLs only before the expiration date.
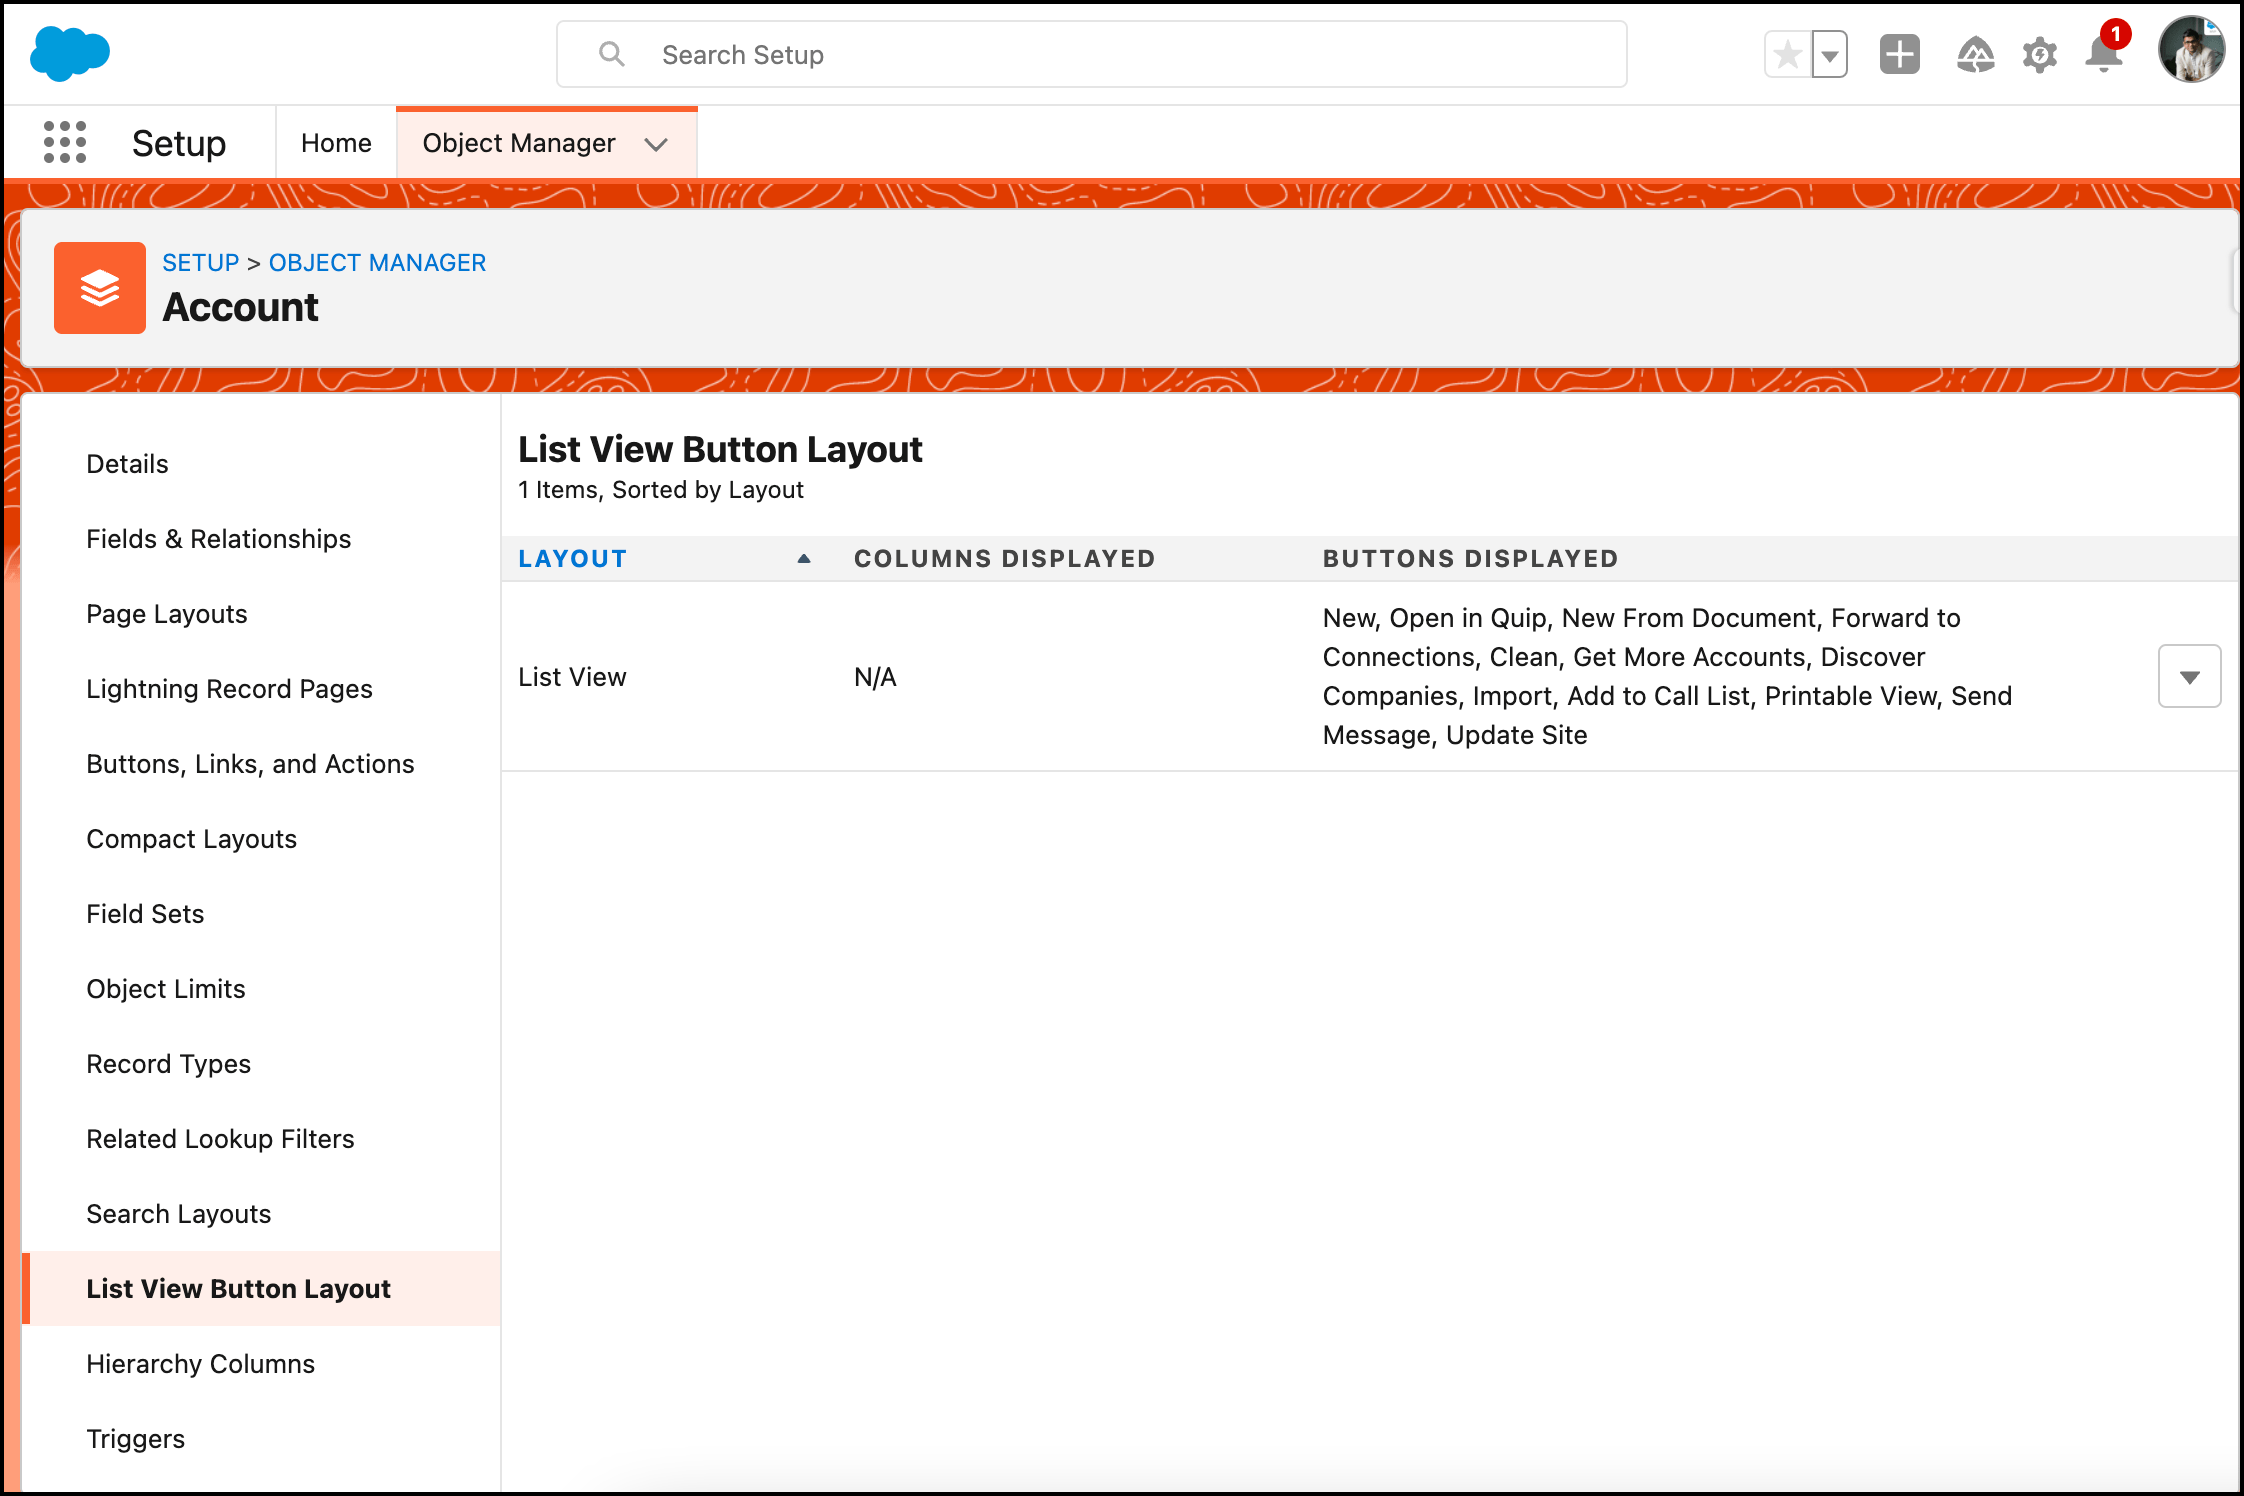
- Search Layouts for Salesforce Classic Is Now List View Button Layout: – In Setup, the Search Layouts for Salesforce Classic page was renamed List View Button Layout.

- Run Flows for Guest Users Is Being Deprecated: – In Winter’22 Salesforce discontinued the Run Flows permission for the Guest User and Experience Cloud External User profiles in new orgs. Without the Run Flows permission, you’re free to use the more granular permission structure embedded in Flows and give your users the detailed access they need. Run Flows will be removed from the Guest User profile in all orgs in Spring’23. To avoid future access issues, Salesforce recommend updating your sites to the new permission structure before Spring’23.
- Customize Cumulative Rollup Names: – To tailor your forecast grid to your business, change the labels that represent cumulative rollups of forecast categories. For example, show cumulative rollups for Closed Only, Best Case, Commit, Most Likely, and Open Pipeline forecasts to reflect the way your company forecasts. Previously, label changes showed only for single-category rollups.

- Get a List of Custom Picklist Fields with Inactive Values: – Manage your inactive picklist values and enforce limits on inactive values for custom picklists to improve system performance and overall health. Get email notifications when custom picklist fields have more than 4,000 inactive values and then use this information to bulk delete the inactive unused values. Previously, you checked each field for inactive values, which is time-consuming when there are many custom picklist fields.

- Limit Results in Tabular Reports: – To fast-track to the most relevant records and to avoid unnecessary processing time, you can limit the number of rows returned in a tabular report in report builder. When you set a row limit, you can include the report as the source for a dashboard table or chart component.
- For example, to review the top 20 opportunities by amount, open the opportunities report in the report builder. Sort the Amount column in descending order (1). Then click (2). Set the row limit to 20, and click Apply (3). Save your changes and run the report.

- For example, to review the top 20 opportunities by amount, open the opportunities report in the report builder. Sort the Amount column in descending order (1). Then click (2). Set the row limit to 20, and click Apply (3). Save your changes and run the report.
- Test a Custom Domain with the Salesforce CDN Partner in a Sandbox: – Roll out changes to a custom domain such as https://www.example.com with confidence. Now you can test a custom domain that uses the Salesforce CDN partner to serve your site in a sandbox before you enable the updated domain in production.
- In production, on the Domains Setup page, edit your custom domain. Select the HTTPS option, Salesforce serves the domain over HTTPS using a Salesforce content delivery network (CDN) partner. In the Associated Org field, select your sandbox, and save your changes. After Salesforce provisions your changes, activate the custom domain in production. Then log in to the sandbox to finish updating the sandbox Experience Cloud sites domains.
- Export Security Center Data with the Click of a Button: – Easily download a .csv file for tables that show your policies, alerts, and monitoring metric details to access important data whenever you need it.

- Add an Enhanced Bot to Messaging for In-App and Web: – Create an enhanced bot for your Messaging for In-App or Web channels to ease the load for service agents and leverage flexible routing with Omni-Channel Flow.

- Configure a Single Default No-Reply Address from Organization-Wide Addresses in Setup: – You can use an existing org-wide email address as a default No-Reply email address. Choose multiple purposes for an existing org-wide email address in the record page.
- Account for Holiday Closures: – Refine your working hours and show holidays in the dispatcher console. Update operating hours so that service appointments aren’t scheduled on holidays. You can override holidays to schedule workers as needed by creating holiday shifts.
- Turn on Enhanced Scheduling and Optimization in Field Service Settings. Create holidays in setup, then add them to your operating hours. To add availability during holidays, select the Holiday field on a shift.

- Turn on Enhanced Scheduling and Optimization in Field Service Settings. Create holidays in setup, then add them to your operating hours. To add availability during holidays, select the Holiday field on a shift.
- Enable Multi-Factor Authentication for Your Entire Org: – Now you can turn on MFA for all the users in your org with the click of a checkbox. This setting is the fastest way to satisfy the MFA requirement. It’s also the setting that Salesforce will use to automatically enable and enforce MFA in the future.
- To enable MFA for all users in your org, from Setup, in the Quick Find box, enter Identity and select Identity Verification. Then select Require multi-factor authentication (MFA) for all direct UI logins to your Salesforce org.

- To enable MFA for all users in your org, from Setup, in the Quick Find box, enter Identity and select Identity Verification. Then select Require multi-factor authentication (MFA) for all direct UI logins to your Salesforce org.
- Exclude Exempt Users from Future MFA Auto-Enablement and Enforcement: – There are several use cases that are exempt from the MFA requirement. Salesforce will automatically exclude many of these cases when auto-enablement and enforcement milestones go into effect in the future. But even if you’re fully in compliance with the MFA requirement now, there are some exempt use cases that you must exclude on your own. If any of these situations apply to your org, avoid disruptions by using the new Waive Multi-Factor Authentication for Exempt Users user permission before Salesforce enables and enforces MFA.

- See Related Sales Cadences in Task Reports: – New fields available in Task object reports let your users see the sales cadences, sales cadence states, sales cadence steps, and target dispositions ralated to each task.

- Raise Flags and Whisper in More Channels: – The Phone, Messaging for In-App, and Messaging for Web-enhanced channels support flag raises and whisper messages. For example, an agent can raise a flag to get their supervisor’s attention, chat with them with two-way messaging, and then ask them to join the call to help resolve a complicated customer issue. Previously, only the Service Chat standard channel supported agents raising flags and supervisors sending one-way messages to agents.
- Agents can click Flag to raise a flag and enter a whisper message.
- The flag and whisper message appear in the Conversation component (1) for messaging sessions and Call Controls (2) and Omni-Channel widget for calls.

- Customize the Agent Experience with Omni-Channel Alert Sounds: – Define custom sounds to notify agents when work is routed to them in Omni-Channel. You can play a different sound for each service channel or group of agents. For example, to differentiate the type of work, you can play a ringing sound for incoming calls and a ta-dah sound for incoming messages.
- You can set up the sound notification in the presence configuration for a group of agents or in a service channel. The sound notification at the service channel level overrides the setting at the presence configuration level. When you set up the sound configuration, select the default sound or add a custom sound based on an audio file. You can also specify how long the sound plays.

- You can set up the sound notification in the presence configuration for a group of agents or in a service channel. The sound notification at the service channel level overrides the setting at the presence configuration level. When you set up the sound configuration, select the default sound or add a custom sound based on an audio file. You can also specify how long the sound plays.
- Remove Guest User Assignments from Permission Sets Associated with Permission Set Licenses with Restricted Object Permissions (Release Update): – To improve the security of your data, Salesforce is removing guest user assignments from permission sets and permission set groups associated with permission set licenses that contain View All, Modify All, edit, and delete standard object permissions. The only standard object permissions allowed for guest users are read and created. You can no longer assign guest users permission sets or permission set groups that are associated with these permission set licenses that contain the restricted permissions. This update was first available in Spring’22.
- Analyze Google BigQuery Data Directly (Generally Available): – Skip the hassle of bringing Google BigQuery data into Salesforce and prepping it before you can explore and analyze it. With CRM Analytics Direct Data for Google BigQuery, run explorations directly on your data in Google BigQuery after creating a live connection to it. You can query the data in real-time, explore it in tables, and visualize it in charts. To continuously monitor important metrics and accelerate business decision-making, you can also include your BigQuery data in dashboards. This feature, now generally available, includes support for binding functions in conjunction with the
bigquerykeyword. - Securely Connect Data Across Amazon DynamoDB and Salesforce (Generally Available): – Use the new Salesforce Connect adapter for Amazon DynamoDB to seamlessly and quickly integrate AWS data natively with Salesforce business applications. You can connect DynamoDB data sources to Salesforce through external objects and take advantage of the Salesforce Platform capabilities.


Developer’s Point of View
- Create and Share Your Own Bot Templates (Beta): – Now you can create your own bot templates from scratch or from existing bots. You can even package and share your bot templates between orgs or on AppExchange so everyone can use your bot customized for your industry or use case. Bot template packages include stored intent data, Flows, and Apex, so you can go from idea to fully-featured bot in minutes.
- Update an Existing Schema Connected to Flow: – If a registration is in use by a flow, now you can update it with a new, compatible API specification version. Previously, you couldn’t update a registered schema that was in use by a flow. If the new schema version isn’t compatible, the editing workflow notifies you which operations and schema objects are in use by which flows and by which Apex classes. With this information, you know which existing references are incompatible so that you can remove them before saving your updated registration.
- Call Invocable Actions from Apex (Developer Preview): – Invocable.Action is a new Apex class that allows you to call invocable actions from Apex code. For the developer preview, this feature is available only in scratch orgs.
To enable this feature in your scratch org, add a reference to
CallIAFromApexin the project-scratch-def.json file in your SFDX project.{ "orgName": "my company", "edition": "Developer", "features": [ "CallIAFromApex" ], "settings": { ... } }After you modify the file, reference Invocable.Action in your Apex code. This example uses the standard invocable action “chatterPost” to post a message to the current user’s feed.
Invocable.Action action = Invocable.Action.createStandardAction('chatterPost');
action.setInvocationParameter('text', 'This is a test.');
action.setInvocationParameter('type', 'User');
action.setInvocationParameter('subjectNameOrId', UserInfo.getUserId());
List<Invocable.Action.Result> results = action.invoke();
if (results.size() > 0 && results[0].isSuccess()) {
    System.debug('Created feed item with ID: ' +
results[0].getOutputParameters().get('feedItemId'));
}
This example calls a custom invocable action named Doubler that returns a number that’s twice the input value.
Invocable.Action action = Invocable.Action.createCustomAction('apex', 'Doubler'); action.setInvocationParameter('input', 1); List<Invocable.Action.Result> results = action.invoke(); if (results.size() > 0 && results[0].isSuccess()) { System.debug('Result is: ' + results[0].getOutputParameters().get('output')); } - Write Queries with GraphQL API (Beta): – Aggregate records, request explicit fields, introspect the schema and more with the GraphQL API for Salesforce. GraphQL is an open-source data query and mutation platform for APIs. Use the GraphQL API instead of REST APIs to send and receive data more efficiently and make your app perform better. Your app can query for all the data that you want in a single request, and the response contains only the data you need.
- Salesforce Flow Enhancements: – There are several enhancements in Salesforce Flow as follows:
- Send Screen Flows to Slack with an Invocable Action (Beta): – Send a message to a Slack channel, a direct message, or the Messages tab of a Slack app that includes a button that a recipient can use to launch a flow.

- Use Formulas as Flow Entry Conditions: – A formula builder is now available in the Start element of a record-triggered flow. The builder guides you through the syntax and simplifies the process. Instead of waiting until you save a flow, you can check the formula syntax and catch errors as you work.

- Add Section Headers to Flow Screens: – Use section headers to create a visual hierarchy to guide your users to the most important items on a screen. Sections with headers are collapsible and always open by default to make screen flow completion more efficient.

- Manage the Run Order of Record-Triggered Flows from Flow Trigger Explorer: – Easily change the run order of record-triggered flows by dragging them into place. Flow Trigger Explorer lets you manage the run order of record-triggered flows without opening and editing individual flows.

- Two-Column Flow Layouts Are Superseded by Multicolumn Screens: – Starting in Winter’23, two-column layouts are ignored. But your data isn’t affected, and a better layout option is available. With the Section component, you can organize record fields and screen components in up to four columns directly on the screen. To prepare for this change, Salesforce recommend that you update your flow screens to use Section components.
- Make Custom Screen Components React to Other Components on the Same Flow Screen (Pilot): – Design a flow screen with custom screen components that respond to updates on the same screen, and reduce the number of screens for a user to navigate through. Previously, you placed these components on separate screens.
- Convert Workflow Rules to Flows with the Migrate to Flow Tool (Generally Available): – Start transitioning to Flow Builder. The Migrate to Flow tool now supports more kinds of workflow rules, including most rule criteria formulas. Use the Migrate to Flow tool to convert your workflow rules into flows. Flow Builder can do everything that workflow rules can do—and more.
- In Spring ’22, the Migrate to Flow tool supported workflow rules that contained these items:
- Field-based criteria
- Field updates
- Email alerts
- Outbound messages
- Time-dependent workflow actions
- Rule criteria formula that’s set to true (unless evaluation criteria is also set to created, and any time it’s edited to subsequently meet criteria)
- In Summer ’22, the Migrate to Flow tool now also supports:
- Equal to null
- Not equal to null
- Rule criteria formula
- Formulas that use Hour, Minute, Second, TimeNow, TimeValue, IsClone, or $RecordType aren’t supported.
- In Spring ’22, the Migrate to Flow tool supported workflow rules that contained these items:
- Test One, Two, Three, Flow (Beta): – Before you activate a record-triggered flow, you can now test it to quickly verify its expected results and identify flow run-time failures. In Flow Builder, you create, save, and run flow tests. Previously, you debugged a flow manually to troubleshoot failures each time they occurred. Now, you create and save a flow test from a debug run. Then each time you modify the flow, you can run the test. You can test only a flow path that runs immediately.
- Flow tests don’t support flows that run when a record is deleted.
- View All Data Permissions for Debugging Triggered Flows
- Send Screen Flows to Slack with an Invocable Action (Beta): – Send a message to a Slack channel, a direct message, or the Messages tab of a Slack app that includes a button that a recipient can use to launch a flow.
- Flow Orchestrator: – There are several enhancements in Flow Orchestrator as follows:
- See New Milestones in Orchestration History: – New orchestration history milestones make testing and debugging your orchestrations easier. See when an orchestration is canceled; a stage or step is discontinued; an orchestration, stage, or step encountered an error; or a work item is reassigned.

- Wake Up Paused Orchestrations: – You now have access to an orchestration’s run ID with the new $Orchestration.Instance system variable. Use it to save the ID to a record field so you can reuse it later to fire a Flow Orchestration Event platform event and wake up the associated paused orchestration run. This change gives you greater flexibility to wake up paused orchestrations.
- Deploy Orchestrations with Change Sets: – Develop and test orchestrations in a sandbox environment and use a change set to send the orchestration and its associated flows to production.
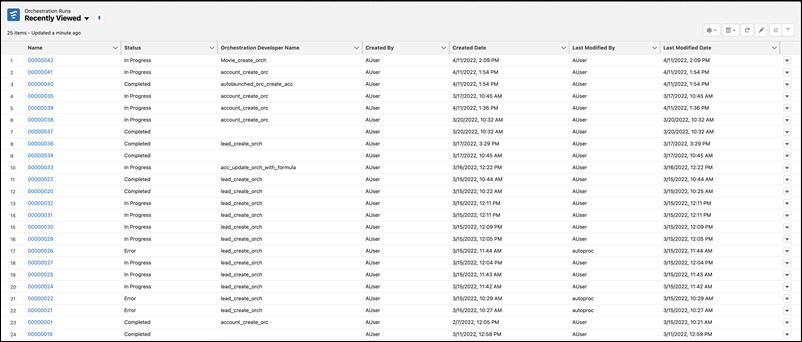
- Use Improved Orchestrator List Views: – Use the Recently Viewed list view for orchestrator runs and orchestrator work items to limit the items you view. Use the new Orchestration Developer Name column in Orchestration Runs list views to identify the API name of the orchestration associated with an orchestration run. Completed, canceled, or failed orchestration runs with no orchestration developer name indicate that the orchestration was deleted from the Flows page in Setup.
- In the App Launcher, find and select Orchestration Runs or Orchestration Work Items. Then select Recently Viewed from the list view dropdown.

- In the App Launcher, find and select Orchestration Runs or Orchestration Work Items. Then select Recently Viewed from the list view dropdown.
- See New Milestones in Orchestration History: – New orchestration history milestones make testing and debugging your orchestrations easier. See when an orchestration is canceled; a stage or step is discontinued; an orchestration, stage, or step encountered an error; or a work item is reassigned.
- Limit How Often a Recommendation or Offer Appears: – With Next Best Action Limit Repetitions, you can limit the number of times the same recommendation or offer appears on the same record or for the same user during a time period. For example, you can use Limit Repetitions so that service agents don’t see the same offer for a customer more than once a week. After you configure Limit Repetitions for a recommendation, Next Best Action captures the user’s response to a recommendation or offer and then filters out recommendations that don’t meet your thresholds.

- Get the Result of Asynchronous Platform Event Publishing in Apex (Pilot): – Get the final result of an event publish operation through an Apex callback that you implement. Previously, you could get the intermediate queueing result only of an event publish operation, not the final result. Event publishing is asynchronous, and the immediate result returned in SaveResult is the result of queuing the publish operation in Salesforce. When resources are available, the system carries out the event publish operation, and the final result is sent in an Apex callback.
The publish callback is an Apex class that implements the
EventBus.EventPublishCallbackinterface. The interface includes two methods:onSuccessandonFailure.public class MyPublishCallbackClass implements EventBus.EventPublishCallback { public void onSuccess(EventBus.SuccessResult successResult) { // Your implementation. // ... } public void onFailure(EventBus.FailureResult failureResult) { // Your implementation. // ... } }If the asynchronous publish operation is successful, the
onSuccessmethod is invoked. If it isn’t successful, theonFailuremethod is invoked. Each method takes a parameter that contains the result of the publish operation.Apex publish callbacks are available for high-volume platform events. Legacy standard-volume events aren’t supported.
- Group Platform Events into One Stream with a Custom Channel: – With a custom channel, you can receive a stream of event messages corresponding to one or more platform events defined in Salesforce. For example, if you defined platform events corresponding to orders for different regions, one client can subscribe to all those events and process them. Custom channels are supported in CometD clients only and you can add filters (beta) to them. By using only one client to subscribe to all events and using filters, your subscriptions are optimized.
- Create a custom channel, and specify the platform events it contains in Tooling API and Metadata API using PlatformEventChannel and PlatformEventChannelMember.
- Custom channels are supported for high-volume custom platform events that you define. They aren’t supported for legacy standard-volume custom platform events or standard platform events, such as real-time event monitoring events.
- For Performance, Unlimited, and Enterprise editions, you can add up to 50 distinct platform events as part of channel members to a channel. For Developer Edition and Professional Edition with the API add-on, this allocation is 5 distinct platform events. If the same platform event is a member of multiple channels, it’s counted once toward the allocation.

- As part of this change, Salesforce added the
EventApiNamefield to event messages to distinguish the messages received on a custom channel. The field contains the type of event and is available in CometD clients that use a Streaming API endpoint with API version 55.0 and later. For example, this event message has anEventApiNameof Order_EMEA__e, which means that it’s an Order_EMEA__e event.{ "schema": "e8jMOnID4xDThlaPBMx5gg", "payload": { "City__c": "London", "CreatedById": "005RM000002Qu16YAC", "Amount__c": 20, "CreatedDate": "2022-03-29T13:45:19.230Z", "Order_Number__c": "2" }, "event": { "EventApiName": "Order_EMEA__e", "EventUuid": "218544ad-0472-4315-970f-8825a2802de6", "replayId": 10306 } }
- Plan and Test Your System for Scale Using Performance Assistant: – Performance Assistant is your central hub of information and resources about scalability and performance testing with Salesforce. Use the step-by-step instructions, articles, and tools to help you architect your system, conduct performance testing, and interpret your results.

- Secure Apex Code with User Mode Database Operations (Beta): – Declare if Apex runs database operations in user mode or system mode. The new Database methods support an
AccessLevelparameter that lets you run database operations in user mode instead of in the default system mode.You can indicate the mode of the operation by using
WITH USER_MODEorWITH SYSTEM_MODEin your SOQL query. This example specifies user mode.List<Account> acc = [SELECT Id FROM Account WITH USER_MODE];Database operations can specify user or system mode. This example inserts a new account in user mode.
Account acc = new Account(Name='test');
insert as user acc;
The new
AccessLevelclass represents the two modes in which Apex runs database operations. Use this new class to define the execution mode as user mode or system mode. Use these new overloaded methods to perform DML and query operations.Database.querymethodsSearch.querymethods- Database DML methods (
insert,update,upsert,merge,delete,undelete, andconvertLead)
- Debug Your Code More Easily to Run with Lightning Web Security: – Dig deep into your code as it runs with Lightning Web Security. Now you have greater visibility into your code as it runs in a JavaScript sandbox. Previously, you saw your source code with Lightning Web Security’s runtime changes in your web developer tools, which could make it difficult to find problems in your code. The features are optimized for Chrome DevTools.
- Enable Debug Mode for your Salesforce user account to see these improvements in source display while debugging your component code as it runs in a Salesforce org.
- Source location has changed so that you can find your files more easily in the Page tab of the Source panel. Instead of the lightning/n/modules folder, look for the lws folder. Expand the folder and see your component files organized under their namespace folder. Here you see the c namespace and its components on the current page.

- Source mapping is improved so that the sandboxed code in the lws folder now looks closer to your components’ source code. You can inspect it, use breakpoints, and so on, in the Source panel.
- Load Large Datatables Faster with Virtual Rendering: – Display datatables with more than 200 rows more quickly and make them scroll more smoothly with virtual rendering. Use the
render-modeandrender-configattributes with thelightning-datatablecomponent to enable virtualization for your datatable. Instead of rendering all the table rows on load, the datable renders the rows that are visible and a few rows above and below them to ensure smooth scrolling.- This example shows how to enable virtualization for
lightning-datatablein Lightning web components. See New and Changed Aura Components for an example using Aura syntax with thelightning:datatablecomponent. - In the JavaScript file of your component, create a
renderConfigobject with the attributevirtualizeset tovertical.import { LightningElement } from 'lwc'; export default class DataTable extends LightningElement { // set data // set columns renderConfig = { virtualize: 'vertical', // additional customization }; }In the
lightning-datatablecomponent, set therender-configattribute to yourrenderConfigobject. Set the component’srender-modeattribute torole-basedand set thelightning-datatablecomponent’s parent container to an explicit height.<template> <div style="height: 300px;"> <lightning-datatable key-field="id" data={data} columns={columns} render-mode="role-based" render-config={renderConfig}> </lightning-datatable> </div> </template>
- This example shows how to enable virtualization for
- Create Notifications with New Alert, Confirm, and Prompt Modules – Use the new modules
LightningAlert,LightningConfirm, andLightningPromptinstead of native APIs to create notifications from your Lightning web components. Chrome and Safari plan to end support for cross-origin use of thewindow.alert(),window.confirm(), andwindow.prompt()native APIs. Each new module creates a modal that functions like its API counterpart and works in cross-origin iframes.This example creates an alert modal with an error message and “OK” button. The.open()function returns a promise that resolves when the user clicks “OK.”<!-- c/myApp.html --> <template> <lightning-button onclick={handleAlertClick} label="Open Alert Modal"> </lightning-button> </template>// c/myApp.js import { LightningElement } from 'lwc'; import LightningAlert from 'lightning/alert'; export default class MyApp extends LightningElement { async handleAlertClick() { await LightningAlert.open({ message: 'this is the alert message', theme: 'error', // a red theme intended for error states label: 'Error!', // this is the header text }); //Alert has been closed } } - Enable Third-Party Integrations with Light DOM (Generally Available) – Lightning web components render in shadow DOM by default, providing strong encapsulation but posing challenges for global styling and many third-party integrations. With light DOM, your component markup is attached to the host element instead of its shadow tree. You can then access it like any other content in the document host.To enable a component to render in light DOM, set the
renderModestatic field in your component class.import { LightningElement } from 'lwc'; export default class LightDomApp extends LightningElement { static renderMode = 'light'; // the default is 'shadow' }Use the
lwc:render-modetemplate directive on the<template>tag of your component.<template lwc:render-mode='light'> <my-header> <p>Hello World</p> </my-header> </template>When you enable light DOM on a component, it no longer renders its elements in the
#shadow-roottree.<my-app> <my-header> <p>Hello World</p> </my-header> </my-app>A light DOM component can contain a shadow DOM component. Similarly, a shadow DOM component can contain a light DOM component. However, base Lightning components always render in shadow DOM. Restricting light DOM to specific namespaces isn’t supported.


Additional Enhancements are Worth Noting!
- Use a Session Token Instead of a Cookie for Lightning Apps on Third-Party Sites: – Use the new setting that replaces the authentication cookie with a session token when a Lightning app is in a third-party context, such as Lightning Out. Browsers are restricting the use of third-party cookies, so the setting is an alternative to requiring that users disable browser settings, such as Safari’s Prevent cross-site tracking setting.
- From Setup, in the Quick Find box, enter Session, and then select Session Settings. On the Session Settings page, select When embedding a Lightning application in a third-party site, use a session token instead of a session cookie.
- To test this setting, Salesforce recommend working in a sandbox.
- If you hard code a URL to a third-party resource that’s hosted in your org and requires authentication, your code won’t work with this setting. Instead, Salesforce recommend that you use
$Resourceor$ContentAssetin Aura components, and import@salesforce/resourceUrl/resourceReferenceor@salesforce/contentAssetUrl/contentAssetReferencein Lightning web components.
- If you hard code a URL to a third-party resource that’s hosted in your org and requires authentication, your code won’t work with this setting. Instead, Salesforce recommend that you use
- Access Device Contacts from a Lightning Web Component: – Use the ContactsService API to create a customized contact import feature, create or update records with contact data, or otherwise reduce the friction of adding contact information to Salesforce from a mobile device.
- Using ContactsService in your Lightning web component is easy.
- Import ContactsService into your component definition.
- Test to make sure ContactsService is available before you call contacts-related functions.
- Use the
getContacts()function to select and access contacts.
- Using ContactsService in your Lightning web component is easy.
-
Choose Global Cache Scope for Apex Controller Methods: – The
@AuraEnabledannotation is enhanced with ascopeattribute. Setting the scope toglobalenables Apex methods to be cached in a global cache such as the Salesforce CDN. - Determine Which Apex Classes Have Insufficient Code Coverage: – To help you determine how to improve code coverage for your packages, we’ve extended the output of the Salesforce CLI package version report command. When you run sfdx force:package:version:report –verbose, Salesforce display a list of Apex classes that aren’t passing code coverage requirements, from lowest to highest code coverage percentage.
- To display a report directly in Salesforce CLI, run sfdx force:package:version:report –verbose. To create a report in JSON, run sfdx force:package:version:report –verbose –json.
- Create Licenses for Specific Features and User Categories with the Partner Licensing Platform (Developer Preview): – The Partner Licensing Platform transforms how you price, license, and distribute your applications. Use custom permission set licenses to increase and diversify revenue by selling multiple tiers, versions, or supplements for your products. Create licenses that can be assigned to specific user types only. And recover revenue for products that previously were restricted only contractually.
- Enrich Change Events with TextArea Fields: – You can now add TextArea fields as enriched fields in your change events. Previously, only Text fields were supported.
- Receive Change Event Notifications for More Objects: – With Change Data Capture, you can now receive notifications of record changes for the BriefcaseAssignment, BriefcaseDefinition, CommerceEntitlementBuyerGroup, CommerceEntitlementPolicy, CommerceEntitlementProduct, Expense, FieldServiceMobileSettings, IndividualApplication, Order, OrderItem, Product2, and ServiceTerritoryLocation objects.
- Filter Your Stream of Platform Events with Custom Channels (Beta) – Optimize event processing by receiving only the event messages that match a predefined filter on a custom channel. Create a channel and configure it with a complex filter that CometD clients can subscribe to. With fewer events delivered, subscribers can make more efficient use of the event delivery allocation. This feature, offered last release in beta, continues to be a publicly available beta.
- With the Customize Application permission, you can configure stream filtering using Tooling API or Metadata API. To create a channel, use PlatformEventChannel. To add a filter expression for a custom platform event, use PlatformEventChannelMember
- This example shows a filter expression value in the
PlatformEventChannelMember.FilterExpressionfield.(City__c LIKE 'S%' OR City__c='New York') AND Has_Shipped__c=true AND Delivery_Date__c>2021-10-21T09:30:11-08:00
- Access Flow Trigger Explorer from Object Manager:– Now you can access Flow Trigger Explorer right from Object Manager and quickly manage your record-triggered flows. Read this article to find out all flows for an object.

- Add Custom Icons to Apex-Defined Invocable Actions: – Make your Apex-defined invocable actions stand out on the Flow Builder canvas with custom icons.
- Upload a valid SVG file as a static resource or select a standard Salesforce Lightning Design System (SLDS) icon. Then set the value of the iconName attribute of the
InvocableMethodannotation. When a user adds the invocable action in Flow Builder, the custom icon appears on the Flow Builder canvas to represent it.
- Upload a valid SVG file as a static resource or select a standard Salesforce Lightning Design System (SLDS) icon. Then set the value of the iconName attribute of the

Salesforce Mobile App Enhancements
Salesforce performs automated and manual testing of the Salesforce mobile app for iOS and Android on a select set of mobile devices. This is the list of devices for Summer’22.
|
Platform
|
Phones |
Tablets |
|
Android
|
|
|
|
iOS
|
|
|

- View More Forecast Types in the Salesforce Mobile App: – See and use forecast types that use opportunity revenue, opportunity products, opportunity splits, overlay splits, and product schedules grouped by user role. For example, you can view your forecast by opportunity splits. Previously, in the Salesforce mobile app, you could only view forecast types that used opportunity revenue measures.
- Enforcing Certificate Pinning Available for Android:- More protection has been built into the enhanced mobile security for the Salesforce mobile app. You can now enforce certificate pinning for Android. If a user tries to use the app and the server’s certificate doesn’t match the expected value, a secure connection isn’t established. These new policies further secure your Salesforce app data and users’ personal data.
- Filter Records by User ID: – When you configure your object rules for a briefcase, you can now select a user ID as a filter value. This filter value is called Current User ID, and it’s available for ID-based record filter criteria, such as Owner ID, Created By ID, and Last Modified ID.
- Allocate Records to Your Mobile Workforce with More Flexibility: – You can now allocate up to 50,000 records per object in each briefcase, up from the previous limit of 2,000 records per object. This change gives you more flexibility to distribute records across your active briefcases. To help you customize within the record limit, enhancements in the Briefcase Builder setup wizard now give you in-context updates on how your settings affect the number of records returned.
- Access to Mobile Device Contacts Comes to Mobile Publisher Apps: – Use the ContactsService API to create a customized contact import feature to create or update records with contact data. A contact import feature tailored to your audience makes adding contact information to your mobile app from contacts on your mobile device seamless.
- Using the ContactsService API to create a contact import feature only works in the mobile app, and not on mobile or desktop web.
Key Resources:
Check out the resources below to learn more about some of the most exciting new innovations before they officially GA on June 13th!
- Salesforce Website: Your one-stop-shop to learn all about the latest release
- Release In a Box: A summary deck you can share with your organization, leadership team and/or community
- Demo Videos By Salesforce: 2-3 minute overviews of our top innovations
- Release Trail: Earn that badge and march towards Ranger Status
- 10 Hottest Salesforce Summer ’22 Features
Formative Assessment:
I want to hear from you!
What are your favorite Summer’22 release note gems? You can download release notes in HTML format!, for PDF files.
Feel free to share in the comments below.


Hi there! I’m trying to access the Analytics home app/tab but the Enable the Unified Experience for Analytics Home setting in Reports and dashboard settings is nowhere to be found in my dev org.
Do you know how I can get it?
Thanks
Check if the Summer’22 release hit in your org.