

Last Updated on April 18, 2022 by Rakesh Gupta
Big Idea or Enduring Question:
How do you send an opportunity / Quote / Account approval request to a queue?
Objectives:
After reading this blog, you’ll be able to:
- Understand what a Queue is.
- Use filters and conditions to design a process.
- Understand the Submit for approval action in Salesforce Flow.
- Last but not the least, see how to submit opportunity approval to a queue!
Business Use case
Corey Eridon is working as a System Administrator at Gurukul on Cloud (GoC). He received a requirement – when an opportunity is created, or updated, with an amount greater than $5M, assign it to a queue named ‘Top Management’ for approval!
What is a Queue?
Queues permit groups of users to prioritize, distribute, and assign records to teams that share workloads. A queue is a location where records can be routed to await processing by a group member.
A queue is available for objects like cases, contact requests, leads, orders, custom objects, service contracts, knowledge article versions, etc.
Automation Champion Approach (I-do):
An approval process is an automated process an organization can use to approve records in Salesforce. One can create, either a one-step or a multi-step, approval process in Salesforce based on your business needs.
Let us take a simple use case – submit an Opportunity Approval to a Queue. Wait a minute, you yell! I know Salesforce enough to know that an Opportunity approval request cannot be sent to Queue! In sheer disbelief, you continue to remind me that one can only send an approval request to Queues (in case of a custom object, Lead, and Case) or Users!
You are right, I am glad to admit! True, out-of-the-box, Opportunity doesn’t support a Queue – let alone creating an approval process and assigning it to a queue. Therefore, creating an approval on an Opportunity object using Queues needs out-of-the-box thinking!! Usually, with Salesforce, multiple approaches are available to solve a business requirement. Choose the ones that are simple, straightforward, and consume fewer resources.
To solve this requirement, we will use the After-save Record-Triggered Flow. Check out this article to understand why we are using after-save record-triggered flow for this scenario.
Before diving further, let me also show you a diagram of the Flow at a high level. Please spend a few minutes going through the following Flow diagram and understand it.  Let’s begin building this automation process.
Guided Practice (We-do):
There are 3 steps to solve Corey’s business requirement using After-Save Record-Triggered Flow. We must:
- Create an Approval Process
- Create a Queue
- Salesforce Flow Steps:
- Define Flow properties for record-triggered flow
- Add a decision element to check if the opportunity amount is greater than $5M
- Add a get records element to find the queue Top Management
- Add a decision element to check if the queue was found or not
- Create a collection variable to store queue Ids
- Add an assignment element to add queue Id to a collection variable (created in step 5)
- Add core action submit for approval – to submit an opportunity for approval
Step 1: Creating an Approval Process
- Click Setup.
- In the User Interface, type Approval Processes.
- Clicks on the Approval Processes.
- Create a New approval process on Opportunity as shown in the following screenshot.
- Click Save.
 Make sure that the Assigned Approver in the very first step of the approval process is Manually Chosen.
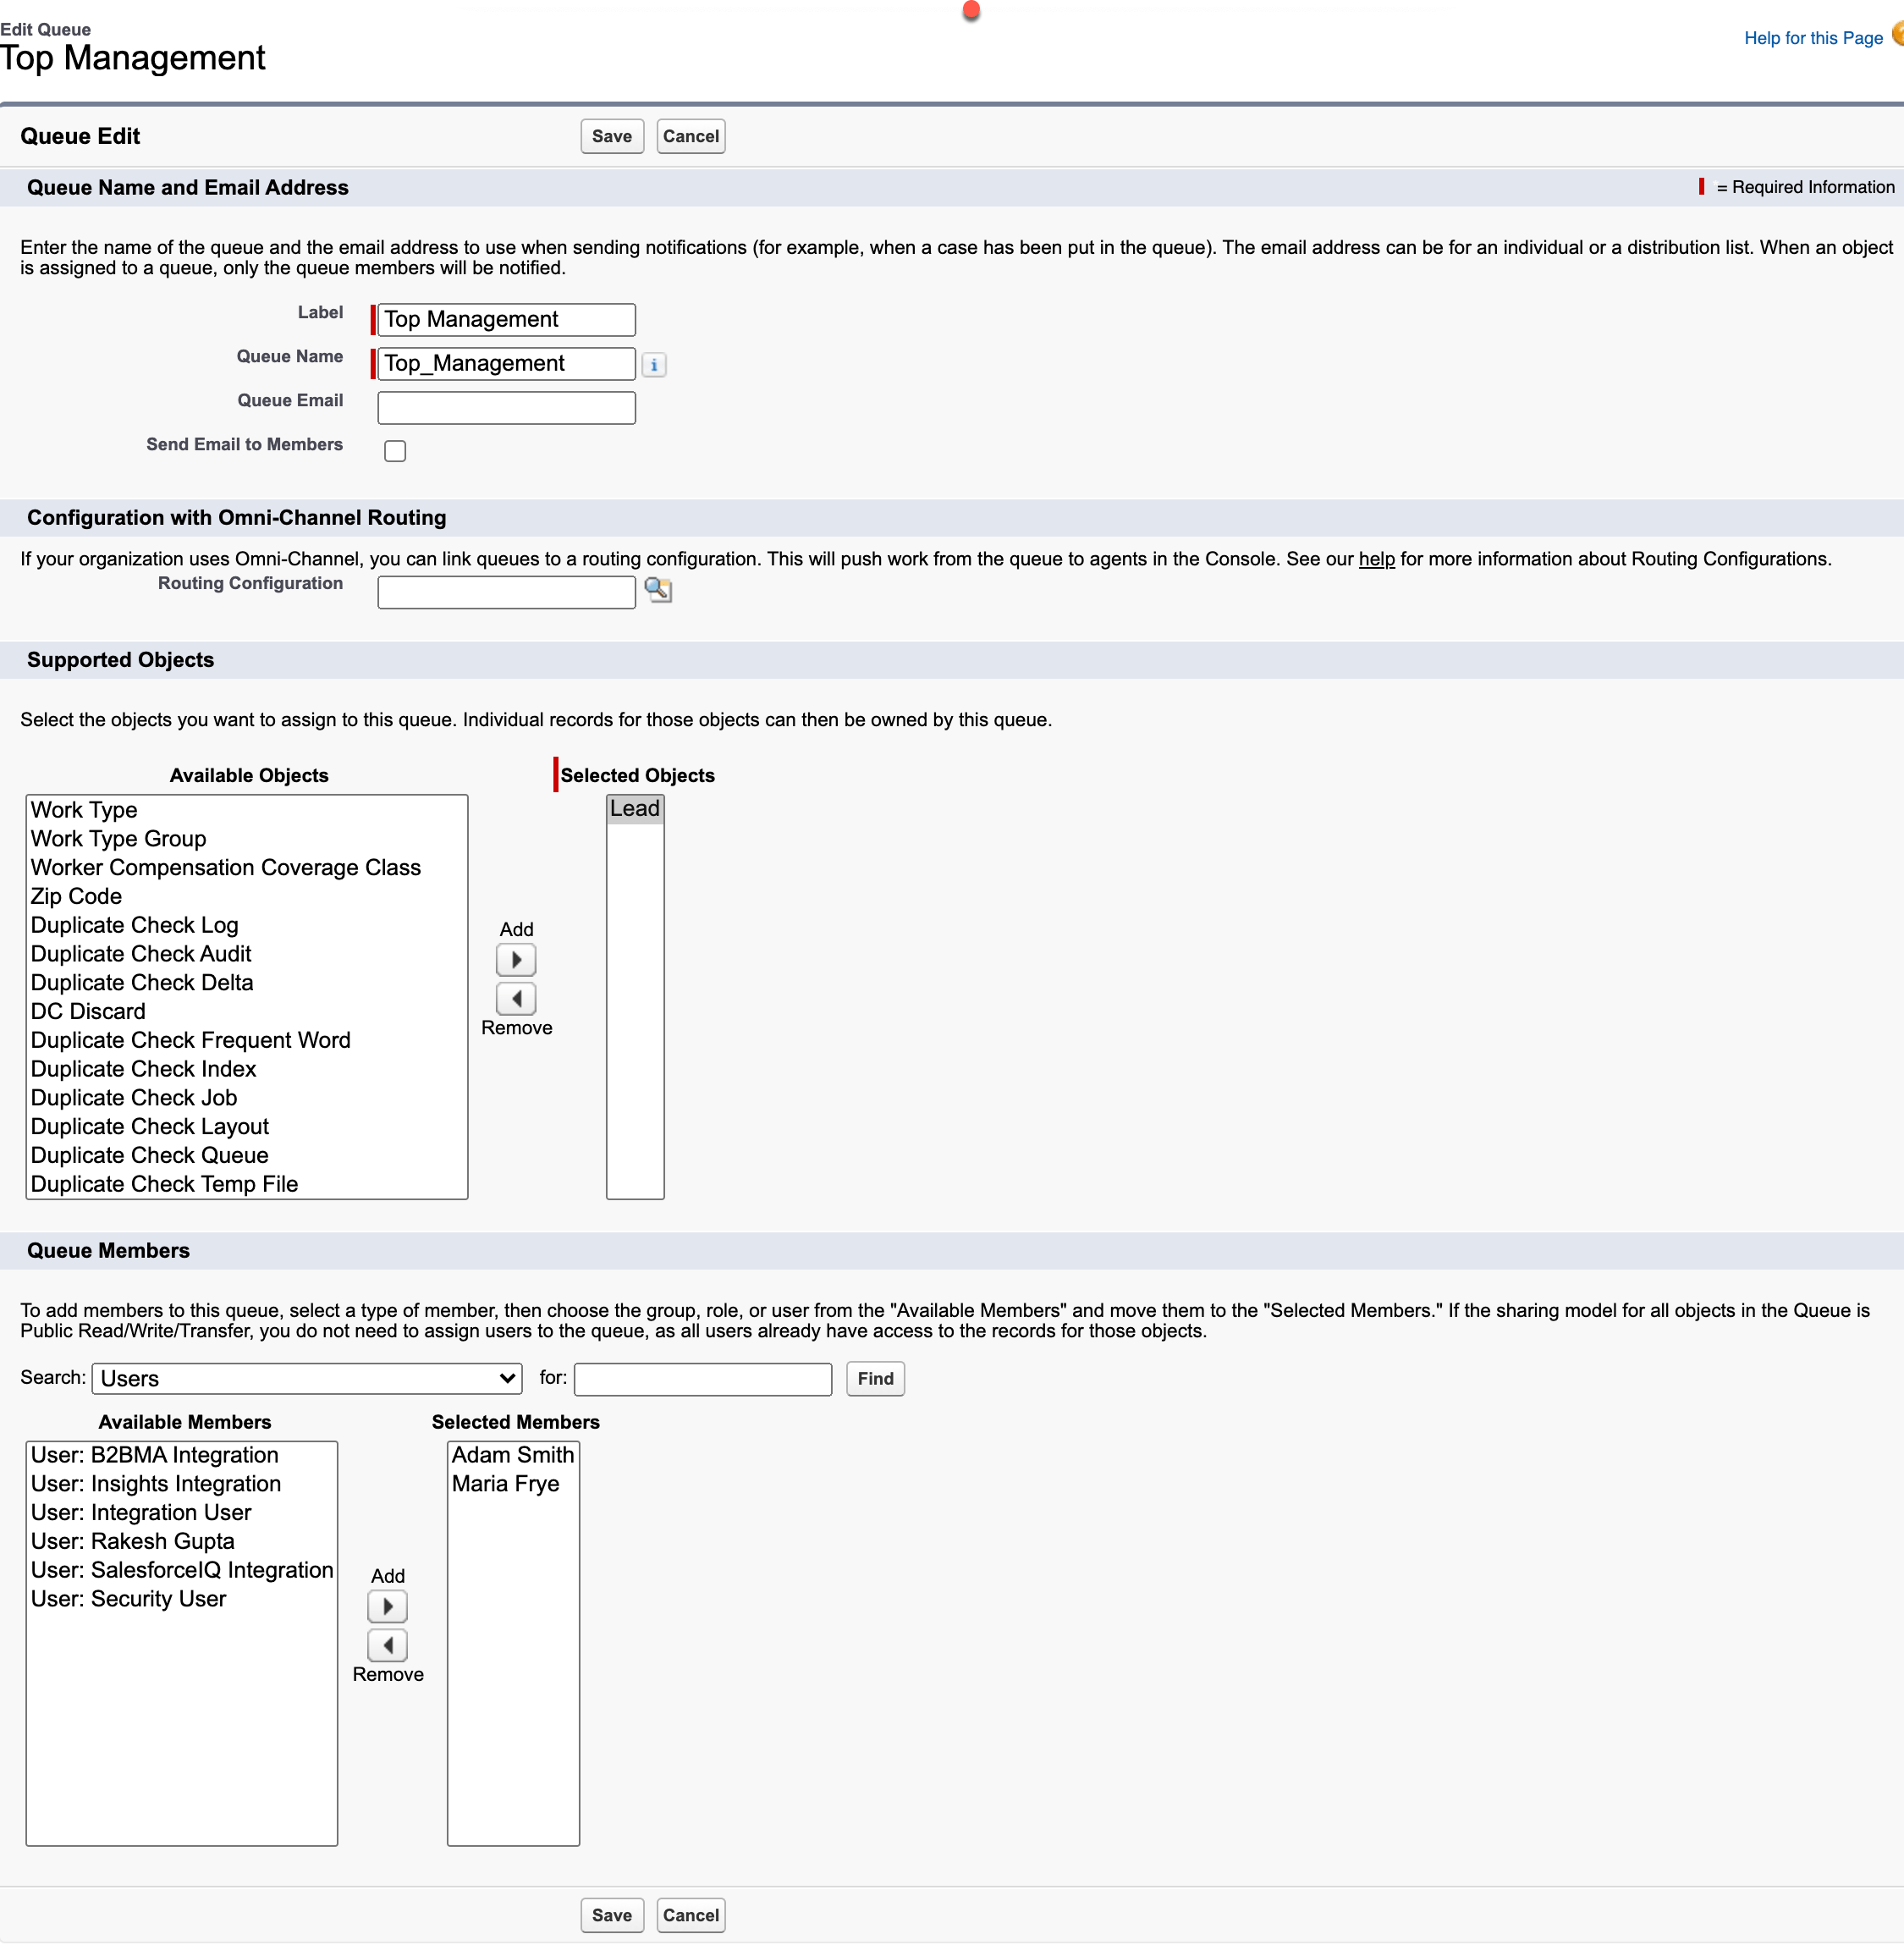
Step 2: Creating a Queue
- Click Setup.
- In the User Interface, type Queues.
- Click on the Queues and then click on the New button.
- Enter a name in the Label field; the Queue Name will auto-populate.
- Now select any random object for Supported Objects as it is required. In this case select Lead, Case, or Custom Object (as we can’t leave this field blank).
- Add the users to the queue.
- Click Save.
Step 3.1: Define Flow Properties
- Click Setup.
- In the Quick Find box, type Flows.
- Select Flows then click on the New Flow.
- Select the Record-Triggered Flow option, click on Create and configure the flow as follows:
- Object: Opportunity
- Trigger the Flow When: A record is created or updated
- Set Entry Criteria
- Condition Requirements: None
- Optimize the Flow For Action and Related Records
- Click Done.

Step 3.2: Using Decision Element to Check if the Opportunity Amount is Greater than $5M
Now we will use the Decision element to check if the opportunity amount is greater than $5M.
- On Flow Designer, click on the +icon and select the Decision element.
- Enter a name in the Label field; the API Name will auto-populate.
- Under Outcome Details, enter the Label the API Name will auto-populate.
- Condition Requirements to Execute Outcome: All Conditions Are Met (AND)
- Row 1:
- Resource: {!$Record.Amount}
- Operator: Greater Than
- Value: 5000000
- Row 1:
- When to Execute Outcome: Only if the record that triggered the flow to run is updated to meet the condition requirements
- Click Done.

Step 3.3: Adding a Get Record Element to Find the Top Management Queue
The next step is to use the Get Records element to find the Top Management queue.
- On Flow Designer, below the > $5M node, click on the +icon and select the Get Records element.
- Enter a name in the Label field; the API Name will auto-populate.
- Select the Group object from the dropdown list.
- Select All Conditions Are Met (AND).
- Set Filter Conditions
- Row 1:
- Field: DeveloperName
- Operator: Equals
- Value: Top_Management
- Click Add Condition
- Row 2:
- Field: Type
- Operator: Equals
- Value: Queue
- Row 1:
- How Many Records to Store:
- select Only the first record
- How to Store Record Data:
- Choose the option to Automatically store all fields.
- Click Done.

Step 3.4: Using Decision Element to Check If Queue was Found or Not
Now, will use the Decision element to check if the previous Get Records element returns a queue top management or not.
- On Flow Designer, click on the +icon and select the Decision element.
- Enter a name in the Label field; the API Name will auto-populate.
- Under Outcome Details, enter the Label the API Name will auto-populate.
- Condition Requirements to Execute Outcome: All Conditions Are Met (AND)
- Row 1:
- Resource: {!Get_Queue}
- Operator: Is Null
- Value: {!$GlobalConstant.False}
- Row 1:
- When to Execute Outcome: If the condition requirements are met.
- Click Done.

Step 3.5: Create Collection Variable to Store Queue Ids
- Under Toolbox, select Manager, then click New Resource to store queue Ids.
- Input the following information:
- Resource Type: Variable
- API Name: varT_QueueIds
- Data Type: Text
- Click the Yes checkbox – Allow multiple values (collection)
- Check Available for Input
- Check Available for Output
- Click Done

Step 3.6: Add an Assignment to Add Queue Id to a Text Collection Variable (Created in step 3.5)
The next step Is to add queue Id into a Text Collection Variable which we created in step 3.5. For this, we will use the Assignment element.
- On Flow Designer, below the Yes node, click on the +icon and select the Assignment element.
- Enter a name in the Label field; the API Name will auto-populate.
- Set Variable Values
- Row 1:
- Field: {!varT_QueueIds}
- Operator: Add
- Value: {!Get_Queue.Id}
- Row 1:
- Click Done.

Step 3.7: Add Submit for Approval Core Action to Submit an Opportunity for Approval
Now we will use the Submit for Approval core action to submit the opportunity for approval to top management.
- On Flow Designer, click on the +icon and select the Action element.
- Search and select the Submit for Approval from the dropdown menu
- Enter a name in the Label field; the API Name will auto-populate.
- Set Input Values
- RecordId: {!$Record.Id}
- Approval Process Name ID: X5M_Deal_Approval_Process
- Next Approver IDs: {!varT_QueueIds}
- Click Done.

In the end, Corey’s Flow will look like the following screenshot:

Once everything looks good, perform the steps below:
- Click Save.
- Enter Flow Label the API Name will auto-populate.
- Click Show Advanced.
- API Version for Running the Flow: 55
- Interview Label: Auto Submit Opportunity Approval to Queue {!$Flow.CurrentDateTime}
- Click Save.

Almost there! Once everything looks good, click the Activate button.
Proof of Concept
Next time, when a Sales rep creates, or updates, an opportunity with an amount greater than $5M – It will submit to Queue approval.
Great! You are done! Feel free to modify it based on your business requirement.
Things to Remember
- Make sure that the user must have access to the Opportunity record he needs to approve.
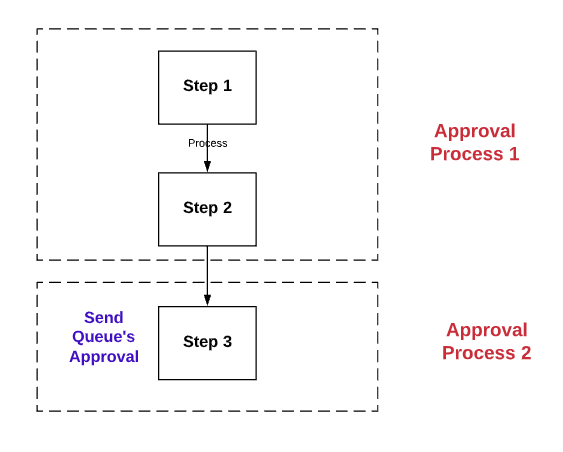
- If you have a multi-step opportunity approval process, and you want to send step three to Queue’s approval, consider breaking it into two approval processes as shown in the following screenshot:

- Another option is to consider, Flow orchestrator.
Formative Assessment:
I want to hear from you!
What is one thing you learned from this post? How do you envision applying this new knowledge in the real world? Feel free to share in the comments below.


Why In Step 1. Assigned Approver = Manually Chosen option is not showing.
Check and make sure you do not have “Allow approvers to access the approval page from within the salesforce.com application, or externally from a wireless-enabled mobile device” selected this will take away the ability to manually select an apporver
Great article! Is there a reason why “Allow Multiple Values” is check on “varT_QueueIds” when there will be only 1 queue available? Thank you.
Yes, the “Next Approver Ids” in the “Submit for Approval” action only accept a list of Ids.
This is great but how can I make sure that ALL users in the Queue approve before moving to the next step? I need to dynamically set multi-users to approve unanimously the opportunity. I already solved the step of finding the correct users by using Flow but flow can only assign one NextApproverId and in your example that will make it into a queue but I need to assign the approval step to multiple users and need ALL of their approval. Is that doable somehow? I have yet to find a solution. Any ideas? Thanks!