

Last Updated on February 5, 2025 by Rakesh Gupta
Big Idea or Enduring Question:
-
How can I send emails with dynamic attachments to my users using Flow without writing any code or installing additional applications?
Objectives:
After reading this blog, you’ll be able to:
- Create a record-triggered flow to automatically send an email alert.
- Utilize the Send Email action within flow to send email.
- Fetch a file from a Salesforce record and attach it to an outbound email.
- Attach multiple files to a single email seamlessly.
- Use a text template to construct a dynamic email body and subject.
- And much more!
Business Use case
Warren Mason, a Junior Developer at Gurukul on Cloud (GoC), met with Sales Director Amanda Wilson to discuss ways to better automate quote email to contact associated with each quote when the status changes to Approved. He proposed attaching the following two files from the quote to outbound emails:
- He wants to attach the quote PDF that the sales representative generates using the out-of-the-box feature. He also confirmed that only one quote PDF will be included in each quote at any given time.
- A static PDF document that representatives will upload under the quote, detailing how customers can process payments. This will enable customers to easily understand and complete the payment process.
- Also, log the emails to non-recipient records, such as the quote in this scenario.
Automation Champion Approach (I-do):
Before the Spring ’25 update, Salesforce Flow couldn’t attach dynamic files to emails without using code. Salesforce Flow is a tool that lets you automate tasks without needing to write any programming.
What Changed in Spring ’25?
With the Spring ’25 release, Salesforce Flow now allows you to attach files to emails when sending such emails from Flow using SendEmail action. This means you can set up automatic emails with attachments based on certain actions, all without writing any code.
Examples of What You Can Do Now
- Order Confirmation Emails
- Before Spring ’25: You couldn’t automatically attach a payment receipt PDF to an email when an order was processed unless you used custom code.
- Now: After an order is processed, Salesforce Flow can automatically send an email to the customer with the payment receipt PDF attached.
- Sending Contracts When Opportunities Are Won
- Before Spring ’25: Sending a contract generated by a third-party tool like S-Doc required using Apex code with Salesforce Flow.
- Now: When an opportunity is marked as “Closed Won,” Salesforce Flow can automatically send the contract generated by S-Doc as an email attachment without any coding.
There are a few possible solutions for the above business scenario. We will use Record-triggered After-Save Flow to solve the requirement.
Before discussing the solution, let me show you a diagram of the process at a high level. Please spend a few minutes going through the following Flow diagram to understand it.
Guided Practice (We-do):
There are 6 steps to solve Warren’s business requirement using Record-triggered After-Save Flow. We must:
- Define flow properties for a record-triggered flow.
- Add a Text variable to store the file IDs.
- Add a Get Record element to get files from the quote.
- Add a Loop element to retrieve the records from the record collection variable
- Add an Assignment element to assign values into a Text Variable in a comma-separated format.
- Add send email action – to send the email with attachments.
Step 1: Define Flow Properties
- Click Setup.
- In the Quick Find box, type Flows.
- Select Flows then click on the New Flow.
- Select the Start From Scratch option and click on Next.

- Select the Record-Triggered Flow option, click on Create
- Object: Quote
- Trigger the Flow When: A record is created or updated
- Set Entry Conditions:
- Row 1:
- Field: Status
- Operator: Equals
- Value: Approved
- Row 1:
- When to Run the Flow for Updated Records: Only when a record is updated to meet the condition requirements
- Optimize the Flow For: Action and Related Records
- Click the X at the top to save your changes.


Step 2: Add a Text Variable to Store the File IDs
- Under Toolbox, select Manager, then click New Resource to store the file Ids in comma-separated format.
- Input the following information:
- ResourceType: Variable
- API Name: varT_QuotePDF_IDs
- Data Type: Text
- Default Value: {!$GlobalConstant.EmptyString}
- Check Available for Input
- Check Available for Output
- Click Done.

Step 3: Adding a Get Record Element to Get Files from the Quote
The next step is using the Get Element to find the files from the quote reocrd.
- On Flow Designer, click on the +icon and select the Get Records element.
- Enter a name in the Label field; the API Name will auto-populate.
- Select the ContentDocumentLink object from the dropdown list.
- Select All Conditions Are Met (AND).
- Set Filter Conditions
- Row 1:
- Field: LinkedEntityId
- Operator: Equals
- Value: {!$Record.Id}
- Row 1:
- How Many Records to Store:
- Select All record
- How to Store Record Data:
- Choose the option to Automatically store all fields.
- Click the X at the top to save your changes.


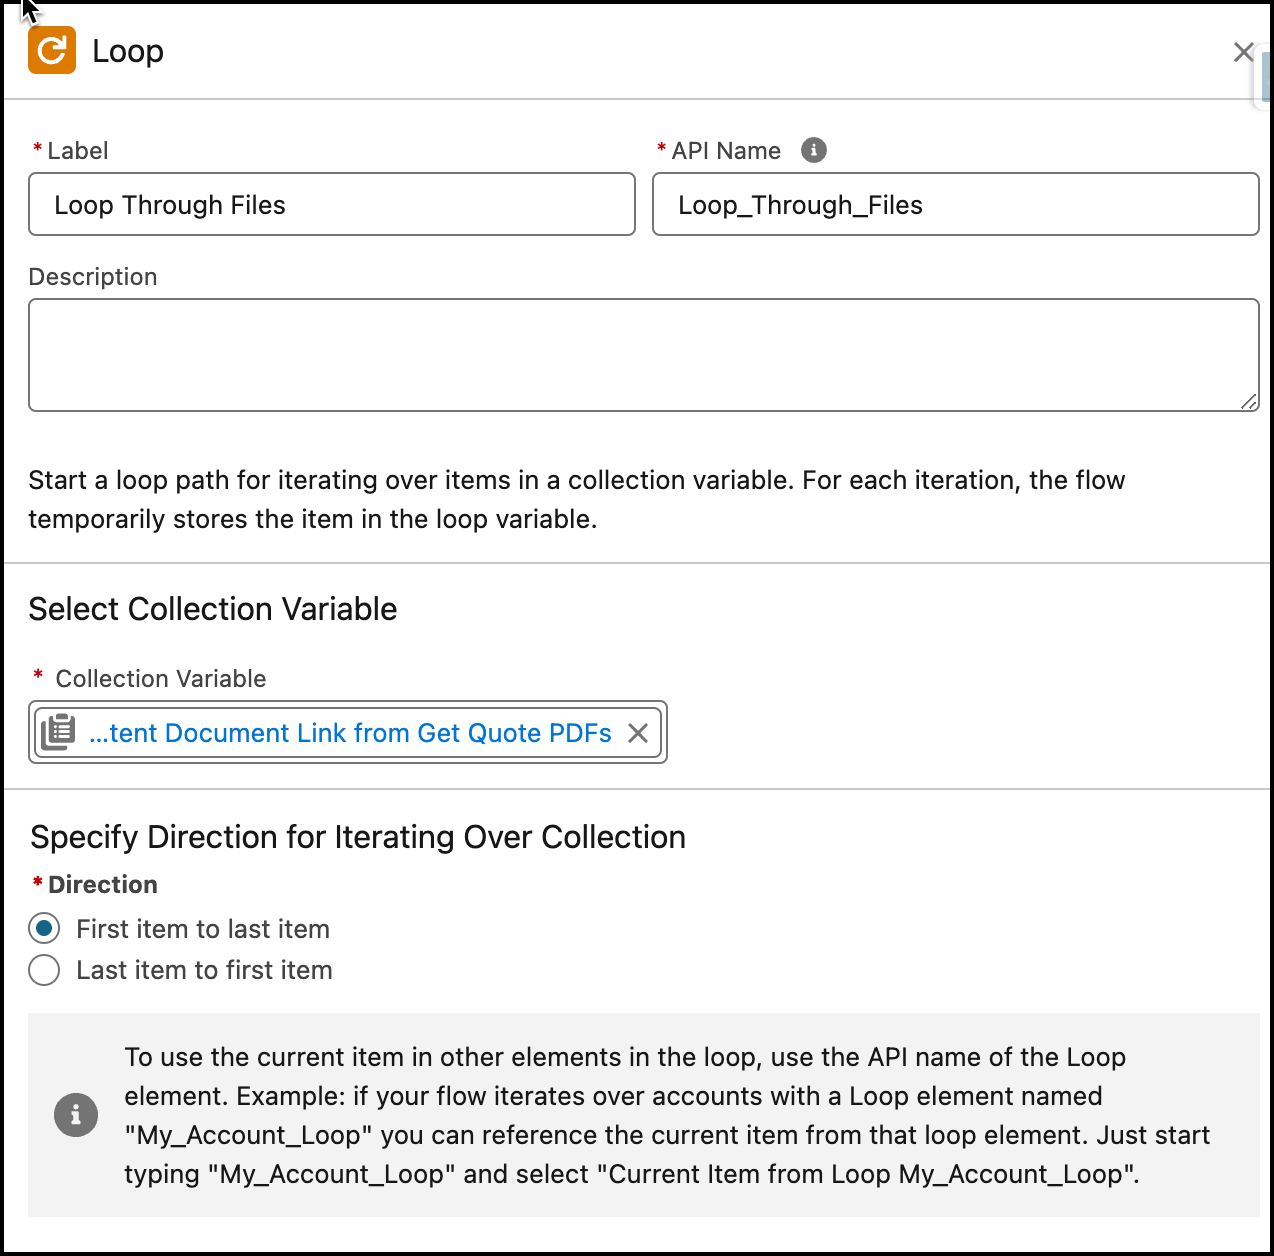
Step 4: Add a Loop Element to Retrieve the Records from the Record Collection Variable
- On Flow Designer, click on the +icon and select the Loop element.
- Enter a name in the Label field; the API Name will auto-populate.
- For Collection Variable select {!Get_Quote_PDFs}.
- For Specify Direction for Iterating Over Collection select the option First item to last item.
- Click the X at the top to save your changes.

Step 5: Adding an Assignment Element to Assign the Values into a Text Variable
The next step is to collect the LatestPublishedVersionId for each file and store them in the text variable in a comma-separated format. We will use the Assignment element.
- On Flow Designer, click on the +icon and select the Assignment element.
- Enter a name in the Label field; the API Name will auto-populate.
- Set Variables Values
- Row 1:
- Field: {!varT_QuotePDF_IDs}
- Operator: Add
- Value: {!Loop_Through_Files.ContentDocument.LatestPublishedVersionId}
- Row 2:
- Field: {!varT_QuotePDF_IDs}
- Operator: Add
- Value: ,
- Row 1:
- Click the X at the top to save your changes.


Step 6: Add send email action – to send the email with attachements.
Now we will use the Send Email static action to send out an e-mail alert with attachements.
- Let’s create two text templates as shown below: one for the subject and another for the body.


- On Flow Designer, click on the +icon and select the Action element.
- Search and select the Send Email from the dropdown menu
- Label the new action Email to Contact
- Set Input Values
- Body: {!tt_emailBody}
- Log Email on Send: {!$GlobalConstant.True}
- Note:- Indicates whether to log the email on the specified records’ activity timelines. Valid values are true and false. Default value is false, and the email isn’t logged. To log an email, you must specify a value in Recipient ID or Related Record ID. If Log Email on Send is set to true, it changes the API called by the action, which can impact your daily email-sending limit.
- Recipient Address List: {!$Record.Contact.Email}
- Related Record ID: {!$Record.Id}
- Note:- The ID of a non-recipient record. For example, the ID of a case record. If Log Email on Send is included, then Related Record ID is the ID of a secondary record to log the email to. In this case, the email can’t be logged if Recipient ID is a lead record. If Email Template ID is included, then Related Record ID is the ID of the non-recipient record used to populate email template merge fields.
- Rich-Text-Formatted Body: {!$GlobalConstant.True}
- Subject: {!tt_emailSubject}
- Click the X at the top to save your changes.


In the end, Warren’s Flow will look like the following screenshot:

Once everything looks good, perform the steps below:
- Click Save.
- Enter the Flow Label the API Name will auto-populate.
- Click Show Advanced.
- API Version for Running the Flow: 63
- Interview Label: Send Emails with Attachements {!$Flow.CurrentDateTime}
- Click Save.


Almost there! Once everything looks good, click the Activate button.
Proof of Concept


Salesforce’s Spring ’25 update makes it easier than ever to send emails with dynamic attachments using Salesforce Flow. Now, you can automate sending important documents like payment receipts and contracts without needing any programming skills. This update helps businesses work more efficiently and provide better service to their customers.
Formative Assessment:
I want to hear from you!
What is one thing you learned from this post? How do you envision applying this new knowledge in the real world? Feel free to share in the comments below.


Hi Rakesh,
With your solution I have received the email with attachments thanks for that but the email attachments are with extension .html instead of its original extension e.g. I have attached .jpg, .png, .docx etc but in email attachment I got these files as .html extension. How can I resolve this issue ?
Hi Rakesh,
Can we use files from Notes & Attachments instead of files? if yes, How?
To be honest, I haven’t tried it, so I’m not sure.
In loop when we are collecting file Id I am getting error “In an Assignment element, “loop_Through_DLR_files.ContentDocument.LatestPublishedVersion” isn’t a valid reference for the value when the “var_DataLoadResPDF_IDs” variable is set with the Add operator.”
i followed the steps mentioned above
Please share a screenshot.
can we use the transform instead of the loop to make the ID collection?
No.
Hi Rakesh Gupta,
You could use the transform element to populate the Attachment Collection IDs instead of a loop and assignment.
No possible as of today.