

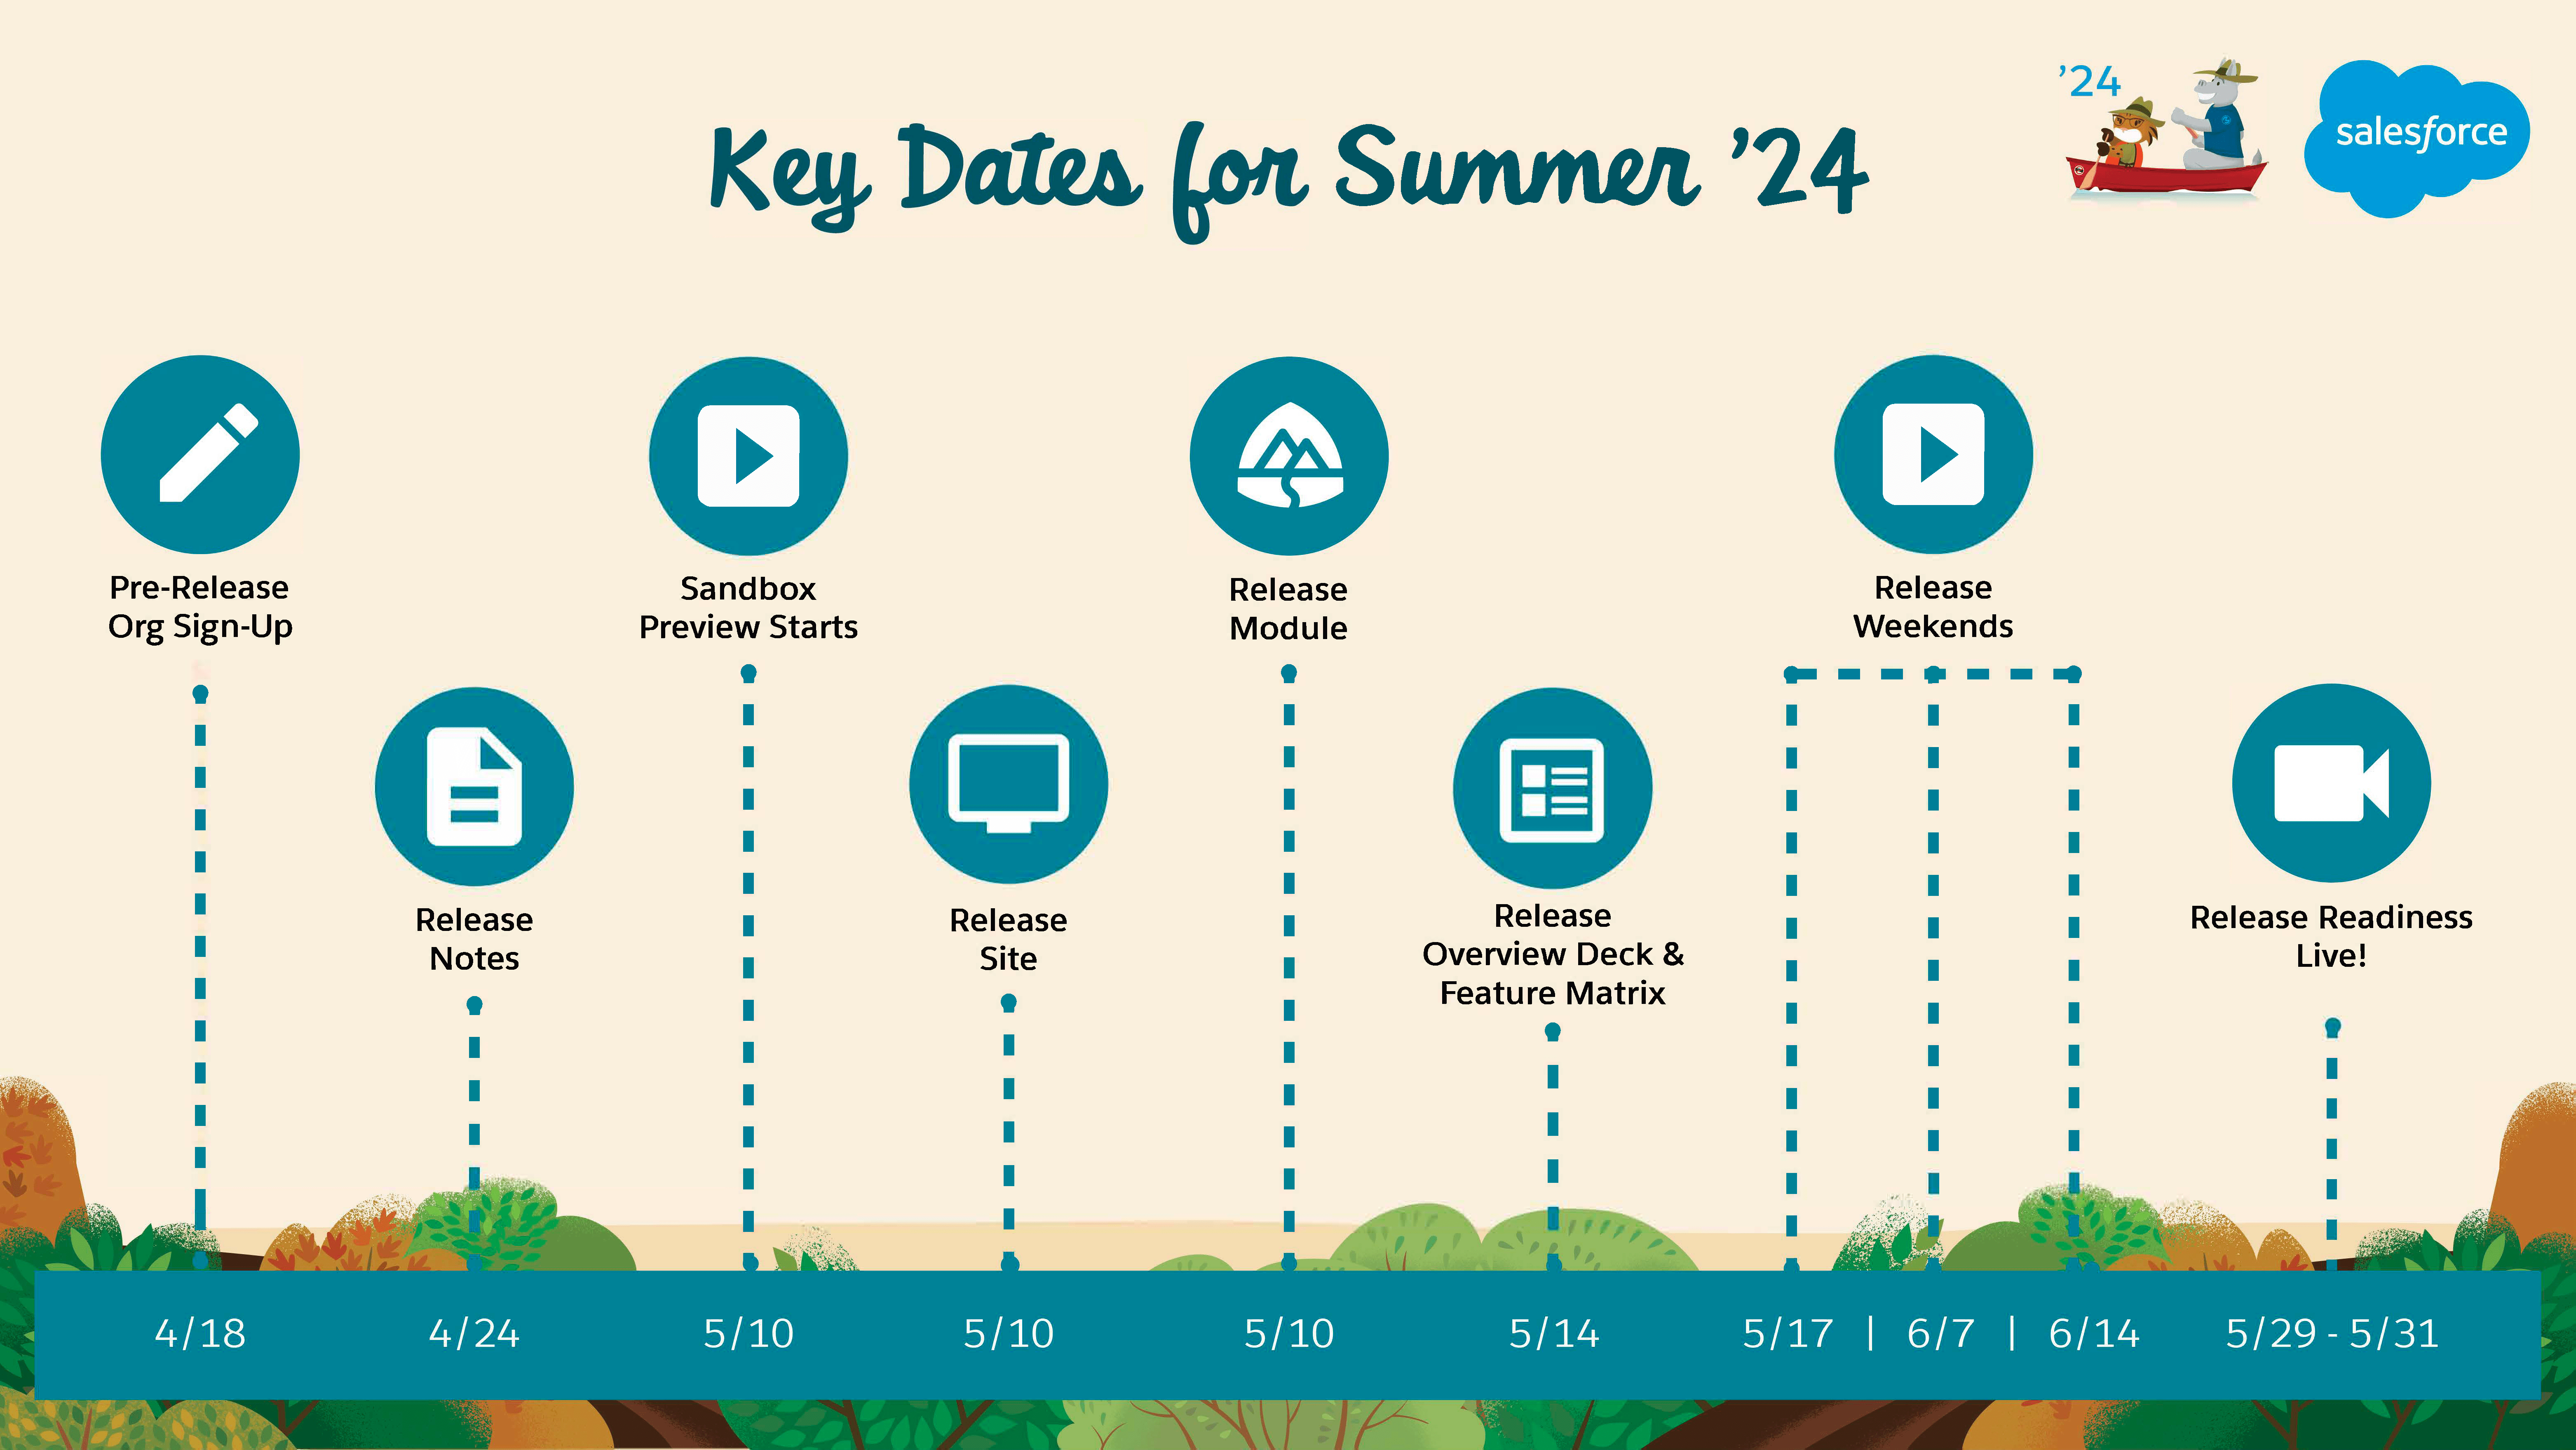
Currently, the Summer’24 release is available under the pre-release program. On the 10th of May 2024, Sandboxes will be upgraded, and as a result, your organization will get the look and feel of the Summer’24 release.
In this release, there are numerous fresh features and improvements encompassing various areas. These include enhancements in Lightning Experience, enhancements in Salesforce Flow, updates to Lightning Web Component and Apex, and new features in Experience Cloud. Einstein Automate and Data Cloud have also seen significant upgrades. Additional improvements can be found in Salesforce Scheduler, Field Service, and Marketing Cloud Account Engagement (formerly known as Pardot). Updates to Quip, CRM Analytics, Salesforce CMS, and Salesforce Payments are also included. Enhancements in Salesforce Connect, Salesforce Backup, and Subscription Management are noteworthy. There are new features in Enablement Sites (myTrailhead), Financial Services Cloud, Salesforce Revenue Cloud, and various APIs.
For example, some exciting features like Einstein for Developers (Beta), Use Threading Tokens in Emails, Improve Search for Users with Search Manager, Invite Customers to Enroll in Group Service Appointments, AI in Data Cloud, and Navigate to a URL-Addressable Lightning Web Component are coming to Salesforce.
Additionally, take a look at these beta and pilot features:
- Use Third-Party Web Components in LWC (Beta): – Open mode now gives you access to the shadowRoot object. Using third-party web components in LWC continues to be available in beta.
- <<Steps to Implement>>
- Many third-party web components require an open shadow root, so they can call appendChild, adoptedStyleSheets, and other web APIs. For example, they can append HTML tags like <div> and <style> or share a stylesheet with a shadow root.
- To create a shadow root, a custom element uses the attachShadow() web API method in the constructor.
- Previously, Lightning Web Security changed open mode to closed mode automatically. In closed mode, JavaScript access to the shadow DOM tree is blocked, and shadowRoot returns null.
- This change applies to custom Lightning web components in Lightning Experience, Experience Builder sites, and all versions of the Salesforce mobile app.
- <<Steps to Implement>>
- Use Cursors for Expanded SOQL Query Result Support (Beta): – With Apex cursors, you can break up the processing of a SOQL query result into pieces that can be processed within the bounds of a single transaction. Cursors provide you with the ability to work with large query result sets, while not actually returning the entire result set. You can traverse a query result in parts, with the flexibility to navigate forward and back in the result set. Package developers and advanced developers can use cursors effectively to work with high-volume and high-resource processing jobs. Cursors are an alternative to batch Apex and address some of batch Apex’s limitations. Cursors are also more powerful because they can be used in a chain of queueable Apex jobs.
- Apex cursors are stateless and generate results from the offset that is specified in the Cursor.fetch(integer position, integer count) method. You must track the offsets or positions of the results within your particular processing scenario.
public class QueryChunkingQueuable implements Queueable { private Database.Cursor locator; private integer position; public QueryChunkingQueuable() { locator = Database.getCursor ('SELECT Id FROM Contact WHERE LastActivityDate = LAST_N_DAYS:400'); position = 0; } public void execute(QueueableContext ctx) { List<Contact> scope = locator.fetch(position, 200); position += scope.size(); // do something, like archive or delete the scope list records if(position < locator.getNumRecords() ) { // process the next chunk System.enqueueJob(this); } } } - This change applies to all editions.
- Apex cursors are stateless and generate results from the offset that is specified in the Cursor.fetch(integer position, integer count) method. You must track the offsets or positions of the results within your particular processing scenario.
- Evaluate Dynamic Formulas in Apex (Beta): – Dynamic formulas in Apex now support Sobjects. Use the new
Formula.builder()method to create an instance of theFormulaBuilderto configure the formula. Get a list of the field names as referenced in a formula using thegetReferencedFields()method. Formula evaluation in Apex is bound by the character limit, but not the compile size limit.- This change applies to all editions.
- View More Details in the Updated OpenAPI Spec sObjects (Beta): – View a details page and get more usable responses with the updated OpenAPI Spec sObjects REST API. The new details page contains information about the state of the current request and details of any errors that have occurred.
- This beta feature is available in Developer Editions, Partner Developer Editions, sandboxes, and scratch orgs that have API Enabled.
- This release introduces important behavior changes to REST API:
- To get the OpenAPI document, use a URI that ends in /locatorID/results. Don’t use a URI that ends in /locatorID.
- On a successful POST request, the server responds with an HTTP 202 status code (Accepted) and a JSON response body. That body contains a URI to view the details page and a URI to get the OpenAPI document.
- If an attempt is made to send more than one document request within 6 hours, an HTTP 429 status code with an error message is returned. Previously, an HTTP 202 status code with a non-error response body was returned.
- Improve Search with Insights from Search Analytics (Pilot): – Analyze search-related data with the built-in dashboard or build your own dashboard. Use insights to make search engine changes, optimize content, and train users. For example, Search Analytics tells you when your users can’t find results for certain search terms. You can then add content to address gaps or modify the search engine to include those search terms in synonym groups.
- <<Steps to Implement>>
- To use Search Analytics, you need a Data Cloud license and Data Cloud credits.
- From Setup, in the Quick Find box, enter Einstein Search, and then select Settings.
- This change applies to Lightning Experience in all editions.
- <<Steps to Implement>>
- Access Your Snowflake Data Using VPC on AWS (Pilot): – You can now gain insights into your private Snowflake data in Salesforce Data Pipelines. Create a remote connection using the Virtual Private Connection (VPC) for Snowflake on AWS connector to sync data from Snowflake to Data Manager. Using the AWS VPC interface endpoints provides secure connectivity to Snowflake internal stages and ensures that data transfer from Snowflake takes place on the AWS internal network and doesn’t use the public internet.
- This change applies to Salesforce Data Pipelines in Lightning Experience. Salesforce Data Pipelines is available for an extra cost in Enterprise, Performance, and Unlimited editions.
- <<Steps to Implement>>
- From Setup, in the Quick Find box, enter Private, and select Private Connect. Create an outbound connection, and then on the Named Credentials page create external credentials and named credentials. In Data Manager, create a new connection for the Snowflake Private Connector.
- Optimize Recipes That Use the Local Salesforce Connection (Pilot): – Improve the performance of recipes run after a full local Salesforce object sync by choosing to optimize the synced data.
- This change applies to Salesforce Data Pipelines in Lightning Experience. Salesforce Data Pipelines is available for an extra cost in Enterprise, Performance, and Unlimited editions.
- <<Steps to Implement>>
- In Data Manager, open the Connections option. Under SFDC_LOCAL, click the object that you want to optimize full syncs for. Then, on the Data Sync Settings tab, select Optimize data sync for future runs.
- Improve the Performance and Scalability of LWR Sites with Experience Delivery (Pilot): – Boost the performance and scalability of your LWR sites using Experience Delivery, a powerful new infrastructure for hosting LWR sites. Along with subsecond page load times, this new infrastructure provides improved security and search engine optimization (SEO) to ensure that your site meets your customers’ demands. Experience Delivery includes some changes since the previous release.
- This change applies to LWR sites accessed through Lightning Experience and Salesforce Classic in Enterprise, Performance, and Unlimited editions. Developer Edition isn’t supported.
- <<Steps to Participate>>
- To participate in this pilot, contact your Salesforce account executive. This pilot is aimed at developers who are comfortable:
- Building LWR or enhanced LWR sites with Experience Builder
- Developing custom Lightning web components that are server-side ready
- Working with Salesforce DX
- To participate in this pilot, contact your Salesforce account executive. This pilot is aimed at developers who are comfortable:

Supported Browsers for Lightning Experience
Lightning Experience is supported by Apple® Safari®’s latest version on macOS. The most recent stable versions of Microsoft® Edge Chromium, Mozilla® Firefox®, and Google Chrome™ are also supported.
Use Apple Safari on iPadOS (iOS 13.x or later). . Lightning Experience on iPad Safari doesn’t support portrait orientation and orientation switching. Use landscape orientation, and maximize your Safari browser to full width. To prevent your tablet from switching orientation, turn on the iPad rotation lock.
Salesforce treats touch-enabled laptops, including Microsoft Surface and Surface Pro devices, as laptops instead of tablets. You can’t access the Salesforce mobile app on these devices. Users are redirected to the full site experience that’s enabled for them—Lightning Experience or Salesforce Classic. Only standard keyboard and mouse inputs are supported on these types of devices.
Customers / Administrator’s Point of View
- Better Error Handling for Outdated Pages in Lightning Experience: – Experience a smoother workflow with more precise error handling if your page falls out of sync with the Salesforce server. Previously, an outdated page immediately triggered an error and a forced refresh. Now, the server attempts to process the outdated page. If successful, the page shows a warning message that reminds you to refresh the page when convenient. Rarely, the server can’t process the outdated page. In this case, an error message prompts you to refresh the page, which resyncs the page to the server.
- This change applies to Lightning Experience in all editions.
- This change is applied on a rolling basis starting in Summer ’24.
- Enable Unauthenticated Users to Modify Service Appointments: – Unauthenticated users can now modify or cancel the service appointments that they created. Salesforce Scheduler provides customizable email templates that include links that redirect users to dedicated pages, allowing them to modify their appointments with ease.
- This change applies to Lightning Experience in Enterprise and Unlimited editions with Salesforce Scheduler enabled.
- <<Steps to Implement>>
- Click the link in the email notification that launches the flow to modify a service appointment for unauthenticated users.
- Generate Personalized Appointment Invitation Emails with Prompt Builder: – Save your end users time from manually writing appointment invitation emails by creating a Salesforce Scheduler Email prompt template.
- Prompt Builder is available in Lightning Experience in Enterprise and Performance editions with the Einstein for Sales, Einstein for Platform, or Einstein for Service add-on. These add-ons include Data Cloud. Einstein generative AI is available in Lightning Experience.
- <<Steps to Implement>>
- From Setup, in the Quick Find box, enter Prompt, and then select Prompt Builder.
- Create a prompt template by using the Salesforce Scheduler Email template type and the appointment invitation object.

- Post from CRM Analytics to Slack: – Facilitate data-driven collaboration by sharing directly from CRM Analytics to your channels in Slack. Now you can post CRM Analytics dashboards and lenses, including intelligent app dashboards. Slack recipients get a snapshot showing the latest data. Or post a link with quick action buttons that can include view details, share, subscribe, and download from Slack.
- This change applies to CRM Analytics in Lightning Experience and Salesforce Classic.
- <<Steps to Implement>>
- On a dashboard or lens that’s been saved in CRM Analytics, click the Post to Slack icon.

- Select the Slack workspace and channels where you want to share the item. Optionally, add a comment to spark conversation with your teammates.

- You can post with or without a snapshot. Both options include a link to the item in CRM Analytics.

- On a dashboard or lens that’s been saved in CRM Analytics, click the Post to Slack icon.
- Access Any Analytics Collection in Lightning Pages: – Provide analytics where your users work with embedded collections on Lightning pages. In the Lightning App Builder, you can now select any Analytics collection to be a component of your page. Previously, only the first collection was available for embedding. A collection can include CRM Analytics dashboards and lenses, Lightning reports and dashboards, and Tableau dashboards.
- Provide analytics where your users work with embedded collections on Lightning pages. In the Lightning App Builder, you can now select any Analytics collection to be a component of your page. Previously, only the first collection was available for embedding.
- <<Steps to Implement>>
- In the Lightning App Builder, add the CRM Analytics Collection component to your page (1).
- Select an available collection from the Collection lookup in the configuration panel (2).

- Amplify Visual Impact In Waterfall Charts with Conditional Formatting: – Help users quickly spot areas of interest and get deeper exploration of their data by adding conditional formatting to waterfall charts. Previously, your data had to be configured with other supported chart types that weren’t as compelling with displaying how positive and negative changes impacted initial data values.
- This change applies to CRM Analytics in Lightning Experience and Salesforce Classic. CRM Analytics is available in Developer Edition and for an extra cost in Enterprise, Performance, and Unlimited editions.
- <<Steps to Implement>>
- Open or create a dashboard with a waterfall chart. Click Formatting and open Conditional Formatting.

- Apply a conditional formatting rule to a field. For example, highlight when available container inventory is lower than demand. Click Done.

- Open or create a dashboard with a waterfall chart. Click Formatting and open Conditional Formatting.
- Embed CRM Analytics Dashboards in LWR Sites (Generally Available): – Let your customers view and interact with CRM Analytics dashboards in your Lightning Web Runtime (LWR) site by adding the CRM Analytics Dashboard component. For example, customers can view visualizations of account data alongside their account information.
- This change applies to CRM Analytics in LWR sites accessed through Lightning Experience and Salesforce Classic. CRM Analytics is available in Developer Edition and for an extra cost in Enterprise and Performance editions, and requires an Experience Cloud license.
- <<Steps to Implement>>
- Use the new CRM Analytics Dashboard Lightning web component in your Experience Cloud pages. From the component palette of an object detail page in Experience Builder, drag the dashboard component to the page.

- Use the new CRM Analytics Dashboard Lightning web component in your Experience Cloud pages. From the component palette of an object detail page in Experience Builder, drag the dashboard component to the page.
- Exchange Fulfilled Items Using UI Flows: – Enhance your exchanges with post-fulfillment and uneven exchanges—no need to create your own flow using APIs. Increase your post-order services and provide a more flexible order management experience. To use the exchanges flow in the UI, clone the flow and then add it to your Actions and Recommendations section.
- This change applies to Order Management in Unlimited, Developer, and Enterprise editions with the Order Management Growth license.
- Get a Summary of a User’s Permissions and Access: – If you’ve wondered what permissions, public groups, or queues a user is assigned, you’re in luck. With the User Access Summary you can see this information directly from the user’s detail page, saving you time, clicks, and effort. There’s no need to run queries or look through each profile, permission set, public group, or queue when troubleshooting or managing access.
- This change applies to Lightning Experience and Salesforce Classic (not available in all orgs) in all editions.
- <<Steps to Implement>>
- From Setup, in the Quick Find box, enter Users, and then select Users. Select a user, and then click View Summary.

- From Setup, in the Quick Find box, enter Users, and then select Users. Select a user, and then click View Summary.
- See What’s Enabled in Permission Sets and Permission Set Groups : – It can be tricky to track all the permissions included in your permission sets and permission set groups. To make managing your users’ access easier, you can now see all enabled object, user, field, and custom permissions on one page. You can also see which permission set groups include the permission set and vice versa. This feature, now generally available, includes some changes since the beta release. The summary page has an improved interface, and Salesforce added the ability to see included custom permissions and permission sets in permission set groups.
- This change applies to Lightning Experience and Salesforce Classic (not available in all orgs) in all editions.
- <<Steps to Implement>>
- From Setup, in the Quick Find box, enter Permission Sets, and then select Permission Sets. Or, enter Permission Set Groups, and then select Permission Set Groups. Select a permission set or permission set group, and then click View Summary.

- From Setup, in the Quick Find box, enter Permission Sets, and then select Permission Sets. Or, enter Permission Set Groups, and then select Permission Set Groups. Select a permission set or permission set group, and then click View Summary.
- Automate and Migrate User Access with User Access Policies (Generally Available): – Automate your users’ assignments to permission sets, package licenses, public groups, and other access features based on criteria that you set. Create policies that automatically grant or remove access whenever users are created or updated. Or, easily migrate large sets of users to a new access setup in a single operation. User access policies, now generally available, include some enhancements since the Spring ’24 release. You can now create 200 active policies, up from 20, and set the order in which active policies are run.
- This change applies to Lightning Experience and Salesforce Classic (not available in all orgs) in Enterprise and Unlimited editions.
- <<Steps to Implement>>
- From Setup, in the Quick Find box, enter User Management Settings, and then select User Management Settings. Turn on User Access Policies. T
- To create or manage your user access policies, in the Quick Find box, enter User Access Policies, and then select User Access Policies.
- Set Conditional Visibility for Individual Tabs in Lightning App Builder: – Customize tab visibility in the Lightning App Builder according to your business needs. You can set the conditions to dynamically show or hide an individual tab in the Tabs component. This change applies to tabs on LWC-enabled record pages.
- This change applies to Lightning Experience in Professional, Enterprise, Unlimited, Pro Suite, and Developer editions.
- Read this article fort step-by-step instructions.
- Answer Questions Easily with Knowledge and Generative AI (Beta): – Generate conversational answers to customer questions by connecting the Answer Questions with Knowledge copilot action to your bot. When a customer asks your bot a question that doesn’t match to a dialog, the copilot action searches for relevant information in your knowledge articles. If the action finds information, the Einstein Copilot platform sends an AI-generated response to the bot. Then the bot delivers the response as a message to the customer. This feature is available in English only.
- This change applies to Lightning Experience in Enterprise, Performance, and Unlimited editions with the Einstein for Sales, Einstein for Service, or Einstein Platform add-ons.
- <<Steps to Implement>>
- Set up Einstein Copilot for Salesforce and Lightning Knowledge. Then, in the Bot Builder, go to the Bot Overview page. In the Intent Enhancements section of Settings, select Use features that intelligently search for knowledge articles with this bot.
- Then, for the knowledge feature, select Copilot Action: Answer Questions with Knowledge (Beta).
- Add New Custom Fields to Dynamic Forms-Enabled Pages: – Quickly and easily add a new custom field to your Dynamic Forms-enabled pages by using a new step in the custom-field creation wizard.
- This change applies to Lightning Experience in Group, Professional, Enterprise, Performance, Unlimited, and Developer editions.
- <<Steps to Implement>>
- Create a custom field as usual in Setup. After setting field-level security, you see the new step to select which Lightning record pages to add the field to.
- The new field is added to each record page you select as the last field in the first field section on the page.

- Send Operational Emails to Opted-Out Prospects Directly from Engagement Studio: – You can now send non-marketing emails to opted-out prospects directly from Engagement Studio. Previously, you could only send operational emails as list emails.
- This change applies to all Account Engagement editions.
- Polish the Layout of Your LWR Site for Every Screen Size: – Enjoy more flexibility and control over the layout and spacing of your LWR site, and ensure the best presentation of your content on any screen size. Arrange columns to be side by side or stacked, and specify the arrangement for desktop, tablet, and mobile devices. Vertically align the components across columns to the top, center, or bottom of the column. Refine page spacing and layout with the minimum height fields in the Section and Columns components.
- This change applies to LWR sites accessed through Lightning Experience and Salesforce Classic in Enterprise, Performance, Unlimited, and Developer editions.
- <<Steps to Implement>>
- In Experience Builder, on the Section or Columns property panel, adjust the Minimum Height and Component Alignment fields. To specify the column arrangement for a specific screen size, use the View Mode dropdown in the top navigation bar to select the Desktop, Mobile, or Tablet view, and adjust the Column Arrangement property.

- In Experience Builder, on the Section or Columns property panel, adjust the Minimum Height and Component Alignment fields. To specify the column arrangement for a specific screen size, use the View Mode dropdown in the top navigation bar to select the Desktop, Mobile, or Tablet view, and adjust the Column Arrangement property.
- Prevent Overlapping Optimization Runs: – Enhance operational stability and reduce your optimization partial completion rate by preventing optimization requests from running on overlapping datasets. Check for optimization requests being processed for the same territory and time horizon and then block any identical or overlapping requests. For example, a dispatcher activates resource schedule optimization for a resource that’s already part of a dataset optimized with in-day optimization. And, avoid setting up overlapping enhanced optimization requests when using enhanced scheduled jobs. Previously, you could create an enhanced scheduled job with overlapping time periods within the same job.
- This feature is available in Lightning Experience and Salesforce Classic in Enterprise, Unlimited, and Developer editions with the Field Service managed package installed.
- <<Steps to Implement>>
- In Setup, go to Field Service Settings and verify that Field Service Enhanced Scheduling and Optimization is enabled. In the Field Service Admin app, go to Field Service Settings. Select Optimization, and then select the Logic tab. Check that Enable optimization overlaps prevention is enabled (default).

- For enhanced scheduled jobs, go to the Scheduled Jobs tab and then select the General tab.

- In Setup, go to Field Service Settings and verify that Field Service Enhanced Scheduling and Optimization is enabled. In the Field Service Admin app, go to Field Service Settings. Select Optimization, and then select the Logic tab. Check that Enable optimization overlaps prevention is enabled (default).
- Enhance Service Coverage and Boost Resource Productivity by Scheduling Across Multiple Time Zones: – Increase resource utilization and reduce response time by enabling your resources to service multiple time zones in one shift. Set operating hours on secondary service territories in various time zones to maximize resource availability. For example, a mobile worker can service adjacent cities in different time zones. Or, a service resource can provide technical assistance from a call center to New York, Tel Aviv, London, and Sydney. Previously, with Enhanced Scheduling and Optimization, secondary service territory memberships with different time zones on operating hours were ignored.
- This feature is available in Lightning Experience and Salesforce Classic in Enterprise, Unlimited, and Developer editions with the Field Service managed package installed.
- <<Steps to Implement>>
- In Setup, go to Field Service Settings and verify that Field Service Enhanced Scheduling and Optimization is enabled. Define Operating Hours on secondary service territory memberships in different time zones.

- In Setup, go to Field Service Settings and verify that Field Service Enhanced Scheduling and Optimization is enabled. Define Operating Hours on secondary service territory memberships in different time zones.
- Use Screen Flows as Cadence Steps in Cadence Builder 2.0: – Now sales managers can specify a screen flow as a cadence step in Cadence Builder 2.0. Use screen flow steps to let reps create a case, event, or task or to perform another action. The screen flow runs when the sales rep initiates the step for a target from their To Do List, Work Queue, or the Sales Engagement component on target records. Use the Cadence Step Flow process type to create screen flows for cadence steps, or use the included flow templates.
- This change applies to Lightning Experience in Enterprise, Performance, and Unlimited editions with Sales Cloud.
- In the Flow Builder, create a screen flow from the Cadence Step Flow process type. Three flow templates are included with Sales Engagement. Flow templates must be activated before being cloned.
- Create a Case
- Create an Event
- Create a Task

- Then add a screen flow step in Cadence Builder 2.0 (1) and choose a screen flow (2).


Additional Enhancements Worth Noting!
- Create and Verify Your Default No-Reply Organization-Wide Email Address to Send Email (Release Update): – To comply with increased email security standards, orgs are required to create and verify a Default No-reply address in Organization-Wide Email Address settings. The verified Default No-Reply organization-wide email address is used to send emails from your org. This update allows increased accountability for email deliverability.
- This change applies to Lightning Experience and Salesforce Classic in all Editions, except Database.com.
- This update was introduced with Summer ’24 and Salesforce is scheduled to enforce it in Winter ’25
- <<Steps to Implement>>
- In order to comply with increased email security standards, some emails will fail to be sent when lacking a customer defined Default No-Reply Organization-Wide Email Address.
- Add the New Setup Domain: – Ensure that Setup pages in Lightning Experience load content correctly when browsers block third-party cookies. If your users have general access to the internet, no action is required. If your company controls users’ or servers’ access to the internet through firewalls or allowlists, your IT department must add *.salesforce-setup.com to the company’s list of allowed domains. Salesforce Setup pages are now hosted on that domain.
- This change applies to Lightning Experience in all editions.
- Prepare for Restrictions on Salesforce Cookie Use: – To test custom functionality and code that relies on a Salesforce session cookie before browsers fully block third-party cookies, enable a new My Domain setting. For example, you enabled third-party cookies to use Lightning Out (beta) without a custom domain or token-based authentication. Also, to load your authenticated Visualforce page in an iframe on a third-party website, the process relies on a Salesforce session cookie. Previously, to test the impact of this change on the use of Salesforce cookies, you set flags and settings in your browser, and those steps vary by browser.
- This change applies to Lightning Experience and Salesforce Classic in Group, Essentials, Professional, Enterprise, Performance, Unlimited, and Developer editions.
- <<Steps to Implement>>
- To prevent third-party use of Salesforce cookies, from Setup, in the Quick Find box, enter My Domain, and then select My Domain.
- In the Routing and Policies section, click Edit.
- Enable Require first-party use of Salesforce cookies, and save your changes.

- MFA Is On by Default for Direct Logins to Production Orgs: – To prevent unauthorized access to Salesforce accounts, multi-factor authentication (MFA) is required when users log in. To help customers satisfy this contractual security requirement, MFA is now a default part of the direct login process when a new production org goes live. Sandbox orgs aren’t affected by this change.
- This change applies to Lightning Experience, Salesforce Classic, and all versions of the mobile app in all editions.
- Monitor Net Zero Cloud Changes with Field History Tracking: – View changes to key Net Zero Cloud fields with Field History Tracking. You can add up to 20 fields per object on every Net Zero Cloud object, expanding your monitoring and data governance reach to sustainability and emissions data
- This change applies to Salesforce Classic, Lightning Experience, and the Salesforce app in Contact Manager, Essentials, Group, Professional, Enterprise, Performance, Unlimited, Developer, and Database.com editions.
- <<Steps to Implement>>
- From Setup, in the Quick Find box, enter Field History Tracking, and then select Field History Tracking.
- Click View on an object, enable tracking on that object, and then select the fields you want to track.
- See Where a Public Group Is Used: – Quickly find where a public group is used and the level of access its users get without running queries or clicking multiple features. For a specific public group, you can view the sharing rules an object is referenced in and the list views it’s shared with in the new Public Group Access Summary. You can also see the report and dashboard folders that the public group can access and the other public groups it’s included in.
- This change applies to Lightning Experience and Salesforce Classic (not available in all orgs) in Professional, Enterprise, Performance, Unlimited, and Developer editions.
- <<Steps to Implement>>
- From Setup, in the Quick Find box, enter Public Groups, and then select Public Groups.
- Select a public group, and then click View Summary.

- Allow Users to Freeze Users and Monitor Login History Without the Manage Users Permission: – You can now grant the ability to freeze and unfreeze users by using the Freeze Users permission. You can also allow users to view and download login history with the Monitor Login History permission. With this permission, a user can access the login history related list on user records and view data in Login History reports with relevant report permissions. Previously, you assigned the Manage Users permission to enable these features for users, but it includes additional capabilities. For users currently assigned the Manage Users permission, the Freeze Users and Monitor Login History permissions are enabled automatically.
- This change applies to Lightning Experience and Salesforce Classic (not available in all orgs) in Professional, Enterprise, Performance, Unlimited, and Developer editions.
- <<Steps to Implement>>
- To assign these new permissions, add them to a permission set, and then assign the permission set to users who require these permissions.
- Use Blank Spaces to Align Fields on Dynamic Forms-Enabled Pages: – Customize field alignment in Dynamic Forms field sections with the new Blank Space component. Find it on the Fields tab when viewing Dynamic Forms-enabled Lightning record pages in the Lightning App Builder. You can use a blank space on its own to separate fields vertically inside a field section. To further enhance the alignment of your field section content, you can also use a blank space in conjunction with the field section property Align fields horizontally.
- This change applies to Lightning Experience in Group, Professional, Enterprise, Performance, Unlimited, and Developer editions.

- A blank space component is considered a field and counts against the limit of 100 fields per region. It doesn’t count against the component page limit.
- This change applies to Lightning Experience in Group, Professional, Enterprise, Performance, Unlimited, and Developer editions.
- Create Rich Text Headings in Lightning App Builder: – Customize rich text on your Lightning pages by giving it style values such as Heading 1 and Heading 2 using the new dropdown menu in the Rich Text component editor. Assigning rich text a Heading value also makes that text accessible for users viewing your Lightning page with a screen reader.
- This change applies to Lightning Experience in Group, Professional, Enterprise, Performance, Unlimited, and Developer editions.
- <<Steps to Implement>>
- Open a custom Lightning page in the Lightning App Builder, and select a Rich Text component on the canvas.
- Select a block of text inside the editor, and use the new styling dropdown to give the text a heading value. For regular rich text, select the Normal setting.

- Fix Formula Syntax Errors with Einstein for Formulas: – Einstein for Formulas now helps you fix syntax errors in a formula in addition to providing an explanation for a formula that’s used in Formula fields, default field values, and record validation rules. Create a formula or use an existing Salesforce formula in the Formula Editor and get an explanation generated. For any syntax errors in the formula, use the fixed formula suggested by Einstein.
- This change applies to Lightning Experience in Enterprise, Performance, and Unlimited editions. Einstein generative AI is available in Lightning Experience.
- <<Steps to Implement>>
- To fix a syntax error in a formula you entered in the Formula Editor, click Use Formula Assistant and Einstein suggests a fixed formula for you.
- Get Better Performance for List Views: – To improve performance and meet the latest accessibility standards, list views for custom objects now render with Lightning Web Components (LWC) instead of Aura. LWC, Salesforce’s newest framework, delivers your data faster and makes the latest features available for your list views. List views for standard objects, such as accounts, still render with Aura.
- This change applies to Lightning Experience in all editions.
- List view pages for custom objects include these minor changes, but the overall way that your users work in list views hasn’t changed.
- The List Views dropdown menu displays up to 100 lists and shows Recent List Views and the option to search your lists at the top of the dropdown. If you have more than 100 list views, use search terms to find a specific list.
- Keyboard navigation for the List Views dropdown menu starts with focus at the top of the list rather than on the currently pinned list.
- Some icons and highlights, such as the check mark next to a selected list in the List Views dropdown menu and the icon, have updated colors. Additionally, the color, size, alignment, and capitalization of some windows, buttons, and dropdown menus have changed.
- The Filters panel has new button options in the add or edit filters work flows. Cancel to exit the add or edit filter flow, and Save to apply your changes. You can still click outside of the panel or press the Escape key to close the panel. When you add or edit a filter, the Value menu closes each time you select an option from it. Options appear below the Value menu as you select them. To remove an existing filter, click the icon.
- When you edit filter logic, the Cancel and Save buttons don’t appear in the Filters panel until you click outside of the Filter Logic text field. Your filter logic is checked for errors when you save your changes.
- When you create a filter that uses a location-based field, the values that you select initially show as the full location name in the Filters panel. After you save your changes, the values convert to an abbreviated form, such as CA for California or NV for Nevada.
- After you add a filter, keyboard focus returns to the Add Filter button. After you edit a filter, keyboard focus returns to the edited filter.
- Create Contacts Automatically from Email and Calendar Interactions: – Never create a contact from scratch again. You can also set a threshold to create or suggest contacts after they’re mentioned in your email activity 3 to 10 times.
- This change applies to Lightning Experience in Professional, Enterprise, Performance, Unlimited, Einstein 1 Sales Edition, and Developer editions with Sales Cloud that have Einstein Activity Capture enabled.
- <<Steps to Implement>>
- From Setup, in the Quick Find box, enter autocreation, and then select Autocreation Settings.
- Enable Automatic Contact Creation and set a threshold as to how many times a person is mentioned in email activity before a contact is created or suggested automatically.

- Enhance Your Contact Information Automatically: – Use generative AI and Automatic Contact Enhancements to add phone, address, title, seniority level, department group, and buyer attributes (such as decision maker or detractor) automatically to your contacts based on sales activity. You can show contacts with this information on a buyer relationship map, which helps you visualize key players in your deal or account.
- This change applies to Lightning Experience in Professional, Enterprise, Performance, Unlimited, Einstein 1 Sales Edition, and Developer editions with Sales Cloud that have Einstein Activity Capture enabled. Einstein generative AI is available in Lightning Experience.
- Organize and Find Records Easily with Personal Labels: – Now users can apply their own labels to records to help them organize, track, and find the records they need quickly and easily. Add labels to records related to a region, project, campaign, or anything else that helps keep work organized. Labels that users add to records are separate from labels that are added to To Do List items.
- This change applies to Lightning Experience in Enterprise, Professional, and Unlimited editions with Sales Cloud.
- When users add labels to records, they can quickly view all records with a specific label, as well as the list of labels they’ve created. Each user creates and manages their own set of labels.
- You can add labels to records on these objects.
- Account
- Cadence
- Cadence Step Tracker
- Call Script
- Campaign
- Contact
- Case
- Email Template
- Lead
- Opportunity
- Orchestration Work Item
- Task
- Personal labels added to records are separate from Topics, which other users can see.
- Save Time with Content Record Cloning in Your Enhanced CMS Workspace: – Instead of creating a content record from scratch, make copies of an existing content record of any content type—and its variants—in enhanced CMS workspaces. Organize content into folders, then edit cloned content for quick reuse.
- This change applies to enhanced CMS workspaces in Lightning Experience in Enterprise, Performance, Unlimited, and Developer editions.
- <<Steps to Implement>>
- There are two ways to clone content.
- From the content detail page in your enhanced CMS workspace, click Clone.
- Or, from the row-level actions in the workspace’s content list, select Clone You can clone variants of the content record, too.
- There are two ways to clone content.
- Limit Who Receives Notifications About Certificate Expiration: – By popular demand, you now have more control over who gets certificate expiration email notifications. Assign the new Receive Certificate Expiration Notifications user permission only to the admins who manage certificates. Also, notification emails now include more details about how to update certificates before they expire.
- This change applies to Lightning Experience and Salesforce Classic in Enterprise, Performance, Unlimited, and Developer editions.
- <<Steps to Implement>>
- With this change, most admins see fewer certificate-related emails in their inboxes. And admins who you designate to receive expiration notifications are better informed about how to handle impending certificate expirations.
- Renamed:
- Salesforce Tax Solution Is Renamed Manual Salesforce Tax Solution
- Standard Deployment is the new name for the Out-of-the-Box Deployment feature
- Work Capacity Limit Relaxation Renamed for Better Clarity to Limit Override
- Password Reset Login Subtype Label Is Changed
- Salesforce renamed DataRaptor to Omnistudio Data Mapper
- Retired:
- Salesforce Functions Is Being Retired
- Salesforce for Outlook Is Now Being Retired in December 2027
- Streaming API Versions 23.0 Through 36.0 Are Being Retired
- Cadence Builder Classic Is Being Retired
- Standard-Volume Platform Events Are Being Retired
- Salesforce Inbox Retired
- Inbox Mobile Was Retired
- Salesforce for Outlook (Retiring)Social Customer Service Starter Pack Is Being Retired
- Engage for Gmail Chrome Extension Is Being Retired
- Salesforce Platform API Versions 21.0 Through 30.0 Retirement


Developer’s Point of View
- Update Records Using External IDs in REST API: – You can now update a record using the value of its external ID with the new updateOnly parameter in REST API. Previously, you could only upsert a record using its external ID.
- This change affects API version 61.0 and later.
- <<How>>
- To prevent creating a new record if the target record can’t be found or doesn’t exist, add the updateOnly parameter to a URL that executes an upsert operation. You can also use URLs with the updateOnly parameter in composite REST API and composite graph REST API.
- Ensure More Secure Compilation of Apex Classes: – Run the Compile all classes option on the Apex Classes page in Setup to achieve more reliable compilation. Compiling all classes from Setup now produces consistent compilation output as compared with other compilation mechanisms, such as metadata deployment or on-demand compilation.
- This change applies to all editions.
- <<How>>
- Previously, in some scenarios the Compile all classes option could compile classes that reference Salesforce entities that your organization doesn’t have access to. Attempts to compile Apex classes that contain such references now result in compilation errors, such as Invalid Type: SomeEntity.
- Run the Lightning Knowledge Migration Tool: – Get the latest Knowledge features when you migrate from Knowledge Classic to Lightning Knowledge, like Einstein Article Recommendations, Einstein Search for Knowledge, Flow support, and bots. The Classic Knowledge data model retirement phase is in progress. To prepare for this retirement and take advantage of updated features, run the Lightning Knowledge Migration Tool. After running the Lightning Knowledge Migration Tool, you can still use Classic Knowledge in the Classic UI. We aren’t retiring the Classic UI for Knowledge.
- This change applies to all Salesforce customers using Classic Knowledge.
- <<How>>
- Run the Lightning Knowledge Migration Tool before the deadline to migrate to the Lightning Knowledge data model.
- After the migration tool is run, Lightning Knowledge works in these ways in Salesforce Classic.
- Because Lightning Knowledge uses record types instead of article types, you can no longer filter by article type.
- You can’t set a default record type in Salesforce Classic.
- Some actions, such as Change Record Type, aren’t available from the knowledge article record page in Salesforce Classic.
- Picklist values assigned to one record type in Knowledge aren’t visible on records in Salesforce Classic.
- If you have custom solutions for your Classic Knowledge implementation, such as Visualforce components or pages, refactoring them to work with the Lightning Knowledge data model is sometimes required. Especially if your custom solution relies on article types, refactor it to work with record types. Use a sandbox to test your custom solutions before running the migration tool in production.
- Control Utilities Within the Utility Bar: – To control a utility within a utility bar, use the Utility Bar API methods from a Lightning web component.
- This change applies to Lightning Experience in Group, Essentials, Professional, Enterprise, Performance, Unlimited, and Developer editions. Lightning console apps are available for an extra cost to users with Salesforce Platform user licenses for certain products. Some restrictions apply. For pricing details, contact your Salesforce account executive.
- <<How>>
- To access the LWC Utility Bar API methods and wire adapter, import the lightning/platformUtilityBarApi module. This module is supported for use with Lightning Locker and Lightning Web Service.
- To make your component available for use in the utility bar, include the lightning__UtilityBar target in your component’s .js-meta.xml configuration file.
- enableModal()—Toggles modal mode for a utility.
- enablePopout()—Toggles pop-out mode on a utility.
- getAllUtilityInfo()—Returns the state of all utilities.
- getInfo()—Returns the state of the current utility.
- minimize()—Minimizes a utility.
- onUtilityClick()—Registers an event handler for the utility.
- open()—Opens a utility or minimizes a utility if it’s already open.
- updatePanel()—Specifies a label and icon on the utility panel, and provides a height and width for the panel.
- updateUtility()—Specifies a label and icon on the utility bar, and sets a utility as highlighted.These Utility Bar API methods for LWC are available for Lightning console apps.
- The EnclosingUtilityId() wire adapter is available for Lightning console apps. It returns the ID of the enclosing utility.
- To retrieve the record context from a component in a utility, use the CurrentPageReference wire adapter.
- To make your component available for use in the utility bar, include the lightning__UtilityBar target in your component’s .js-meta.xml configuration file.
- To access the LWC Utility Bar API methods and wire adapter, import the lightning/platformUtilityBarApi module. This module is supported for use with Lightning Locker and Lightning Web Service.
- Support for Five-Level Parent-to-Child Relationship SOQL Queries in Apex: – Apex now supports SOQL relationship queries that traverse up to five levels of parent-child records. Each parent-child relationship subquery counts towards the number of aggregate queries processed in an SOQL query statement.
- This change applies to all editions.
- In API version 61.0 and later, SOQL parent-child relationship queries in Apex can contain a parent root as the first level of the query and child relationships up to four levels deep from the parent root. Track the number of aggregate queries processed in an SQL statement with the Limits.getAggregateQueries() method. The Limits.getLimitAggregateQueries() method returns a value of 300, which is the total number of aggregate queries that can be processed with SOQL query statements.
- <<How>>
- This example SOQL query statement includes five levels of parent-child relationships.
List<Account> accts =
[SELECT Name,
    (SELECT LastName,
        (SELECT AssetLevel,
            (SELECT Description,
                (SELECT LineItemNumber FROM WorkOrderLineItems)
            FROM WorkOrders)
        FROM Assets)
    FROM Contacts)
FROM Account];
- This example SOQL query statement includes five levels of parent-child relationships.
- This change applies to all editions.
- Class and Style Attributes Render with Extra Whitespaces: – More components render with extra whitespaces in the class and style attributes. In Spring ’23, we announced an improved rendering time for your Lightning web components as a result of an optimization on how the framework handles static elements. That change influenced how the class and style attributes of your static nodes are rendered in the DOM. Extra whitespaces or unexpected characters sometimes appear in values for those attributes.
- This change applies to custom Lightning web components in Lightning Experience, Experience Builder sites, and all versions of the Salesforce mobile app. This change also applies to Lightning web components open source.
- <<How>>
- An element with class values can render with an extra space. For example, consider this element with the highlight and yellow class values.
<div class=" highlight yellow">
- We recommend updating code that uses style or class attributes. Previously, you could query elements with an exact class name.
// Don’t do this document.querySelector('[class="highlight yellow"]') - Revise the query to use a selector that ignores whitespace changes.
// Do this instead
document.querySelector('.highlight.yellow')
- An element with class values can render with an extra space. For example, consider this element with the highlight and yellow class values.
- Navigate to a URL-Addressable Lightning Web Component: – Make your component available via a URL using the lightning__UrlAddressable target. To create a URL addressable component, you no longer have to embed your Lightning web component in an Aura component.
- This change applies to custom Lightning web components in Lightning Experience and all versions of the Salesforce mobile app. This change also applies to Lightning console apps in Enterprise, Performance, Unlimited, and Developer editions. This change isn’t available in Experience Builder sites because it interferes with custom domain and CDN support.
- <<How>>
- To generate a URL for your Lightning web component and make it available via a URL, include the lightning__UrlAddressable target in your component’s .js-meta.xml configuration file. Set the <isExposed> tag to true. The <apiVersion> tag has no impact on this feature and can be set to an earlier or later version.
<!-- myComponent.js-meta.xml --> <?xml version="1.0" encoding="UTF-8" ?> <LightningComponentBundle xmlns="http://soap.sforce.com/2006/04/metadata"> <apiVersion>59.0</apiVersion> <isExposed>true</isExposed> <targets> <target>lightning__UrlAddressable</target> </targets> </LightningComponentBundle> - To navigate to the custom component, use the lightning/navigation module with the standard__component page reference type.
// navToComponentWithState.js
import { LightningElement } from 'lwc';
import { NavigationMixin } from 'lightning/navigation';

export default class NavToComponentWithState extends NavigationMixin(LightningElement) {
  navigateToComponent() {
    this[NavigationMixin.Navigate]({
      // Pass in pageReference
      type: 'standard__component',
      attributes: {
        componentName: 'c__myComponent',
      },
      state: {
        c__propertyValue: '2000',
      },
    });
  }
}
- To generate a URL for your Lightning web component and make it available via a URL, include the lightning__UrlAddressable target in your component’s .js-meta.xml configuration file. Set the <isExposed> tag to true. The <apiVersion> tag has no impact on this feature and can be set to an earlier or later version.
- Call Component Lifecycle Hooks Using Native Browser APIs: – In LWC API version 61.0 and later, components fire lifecycle hooks using only native browser APIs. Native element lifecycle hooks align with modern browser standards, and they fix common memory leaks caused by disconnectedCallback() firing inconsistently. This change mostly impacts test code, so we recommend you review and update your tests. In earlier versions, LWC uses a synthetic polyfill system to fire these hooks.
- This change applies to custom Lightning web components in Lightning Experience, Experience Builder sites, and all versions of the Salesforce mobile app. This change also applies to Lightning web components in open source.
- <<How>>
- Native lifecycle hooks behave differently than synthetic polyfill ones. If your components fire lifecycle hooks and use the latest version of LWC, review them for these changes and revise them as needed.
- Now the connectedCallback() and disconnectedCallback() lifecycle hooks dispatch errors globally. In LWC API version 60.0 and earlier, these hooks dispatch errors locally.
- To fire connectedCallback() in LWC API version 61.0, a component has to be connected to the DOM. In earlier versions of LWC, disconnected components can trigger this hook.
- In the latest version of LWC, elements render only when they’re connected to the DOM. If you don’t append an element to the DOM, sometimes its shadow root is null. In earlier versions, you can render components that were detached from the DOM.
- Now, when you remove elements from the DOM and then reinsert them, connectedCallback() and disconnectedCallback() fire for each element. If the data bindings inside the component change too, renderedCallback() also fires. In earlier versions of LWC, these callbacks don’t fire after reordering.
- connectedCallback() and renderedCallback() now fire in the standard DOM depth-first tree traversal order. In earlier versions, these hooks traverse element trees according to the synthetic lifecycle polyfill.
- Build Custom Forms with the ElementInternals Web API: – Custom components using LWC API version 61.0 and later can use the standard ElementInternals web API to build custom form controls that work like standard HTML forms.
- This change applies to custom Lightning web components in Lightning Experience, Experience Builder sites, and all versions of the Salesforce mobile app. This change also applies to Lightning web components in open source.
- <<How>>
- To create an ElementInternals object, call the this.attachInternals() method, which gives you access to methods and properties for form controls.
export default class extends LightningElement { constructor() { super(); const internals = this.attachInternals(); internals.role = 'button'; internals.ariaLabel = 'My button'; } } - To use the FACE lifecycle callbacks, add a formAssociated property, which identifies the Lightning web component as a form control.
export default class extends LightningElement { static formAssociated = true; formAssociatedCallback(form) { console.log('Form:', form); } } - You can call the this.attachInternals() method only one time. It throws an error if you call it twice. Avoid calling this.attachInternals() in a lifecycle hook that can be called multiple times, such as in connectedCallback or renderedCallback.
- Also consider these usage guidelines.
- ElementInternals is available only with Chromium, Firefox, and Safari. In unsupported browsers, this.attachInternals() throws an error. LWC doesn’t provide a polyfill for unsupported browsers.
- Accessing internals from outside a component returns undefined. For example, document.querySelector(‘my-component’).attachInternals returns undefined.
- In server-side rendering, this.attachInternals() is undefined.
- internals.shadowRoot doesn’t return an instance of ShadowRoot. It returns the same proxy object as this.template.
- Register a component with the formAssociated property only once. To register multiple components with different formAssociated values, use a different tag name. For example, you can’t use two components with the c-my-component tag name, one with formAssociated = true and the other with formAssociated = false.
- To create an ElementInternals object, call the this.attachInternals() method, which gives you access to methods and properties for form controls.
- Salesforce Flow Enhancements: – There are several enhancements in Salesforce Flow as follows:
- Collect User Input to Build a List of Records from a Screen (Generally Available): – Collect information about multiple items of the same type on a screen with the Repeater component. For example, use a Repeater component to gather details about beneficiaries on an insurance policy. Users can add as many beneficiaries as needed on the screen. You can then loop through the list of beneficiaries to create records. This feature, now generally available, includes some changes since the last release.
- This change applies to Lightning Experience and Salesforce Classic in Essentials, Professional, Enterprise, Performance, Unlimited, and Developer editions. It’s supported only in Lightning runtime for flows.
- The Repeater component provides an intuitive interface for building a list and includes these enhancements since the beta release:
- Use custom components and all standard generally available screen components as child components.
- Reference the output of a child component in a different child component in a Repeater component.
- Apply conditional field visibility, input validation, and help text.
- When you debug a flow that includes a Repeater component, view information about the component in the debugger.
- Configure the component to react to user input on the same screen.
- <<Steps to Implement>>
- In Flow Builder, create a screen flow. Then, add a Screen element to the flow that includes a Repeater component. Add child components to the Repeater component.

- In Flow Builder, create a screen flow. Then, add a Screen element to the flow that includes a Repeater component. Add child components to the Repeater component.
- Update Choices on a Screen in Real Time with Reactive Collection Choice Sets: – Screen components that accept Collection Choice Set resources as inputs can now react to changes in other components on the same screen. For example, you can now use the output of a Data Table component to populate a collection choice set resource, and then use that resource to configure a Choice Lookup component on the same screen. Each time a user updates a selection in the Data Table component, the Choice Lookup component reflects the change. Previously, collection choice set resources couldn’t react to changes on the same screen.
- This change applies to Lightning Experience and Salesforce Classic in Essentials, Professional, Enterprise, Performance, Unlimited, and Developer editions. It’s not supported in Classic runtime for flows.
- <<How>>
- In Flow Builder, create a screen flow, add a Screen element to the flow, and include a component that populates a collection choice set on the screen. Add a choice component such as a Choice Lookup component to the screen and set the Choice value for the component to the collection choice set. Save and run the flow.
- Restrict User Input on Screen Components with the Disabled and Read Only Fields: – Use two new fields to specify how users interact with screen components. When the Disabled field is set to true, users can’t navigate to, copy, or modify any fields in the component. A gray background appears on the input fields in the component to provide users with a visual cue. When the Read Only field is set to true, users can’t modify any fields in the component. However, they can navigate to and copy values.
- This change applies to Lightning Experience and Salesforce Classic in Essentials, Professional, Enterprise, Performance, Unlimited, and Developer editions. It’s not supported in Classic runtime for flows.
- <<How>>
- Read this article for step-by-step instructions.
- The following table shows which components have the Disabled and Read Only fields.
SCREEN COMPONENT HAS DISABLED FIELD HAS READ ONLY FIELD Action Button (Beta) No Not applicable Address Yes No Checkbox Yes Not applicable Checkbox Group Yes Not applicable Choice Lookup Yes Not applicable Currency Yes Yes Date Yes Yes Date & Time Yes Yes Dependent Picklist No Not applicable Email Yes Yes File Upload Yes Not applicable Long Text Area Yes Yes Lookup No No Multi-Select Picklist Yes Not applicable Name Yes Yes Number Yes Yes Password Yes Yes Phone No Yes Picklist Yes Not applicable Radio Buttons Yes Not applicable Slider No Not applicable Text Yes Yes Toggle Yes Not applicable URL Yes Yes
- Configure Conditions More Easily with Is Blank and Is Empty Operators in Flows: – Use the Is Blank operator in a condition to check whether a text value contains no characters or only white space. For data type values other than text values, the Is Blank operator checks whether values are null. Previously, you used the Equals operator and the Blank Value (Empty String) global constant. To check whether a collection is empty, use the Is Empty operator. Previously, you added the Assignment and Decision elements to check the collection size.
- This change applies to Lightning Experience in Essentials, Professional, Enterprise, Performance, Unlimited, and Developer editions.
- <<How>>
- Add one of these elements to your flow: Decision, Wait for Conditions, or Collection Filter. To configure a condition in the element, enter a resource that references a value. Select the Is Blank operator. Enter a resource that references a collection. And then select the Is Empty operator.

- Add one of these elements to your flow: Decision, Wait for Conditions, or Collection Filter. To configure a condition in the element, enter a resource that references a value. Select the Is Blank operator. Enter a resource that references a collection. And then select the Is Empty operator.
- Debug Scheduled Flows More Successfully: – New options are available when debugging scheduled flows. You can skip the start condition requirements for the flow. You’re no longer restricted to using the first available record to debug. Instead, you select the specific record on which to run. You can also test multiple scenarios by selecting different triggering records to see whether a record runs.
- This change applies to Lightning Experience and Salesforce Classic in Essentials, Professional, Enterprise, Performance, Unlimited, and Developer editions.
- Check for Duplicates Before Creating Records in a Flow: – To prevent duplicate records, check for records that match a set of criteria in the Create Records element. Also specify whether to skip or update matching records. If you choose to skip matching records, the flow doesn’t create or modify any records. If you choose to update matching records, the flow modifies the records with the values that you provide. Some field-level configurations and validations in your org override the settings in the Create Records element.
- This change applies to Lightning Experience and Salesforce Classic in Essentials, Professional, Enterprise, Performance, Unlimited, and Developer editions.
- <<How>>
- In Flow Builder, create a flow that includes a Create Records element. In the Create Records pane, enable Check for Matching Records. Add one or more conditions. Select whether to update or skip matching records. Save the flow.

- In Flow Builder, create a flow that includes a Create Records element. In the Create Records pane, enable Check for Matching Records. Add one or more conditions. Select whether to update or skip matching records. Save the flow.
- Run and Use the Results of an Autolaunched Flow on the Same Screen with the New Action Button Component (Beta): – Add an Action Button component to a flow screen to run and retrieve information from an active autolaunched flow without leaving the screen. The component renders a button that invokes the flow when clicked. For example, create a screen that includes a Lookup component that enables a user to search for and select a Contact record. Add an Action Button component to the screen to launch a flow that retrieves the Account, Case, and Opportunity records associated with the Contact record and populates other fields on the same screen. The user doesn’t have to navigate away from the screen to run the flow.
- This change applies to Lightning Experience and Salesforce Classic in Essentials, Professional, Enterprise, Performance, Unlimited, and Developer editions. It’s not supported in Classic runtime for flows.
- <<How>>
- In Flow Builder, create and activate an autolaunched flow that retrieves data and saves data as one or more outputs that you can reference later in the flow. Then, create a screen flow, add a Screen element to the flow, and include an Action Button on the screen. Configure the Action Button component to launch the autolaunched flow that you previously created. Add another element to the screen that ingests the data you retrieve with the Action Button component. Save and run the flow.

- In Flow Builder, create and activate an autolaunched flow that retrieves data and saves data as one or more outputs that you can reference later in the flow. Then, create a screen flow, add a Screen element to the flow, and include an Action Button on the screen. Configure the Action Button component to launch the autolaunched flow that you previously created. Add another element to the screen that ingests the data you retrieve with the Action Button component. Save and run the flow.
- Manage Your Flows More Efficiently with the Automation Lightning App: – View and monitor your flows in the Automation Lightning app, which is now available to all flow admins and other users that you grant access to. From the app, you can create flows or open any flow that you have permission to access in Flow Builder. New list views show your most recently modified flows and flow definitions that include errors. Search for flows using a keyword in the flow label. Filter or sort flows by type, progress status, last modified date, last modifying user, and associated record fields.
- This change applies to Lightning Experience and Salesforce Classic in Essentials, Professional, Enterprise, Unlimited, and Developer editions.
- <<How>>
- In the App Launcher, search for Automation and select the Automation app. If you don’t see the app, go to Process Automation Settings in Setup, and select Enable the Automation Lightning App.

- In the App Launcher, search for Automation and select the Automation app. If you don’t see the app, go to Process Automation Settings in Setup, and select Enable the Automation Lightning App.
- Organize Your Flows Based on Categories and Subcategories That You Define: – Group your flows into categories and subcategories with two new fields on the flow record Details page. Use these fields to create custom list views of your flows in the Automation Lightning app.
- This change applies to Lightning Experience and Salesforce Classic in Essentials, Professional, Enterprise, Unlimited, and Developer editions.
- <<How>>
- In the Automation Lightning app, click a Flow Label to open the Details page for a flow. Edit the Category or Subcategory field. For example, set the Category field to Service. Because Category and Subcategory are text fields, we recommend maintaining a list of any values that you create.

- In the Automation Lightning app, click a Flow Label to open the Details page for a flow. Edit the Category or Subcategory field. For example, set the Category field to Service. Because Category and Subcategory are text fields, we recommend maintaining a list of any values that you create.
- Collect User Input to Build a List of Records from a Screen (Generally Available): – Collect information about multiple items of the same type on a screen with the Repeater component. For example, use a Repeater component to gather details about beneficiaries on an insurance policy. Users can add as many beneficiaries as needed on the screen. You can then loop through the list of beneficiaries to create records. This feature, now generally available, includes some changes since the last release.
- Flow Orchestrator: – There are several enhancements in Flow Orchestrator as follows:
- Suspend and Resume an Orchestration: – You started your loan processing orchestration, but your customer wants to pause the process so they can add more documentation. What can you do? Now you can suspend a running orchestration, and when the customer has updated their documentation, you can resume the orchestration.
- This change applies to Lightning Experience in Enterprise, Performance, Unlimited, and Developer editions.
- <<How>>
- To suspend an orchestration run, from the Orchestration Runs list view, locate the orchestration run you want to suspend, and, from its Quick Action menu, select Suspend Run. To resume a suspended orchestration run, from the Orchestration Runs list view, locate the suspended orchestration run you want to resume, and, from its Quick Action menu, select Resume Run.
- Resume a Failed Orchestration: – Your orchestration ran for 3 weeks and then failed. Did it fail because a flow or action called by a step failed? If it did and the orchestration run failed within the last 14 days, you can now fix the error and resume the orchestration run.
- This change applies to Lightning Experience in Enterprise, Performance, Unlimited, and Developer editions.
- <<How>>
- To resume a failed orchestration run, from the Orchestration Runs list view, locate the orchestration run you want to resume, and, from its Quick Action menu, select Resume Run. Resume Run isn’t available for an orchestration run when its failure wasn’t due to a called flow or when action or the failure occurred more than 14 days in the past.
- Select the Orchestration Work Item to Complete: – You’ve been assigned 3 work items for an opportunity record. You can now see all items assigned to you in the Orchestration Work Guide component on the associated record page, so you select the one that you want to complete first. When you’ve completed a work item, the work item list refreshes automatically.
- This change applies to Lightning Experience in Enterprise, Performance, Unlimited, and Developer editions.
- Suspend and Resume an Orchestration: – You started your loan processing orchestration, but your customer wants to pause the process so they can add more documentation. What can you do? Now you can suspend a running orchestration, and when the customer has updated their documentation, you can resume the orchestration.
- Quickly Iterate Package Development Using Async Validation: – When creating a new package version, you have the option to specify async validation. Async validation creates a new package version before completing package validations. By receiving the package version earlier in the process, you can install and test the new version right away. If your development team is using continuous integration (CI) scripts, async validation can reduce your overall CI run time.
- This change applies to unlocked packages and second-generation managed packages.
- <<How>>
- Specify async validation when you create a new package version.
sf package version create –-async-validation <rest of command syntax>
- Specify async validation when you create a new package version.
- Shorten Package Install Time in Scratch Orgs by Skipping a Handler: – To shorten package install time when installing in scratch orgs, you can specify the FeatureEnforcement skip handler when using either the PackageInstallRequest object, or the sf package install command. The feature enforcement handler adds object and feature validations in the subscriber org that prevent an admin from turning off a feature that would cause your app to malfunction. However, this enforcement isn’t critical in scratch orgs.
- This change applies to unlocked packages, second-generation managed packages, and first-generation managed packages installed in scratch orgs.
- <<How>>
- Set the SkipHandler field on the PackageInstallRequest object to FeatureEnforcement. Or use the CLI and specify:
sf package install --skip-handlers FeatureEnforcement <rest of command syntax>
- Set the SkipHandler field on the PackageInstallRequest object to FeatureEnforcement. Or use the CLI and specify:
- Add Real-Time Event Monitoring Events to a Custom Channel: – You can now receive multiple real-time event monitoring event types in one stream by adding them to a custom platform event channel. A subscriber can then subscribe to the channel to receive the various events.
- This change applies to Lightning Experience and Salesforce Classic in Enterprise, Performance, Unlimited, and Developer editions.
- <<How>>
- To specify that a channel holds event monitoring events, set the new eventType field in the PlatformEventChannel metadata type to the appropriate value. Use Metadata API or Tooling API to configure the channel with PlatformEventChannel, and add each event to the channel with PlatformEventChannelMember. You can add up to 3 custom event monitoring channels, and each channel can contain up to 10 members that reference real-time event monitoring events.
- Take Advantage of Apex Enhancements for Processing JSON Web Tokens (JWTs)): – With changes to how JSON Web Tokens (JWTs) are processed, it’s now easier to extract data from JWTs generated by methods in the Auth.JWTUtil class. We also clarified what methods we support for a JWT depending on where it came from. And you can get more test coverage by mocking HTTP callouts when processing JWTs.
- These changes are available in Enterprise, Performance, Unlimited, and Developer Editions.


Additional Enhancements Worth Noting!
- Enable LWC Stacked Modals (Release Update): – As part of the Salesforce internal migration from Aura to LWC, more modals in Lightning Experience now render using LWC. This update provides improved performance, especially when working with a large number of fields on a record create or edit modal. You can now also use Dynamic Forms in a modal that’s opened from a Create from Lookup field on most LWC-enabled record pages. When you enable this update, you can expect minor changes to modal behavior. This update is available starting in Summer ’24.
- This change applies to Lightning Experience in all editions.
- If you use custom quick actions, consider these guidelines.
- LWC quick actions—When using the lightning/navigation module, the newer modal overlays and stacks on the previous modal by default. To automatically close the previous modal when navigating, set replace to true.
- Aura quick actions—If you used force:createRecord or force:editRecord, Salesforce recommend updating your code to use lightning:navigation so that you can control post-save navigation behavior. To use post-save navigation on record save, specify navService.navigate(pageRef, true); where the replace property is true.
- Temporarily Opt Out of Google Chrome Storage Partitioning: – Google Chrome storage partitioning is enabled for Salesforce domains in Summer ’24. Give your company additional time to transition away from unpartitioned storage with a new setting that disables storage partitioning until September 2024.
- This feature applies to Lightning Experience and Salesforce Classic (not available in all orgs) in all editions.
- <<Steps to Implement>>
- From Setup, in the Quick Find box, enter User Interface, and then select User Interface.
- Select Disable Google Chrome Storage Partitioning for Salesforce Domains, and then save your changes. Clear all browser cookies and browser history, and then close the browser.
- Access More External Data Types with the Custom Adapter for Salesforce Connect: – Enhancements to the Apex Connector Framework help you connect your users to more external data when you develop your own custom adapter for Salesforce Connect. With support for more external object field types, your users can work with and search across a richer set of external data directly in Salesforce.
- This change applies to Lightning Experience and Salesforce Classic in Enterprise, Unlimited, Developer, and Performance editions.
- To use the Apex Connector Framework to map external data to Salesforce external objects, create or update a DataSource.Connection Apex class. The newly supported external object field types include:
- Currency
- Date
- Percent
- Phone
- Be Aware of Base Lightning Component Internal DOM Structure Changes for Future Native Shadow Support: – Salesforce is preparing the base Lightning components to adopt native shadow DOM to enhance performance and comply with Web Components standards. These updates change the internal DOM structure. Ensure that your tests don’t rely on the previous internal structure of these components.
- This change applies to Lightning Experience and all versions of the mobile app in all editions.
- Read about this changes here.
- Use SOQL in Apex with Data Cloud Objects: – Static SOQL is now supported with Data Cloud data model objects (DMOs) as a more direct alternative to using either dynamic SOQL or ConnectAPI. Additionally, SOQL using Apex Database.QueryLocator or in FOR loops is supported in API version 61.0 and later. In versions earlier than 61.0, only the first 201 records are returned. Batch Apex is currently blocked against DMOs when using QueryLocators, but is supported when using Iterable.
- This change applies to all editions.
- This example uses static SOQL with the UnifiedIndividual__dlm Data Cloud object.
//Static SOQL example
List<UnifiedIndividual__dlm> unifiedIndividuals = [
      SELECT
        Id,
        ssot__FirstName__c,
        ssot__LastName__c,
        ssot__Email__c,
        ssot__SkyMilesBalance__c,
        ssot__MedallionStatus__c
      FROM UnifiedIndividual__dlm
      WHERE ssot__CompanyId__c = :companyId
    ];
- Make Invocable Actions Easier to Configure with New InvocableVariable Modifiers: – Set a default value for an input parameter by using the new defaultValue modifier. Set custom placeholder text for an input parameter and provide examples or additional guidance by using the placeholderText modifier. The defaultValue and placeholderText modifiers appear in Flow Builder for the Action elements that correspond to an invocable method.
- This change applies to Lightning Experience and Salesforce Classic in Performance, Unlimited, Developer, Enterprise, and Database.com editions.
- Monitor Setup Methods Using ApexTestResult: –
ApexTestResultrows are now generated for Apex tests run with the@testSetupannotation. A newIsTestSetupcolumn is set totruefor these annotated tests to distinguish them from other test methods. Also, a newTestSetupTimecolumn onApexTestRunResulttracks the cumulative time of all setup methods for the givenApexTestRunResult, similar to howTestTimetracks the cumulative time of all its test methods. Previously, information about limits and cumulative run time was available only by parsing the appropriate method sections in the debug log.- This change applies to all editions.
- <<Steps to Implement>>
- ApexTestResult is updated by default for all setup methods. You can opt out in one of these ways.
- From Setup, in the Quick Find box, enter Apex Settings, and then select Do not create Apex test results for @TestSetup methods.
- To disable this feature programmatically with Metadata API, use the enableTestSetupSkipTestResults option in ApexSettings.
- Monitor Apex Scheduled Jobs More Efficiently: – Mitigate potential limit problems before they happen by tracking the percentage of the scheduled jobs used. You can now schedule Apex jobs from the All Scheduled Jobs page and manage jobs that are scheduled using a cron expression. You can also view the ID of the CronTrigger object associated with scheduled jobs in the details list.
- This change applies to all editions.
- <<Steps to Implement>>
- From Setup, in the Quick Find box, enter Scheduled Jobs, and then select Scheduled Jobs.
- On the All Scheduled Jobs page, view the current consumption stats for the scheduled jobs along with the allowed org limit.
- See Improved Logging When FOR UPDATE Locks Are Released: – Record locks that are obtained in Apex using FOR UPDATE are released automatically when you roll back to a savepoint that’s set using the
Database.setSavePoint()method. The information is now logged in the debug log, and the logged database category message includes the most recently locked entity type. For example: FOR_UPDATE_LOCKS_RELEASE | FOR UPDATE locks released due to a savepoint rollback. The most recent lock was Account.- This change applies to all editions.
- Receive Change Event Notifications for More Objects: – With Change Data Capture, you can now receive notifications of record changes for more objects.
- This change applies to Lightning Experience and Salesforce Classic in Enterprise, Performance, Unlimited, and Developer editions.
- <<Steps to Implement>>
- Select the objects that you want to get notifications for on the Change Data Capture page in Setup or create a custom channel. You can now receive change events for:
- Award
- IdentityDocument
- InsurancePolicy
- PersonEmployment
- Select the objects that you want to get notifications for on the Change Data Capture page in Setup or create a custom channel. You can now receive change events for:
- Run Flows in Bot User Context (Release Update): – With this update enabled, a flow initiated by a bot runs in user context. The user profile and permission sets associated with the bot, as well as any sharing rules, determine the object permissions and field-level access of the flow. This update prevents flows initiated by a bot from creating, reading, updating, or deleting records that the bot doesn’t have permission to access or modify. Previously, a flow initiated by a bot ran in system context and had permission to access and modify all data. This update was first made available in Summer ’23.
- This change applies to Lightning Experience and Salesforce Classic in Enterprise, Performance, Unlimited, and Developer editions. Setup for Einstein Bots is available only in Lightning Experience.
- Have Unlimited Paused and Waiting Flows: – Salesforce has removed the per-org usage-based limit for paused and waiting flow interviews. While there’s no limit now for paused and waiting flow interviews, the number of paused and waiting flows can still be limited by the amount of storage available to your org. If you need more storage, call your Salesforce account rep.
- This change applies to Lightning Experience in Enterprise, Performance, Unlimited, and Developer editions.
- Use Threading Tokens in Emails: – Now even automated emails support the new token-based threading. To securely link email replies to the correct record, place a threading token in the email’s subject or body.
- This change applies to Lightning Experience in Essentials, Professional, Enterprise, Performance, Unlimited, and Developer editions.
- <<Steps to Implement>>
- Go to the Send Email core action in Flow Builder. When you’re setting input values, choose to add a threading token to the email subject or body. Be sure to include a Related Record ID.
- If the related record is a case, Email-to-Case processes email replies automatically. Salesforce now also supports threading for other types of objects. To process incoming emails containing tokens that aren’t cases, create an Apex Email Service and use the EmailMessages.getRecordIdFromEmail function to find the record that matches the token. For example, if you’re implementing approval processing and you’ve provided a Related Record ID of a PurchaseRequest custom object record, use the Apex Email Service to retrieve the recordId and pass it to an autolaunched flow.
- Lock and Unlock Records with an Action: – Worried about someone updating a record when you’re updating it in a flow? Use the Lock Record action in a flow’s Action element to lock or unlock a record and specify who can edit the record while it’s locked.
- This change applies to Lightning Experience, Salesforce Classic (not available in all orgs), and all versions of the mobile app in Essentials, Professional, Enterprise, Performance, Unlimited, and Developer editions.
- Customize SMS One-Time Password Delivery for Experience Cloud Sites (Beta): – To provide branded, personalized identity verification experiences for external users, create an Apex handler to send one-time passwords (OTPs) via an SMS messaging provider of your choice. Customize the content of the message and the short code that tells users who sent it. Use the handler to send OTPs for any Experience Cloud identity verification use case, such as multi-factor authentication (MFA) and passwordless login.
- These changes apply to LWR, Aura, and Visualforce sites accessed through Lightning Experience and Salesforce Classic in Enterprise, Unlimited, and Developer editions.
- <<Steps to Implement>>
- Create a custom one-time password delivery handler Apex class. From your Experience Cloud Login & Registration settings, in the Customized OTP Delivery section, select your Apex handler class.
- To opt in to this feature, contact your Salesforce account executive. Opting in to this feature affects all Experience Cloud sites. To avoid disruptions, enable the Apex handler for all sites.
- Query Low-Latency Event Data with Event Log Objects (Beta): – Store and query all of your event data via the API with the new event log object framework (beta) that captures event data in standard objects.
- This change applies to Lightning Experience and Salesforce Classic (not available in all orgs) in Enterprise, Performance, and Unlimited editions where Event Monitoring is enabled.
- <<Steps to Implement>>
- Access Event Log Objects via the API or through CRM Analytics.
- Download Up to 1 Year of Event Log Files: – Adjust your event log file data retention period and download up to 1 year of event log file data in case of a security incident.
- This change applies to Lightning Experience and Salesforce Classic (not available in all orgs) in Enterprise, Performance, Unlimited, and Developer editions where Event Monitoring is enabled.
- <<Steps to Implement>>
- From Setup, in the Quick Find box, enter Event Monitoring Settings and then select Event Monitoring Settings.
- Enable the Retain event log files setting.
- Then, to specify the number of days to retain your data, use the eventLogRetentionDuration field on the EventSettings Metadata API type.
- Update the API Version of Abstract or Virtual Classes to Prevent Overriding Private Methods: – In API version 61.0 and later, private methods are no longer overridden by an instance method with the same signature in a subclass. This change is versioned, so to prevent the override, update your abstract or virtual classes that contain private methods to API version 61.0 or later. In API version 60.0 and earlier, if a subclass declares an instance method with the same signature as a private method in one of its superclasses, the private method is overridden by the method in the subclass.
- This change applies to all editions.
- View CronTrigger and Batch Job IDs in Improved Error Messages with Scheduled and Batch Apex: – You can now see CronTrigger and batch job IDs in error messages generated when you delete a class in use by a scheduled or batch job. If you try to uninstall a package containing a class that’s in use by a batch job, the error message also includes the Apex batch job ID. The error message lists up to five IDs. Also, if you modify a class that’s being used by a batch job, the error message includes the AsyncApexJob ID.
- This change applies to all editions.
Salesforce Mobile App Enhancements
Mobile Offline for Salesforce Mobile App Plus gets updates to the Offline App Developer Starter Kit, Offline App Onboarding Wizard, and the new Mobile Builder (beta). The new Salesforce mobile app is available for all editions, except Database.com, without an additional license. Your org’s Salesforce edition and licenses, as well as a user’s assigned profile and permission sets, determine the Salesforce data and features that are available to each user.
- Configure Offline App Landing Pages Easily with Mobile Builder (Generally Available): – With Mobile Builder for Salesforce Mobile App you can customize offline landing pages for your mobile users without writing a single line of code. Now you can show the most important records to your mobile users so they can quickly and easily take relevant actions based on their use cases. Mobile Builder was beta in Spring ’24 and is now generally available.
- These changes apply to Salesforce Mobile App Plus for Android and iOS on phones and tablets in all editions, except Database.com.
- <<Steps to Implement>>
- From Setup, in the Quick Find box, enter Mobile Builder, and then select Mobile Builder for Salesforce Mobile App.
- Create configurations, assign them to user profiles, and publish.
- Keep Working While Your Records Download with Background Priming (Beta):- Now when you download records for offline use, that process happens in the background and you can continue using your mobile device uninterrupted. Take a phone call, schedule a meeting, or even lock your device and take a break. The app notifies you when the download is complete and you’re ready to work offline.
- This change applies to the Salesforce Mobile App Plus for iOS and Android on phone and tablets in all editions, except Database.com.
- Mobile Offline is available in orgs with the Salesforce Mobile App Plus license and to users within that org who have the Mobile Offline for Salesforce Mobile App Plus user permission.
- <<Steps to Participate>>
- To participate in this beta program, contact your customer success representative or account executive.
- Message Customers in the Salesforce Mobile App: – Modernize your customer service by letting agents message customers from the Salesforce mobile app. Previously, agents had to be signed in to Omni on the Salesforce agent console to engage in conversations.
- This change applies to all enhanced messaging channels and Messaging for In-App and Web.
- This feature is available after May 17, 2024.
- <<Steps to Implement>>
- To accept or send messages, agents sign in to the Salesforce app and make themselves available in the Omni widget.
- See Record Fields in Two Columns on Tablets: – If you have Dynamic Forms on Mobile enabled, the Record Detail – Mobile and Field Section components now display fields in two columns when viewed on a tablet. Previously, fields in these components displayed in only one column when viewed on a tablet even if they were configured with two columns.
- This change applies to Lightning Experience in Group, Professional, Enterprise, Performance, Unlimited, and Developer editions.
Check out the resources below to learn about some of the most exciting innovations before officially GA on February 05th!
- Keep Track of Upcoming Release Dates: Mark your calendar for when you can preview and roll out Summer’24 Release updates.
- Sandbox Refresh Calculator: Plan if and when to refresh your sandboxes.
- Salesforce Website: Your one-stop-shop to learn all about the latest release
- Release In a Box: A summary deck you can share with your organization, leadership team, and/or community
- Demo Videos By Salesforce: 2-3 minute overviews of our top innovations
- Release Readiness Trailblazers: Access resources and experts for all things release readiness.
- Release Trail: Earn that badge and march towards Ranger Status
Formative Assessment:
I want to hear from you!
What are your favorite Summer’24 release note gems? You can download release notes in HTML format!, for PDF files.
Feel free to share in the comments below.


Excellent summary. Much appreciated!
Thanks for reading 🙂