

Last Updated on July 7, 2022 by Rakesh Gupta
Big Idea or Enduring Question:
- How to pass lightning-input field value as a parameter to controller class method in Lightning Web Component?
Objectives:
After reading this blog, you’ll be able to:
- Understand what is lightning-input field and how to work with them
- Understand when to use querySelector vs querySelectorAll to access element
- Use custom data attribute to query or set the lwc component
- Pass lightning-input field value to lightning web component (lwc) controller
In the past written a few articles on Lightning Web Component. Why not check them out while you are at it?!
- How to Implement Conditional Rendering in Lightning Web Component
- Get Information About the logged-In User in Lightning Web Component
Business Use case
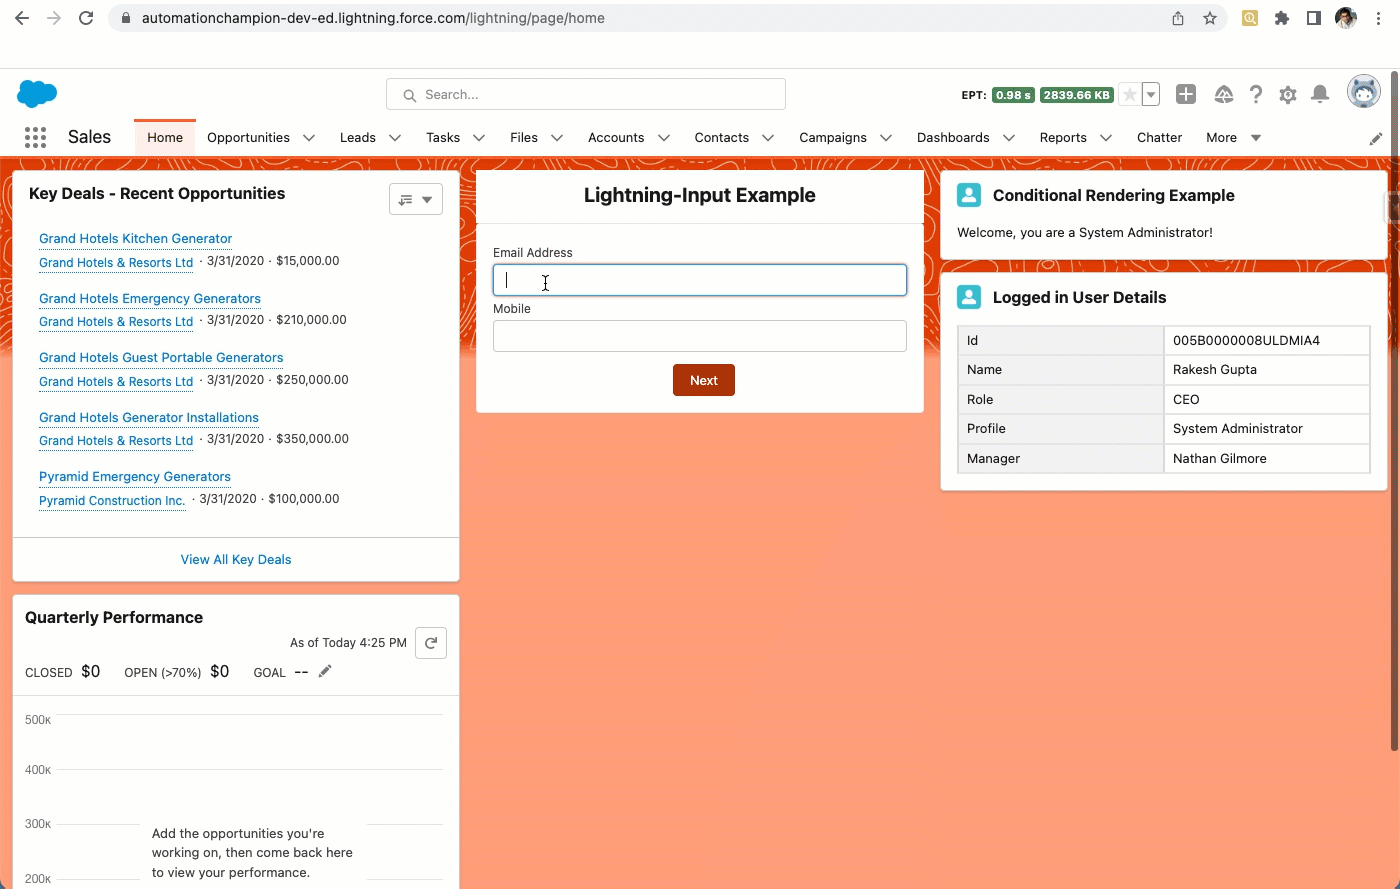
Rachel Gillett is working as a Junior Developer at Gurukul on Cloud (GoC). She just started learning the lightning web component and wondering if someone could help her understand how to build the following screen and pass email and mobile field values to the lwc JavaScript controller on a button (Next) click.

What is a lightning-input component?
The lightning-input component is used to create interactive forms in order to accept data from the user; a wide variety of types of input types and attributes are available, depending on the use cases. The lightning-input element is one of the most powerful and complex in all LWC components due to the sheer number of combinations of input types and attributes.
This component supports the following input types:
- checkbox
- checkbox-button
- date
- datetime
- time
- file
- password
- search
- tel
- url
- number
- text (default)
- toggle
Data attributes in Lightning Web Components
While working with a lightning web component, sometimes, we want to pass components’ values to JavaScript on a button click. You can do this in many ways, and data attribute is one of them.
For example, we are showing a form with few input fields. We want to pass entered values to the component JavaScript file on the button click. To achieve this, create the custom attributes by appending any string to data- and providing the information to it, like data-name, data-element, data-title, etc. Remember, you can only be able to enter string values to the data attributes.
Syntax
<lightning-input
   type="email"
   data-element="user-input-email"
   label="Email Address">
</lightning-input>
Using querySelector and querySelectorAll
The querySelector() and querySelectorAll() are DOM APIs available on modern web browsers. They are used to query DOM elements that match a specified selector.
The difference between these two is that querySelector() returns a single element matching its selection criteria. querySelectorAll(), on the other hand, returns all elements matching the search criteria in an iterable list.
Syntax
this.template.querySelector('p'); // Selects first paragraph element in document
this.template.querySelectorAll('p'); // Selects all paragraph elements in document
this.template.querySelectorAll('[target]'); //Get all elements that contain the attribute target
Automation Champion Approach (I-do):
Now you have a basic understanding of all ingredients we need to build the lightning web component for the given business requirement. Let’s get started
lightningInputExample.js-meta.xml
A lightning web component can be used to build custom pages for Lightning Experience and the Salesforce mobile app quickly with point-and-click tools. Make sure to add the right target for it.
This configuration file makes the component available for all Lightning page types but restricts support on desktops.
<?xml version="1.0" encoding="UTF-8"?>
<LightningComponentBundle xmlns="http://soap.sforce.com/2006/04/metadata">
    <apiVersion>54.0</apiVersion>
    <isExposed>true</isExposed>
    <targets>
        <target>lightning__RecordPage</target>
        <target>lightning__AppPage</target>
        <target>lightning__HomePage</target>
    </targets>
</LightningComponentBundle>
lightningInputExample.html
Every UI component must have an HTML file with the root tag <template>. The template contains two lightning-input tags that create input for email and mobile. The template includes one lightning-button (Next) with the onclick method handleNext.
It is possible to use data-element attributes in the lightning-input component to pass email and mobile details to javascript for further logic. But we will use onchange event and store the values in variables in LWC controller.
When a user clicks on the Next button, it will call a JavaScript method handleNext() which will use variables to get the email and mobile field values.
<!-- lighntingInputExample.html -->
<template>
    <form>
        <div
            class="slds-p-top_small slds-p-bottom_medium slds-align_absolute-center slds-theme_default slds-text-heading_medium">
            <b>Lightning-Input Example</b></div>
        <div class="slds-box slds-theme_default">
            <lightning-input
                    type="email"
                    label="Email Address"
                    value={emailvalue}
                    onchange={handleEmailChange}>
            </lightning-input>
            <lightning-input
                    type="tel"
                    name="mobile"
                    label="Mobile"
                    value={mobilevalue}
                    onchange={handleMobileChange}>
            </lightning-input>
            <div class="slds-m-top_small slds-align_absolute-center">
                <lightning-button
                    variant="Neutral"
                    label="Cancel"
                    class="slds-m-left_x-small"
                    onclick={handleCancel}>
                </lightning-button>
                <lightning-button
                    variant="brand"
                    class="slds-m-left_x-small"
                    label="Next"
                    onclick={handleNext}>
                </lightning-button>
            </div>
        </div>
    </form>
</template>
lightningInputExample.js
Use variables from LWC controller to get the email and Mobile values. The alert will display the value of email and mobile when clicking on the Next button.
import { LightningElement } from 'lwc';

export default class InputExample extends LightningElement() {

    emailvalue ="username@example.com";
    mobilevalue= "000-000-0000";

    handleEmailChange(event){
        this.emailvalue = event.target.value;
    }

    handleMobileChange(event){
        this.mobilevalue = event.target.value;
    }

    handleNext() {

        alert('email '+ this.emailvalue);
        alert('Mobile '+ this.mobilevalue);

    }
}
Proof of Concept
Formative Assessment:
I want to hear from you!
What is one thing you learned from this post? How do you envision applying this new knowledge in the real world? Feel free to share in the comments below.


This is very close to what I am trying to do! What I am getting hung up on is attempting to have the selected text insert where I have clicked the cursor.
I am working on an LWC someone else created. It’s quite creative and allows regular users to create SMS templates with merge fields using any object. It already queries all the fields.
I am updating it to make it more user friendly for the marketing person to create their own SMS templates.
At the start, it was only populating a combobox. At first I had it sort the list of fields alphabetically, which helped, but there are hundreds of fields.
So, I changed it to an input book that used incremental search. So, now I can search and click on the label and have it appear in the box.
There is an “Insert Field” button under that. It uses a method that concatenates the object and field api names and formats them as a merge field. This was created by the original developer.
My Issue: I can’t get the merge field to insert where I want it to. I am attempting to place my cursor at a position and have the field insert there but it will only insert at the end of the text string. I even tried having AI help me and it tried many many ways to do it.
Ex. you can imagine a template written in a Google Doc: Hi [Client first name], We are updating you on your recent [product name] purchase.
Then in the template creator converting those into merge fields like: Hi {!Contact.FirstName},…
It would make it easy if the user could delete the bracketed term, leave their cursor there, then go search the field and click Insert and have it appear there rather than at the end of the template where they have to cut and paste it.
Is it possible to do this?
Thanks!
Doug Crew