

Last Updated on May 21, 2022 by Rakesh Gupta
You may be thinking, what am I so excited about the Salesforce recent release? Well, let me count the reasons! However, one of the reasons, that stands out the most is, enhancements related to Salesforce Flow – Oh, yes! you got that right. Let me start with a few examples:
- How do you notify opportunity team members when an opportunity is marked as closed won? – Using email alert, right?
- How to notify the account owner if a new support case is logged while trying to close a high-value opportunity? – Using email, right?
Over time, how many email alerts are you going to send? Sometimes, these email alerts can be irritating – they are, at least for me. If so then, can we handle, the process of notifying team members, a bit better? With Salesforce’s new release, we certainly can! Now, instead of email alerts, we can send a push notification to users on their mobile (Salesforce mobile app is required) or Lightning Experience (Desktop)!
Let’s take a business use case to understand – what a push notification is; how to auto-send a push notification to users; and, finally, how does it look to the end-users.
Business Use case
Donna Serdula is working as a System Administrator at Gurukul on Cloud (GoC). She is an experienced Salesforce Administrator and is proficient at using automation to eliminate manual processes. Since the last few months, she is getting a request from the Sales team to reduce the number of email notifications they get from Salesforce.
Donna has identified a use case – she wants to replace email notification with new push notification – whenever an opportunity is marked as ‘Closed Won’, send push notification to Opportunity team members on their Salesforce mobile app or Lightning Experience (Desktop).
Automation Champion Approach (I-do):
Until now, Apex was the one, and only solution; but, starting the Summer’19 release, we can use Salesforce Flow to solve the above business requirement. And, we will!
What is a Push Notification?
Push Notifications are messages that are pushed to a user’s device – either desktop or mobile.  Starting Summer’19 release, users can see get/see push notification in the (1) Salesforce mobile app notification center; and, (2) if System administrator configures it so, then, users can also see push notification in Lightning Experience notification center too (Desktop).

Before trying to understand the technical aspect of the solution, let us spend some time to understand the general flow at a high level. Please spend a few minutes to go through the following flow diagram and understand it.  To send a notification on mobile devices, or Desktop, Salesforce will use Custom Notification Types. The custom notification contains details about, how it displays an abbreviated banner with the title, subtitle, and two to four lines of body text from the notification.
Let’s begin building this automation process.
Guided Practice (We-do):
There are 2 steps to solve Donna’s business requirement using Salesforce Flow. We must:
- Create a New Custom Notification
- Salesforce Flow
- Define Flow properties for record-triggered flow
- Create a Formula to construct a notification title
- Create a Formula to construct notification body
- Create a Collection Variable to store recipient Ids
- Add a Decision element to check the opportunity stage and amount
- Add a Get element to find custom notification type Id
- Steps to populate recipient Ids
- Add a Get Records element to find opportunity team members
- Add a decision element to check if opportunity team member(s) exists
- Add a Loop element to extract records from the collection variable (From step 7.3)
- Add an Assignment element to add opportunity team userId into a collection variable (Created in step 4)
- Add action – Send Custom Notification
Step 1: Create a Custom Notification Type
- Navigate to Setup Setup | Notification Builder | Custom Notifications and click on the New button.
- Create a new Custom Notification Type, as follows:


Step 2.1: Salesforce Flow – Define Flow Properties
- Click Setup.
- In the Quick Find box, type Flows.
- Select Flows then click on the New Flow.
- Select the Record-Triggered Flow option, and click on Create and configure the flow as follows:
- Object: Opportunity
- Trigger the Flow When: A record is created or updated
- Set Entry Criteria
-
- Condition Requirements: None
-
- Optimize the Flow For Action and Related Records
- Click Done.

Step 2.2: Salesforce Flow – Formula to Construct Push Notification Title
- Under Toolbox, select Manager, then click New Resource to construct push notification title.
- Input the following information:
- Resource Type: Formula
- API Name: forT_Title
- Data Type: Text
- Formula: ‘Opportunity – ‘+”+{!$Record.Name}
- Click Done.

Step 2.3: Salesforce Flow – Formula to Construct Push Notification Body
- Under Toolbox, select Manager, then click New Resource to construct push notification body.
- Input the following information:
- Resource Type: Formula
- API Name: forT_Body
- Data Type: Text
- Formula: ‘Is successfully closed by ‘+”+{!$Record.Owner.FirstName}+’ ‘+ {!$Record.Owner.LastName}
- Click Done.

Step 2.4: Salesforce Flow – Create Collection Variable to Store Recipient Ids
- Under Toolbox, select Manager, then click New Resource to store opportunity team members userIds.
- Input the following information:
- Resource Type: Variable
- API Name: varT_RecipientIds
- Data Type: Text
- Click the Yes checkbox – Allow multiple values (collection)
- Check Available for Input
- Check Available for Output
- Click Done.


Step 2.5: Salesforce Flow – Using Decision Element to Check Opportunity Stage and Amount
Now we will use the Decision element to check the stage to ensure that it is equal to Closed Won and the amount is greater or equal to $1M.
- On Flow Designer, click on the + icon and select Decision element.
- Enter a name in the Label field; the API Name will auto-populate.
- Under Outcome Details, enter the Label the API Name will auto-populate.
- Condition Requirements to Execute Outcome: All Conditions Are Met (AND)
- Row 1:
- Resource: {!$Record.StageName}
- Operator: Is Changed
- Value: {!$GlobalConstant.True}
- Click Add Condition
- Row 2:
- Resource: {!$Record.StageName}
- Operator: Equals
- Value: Closed Won
- Click Add Condition
- Row 3:
- Resource: {!$Record.Amount}
- Operator: Greater Than or Equal
- Value: 1000000
- Row 1:

Step 2.6: Salesforce Flow – Adding a Get Record Element to Find Custom Notification Type Id
The next step is to get the Custom Notification Type Id.
- On Flow Designer, click on the + icon and select Get Records element.
- Enter a name in the Label field; the API Name will auto-populate.
- Select the Custom Notification Type object from the dropdown list.
- Select All Conditions Are Met (AND).
- Set Filter Conditions
- Row 1:
- Field: DeveloperName
- Operator: Equals
- Value: Opportunity_Closed_Won_Notification
- Row 1:
- How Many Records to Store:
- select Only the first record
- How to Store Record Data:
- Choose the option to Automatically store all fields.
- Click Done.

Step 2.7.1: Salesforce Flow – Adding a Get Record Element to Find Opportunity Team Members
The next step is to get the opportunity team members of the current opportunity.
- On Flow Designer, click on the + icon and select Get Records element.
- Enter a name in the Label field; the API Name will auto-populate.
- Select the Opportunity Team Member object from the dropdown list.
- Select All Conditions Are Met (AND).
- Set Filter Conditions
- Row 1:
- Field: OpportunityId
- Operator: Equals
- Value: {!$Record.OpportunityId}
- Row 1:
- How Many Records to Store:
- select All records
- select All records
- How to Store Record Data:
- Choose the option to Automatically store all fields.
- Click Done.

Step 2.7.2: Salesforce Flow – Using Decision Element to Check if Opportunity Team Member Record(s) Exist or Not
Now we will use the Decision element to check the Record Collection Collection Variable from step 2.7.1 to find if it returns the Opportunity Team Members or not.
- On Flow Designer, click on the + icon and select Decision element.
- Enter a name in the Label field; the API Name will auto-populate.
- Under Outcome Details, enter the Label the API Name will auto-populate.
- Condition Requirements to Execute Outcome: All Conditions Are Met (AND)
- Row 1:
- Resource: {!Get_Team_members}
- Operator: Is Null
- Value: {!$GlobalConstant.False}
- Row 1:
- Click Done.

Step 2.7.3: Salesforce Flow – Add a Loop Element to Extract Records from the Record Collection Variable
The next step is to extract the opportunity team members from Record Collection Variable from step 2.7.1 one by one. For this, we will use the Loop Element.
- On Flow Designer, click on the + icon and select Loop element.
- Enter a name in the Label field; the API Name will auto-populate.
- For the Record Collection Variable select {!Get_Team_Members}.
- For Specify Direction for Iterating Over Collection select the option First item to last item
- Click Done.

Step 2.7.4: Salesforce Flow – Add an Assignment to Add Opportunity Team Member UserId Record Collection Variable (Created in step 4)
The next step Is to add opportunity team member userid from into a Collection Variable which we created in step 4, So at the end, we will send out push notification to in Opportunity Team Members
- On Flow Designer, click on the + icon and select Assignment element.
- Enter a name in the Label field; the API Name will auto-populate.
- Set Variable Values
- Row 1:
- Field: {!varT_RecipientIds}
- Operator: Add
- Value: {!Team_Members.UserId}
- Row 1:
- Click Done.

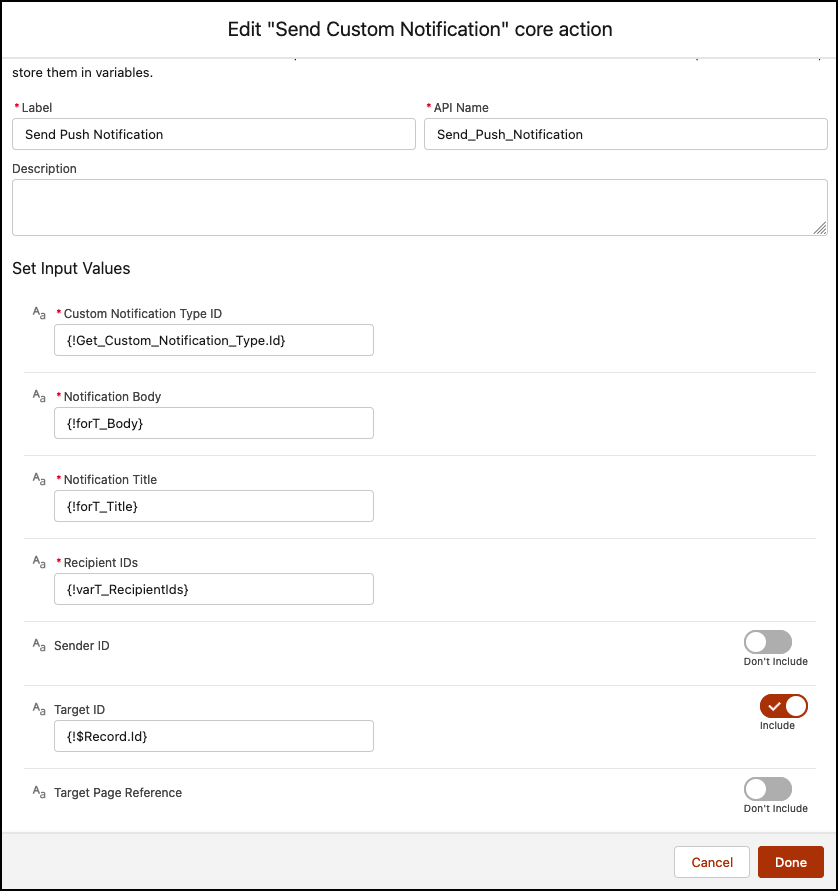
Step 8: Add Action – Send Custom Notification
Next, we will use another Core Action – Send Custom Notification – to send out a push notification to opportunity team members. Now follow the steps below:
- On Flow Designer, click on the + icon and select Action element.
- Below Filter By, select Type.
- Search and select the Send Custom Notification from the dropdown menu
- Label the new action Send Push Notufucation
- Set Input Values
- Custom Notification Type ID: {!Get_Custom_Notification_Type.Id}
- Notification Body: {!forT_Body}
- Notification Title: {!forT_Title}
- Recipient IDs: {!varT_RecipientIds}
- Note: Instead of {!varT_RecipientIds), you can also map/pass opportunity Id. In both the cases, notification is sent all active users who are members of this opportunity’s Opportunity Team. The purpose of using {!varT_RecipientIds) is to help you to learn Loop.
- Target ID: {!$Record.Id}
- Click Done.
In the end, Donna’s Flow will look like the following screenshot:  Once everything looks good, perform the steps below:
- Click Save.
- Enter Flow Label the API Name will auto-populate.
- Click Show Advanced.
- API Version for Running the Flow: 54
- Interview Label: Record-Trigger: Opportunity After Save {!$Flow.CurrentDateTime}
- Click Save.
 Almost there! Once everything looks good, click the Activate.
Proof of Concept
Next time, when a user updates the opportunity to ‘Closed Won’, the process we created (Using Salesforce Flow) will fire and, it will send the push notification to opportunity team members on Salesforce mobile app and Desktop (Lightning Experience).

Formative Assessment:
I want to hear from you!
What is one thing you learned from this post? How do you envision applying this new knowledge in the real world?
Let me know by Tweeting me at @automationchamp, or find me on LinkedIn.


What would be the simplest way to send these notifications outside Salesforce using Flow? To Microsoft Teams for example. Is it feasible?
Yes, it is feasible to send notifications from Salesforce to external platforms like Microsoft Teams using Salesforce Flow using HTTPS callout. I have also heard that Salesforce has a product that connects with Microsoft Teams out of the box.
Can you provide steps to send email to opportunity team when stage is at 30%
1. Create an email alert on Opportunity
2. For Recipient Type select opportunity team
3. Create a After-Save flow on opportunity
4. Check opportunity probability field, if it is 30%
5. Then trigger an email alert