

Last Updated on January 15, 2026 by Rakesh Gupta
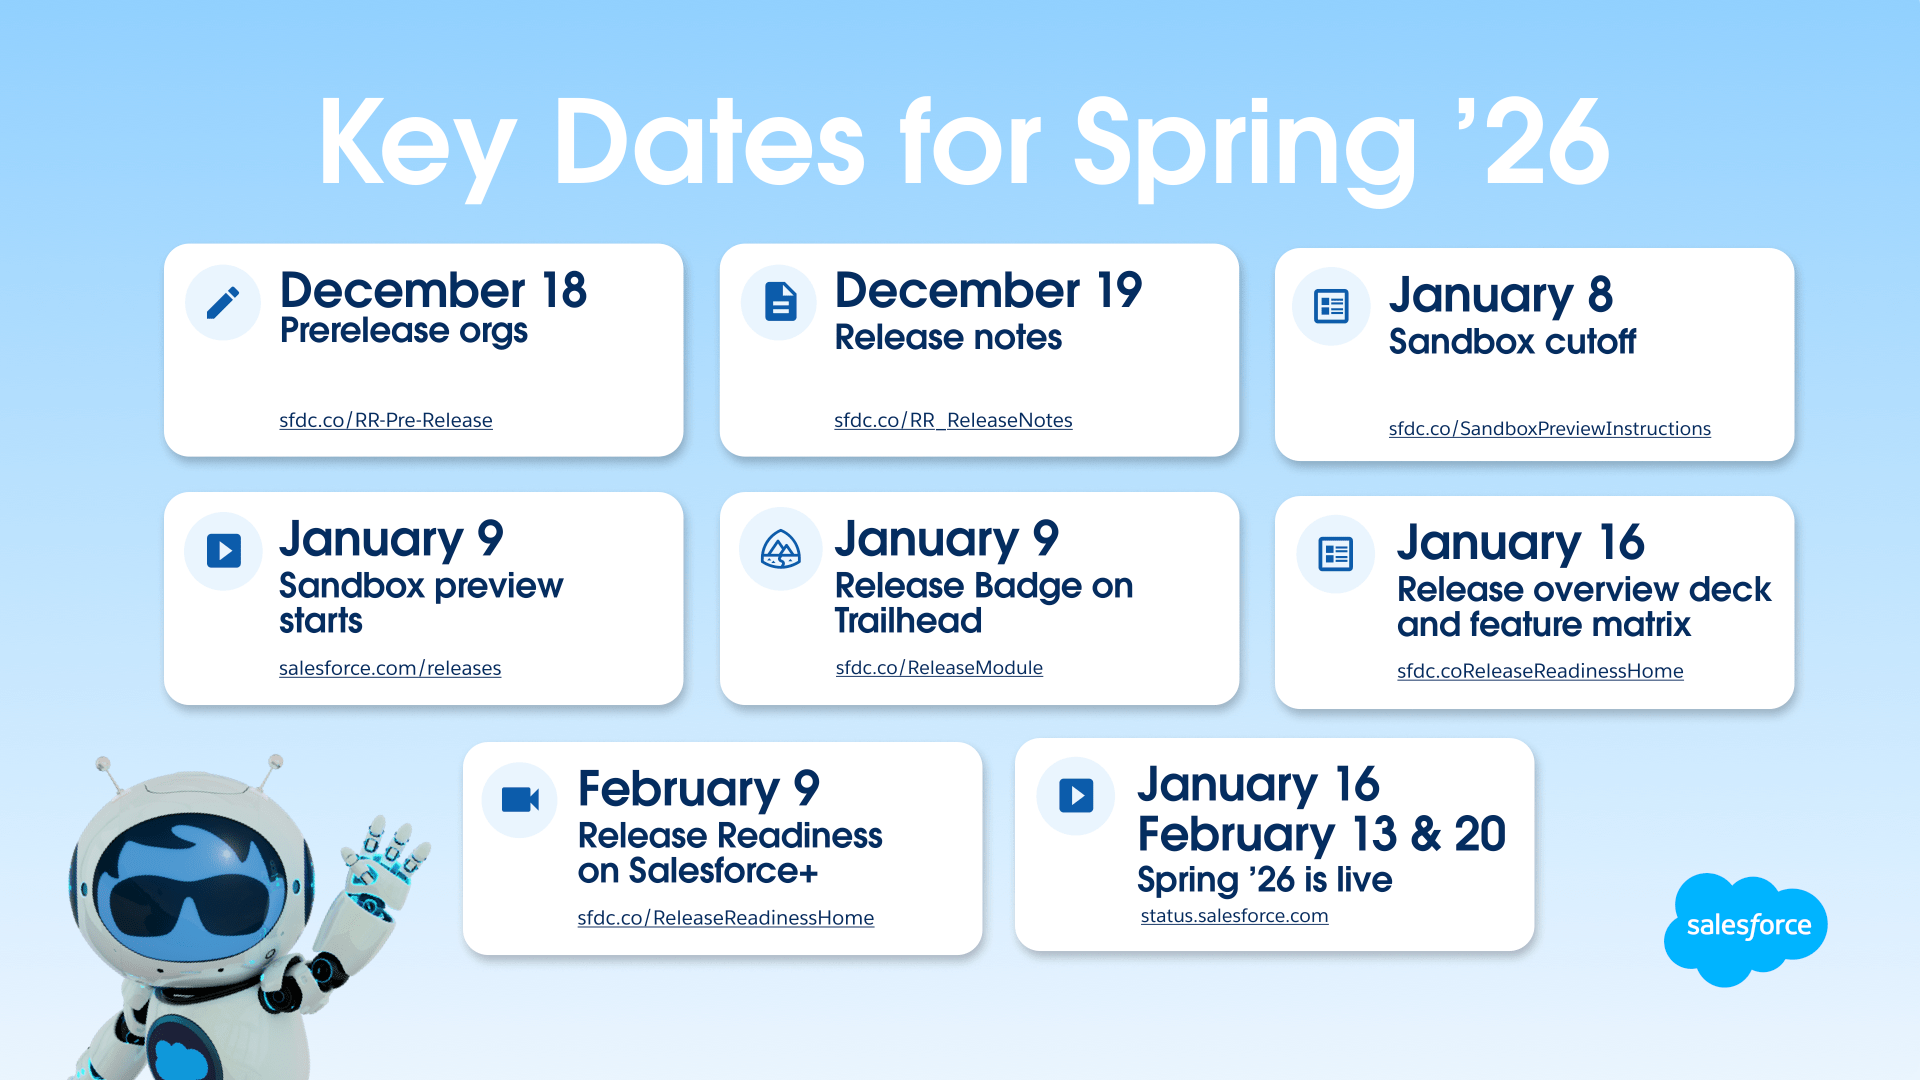
The Spring’26 release is already available via the Pre-release and Pre-release for partners programs. Starting January 09, 2026, Sandboxes will be upgraded to give early access to the Spring’26 experience.
Salesforce Spring ’26 just dropped, and it doubles down on what matters most in our current project: Agentforce. This release introduces the Agentforce DX MCP Server, the Agentforce Vibe IDE, and powerful new extensions that make building, customizing, and scaling intelligent agents easier and more predictable. Beyond Agentforce, Spring ’26 delivers solid improvements across Lightning Experience, Flow, Apex, and Lightning Web Components, along with strengthened integration and data capabilities through MuleSoft, and Data Cloud. The release also includes practical upgrades in Field Service, Commerce Cloud, Tableau, Marketing Cloud Account Engagement, and Revenue Cloud, all aimed at driving real-world value rather than just buzz. Spring ’26 feels like a forward leap for agents and automation while still reinforcing core CRM and developer productivity.
For example, some exciting features like MuleSoft API Governance for Salesforce (Beta), Streamline Administrative Tasks with Setup with Agentforce (Beta), Enhance Proactive Customer Service with Agentforce, Agentforce Sales App in ChatGPT (Beta), Access Agentforce from Your Outlook Integration, and AI Agents for Sales are coming to Salesforce.
Additionally, take a look at these beta and pilot features:
- Manage Deals Directly from the Agentforce Sales App in ChatGPT (Beta): – Sellers can research leads and accounts, plan sales strategies, and update Salesforce records—all powered by secure, accurate, and real-time CRM data, while using the Agentforce Sales App in ChatGPT. This seamless connection helps sales teams close deals faster and maintain data accuracy, directly within their flow of work.
- This feature is available in Enterprise, Performance, and Unlimited editions with the Agentforce for Sales add-on, and in Agentforce 1 Sales Edition.
- <<How>>
- From the gear icon, select Salesforce Go, and search for Agentforce Sales ChatGPT App (Beta). Go to the Agentforce Sales ChatGPT app (Beta) page and turn on the feature. Next, go to ChatGPT to publish the app. After these steps are complete, your users must connect the Agentforce Sales ChatGPT App to their Salesforce accounts.
- Build Enterprise-Ready Agents with Agentforce DX and Agent Script (Beta): – Use pro-code tools, such as VS Code and Salesforce CLI, to build hybrid reasoning Salesforce agents. These new types of agents have both the predictability that your business demands and the creativity that large language models (LLMs) make possible.
- These new features are available in Salesforce CLI version 2.115.15 and Agentforce VS Code Extension version 1.6.0.
- Personalized Trust Is Now Salesforce My Trust Center (Beta): – Salesforce My Trust Center (beta) provides authenticated access to service health information tailored to your specific Salesforce products and services. Based on customer feedback, the renamed Salesforce My Trust Center (beta) has been improved. Subscribe to notifications, access 1 year of extended incident and maintenance history with enhanced navigation, and view details on org location and MyDomain information. Also, the public Status site now supports Heroku and Spiff.
- These changes apply to my.trust.salesforce.com and Status.salesforce.com.
- New capabilities in Salesforce My Trust Center (beta) include:
- Subscriptions: Subscribe to notifications for events on your tenants through a new tab.
- Extended history: View 1 year of incident and maintenance history, plus the next 90 days of upcoming maintenance. Navigate all data with search, filtering, and pagination tools.
- Enhanced tenant details: See org location and MyDomain information for Sales, Service, and Industries on tenant detail pages.
- Accessibility: Complies with WCAG 2.2 standards.
- Documentation: Access Salesforce My Trust Center (beta) documentation on the Help site.
- Speed Up Queries and Improve Data Handling with Data 360 SQL (Beta): – Enhance data handling, strengthen security, and speed up query responses by using Data 360 SQL. New compact form queries and custom SQL queries now run on Data 360 SQL by default. Existing custom SQL queries continue to use legacy SQL, and you can manually switch them to Data 360 SQL for improved performance.
- This change applies to CRM Analytics in Lightning Experience and Salesforce Classic. CRM Analytics is available in Developer Edition and for an extra cost in Enterprise, Performance, and Unlimited editions.
- <<How>>
- Select a lens that contains a custom SQL query. In the custom SQL query editor, click the SQL Version dropdown and select Data 360 SQL.

- In the confirmation window, click Change to Data 360 SQL, and then click Update.
- Select a lens that contains a custom SQL query. In the custom SQL query editor, click the SQL Version dropdown and select Data 360 SQL.
- Use Complex Template Expressions in Your Lightning Web Components (Beta): – Add sophisticated presentation logic to your Lightning web component template files, and remove extra code from your component implementation. A component that renders a user interface can now use complex JavaScript expressions directly in its HTML template file. Use complex template expressions anywhere you use basic properties.
- This change applies to Lightning Experience (not available in all orgs) in Enterprise, Unlimited, and Developer editions where Data Detect is installed.
- Resolve Fulfillment Issues Proactively with Agentforce (Pilot): – Manage location exclusions and order rerouting through a conversational interface. By using a single text prompt, your routing agent can block specific locations for a set time or rescue unfulfillable orders, such as those with damaged goods. Previously, mitigating these disruptions required time-consuming manual intervention.
- This change applies to Lightning web components in Lightning Experience, Experience Builder sites, and all versions of the mobile app in all editions.
- Get Instant Product Assistance and Troubleshooting with Omnistudio Assistance AI Agent (Pilot): – Use the Omnistudio Assistance AI pilot agent to get context-aware guidance directly in the designer. Whether you’re a designer, developer, or implementation specialist, the agent provides instant, relevant information about any Omnistudio component or element that you’re working with. It can also provide a complete build plan that helps architect end-to-end solutions, based on an industry vertical. The agent can also run design-time diagnostics to identify gaps and avoid runtime failures.
- This change applies to Lightning Experience, Experience Cloud sites, and all versions of Enterprise, Performance, and Unlimited editions where Omnistudio is enabled. Additionally, you need a Data 360 license with the Agentforce 1 add-ons.
- <<How>>
- After the feature is enabled, from Setup, find and select Agentforce Agents. Select New Agent and select the Omnistudio Assistance template. You can then set up the agent by using the template. In addition, create a permission set.
- From Setup, find and select Permission Sets. Add a new permission set and include Omnistudio Assistance in the Agent Actions section.
- Generate Quotes for Customers in Multiple Locations (Pilot): – Manage complex, large-scale quotes for customers with ease. Your sales representatives can group locations, apply products to entire groups simultaneously, and price quotes for multiple geographical locations efficiently.
- This change applies to Lightning Experience in Enterprise, Performance, and Unlimited editions with Media Cloud- Advanced.


Supported Browsers for Lightning Experience
Lightning Experience is supported by Apple® Safari®’s latest version on macOS. The most recent stable versions of Microsoft® Edge Chromium, Mozilla® Firefox®, and Google Chrome™ are also supported.
Use Apple Safari on iPadOS (iOS 13.x or later). Lightning Experience on iPad Safari doesn’t support portrait orientation and orientation switching. Use landscape orientation, and maximize your Safari browser to full width. To prevent your tablet from switching orientation, turn on the iPad rotation lock.
Salesforce treats touch-enabled laptops, including Microsoft Surface and Surface Pro devices, as laptops instead of tablets. You can’t access the Salesforce mobile app on these devices. Users are redirected to the full site experience that’s enabled for them—Lightning Experience or Salesforce Classic. Only standard keyboard and mouse inputs are supported on these types of devices.
Customers / Administrator’s Point of View
- Migrate Your Agents’ Connected Apps to the External Client App Framework: – With the Spring ’26 release, you can no longer create connected apps. For the best customer experience, migrate your connected apps to external client apps. External client apps provide enhanced security, streamlined packaging, and a more robust framework for your apps. Existing connected apps and connected apps for Slack in the legacy Agentforce Builder aren’t impacted.
- This change applies to Lightning Experience in Enterprise, Performance, Unlimited, and Developer editions.
- <<How>>
- To create an external client app from a connected app, open the connected app in App Manager and then click Migrate to External Client App. In Agentforce Builder (beta), connect the external client app to your agent using the Messaging connection. After you create an external client app from a connected app, the connected app is read-only in App Manager.
- Existing connected apps and external client apps with these OAuth scopes appear in the External Apps list in the Messaging connection.
- Access chatbot services (chatbot_api)
- Access the Salesforce API Platform (sfap_api)
- Manage user data via APIs (api)
- Get Your Agentic Sales Org Ready in a Few Clicks: – AI-Powered Selling Initial Setup simplifies configuration for new and existing orgs. It automatically turns on base Sales features and agents and assigns your sellers the correct permissions. Your sales teams get a consistent, ready-to-use sales environment immediately.
- This change applies to Lightning Experience in Enterprise, Unlimited, and Agentforce 1 Sales editions with the Salesforce Foundation add-on.
- <<How>>
- From the gear menu, select Salesforce Go, and then search for AI-Powered Selling Initial Setup. Turn on AI-Powered Selling Initial Setup and complete the steps.
- Set Up Passwordless Login with Passkeys (Beta): – Give users a fast, easy, and phishing-resistant alternative to passwords. You can now enable passwordless login with passkeys. With this feature, users can log in with a built-in authenticator (such as Touch ID or Face ID) or a security key (such as a YubiKey or mobile device). Look forward to fewer password resets, fewer login issues, and happier users.
- This change applies to Lightning Experience and Salesforce Classic (not available in all orgs) in all editions.
- This feature is available only for internal users, such as employees, who log in to your Salesforce org. It isn’t available for Experience Cloud site users.
- <<How>>
- You can enable passwordless login with passkeys on the Identity Verification page in Setup. Passwordless login with passkeys is available only for users with a registered built-in authenticator or security key, and only for saved usernames. To log in, users click on their saved username and then use their built-in authenticator or security key.
- Enhance Survey Readability with Revamped Matrix Questions View: – Improve survey readability on desktops and smaller screens with the revamped view for matrix questions. The new design presents options for each question in a dedicated dropdown menu, making it easier to read the full question and select an option.
- This change applies to Lightning Experience and Salesforce Classic in Enterprise, Unlimited, and Developer Editions where Feedback Management – Starter or Feedback Management – Growth is enabled.
- <<How>>
- In the Survey Builder, click Add Question, and then select Matrix.

- In the Survey Builder, click Add Question, and then select Matrix.
- Use Existing Report Settings When Adding Tables to Dashboards (Generally Available): – Save time and reduce manual configuration of report settings, such as groupings, custom formulas, and bucketing when adding lightning tables to dashboards. This feature reduces the risk of errors and ensures that the tables in the dashboard retain the same configuration as the report. This feature is now generally available.
- This change applies to Lightning Experience in Enterprise, Professional, and Unlimited editions.
- <<How>>
- In Setup, in the Quick Find box, enter Reports and select Reports and Dashboards Settings. Select Apply report settings to dashboard tables. When adding a Lightning table to your dashboard, select Use table settings from report.

- In Setup, in the Quick Find box, enter Reports and select Reports and Dashboards Settings. Select Apply report settings to dashboard tables. When adding a Lightning table to your dashboard, select Use table settings from report.
- Embed Custom Lightning Web Components in Dashboards for Interactive Data Views (Beta): – Add custom Lightning Web Components (LWC) directly into Lightning Dashboards to create interactive, real-time data views that go beyond standard dashboard capabilities. Filter, explore, and act on data immediately without leaving your dashboard. For example, a business analyst can use a custom LWC to display a waterfall chart or other visualizations that are not available in standard dashboards.
- This change applies to Lightning Experience in Enterprise, Professional, and Unlimited editions.
- <<How>>
- To turn on this feature, contact Salesforce Customer Support. Then, in the dashboard edit mode, click +Widget and select Lightning Web Component. Configure the properties of the custom Lightning web component, and add the component to the dashboard.
- Analyze Data Offline with CSV and Excel Exports of Data 360 Objects: – Export data directly from lenses and widgets that use data from Data 360 objects, such as data lake objects, data model objects, and calculated insights. Save up to 50,000 rows as an Excel or CSV file to use offline features, such as applying advanced filters, integrating with external tools, and performing complex calculations.
- This change applies to CRM Analytics in Lightning Experience and Salesforce Classic. CRM Analytics is available in Developer Edition and for an extra cost in Enterprise, Performance, and Unlimited editions.
- <<How>>
- Select a widget that contains data from a Data 360 object. From the widget’s action, click Download. You can download the data in Excel, Excel with Metadata, or CSV format.
- The Excel with metadata file includes the filters applied, groupings applied on columns, and count of records.
- Manage CRM Analytics Assets with New Bulk Actions: – Minimize the risk of human error associated with repetitive manual tasks and manage multiple CRM Analytics assets efficiently with new bulk actions. You can now add or remove Favorites, and hide or show assets. You can perform bulk actions on up to 50 assets at a time. Previously, bulk actions were limited to Change Owner and Add to Collection.
- This change applies to CRM Analytics in Lightning Experience and Salesforce Classic. CRM Analytics is available in Developer Edition and for an extra cost in Enterprise, Performance, and Unlimited editions.
- <<How>>
- In Analytics Studio, click Browse, and select the items that you want to update (1). From the Bulk Actions dropdown (2), select a bulk action (3).

- In Analytics Studio, click Browse, and select the items that you want to update (1). From the Bulk Actions dropdown (2), select a bulk action (3).
- Let Buyers Request a Quote from Their Cart: – Streamline negotiations by giving B2B buyers the option to request a quote directly from their cart. After the buyer submits the request, your team can review the details, negotiate as needed, and place the order on the buyer’s behalf. Manage pricing and shorten deal cycles by reducing handoffs for complex purchases that require negotiation and approvals.
- This change applies to B2B Commerce in Enterprise, Unlimited, and Developer editions where Revenue Cloud Advanced or Sales Cloud Advanced is enabled.
- <<How>>
- In Experience Builder, drag the Request Quote component to your Cart page. Configure the fields on the quote submission form to capture the information that your sales team needs.

- In Experience Builder, drag the Request Quote component to your Cart page. Configure the fields on the quote submission form to capture the information that your sales team needs.
- Monitor AI-Generated Insights and Fulfillment Data in a Single Dashboard: – The real-time analytics dashboard shows performance and key insights across order fulfillment metrics. Customize the display to view order fulfillment processing by location, category, and products. Make confident decisions with critical order fulfillment data.
- This change applies to Order Management in Enterprise, Unlimited, and Developer editions. This change requires a Data 360 license with CRM Analytics and Data 360 set up for B2B Commerce.
- <<How>>
- From Order Management Setup, select a data space as your data source. Then connect Data 360 to Order Management.

- From Order Management Setup, select a data space as your data source. Then connect Data 360 to Order Management.
- Submit Records for Approval by Using the Request Approval Component: – Your credentialed site visitors can now submit records for approval directly from your site. Add the Request Approval component to an object detail page. Then configure the component to require submitters to select an approver and add comments about their request. The Request Approval component works only with Flow Approval Processes, not with Classic Approval Processes.
- This feature is available in Lightning Experience and in Aura and LWR sites accessed through Lightning Experience in Enterprise, Performance, Unlimited, and Developer editions.
- Make Site Pages More Discoverable by AI: – To make public site pages more discoverable by AI-powered search engines and enhance the precision of generated answers, enable generative engine optimization (GEO) in Experience Builder. When you enable GEO, AI bots can request content snapshots of your site’s pages to generate answers more effectively.
- This change applies to Aura and LWR sites accessed through Lightning Experience and Salesforce Classic in Enterprise, Performance, Unlimited, and Developer editions.
- <<How>>
- In Experience Builder, in SEO settings, enable Provide content snapshots of public site pages when requested by AI bots.

- In Experience Builder, in SEO settings, enable Provide content snapshots of public site pages when requested by AI bots.
- Design LWR Sites with More Standard Component Options: – Sixteen standard components are now available for use on all Lightning Web Runtime sites, even in orgs without an active Community license. Now you have a wider array of options to build and refine your LWR site pages. For example, add a banner, navigation menu, button, or video.
- This change applies to LWR sites accessed through Lightning Experience and Salesforce Classic in Enterprise, Performance, Unlimited, and Developer editions.
- <<How>>
- On an LWR site, drag any of these components to the canvas.
- Actions Bar
- Banner
- Button
- Card
- Flow
- Grid
- Horizontal Line
- Image
- List
- Navigation Menu
- Overlap
- Record List
- Site Header
- Text Block
- Tile
- Video
- On an LWR site, drag any of these components to the canvas.
- Salesforce Migrates Enhanced and Custom Domains Serving Digital Experiences to Cloudflare CDN: – Beginning in 2026, Salesforce is migrating all enhanced and custom domains serving Digital Experiences that use the Salesforce Content Delivery Network (CDN) from Akamai to Cloudflare. Starting with the Spring ’26 release, all enhanced and custom domains that use the Salesforce CDN service are created using the Cloudflare CDN as the default service provider. You can manually migrate custom domains to the Cloudflare CDN ahead of the Salesforce-initiated migration.
- This change applies to Aura and LWR using the CDN accessed through Lightning Experience in Enterprise, Performance, Unlimited, and Developer editions.
- <<How>>
- To manually migrate your custom domain, from Setup, enter Domains in the Quick Find box and select Domains. From the list of domains, select the domain to edit. Select Use the Cloudflare® CDN to serve this domain. After the domain has migrated, you receive a notification. Click Activate to begin using the migrated domain.

- To manually migrate your custom domain, from Setup, enter Domains in the Quick Find box and select Domains. From the list of domains, select the domain to edit. Select Use the Cloudflare® CDN to serve this domain. After the domain has migrated, you receive a notification. Click Activate to begin using the migrated domain.
- Protect Your Salesforce Org and Users by Scanning Files for Malware (Beta): – For improved security in your Salesforce org, files are now scanned for malware in Salesforce Files. When a user tries to upload a file, the process is blocked if the scanned file is malicious. If a malicious file is uploaded via the API, it’s scanned asynchronously, and it appears in the new Malicious Files (Beta) list. When a user attempts to download an existing file, the download is blocked if it’s malicious. This feature was developed based on your idea on IdeaExchange.
- This change applies to Salesforce Files accessed through Lightning Experience and Salesforce Classic in Essentials, Group, Enterprise, Professional, Performance, Unlimited, Contact Manager, and Developer editions.
- <<How>>
- From Setup, in the Quick Find box, enter Files, and then select . The setting Scan files for viruses or malware (beta) is turned on by default. If a new file isn’t scanned during the initial upload, it’s scanned asynchronously and added to the Malicious Files List (Beta) if it contains malware.

- From Setup, in the Quick Find box, enter Files, and then select . The setting Scan files for viruses or malware (beta) is turned on by default. If a new file isn’t scanned during the initial upload, it’s scanned asynchronously and added to the Malicious Files List (Beta) if it contains malware.
- Drive Predictive Operations with Enhanced Scheduling and Optimization Insights (Beta): – Bring best-in-class data visualization directly into your field service workflow with Enhanced Scheduling and Optimization Insights. Monitor performance trends through intuitive dashboards that quantify the impact of your optimization, by turning complex data into clear, actionable benefits. By staying ahead of the curve, you can anticipate resource needs and make confident, data-driven decisions to scale automation before service delivery is ever impacted.
- This feature is available in Lightning Experience in Enterprise, Unlimited, and Developer editions with the Field Service managed package installed.
- Enhance the Field Service Mobile App with Native GIS Mapping: – Eliminate app switching and accelerate time to value by delivering advanced geospatial context directly within the Field Service mobile app. Help mobile workers access geospatial information focused on their work location with the new Geospatial Information System (GIS). With it, they can view, interact with, and update complex map data—including assets, lines, and polygons—even when offline. Configure authentication and GIS map assignments with GIS’ extensive customization capabilities to deliver an intuitive user experience. Simplify deployment and enhance data integrity with a robust connector that seamlessly pushes Salesforce data to ArcGIS feature layers.
- This feature is available in Lightning Experience in Performance and Unlimited editions, and in the Field Service mobile app for Android and iOS.
- <<How>>
- From Setup, in the Quick Find box, search for and select Field Map Settings.

- From Setup, in the Quick Find box, search for and select Field Map Settings.
- Track Engagement History with Tableau Next: – Visualize every lead, contact, account, and person account interaction with Unified Engagement History Dashboards. Pull engagement data directly from Tableau Next to get immediate, actionable marketing insights based on your records in Salesforce CRM.
- This change applies to any Marketing Cloud Account Engagement edition with access to Tableau Next and with Data 360 enabled.

- This change applies to any Marketing Cloud Account Engagement edition with access to Tableau Next and with Data 360 enabled.
- Create Content More Efficiently by Using Improved Extensions in Salesforce CMS: – Add more productivity features to your content workflow, such as third-party generative AI tools, tone and grammar editors, and translators with Extensions in CMS. Formerly known as Sidebar Extensions, Extensions now appear in a floating panel in the content editor. Use the new development workflow to build more complex extensions for specific content types, and customize the size and behavior of the floating panel.
- This change applies to enhanced CMS workspaces in Lightning Experience in Enterprise, Performance, Unlimited, and Developer editions.
- <<How>>
- To build new extensions for specific content types, use the new development workflow. Any extension built with the existing workflow still works as expected. To test the appearance of existing extensions in the new floating panel, open them in the content editor.

- To use an extension while editing CMS content, select one from the extensions menu (1). Work with the extension in the floating panel (2) and apply your changes. Position the floating panel anywhere on the content editor page for easy editing.
- To build new extensions for specific content types, use the new development workflow. Any extension built with the existing workflow still works as expected. To test the appearance of existing extensions in the new floating panel, open them in the content editor.
- Gain Instant Case Context with Case Timeline: – Give your reps a single, unified, and intelligent timeline component for cases. This new component replaces the current fragmented collection of feeds and related lists with a single curated view of case-related events. Reps get instant context with a proactive workspace that intelligently organizes customer conversations, internal team collaboration, and key case milestones. The new timeline brings together channels like emails, chats, and messages into a clean, threaded view.
- This change applies to Lightning Experience in Enterprise, Performance, Unlimited, and Developer editions where Industries Service Excellence is enabled.
- <<How>>
- In Setup, in the Quick Find Box, find and select Timeline. In the Timeline window, turn on the Timeline Configuration.

- In Setup, in the Quick Find Box, find and select Timeline. In the Timeline window, turn on the Timeline Configuration.


Additional Enhancements Worth Noting!
- Guide and Inform Experience Cloud Users with Personalized Task and Activity Components: – Help Experience Cloud site users stay oriented and complete key actions with two personalized home page components: the Pending Task banner and the Activity Timeline. These components surface relevant tasks and recent activity to guide users when they return to your site
- These changes apply to Aura and LWR sites accessed through Lightning Experience and Salesforce Classic in Enterprise, Performance, Professional, Unlimited, and Developer editions.
- Improve SLA Reporting by Using Rule-based Milestone Pause: – Free up your service reps from the manual overhead of stopping a record when the next step is outside their purview. Admins can set rules to automatically pause milestones when the defined conditions are met. For example, a milestone can be paused automatically if the case status is “Waiting for Customer.” The milestone timer stops during the pause duration and resumes when the pause conditions change. The target date is reevaluated when the milestone unpauses. This helps with more accurate SLA reporting and clearly highlights delays.
- This change applies to Lightning Experience in Professional, Enterprise, Performance, Unlimited, and Developer editions with the Service Cloud.
- <<How>>
- From the SLA Policies page, select the SLA policy for which you want to create a milestone. On the Milestones tab, click New Milestone. In the New Milestone window, go to the Pause tab and define your milestone pause criteria. Save your milestone and activate the SLA Policy.
- Match Overall Email Marketing Consent with Marketing Cloud Next: – Send promotional emails with confidence. You can now match overall email consent between Account Engagement prospects and Marketing Cloud Next records. To track overall email consent changes between the two apps, turn on Consent Matching in the Account Engagement Settings tab in the Lightning App.
- This change applies to Salesforce Enterprise and Unlimited editions with Marketing Cloud Next for Account Engagement.
- Optimize SLA Compliance by Using Agentforce SLA Summary: – Get a complete view of Service Level Agreement (SLA) adherence with Agentforce SLA Summary. Track key metrics like SLA breach data and trends, milestone performance, service rep performance and workload, and risk indicators. You can also monitor average response and resolution times against SLA targets, and see which records are close to missing an SLA.
- This change applies to Lightning Experience in Professional, Enterprise, Performance, Unlimited, and Developer editions with the Service Cloud with the Agentforce Employee agent add-on.
- <<How>>
- From Setup, find and select Agentforce Agents. Open Agentforce Employee Agent in Builder and add the SLA Insights topic to it. Save, test, and activate the agent.
- Delete Records in Your Org and Data 360 with Privacy Requests: – When fulfilling Right to Be Forgotten (RTBF) requests from your customers, you can now delete records across your Salesforce org and Data 360 with a single, integrated solution. Use Privacy Requests to find and selectively delete records for a data subject. Easily search for records using flexible criteria, see record details and relationships, and make informed decisions about data deletion.
- This change applies to Lightning Experience in Enterprise, Performance, Unlimited, and Developer editions.
- Send Customers an Automated Email Confirming Their Scheduling Agent Request: – Automate a confirmation email to notify customers that their Agentforce request was successful. This timely communication improves customer experience and gives clear visibility into the outcome of customer requests.
- This feature is available in Lightning Experience in Enterprise, Performance, Unlimited, Einstein 1, Agentforce 1 for Field Service, and Developer editions with any Field Service license and access to Agentforce Service agents.
- <<How>>
- Create an agent from the Scheduling or Agentforce Service Agent templates to get the latest version of the Appointment Management for Field Service topic. The flows referenced by the topic’s actions now include a subflow that automatically sends a confirmation email to the customer. In the Field Service: Send Confirmation to Customer flow, open the sendEmail variable and change the default value to True.
- Capture Leads and Schedule Meetings Autonomously: – Effortlessly capture inbound web and messaging leads, answer inquiries, and schedule meetings with your prospects by setting up Inbound Lead Generation.
- This feature is available in Lightning Experience in Enterprise, Performance, and Unlimited editions with the Agentforce for Sales add-on. Setup for agents is available on the desktop site.
- <<How>>
- From Salesforce Go, navigate to the Agentforce for Sales setup page and select Inbound Lead Generation. Follow the guided setup to enable the required features, assign permissions, and get your agent generating leads.
- Create Richer HTML Content with More Supported Tags and Attributes: – The HTML Editor component for Aura and Lightning Web Runtime sites supports an expanded list of HTML tags and attributes. Organize visual content with the figure and figcaption tags and sidebars or other tangential content with the aside tag. Use the audio tag to embed audio files for rich media experiences. Boost SEO with the footer, header, main, and section tags. Make your content readily accessible to screen readers with aria-* attributes.
- This change applies to Aura and LWR sites accessed through Lightning Experience and Salesforce Classic in Enterprise, Performance, Unlimited, and Developer editions.
- <<How>>
- Use these HTML tags in the HTML Editor components.
- article
- aside
- audio
- bdi
- canvas
- datalist
- details
- dialog
- embed
- figcaption
- figure
- footer
- header
- hgroup
- main
- mark
- meter
- noscript
- object
- output
- param
- progress
- rp
- rt
- ruby
- section
- summary
- svg
- template
- time
- track
- use
- wbr
- Use these HTML tags in the HTML Editor components.
- Use Updated Empty Value Placement in List View Sorting: – When you sort a list view, blank fields, or null values, now are treated as the highest value in the dataset. For example, let’s say you have a column with the data 5, 9, null, and 2. If you sort this column in ascending order, you see 2, 5, 9, null. Previously, Salesforce treated blank fields as the lowest value, so that in the example given, you saw the data as null, 2, 5, 9.
- This change applies to Lightning Experience in all editions.
- List View Edit Limits Are Communicated More Clearly: – List views rendered with Lightning Web Components (LWC) now prevent you from selecting or attempting to edit more than the supported maximum of 200 records at one time. Previously, if you selected more than 200 records, the edit icon still appeared and Salesforce didn’t restrict you from changing a field. However, when you attempted to apply your changes, an error notified you that your changes were unsaveable. To save you time and prevent the input of changes that can’t be saved, list views now enforce the 200-record limit earlier in the edit process.
- This change applies to Lightning Experience in all editions.
- Share Reports and Dashboards Folders Using Usernames: – Securely share report and dashboard folders using precise usernames. Search for users by their usernames, and reduce the risk of sharing sensitive information with the wrong users. Previously, only the name was shown.
- This change applies to Lightning Experience in Enterprise, Professional, and Unlimited editions.
- Ensure Compliance with Custom Disclaimers on Exported Reports: – Ensure that your exported reports meet corporate policies and regulatory requirements by appending a custom disclaimer after the standard Salesforce disclaimer.
- This change applies to Lightning Experience in Enterprise, Professional, and Unlimited editions.
- <<How>>
- In Setup, in the Quick Find box, enter Reports and select Reports and Dashboards Settings. Select Use Custom Disclaimer on Exported Reports. In the text box, enter the custom disclaimer to show after the default Salesforce disclaimer.
- Securely Connect Your Private Redshift Data to CRM Analytics: – Integrate data from your private Amazon Redshift data warehouse into CRM Analytics. Use a virtual private connection (VPC) to make sure that all data transfer happens over an internal network, bypassing the public internet for enhanced security and compliance.
- This change applies to CRM Analytics in Lightning Experience and Salesforce Classic. CRM Analytics is available for an extra cost in Enterprise, Performance, and Unlimited editions. Salesforce Private Connect is required.
- Automate Your Outreach with a Lighter, Faster Email Builder App: – Now it’s easier than ever to connect with your customers. The new Email Builder Lite lets you quickly create and send batch emails to your Sales contacts and leads. Choose from a library of ready-made layouts, or build your own with our new component-based authoring experience. All emails you create are automatically saved to your CMS Content Workspace for easy access and reuse. It’s all accessible right from your Sales list views, so you can automate your outreach via an intuitive interface, without having to open another tab.
- This change applies to supported editions for Salesforce Foundations.
- <<How>>
- To be accessible, Email Builder Lite requires admin enablement. From Setup, in the Quick Find box, enter and select Salesforce Foundations. Under Foundations Apps and Features, enable Email Builder Lite for Sales.
- Allow More Users to Delete Files: – Manage files in Salesforce more efficiently by assigning the new Delete Salesforce Files permission to your users. With this permission, a user can delete any file that they have access to view. Previously, only a Salesforce admin or the file owner could delete a file. This feature was developed based on your idea on IdeaExchange.
- This change applies to Salesforce Files accessed through Lightning Experience and Salesforce Classic in Essentials, Group, Enterprise, Professional, Performance, Unlimited, Contact Manager, and Developer editions.
- <<How>>
- Enable Delete Salesforce Files for a profile or permission set.

- Enable Delete Salesforce Files for a profile or permission set.
- Manage Files up to 10 GB in Salesforce Files: – Salesforce Files has increased the file size limit from 2 GB to 10 GB. The increased limit is available to Files home, libraries, and on a record’s Files related list, but not to files uploaded to Chatter or LWR sites in Experience Cloud.
- This change applies to Salesforce Files accessed through Lightning Experience in Essentials, Group, Enterprise, Professional, Performance, Unlimited, Contact Manager, and Developer editions.
- Inbound Limit for Service Agent Emails is Extended: – Inbound emails handled by the Service agent count against your Agentforce for Service on Email daily transaction limit, which is 5,000 by default. You can ask Salesforce Customer Support to raise this limit. Previously, this checked against the org’s single email limit, which is shared with Apex and flow emails.
- Renamed:
- User Locale setting is now named Logged-in User Locale.
- The Pricing Operations Console is now renamed to Revenue Cloud Operations Console.
- Communications Cloud Sales Is Now Revenue Cloud for Communication
- Intelligent Document Processing Is Now Document AI for Health
- Personalized Trust Is Now Salesforce My Trust Center (Beta)
- Retired:
- Salesforce Functions Is Being Retired
- Legacy Chat Is Being Retired
- Unified Knowledge Is Being Retired
- Salesforce to Salesforce Is Being Retired
- SOAP API login() Call in SOAP API Versions 31.0 Through 64.0 Is Being Retired
- Article Answers for Einstein Bots Is Being Retired
- Salesforce for Outlook Is Being Retired in December 2027
- Work Summaries for Case (Beta) Is Being Retired
- Sales Planning Version 1 is Scheduled for Retirement
- Use Quick Text in Case Comments: – With Quick Text, reps can quickly add predefined text snippets, including dynamic merge fields to Case Comments. Quick Text standardizes internal and external communication, keeps notes consistent, and saves time by reducing repetitive manual typing.
- This change applies to Lightning Experience in Essentials, Professional, Enterprise, Performance, Unlimited, and Developer editions.
- <<How>>
- From Setup, in the Quick Find box, enter and select Quick Text Settings. Turn on Quick Text on the Quick Text Settings page. For Case Comments, admin must also turn on the Rich Text for Case Comments org preference in Support Settings. Your reps can access Quick Text by using the insert button or the Quick Text icon in the Case Comments editor.

Developer’s Point of View
- Accelerate Custom Lightning Type Creation for Agentforce with the Lightning Types MCP Tool (Developer Preview): – The Lightning Types Model Context Protocol (MCP) tool in the Salesforce DX MCP Server provides a dynamic way to create and enhance your custom Lightning types. Salesforce DX MCP Server uses large language models (LLMs) to generate the necessary LightningTypeBundle metadata files, including schema.json, editor.json, and renderer.json. You use these custom Lightning types to generate the custom Lightning Web Component (LWC) responses that you’re looking for. This feature supports Agentforce Employee agents in Lightning Experience and Agentforce Service agents via Enhanced Chat v2. You can also define structured outputs in Prompt Builder with these Lightning types.
- The Lightning Types MCP tool is available in the latest version of the Salesforce DX MCP Server (beta).
- <<How>>
- Access the Lightning Types MCP tool, which works with your integrated development environment (IDE), through Agentforce or other MCP clients of your choice. The Salesforce DX MCP Server is preconfigured in Agentforce Vibes Extension. To interact with the tool, turn on the server in Agentforce, which is a part of Agentforce Vibes Extension. After the server is running, interact with it by using natural language prompts to create, enhance, and get guidance on your custom Lightning types.
- Display Consistent Empty State Illustrations With Theme Support (Beta): – Use the new lightning-empty-state component to add meaningful visuals and content to your components that show empty states. This component displays the latest Salesforce Lightning Design System (SLDS) empty state illustration and correctly sizes it for the container, simplifying your UI development. The SVG illustrations automatically adjust to the user’s selected theme, and can adapt to dark mode in SLDS 2 themes, for a consistent look and feel across your app. The new lightning-illustration component displays the same set of illustrations without text.
- This feature applies to Lightning Experience. The component must run in a Salesforce org to display the illustrations.
- <<How>>
- Include the
<lightning-empty-state>tag in your Lightning web component and pass the illustration name and title by using attributes. Pass the description and cta (call-to-action) by using slots. See the illustration names and usage information in the Lightning Component Reference (can be outdated or unavailable during release preview). See the SLDS 2 (can be outdated or unavailable during release preview) site for images of the illustrations and extensive information about the Empty State design. - This example shows an empty cart illustration along with a Browse Products call-to-action button with the brand variant.
<!-- myEmptyState.html --> <!-- With illustration and action --> <lightning-empty-state illustration-name="cart:noitems" title="It's looking a little empty in here"> <p slot="description">Head to the product catalog to add something to your cart.</p> <lightning-button variant="brand" label="Browse Products" slot="cta" onclick={handleCtaClick}> </lightning-button> </lightning-empty-state> - The button handler in the component’s JavaScript file carries out the action.
import { LightningElement } from "lwc"; export default class MyEmptyState extends LightningElement { handleCtaClick(event) { // go to the Products tab } } - The same myEmptyState example component can run in both SLDS 1 and SLDS 2 themes. The lightning-empty-state component automatically detects the SLDS version of the theme and presents the correct version of the illustration.
In SLDS 2 themes, this component code produces this empty state depiction with an empty cart illustration.
- Include the
- This feature applies to Lightning Experience. The component must run in a Salesforce org to display the illustrations.
- Update Your Custom Components for Use in Setup with Agentforce (Beta): – Make your custom Aura and Lightning web components accessible to Agentforce in Setup by adding AI-related component and property descriptions to their js-meta.xml and .design files. AI component and property descriptions are used only in orgs that have Setup with Agentforce (beta) enabled.
- This feature is available in Lightning Experience in Enterprise, Performance, Unlimited, and Developer editions with Foundations or Agentforce 1 editions.
- Manage Page Errors with Error Console: – Enable the Error Console to capture and display component and page errors without interrupting your work in Salesforce. The console collects non-fatal errors so you can see them when it’s convenient for you, and they don’t require interaction. Fatal errors still show in modal error panels that you must dismiss before continuing. Fatal errors are also collected in the Error Console for later inspection.
- This change applies to Lightning Experience.
- The Error Console keeps non-fatal errors from interrupting your work, while making it easier to share error details with your Salesforce admin or developer.

- <<How>>
- From Setup, in the Quick Find box, enter User Interface, and then select User Interface. Enable the Use Error Console for error reporting in Lightning Experience option in the Advanced Settings section.
- Deploy Apex Components Faster by Running Only Relevant Tests (Beta): – To reduce Apex component deployment time, use the new RunRelevantTests test level to run only the tests relevant to your code changes. This feature automatically determines which tests to run based on an analysis of the deployment payload and the payload dependencies. For fine-grained control, you can annotate test classes so that they either run regardless of the deployment payload, or run when specified components are new or modified. This targeted approach boosts the speed and reliability of your deployment while maintaining code quality and coverage requirements.
- The RunRelevantTests test level is available in all API versions. The @IsTest(critical=true) and @IsTest(testFor=’…’) annotations are available in API version 66.0 and later. The feature is available in Lightning Experience and Salesforce Classic in Enterprise, Performance, Unlimited, and Developer editions.
- <<How>>
- To specify the
RunRelevantTeststest level when you deploy Apex components, use one of these methods.- To deploy by using a file-based call, set the
testLevelfield on theDeployOptionsobject toRunRelevantTests. Then passDeployOptionsas an argument to thedeploy()method. - To deploy by using the
deployRequestREST resource, define adeployOptionsobject in the POST request body and set itstestLevelfield toRunRelevantTests. - To deploy by using the Salesforce CLI, use the
sf project deploy startcommand and set the--test-levelflag toRunRelevantTests. - If a test class must always run regardless of the classes or triggers in the deployment payload, annotate the test class with
@IsTest(critical=true). - If a test class must always run whenever specified classes or triggers are new or changed in the deployment payload, annotate the test class with
@IsTest(testFor='ApexClass:ClassName, ApexTrigger:TriggerName').
- To deploy by using a file-based call, set the
- To specify the
- Use Apex Cursors for Expanded SOQL Query Result Support (Generally Available): – Use Apex cursors and pagination cursors to work with large SOQL query result sets in manageable parts. This feature, now generally available, includes enhancements since the beta release. Standard cursors, when combined with queueable Apex, address the limitations of batch Apex. Pagination cursors are designed for UI elements, such as multipage record lists. Both Apex cursor types can traverse forwards and backwards through result sets and can handle high-volume, high-resource processing. This feature is available in API version 66.0 and later.
- The feature is available in Lightning Experience and Salesforce Classic in Enterprise, Performance, Unlimited, and Developer editions.
- <<How>>
- This feature, now generally available, includes these enhancements.
- A PaginationCursor class to implement pagination in a UI. Calling the PaginationCursor.fetchPage() and PaginationCursor.fetchDeleted() methods count against the SOQL query limit, and the rows fetched count against the SOQL query row limit.
- Debug log events to track cursor operations.
- Updated cursor governance limits. The maximum cumulative number of new cursor rows per 24-hour period is 100 million.
- These new methods to track usage against new governor limits.
- Limits.getApexCursors() and its upper bound Limits.getLimitApexCursors() method
- Limits.getApexPaginationCursors() and its upper bound Limits.getLimitApexPaginationCursors() method
- Limits.getApexPaginationCursorRows() and its upper bound Limits.getLimitApexPaginationCursorRows() method
- Cursor and pagination cursor support in AuraEnabled serialization and deserialization. You can serialize a cursor in an @AuraEnabled response and deserialize a cursor as an input parameter in an @AuraEnabled method.
- This feature, now generally available, includes these enhancements.
- Extract Picklist Values Based on Record Type: – Get the values for all picklist fields for a particular record type by using the new ConnectApi.RecordUi.getPicklistValuesByRecordType(objectApiName, recordTypeId) method. We delivered this feature due to your idea on IdeaExchange.
- The feature is available in Lightning Experience and Salesforce Classic in Enterprise, Performance, Unlimited, and Developer editions.
- Previously, in Apex, you couldn’t directly get picklist values that were specific to a record type without making callouts.
- <<How>>
- This method is especially useful for getting dependent picklist values. For example, if an object has a tree of dependent picklists, such as Continents__c, Countries__c, Cities__c, use this method to get all the values for each picklist in one request via the ConnectApi.PicklistValuesCollection.
- Expose Apex REST and AuraEnabled Controller Methods as Agent Actions (Generally Available): – Create agent actions based on Apex classes by annotating methods in those classes, generating an OpenAPI spec document, and deploying that document to your org. Manage the exposed methods as APIs in API Catalog. This feature is now generally available.
- This change applies to Lightning Experience in Enterprise, Performance, Unlimited, and Developer editions.
- Use Visualforce PDF Rendering Service with Apex Blob.toPdf() (Release Update): – With this update enabled, the Apex Blob.toPdf() method for PDF rendering uses the same rendering service as Visualforce. The Visualforce PDF rendering service offers improvements such as additional fonts and multibyte character support. This change makes PDF rendering more consistent on the Salesforce Platform.
- This feature is available in Lightning Experience and Salesforce Classic in Enterprise, Performance, Unlimited, and Developer editions.
- <<How>>
- To review this update, from Setup, in the Quick Find box, enter Release Updates, and then select Release Updates. For Use Visualforce PDF Rendering Service with Apex Blob.toPdf(), follow the testing and activation steps.
- With this update enabled, calls to Blob.toPdf() automatically use the Visualforce PDF rendering service. Blob.toPdf() still accepts any string as an argument, and still returns a Blob result. Other than using a different PDF rendering engine, the shape of Blob.toPdf() is unchanged.
- Specify the Number of Async Jobs to Delete: – Use the new method overload for purgeOldAsyncJobs() to specify the number of oldest, completed async jobs in your org to purge. Providing an upper bound for the number of records to delete enables incremental progress when large volumes of records are to be deleted.
- This feature is available in API version 66.0 and later. This feature is available in Lightning Experience and Salesforce Classic in Enterprise, Performance, Unlimited, and Developer editions.
- <<How>>
- Specify the number of completed async jobs to delete, starting from the oldest jobs that finished before the specified date. This example shows how to delete up to 1000 job records for jobs that finished before today’s date.
Integer maximumNumberOfJobsToDelete = 1000;
Integer count = System.purgeOldAsyncJobs(
    Date.today(),
    maximumNumberOfJobsToDelete
);
System.debug('Deleted ' + count + ' old jobs.');
- Specify the number of completed async jobs to delete, starting from the oldest jobs that finished before the specified date. This example shows how to delete up to 1000 job records for jobs that finished before today’s date.
- Expose Custom SOQL in REST API Calls Using Named Query API (General Availability): – Use Named Query API to define and expose custom SOQL queries, or Named Query APIs, as scalable actions for REST API clients. Named Query APIs can retrieve data quickly and more efficiently than existing Flow or Apex processes.
- This change applies to Lightning Experience in Enterprise, Performance, Unlimited, and Developer editions.
- Monitor Sandbox Copy Progress in Greater Detail with an Updated UI: – The updated UI for sandbox copies and refreshes now provides a detailed visual progress bar and real-time status updates for each stage. Users gain greater insight and transparency into the process, enabling better tracking of sandbox progress and completion.
- This change applies to Salesforce Lightning Experience in Enterprise, Performance, and Unlimited editions.
- <<How>>
- From Setup, enter Sandboxes in the Quick Find box, then select Sandboxes. The new UI includes a visual progress bar indicating the current stage and an expandable section with helpful details for each stage of the process. After the copy completes, the visual progress bar changes to an indicator for when your next refresh will become available.
- Create Custom Property Types and Editors for Lightning Web Components in Aura and LWR Sites (Generally Available): – Make your custom Lightning web components highly configurable in Experience Builder by adding custom property editors and property types. This feature, which is now generally available, includes some changes since the beta release.
- This change applies to Aura and LWR sites accessed through Lightning Experience and Salesforce Classic in Enterprise, Performance, Unlimited, and Developer editions.
- <<How>>
- Create custom property types using the new LightningTypeBundle, which supports updates. Previously, the ExperiencePropertyTypeBundle didn’t allow for updates.
- To customize the editing experience specific to Experience Builder, create the editor.json file using the new format for LightningTypeBundle and place it within the experienceBuilder folder.
- Automate UI Testing for Omniscripts and Flexcards: – Omnistudio now supports comprehensive UI testing for guided experiences and visual components by using the UI Test Automation Model (UTAM) framework. UTAM improves deployment reliability by validating end-to-end workflows. Write UI-driven tests for Omniscripts and Flexcards that validate full user journeys exactly as they appear on screen. UTAM interacts directly with the interface to test user inputs, navigation, actions, data rendering, and visual states.
- This change applies to Aura and LWR sites accessed through Lightning Experience in Enterprise, Performance, and Unlimited editions where Omnistudio is enabled.
- Creation of New Connected Apps Is Disabled by Default: – The ability to create new connected apps is disabled by default for all Salesforce orgs. This change improves security by removing the risks associated with connected apps. This update does not affect any existing connected apps, which will continue to function normally. Also, packaged, existing connected apps that are deployed in a new org aren’t affected. We recommend using external client apps for all new integrations and migrating existing connected apps to external client apps.
- This change applies to Lightning Experience, Salesforce Classic, and all versions of the mobile app in Essentials, Professional, Enterprise, Performance, Unlimited, and Developer editions.
- This change addresses an ongoing security threat that takes advantage of connected apps. This change encourages the adoption of external client apps, which are a more secure, modern replacement for connected apps.
- <<How>>
- With Spring ’26, the ability to create connected apps is disabled. The Allow creation of connected apps preference in External Client App Settings is also removed. To enable creation of new connected apps, contact Salesforce Customer Support.
- Salesforce Flow Enhancements: – There are several enhancements in Salesforce Flow as follows:
- Evolve Flows Iteratively with Agentforce: – Improve and modify existing record-triggered and schedule-triggered flows by using natural language without starting from scratch. Use conversational prompts in the Agentforce panel to add, modify, and delete elements in a flow. This feature doesn’t consume generative AI credits.
- This change applies to Lightning Experience in Essentials, Pro Suite, Professional, Enterprise, Performance, Unlimited, and Developer editions with Foundations or Agentforce 1 editions. Verify Agentforce 1 editions feature availability with your account executive.

- This change applies to Lightning Experience in Essentials, Pro Suite, Professional, Enterprise, Performance, Unlimited, and Developer editions with Foundations or Agentforce 1 editions. Verify Agentforce 1 editions feature availability with your account executive.
- Tailor Screen Flows to Your Audience with Component-Level Styling Overrides: – Deliver a personalized screen flow experience to your customers. Customize a variety of style properties for your screen flows, like background color, border color, border weight, border radius, text color, buttons, and more. Any styling changes you set override your org or Experience Cloud site’s default theme.
- This change applies to Lightning Experience and Salesforce Classic in Essentials, Professional, Enterprise, Unlimited, and Developer editions.
- <<How>>
- To customize the look for your screen, edit a screen. On the Screen Properties panel, select the Style tab. On the Style tab, you can set the styles for the header, container, and footer of your screen.
- You can customize the styling for these components: Checkbox, Checkbox Group, Currency, Date, Date/Time, Display Text, Number, Long Text Area, Multi-Select Picklist, Password, Picklist, Radio Button, Repeater, Section, and Text.

- Add Visually Distinct and Accessible Messages to Screen Flows: – With the new Message screen component, you can add an eye-catching a11y-compliant message to a screen to show information, a success, an error, or a warning.
- This change applies to Lightning Experience and Salesforce Classic in Essentials, Professional, Enterprise, Unlimited, and Developer editions.
- <<How>>
- Add the Message display component to a flow screen. The message type determines the color and icon used for the message. Screen readers are able to read the message type to their users. For the message, you can enter text or select a flow resource to use as the message.

- Add the Message display component to a flow screen. The message type determines the color and icon used for the message. Screen readers are able to read the message type to their users. For the message, you can enter text or select a flow resource to use as the message.
- Visualize and Track Record Progress with Kanban Boards in Screen Flows (Beta): – Use the new Kanban Board component to show records as cards in columns that represent workflow stages, without custom Lightning implementations. Your users gain instant visibility into record progress and record details without leaving the flow. The Kanban Board is read-only, so users can’t drag cards between stages at run time.
- This change applies to Lightning Experience and Salesforce Classic in Essentials, Pro Suite, Professional, Enterprise, Performance, Unlimited, and Developer editions.
- <<How>>
- Add the Kanban Board component to a screen and select a record collection whose records you want to show on the board. Then select a picklist field from Source Collection for column headers. You can select only picklist fields for column headers. The field order in the object metadata dictates the display order of columns. Finally, add the fields to show on record cards.

- In this example, a Get Records element retrieves Opportunity records, and set its output as the source collection (1). We selected the StageName picklist for the board’s column headers (2).

- The card displays Opportunity Type, Close Date, Description, Has Overview Task, and Amount (3).

- Records are grouped by Opportunity Type (4) and selected the Summary Field (5) to show aggregates for the columns and groups.
- Here’s the run-time view of the Kanban Board.

- Add the Kanban Board component to a screen and select a record collection whose records you want to show on the board. Then select a picklist field from Source Collection for column headers. You can select only picklist fields for column headers. The field order in the object metadata dictates the display order of columns. Finally, add the fields to show on record cards.
- Open Screen Flows in Lightning Experience with a URL (Generally Available): – Launch screen flows in Lightning Experience and Lightning console apps with a new standardized URL format. Opening flows in Lightning has several benefits, such as faster performance, keeping your users in Lightning console apps, and providing a more consistent browser experience. You can also pass information into your flow through its URL. The new URL format also supports the Salesforce Cosmos theme, and flow local actions.
- This change applies to Lightning Experience in Essentials, Professional, Enterprise, Unlimited, and Developer editions.
- <<How>>
- To open a flow in Lightning Experience, append /lightning/flow/YourFlowNameHere to your URL. To run a specific flow version, append /lightning/flow/YourFlowNameHere/versionId to your URL. Flows that open in Lightning Experience have improved performance because most required Lightning components are already loaded into the browser session. In Lightning console apps, your tabs are preserved when a flow opens, and you can switch to other tabs while the flow is working. Using the new URL format also ensures that your browser behaves consistently, with forward, back, and your browser history working as expected.
- To pass data into a flow through its URL, append ?flow__variableIdHere=value to the end of your URL. For example, to pass a case number into a flow, /lightning/flow/YourFlowNameHere?flow__variableIdHereID={!Case.CaseNumber}.
- Use & to append multiple variables into a flow. For example, /lightning/flow/YourFlowNameHere?flow__varUserFirst={!$User.FirstName}&flow__varUserLast={!$User.LastName} passes both the user first name and last name into the flow.
- Retain Debug Configurations Within Flow Editing Sessions: – Preserve debug configurations when you save changes to your flow. Debug inputs such as triggering record values, debug options, and input variable values now remain set when you save flow changes within your Flow Builder session. Refreshing your browser or closing Flow Builder clears all debug settings.
- This change applies to Lightning Experience and Salesforce Classic in Essentials, Professional, Enterprise, Performance, Unlimited, and Developer editions.
- Monitor Flow Performance with View Flow Version Run Analytics: – Get comprehensive insights into your flow version’s overall health with new version-level analytics. Previously, understanding flow performance required piecing together data from individual element analytics or relying on incomplete aggregate metrics, which made it challenging to assess flow health holistically or spot systematic issues affecting multiple users. Now, you have a unified view showing completion rates, run status distributions, and detailed execution data across all individuals, so you can better monitor performance, identify version-wide trends, and share comprehensive insights with stakeholders
- This change applies to Lightning Experience in Marketing Cloud Growth and Marketing Cloud Advanced for automation event-triggered and segment-triggered flows with Data 360 element-level logging enabled.
- <<How>>
- View version analytics in Flow Builder by opening a flow with completed runs, clicking chart, and selecting View Flow Version Run Analytics from the dropdown menu. Review the summary panel for overview metrics, or click Open Details to access the comprehensive Tableau dashboard.

- View version analytics in Flow Builder by opening a flow with completed runs, clicking chart, and selecting View Flow Version Run Analytics from the dropdown menu. Review the summary panel for overview metrics, or click Open Details to access the comprehensive Tableau dashboard.
- Compare Screen Flow Versions to Track Changes More Efficiently: – Use the Compare Versions feature to automatically track what’s changed between any two versions of a screen flow. View changes to screen flow elements, resources, fields, properties, components, and styles between flow versions.
- This change applies to Lightning Experience in Essentials, Pro Suite, Professional, Enterprise, Performance, Unlimited, Developer, and all Agentforce 1 editions.
- <<How>>
- From the Automation app for a screen flow, click the actions dropdown in the Flows list view, the flow’s details page, or versions page, and click Compare Versions. Or, from Flow Builder, click the versions dropdown and then click Compare Versions. This option is available only if the screen flow has two or more versions.
- Select the screen flow versions to compare, and then click Compare Versions. You can change either flow version to compare. The comparison results show changes made to elements, resources, and flow properties for the selected screen flow versions. You can select to either view only changes or show all the elements in the flow regardless of the change status. To show all items, deselect Show Only Changed Items.

- For more information about changes to an element, resource, or field click View Details. Review detailed changes to screen components, fields, flow properties, and component styles.

- Monitor Performance for Active and Previously Run Flows on the Canvas: – Visualize flow performance directly in Flow Builder. Previously, on-canvas insights were available only for flows triggered by Data 360. Now you can view aggregated element run data for active and previously run flows directly on the canvas to identify performance bottlenecks without relying on logs or external reporting tools. Embedded analytics aren’t available for screen flows or orchestrations.
- This change applies to Lightning Experience in Essentials, Pro Suite, Professional, Enterprise, Performance, Unlimited, and Developer editions.
- <<How>>
- In Flow Builder, open an active or previously run flow in read-only mode. Aggregated run data appears directly on supported canvas elements. To view detailed metrics, including average duration and run status, click an element and select the Analytics tab in the properties panel. Start and End elements don’t display analytics.

- In Flow Builder, open an active or previously run flow in read-only mode. Aggregated run data appears directly on supported canvas elements. To view detailed metrics, including average duration and run status, click an element and select the Analytics tab in the properties panel. Start and End elements don’t display analytics.
- Navigate to Flows in Lightning Experience from Custom Lightning Components: – You can now navigate to a screen flow or autolaunched flow in Lightning Experience from a custom Aura or Lightning web component. Your Lightning component developer uses the Aura lightning:navigation component or the lightning/navigation Lightning web component to navigate to the new Standard Flow PageReference type or generate a URL from the PageReference type.
- This change applies to Lightning Experience in Essentials, Professional, Enterprise, Unlimited, and Developer editions.
- Add Approval Submissions to Record Pages Without Custom Buttons: – Add a component for your users to submit records for approval without you creating a custom button. The Request Approval component works in both Lightning App Builder and Experience Builder. Configure built-in options for first approver selection and submission comments.
- This change applies to Lightning Experience in Enterprise, Performance, Unlimited, all Einstein 1, and Developer editions.
- <<How>>
- Before you add the Request Approval component to a record page layout, consider what input you want from the submitter. If you plan to require that the submitter select a first approver, design a flow approval process to assign one or more approval steps to the firstApprover input variable. To expose optional submitter comments to approvers, use the submissionComments input variable in your flow approval process.
- After you add the Request Approval component to a page, configure it to reference the relevant active autolaunched flow approval process.
- The component shows an Approval Request Comments field by default. To prevent the submitter from adding comments about a submission, select Hide submitter comments.
- To require the submitter to select a first approver, select Require submitter to select first approver.
- Set Up and Monitor Flow Logging in One Place: – Gain visibility into flow performance with the new Flow Logs tab in the Automation Lightning app. Data 360 stores flow run metrics and provides real-time flow performance insights. Use the Flow Logs tab to set up Data 360, configure flow logging, and track performance for enabled flows.
- This change applies to Lightning Experience in Essentials, Professional, Enterprise, Performance, Unlimited, and Developer editions.
- <<How>>
- In the Automation Lightning app, select the Flow Logs tab. From this tab, set up Data 360 in your org, enable flow logging, and view all the flows that are currently logging data.

- In the Automation Lightning app, select the Flow Logs tab. From this tab, set up Data 360 in your org, enable flow logging, and view all the flows that are currently logging data.
- Evolve Flows Iteratively with Agentforce: – Improve and modify existing record-triggered and schedule-triggered flows by using natural language without starting from scratch. Use conversational prompts in the Agentforce panel to add, modify, and delete elements in a flow. This feature doesn’t consume generative AI credits.
- Flow Orchestrator: – There are several enhancements in Flow Orchestrator as follows:
- Create Orchestrations from the Automation Lightning App: – Start building orchestrations directly from the Automation Lightning app without going through Setup. Click New on the Orchestrations tab to open a filtered view of the New Automation window. Select the Autolaunched Automations or Triggered Automations category, and then select the specific orchestration type to create. Or search for the specific orchestration.
- This change applies to Lightning Experience in Enterprise, Performance, Unlimited, and Developer editions.
- View Orchestration Automation Usage in the Automation Lightning App: – Quickly identify dependencies for your orchestrations with the new Usage subtab. On the Orchestrations tab in the Automation Lightning app, select an orchestration or version, then click Usage. The subtab shows automations that the selected item uses or automations that use the selected item.
- This change applies to Lightning Experience in Enterprise, Performance, Unlimited, and Developer editions.
- <<How>>
- On the Usage subtab for a selected orchestration version, view the flows that the version uses and how it references them.

- On the Usage subtab for a selected orchestration version, view the flows that the version uses and how it references them.
- Complete Orchestration Work Items in Flow Builder While Debugging: – Complete orchestration work items while debugging an orchestration without leaving Flow Builder. Open the orchestration work item directly on the canvas from an interactive step’s card. After you complete the work item, the orchestration run resumes.
- This change applies to Lightning Experience in Enterprise, Performance, Unlimited, and Developer editions.
- Create Orchestrations from the Automation Lightning App: – Start building orchestrations directly from the Automation Lightning app without going through Setup. Click New on the Orchestrations tab to open a filtered view of the New Automation window. Select the Autolaunched Automations or Triggered Automations category, and then select the specific orchestration type to create. Or search for the specific orchestration.


Additional Enhancements Worth Noting!
- Export and Import Translated Files with Ease: – Reduce metadata translation file size and complexity with export filters. Now, you can filter metadata translation files for export from the Translation Workbench when you select metadata components and date ranges. To improve the import experience, when you import translated files that contain invalid records, the valid records are imported.
- This change applies to Lightning Experience and Salesforce Classic in all editions.
- <<How>>
- To create files for your translators that contain your Salesforce org’s translatable metadata, from Setup, in the Quick Find box, enter Export, and then select Export. If data translation is enabled, select the Metadata translation type. Then filter by Salesforce Setup components or by modification date.
- Speed Up Custom Label Updates in Translation Workbench: – Save time by updating custom labels directly within the Translation Workbench user interface, instead of navigating to the Custom Labels setup section.
- This change applies to Lightning Experience and Salesforce Classic in all editions.
- <<How>>
- To update custom label translations from the Translation Workbench, from Setup, in the Quick Find box, enter Translate, and then select Translate. To enter new values, select Custom Label from the Setup Components and double click the Custom Label Translation column.
- Use Dark Mode in More Editions (Beta): – You can now enable dark mode for Salesforce Lightning Design System 2 (SLDS 2) themes in Free Suite, Pro Suite, Professional, Enterprise, and Developer edition orgs. Previously, dark mode was available only for Salesforce Starter Suite orgs. Dark mode shows light-colored text and visual elements on a dark background, which lays the foundation for richer theming opportunities and more customization of Lightning base components. With dark mode enabled, your users can select an appearance that reduces eye strain in low-light conditions and enhances readability.
- This change applies to Salesforce Lightning Design System 2 and Lightning Experience in Free Suite, Pro Suite, Professional, Enterprise, and Developer editions.
- <<How>>
- To enable dark mode, from Setup, in the Quick Find box, enter Themes and Branding and select it. Click New Theme, or click drop-down icon next to an existing SLDS 2 theme and then select Edit. In the Dark Mode section, select Let users enable dark mode.

- Save your changes and then activate the theme.
- After you enable dark mode, a user can click their profile image and select how they want Salesforce to appear.
- To enable dark mode, from Setup, in the Quick Find box, enter Themes and Branding and select it. Click New Theme, or click drop-down icon next to an existing SLDS 2 theme and then select Edit. In the Dark Mode section, select Let users enable dark mode.
- EventBusSubscriber Object’s Position and Tip Fields Are Being Deprecated: – The EventBusSubscriber object’s Position and Tip fields are being deprecated. They are being replaced with the new fields LastProcessed and LastPublished. The field type is changing from int to string in order to handle large replay IDs. Salesforce recommends updating your code to use LastProcessed and LastPublished to avoid issues when the replay ID exceeds the maximum integer size.
- This change is available in Developer, Enterprise, Performance, and Unlimited editions.
- Sending Session IDs in Outbound Messages Is Being Removed: – To align with modern security best practices, you can no longer send session IDs in outbound messages starting February 16, 2026. Instead, use OAuth to authenticate. When this change goes into effect, the new outbound message form will not include the option to send a session ID, the IncludeSessionId flag in the API will be ignored and set to FALSE, and the <sessionID></sessionID> element of an outbound message payload won’t include a session ID.
- This change applies to Developer, Enterprise, Performance, and Unlimited editions.
- Change Data Capture Events No Longer Support Custom Formula Fields: – You can no longer include custom formula fields in change data capture events. After this update, change data capture works as it did before Winter ‘26.
- This change applies to Lightning Experience and Salesforce Classic in Enterprise, Performance, Unlimited, and Developer editions.
- The Timeout of Outbound Messages Is Reduced to 20 Seconds from 60 Seconds: – With the lower timeout value, the system makes better use of resources and can process more messages. Also, the lower timeout value prevents long-running messages from delaying the processing of other messages in the queue.
- This change applies to Lightning Experience and Salesforce Classic in Enterprise, Performance, Unlimited, and Developer editions.
- Improve Type Safety with the LWC TypeScript Converter MCP Tool (Beta): – Use natural language prompts to automate the conversion of JavaScript files to TypeScript for LWC development.
- This change applies to Lightning Experience, Experience Builder sites, and all versions of the mobile app in all editions.
- <<How>>
- The recommended way to use the LWC MCP tools is via Agentforce Vibes Extension. Agentforce Vibes is preconfigured with the Salesforce DX MCP Server (Beta). To enable the LWC MCP tools using other clients, such as Cursor or VS Code with Copilot, install the Salesforce DX MCP Server (Beta). The LWC TypeScript Converter MCP Tool is available as part of the
lwc-expertstoolset.
- The recommended way to use the LWC MCP tools is via Agentforce Vibes Extension. Agentforce Vibes is preconfigured with the Salesforce DX MCP Server (Beta). To enable the LWC MCP tools using other clients, such as Cursor or VS Code with Copilot, install the Salesforce DX MCP Server (Beta). The LWC TypeScript Converter MCP Tool is available as part of the
- Update Apex Code and Flows for Changed Sharing Recalculation Behavior (Release Update): – To optimize performance after large-scale updates to groups or roles, Salesforce now performs some sharing recalculations asynchronously. If Apex code and flows require that share records be updated immediately, the code and flows can break when this release update is enforced. Update Apex classes, tests, and flows that update group membership or roles if they rely on synchronous sharing recalculation. This update is available starting in Spring ’26.
- This change applies to Lightning Experience and Salesforce Classic in Professional, Enterprise, Performance, Unlimited, and Developer editions.
- <<How>>
- Review the release update in Setup for information on identifying and fixing your Apex code and flows. To identify required updates, enable Test asynchronous sharing recalculation in Apex tests on the Sharing Settings page. To test your changes, enable this release update in a sandbox before enabling it in production.
- Return Users to Their Previous Page After Session Timeout: – In all LWR sites, authenticated users are now returned to the page they were viewing before their session ended. Previously, the session timeout notification redirected users to the login page, and upon logging back in, they were returned to the Home page.
- This change applies to LWR sites accessed through Lightning Experience and Salesforce Classic in Enterprise, Performance, Unlimited, and Developer editions.
- Get Null Values Easily with the New Is Null Operator in Data Mappers: – Use the new IS NULL operator in Omnistudio Data Mapper Extract and Turbo Extract to filter null or empty records. Previously, the equality operator (=) didn’t consistently handle null filtering, often requiring complex workarounds. For example, to get records with empty account IDs, a Data Mapper operation such as AccountId = null AND Phone != null was required. With the IS NULL operator, you can explicitly filter blank fields, without adding an additional condition, such as != null.
- This change applies to Lightning Experience, Experience Cloud sites, and all versions of Enterprise, Performance, and Unlimited editions where Omnistudio is enabled.
- This feature is available to Omnistudio customers who use the standard runtime and standard designer.
- Generate Larger Documents with Expanded File Size Support: – Scale document generation to support larger outputs, generating single PDF, DOCX, or PPTX files up to 200 MB. This enhancement enables high-volume, media-rich, and evidence-heavy use cases and helps you generate complete documents in one pass without splitting content or assembling files outside Salesforce.
- This change applies to Lightning Experience in Enterprise, Performance, Unlimited, and Developer editions of Agentforce Revenue Managament, formerly Revenue Cloud, with the Revenue Events Starter Pack license, and the Revenue Cloud Advanced or Revenue Cloud Billing license.
- Replace Instanced URLs in API Traffic: – To prevent disruption after infrastructure updates that change your instance name, replace instanced URLs in API traffic with your org’s My Domain login URL. Support for instanced URLs in API traffic ends in Summer ’26.
- This change applies to Lightning Experience and Salesforce Classic in all editions except Database.com.
- Track Attempts to Use Uninstalled Connected Apps: – You can now track denied attempts to use connected apps that aren’t installed in your org (uninstalled apps for short). By tracking these denied attempts, you can identify both legitimate and suspicious attempts to use uninstalled apps. You can decide whether to allow usage of the app or to block it entirely.
- This change applies to Lightning Experience and Salesforce Classic (not available in all orgs) in all editions.
- <<How>>
- On the Connected Apps OAuth Usage page in Setup, review the Denied Attempts Due to Usage Restriction column. You can also review the date and time of the most recent denied attempt.

- On the Connected Apps OAuth Usage page in Setup, review the Denied Attempts Due to Usage Restriction column. You can also review the date and time of the most recent denied attempt.
- API-Only Users Are Blocked from Bridging into UI Sessions: – To improve security, users with the API Only User permission can no longer bridge into UI sessions by using the frontdoor URL generated by the /services/oauth2/singleaccess endpoint, also known as UI Bridge API. This change can break integrations that unintentionally grant UI access to API-only users.
- This change applies to Lightning Experience and Salesforce Classic (not available in all orgs) in all editions.
- <<How>>
- If you call the /services/oauth2/singleaccess endpoint with an access token that was issued to an API-only user, the call fails with this error.
{ "error": "invalid_token", "error_description": "this token is invalid, unknown, or malformed" } - To allow these users to bridge into UI sessions via frontdoor URLs, remove the API Only User permission.
- If you call the /services/oauth2/singleaccess endpoint with an access token that was issued to an API-only user, the call fails with this error.
- Migrate SAML-Enabled Connected Apps to External Client Apps: – Bring the improved usability and security of the external client apps framework to your SAML single sign-on (SSO) configurations. With a few clicks, you can now transform SAML-enabled connected apps into external client apps. After migration, you get an identical external app with all of your SAML configurations, while your old connected app remains in read-only mode.
- This change applies to Lightning Experience and Salesforce Classic (not available in all orgs) in all editions.
- External client apps are a more secure, modern replacement for connected apps. We recommend that you use external client apps instead of connected apps whenever possible. Previously, the external client apps migration tool supported only the OAuth plugin. Now, you can migrate apps that use the SAML plugin.
- <<How>>
- In the App Manager, find your connected app and click Migrate to External Client App.
- New Configurable Settings Added to Health Check: – Health Check now provides deeper insight by tracking seven new configurable security settings, including MFA status, SAML enablement, and session management controls.
- This change applies to Lightning Experience in Enterprise, Performance, Unlimited, and Developer editions.
- Simplify Your Flow Builder Layout by Collapsing Branching Elements: – Manage complex flows more efficiently by hiding unnecessary detail on the canvas. Now you can collapse and expand branching elements with Flow Builder, including Wait, Decision, Loop, Path Experiment, and Async Actions, helping you focus on the key parts of your flow. To ensure a consistent workflow, Flow Builder remembers your specific expand and collapse preferences. This layout is saved automatically and locally in your browser, making it easier to return to your work without changing the view for other users.
- This change applies to Lightning Experience, Salesforce Classic in Essentials, Professional, Enterprise, Performance, Unlimited, and Developer editions.
- <<How>>
- Collapse and expand branching elements in the Flow builder canvas by clicking Collapse or Expand next to an element’s name.

- Collapse and expand branching elements in the Flow builder canvas by clicking Collapse or Expand next to an element’s name.
- Record-Triggered Flows Issue with Non-Insertable Fields Was Fixed: – Record-triggered flows that run before records are saved now respect the internal writeable status of non-insertable fields. If existing flows try to update fields that aren’t editable, this error message appears: Invalid target field for field update.
- Preview Files Natively in Screen Flows: – Eliminate friction in document-based processes by enabling your users to review file content directly within a screen flow. The new File Preview screen component removes the requirement to download files externally, ensuring more streamlined document review and approval workflows.
- This change applies to Lightning Experience and Salesforce Classic in Essentials, Professional, Enterprise, Performance, Unlimited, and Developer editions.
- <<How>>
- In Flow Builder, drag the File Preview component to your screen element. Configure the component by setting the Content Document ID to reference the document you want users to preview. Add a descriptive label to help users understand what they’re reviewing. At runtime, users can view the document content within the screen flow and proceed with their tasks without interruption.


Salesforce Mobile App Enhancements
The new Salesforce mobile app is available for all editions, except Database.com, without an additional license. Your org’s Salesforce edition and licenses, as well as a user’s assigned profile and permission sets, determines the Salesforce data and features that are available to each user.
- Complete Tasks Directly from Custom Phone Notifications (Beta): – Users can now complete tasks directly from custom phone notifications on their Salesforce mobile app. Let’s say your VP of sales wants to approve an expense report. They can do that on the fly just from a notification received on their mobile phone. A task that before took four clicks has now been streamlined into one.
- This change applies to the Salesforce mobile app for iOS and Android on phones and tablets in all editions, except Database.com.
- Access Record Attachments in the Offline App with Files Priming (Generally Available):- When you create or update a briefcase to select records to prime for the Offline App (Salesforce Mobile App Plus), you can now also include files attached to the selected records. The Files Priming feature, which was previously in beta, is now generally available. When you prime file attachments for offline use, you enable your mobile workforce to access important attachments even in low-connectivity settings. For example, you can configure a briefcase to prime attached images for offline use, so that technicians can view the images during site visits or service appointments.
- This change applies to the Salesforce Mobile App Plus for iOS and Android on phone and tablets in all editions, except Database.com.
- Easily Configure Offline App Landing Pages with Mobile Builder (Generally Available): – With Mobile Builder for Salesforce Mobile App you can customize offline landing pages for your mobile users without writing a single line of code. Now you can show the most important records to your mobile users so they can quickly and easily take relevant actions based on their use cases. Mobile Builder was beta in Spring ’24 and is now generally available.
- These changes apply to Salesforce Mobile App Plus for Android and iOS on phones and tablets in all editions, except Database.com.
- Log In Faster with Single Sign-On: – Leverage quicker access to the Salesforce Mobile App so you can get straight to work. The Salesforce Mobile App now also supports single sign-on (SSO) when logging in with your email address instead of a username, streamlining your login experience.
- This change applies to all versions of the mobile app in all editions, in production orgs only.
Additional Resources:
Check out the resources below to learn about some of the most exciting innovations before officially GA on February 13th!
- Keep Track of Upcoming Release Dates: Mark your calendar for when you can preview and roll out Spring’26 Release updates.
- Release In a Box: A summary deck you can share with your organization, leadership team, and/or community
- Demo Videos By Salesforce: 2-3 minute overviews of our top innovations
- Release Readiness Trailblazers: Access resources and experts for all things release readiness.
- Release Trail: Earn that badge and march towards Ranger Status
Formative Assessment:
I want to hear from you!
What are your favorite Spring’26 release note gems? You can download release notes in HTML format!, for PDF files.
Feel free to share in the comments below.


One thought on “Salesforce Spring’26 Release Quick Summary”