


Last Updated on June 20, 2023 by Rakesh Gupta
Big Idea or Enduring Question:
- How to integrate Salesforce with OpenWeatherMap using OpenWeather API to get Weather Information using Salesforce Flow?
Objectives:
After reading this blog, you’ll be able to:
- Create Named Credentials for outbound requests.
- Setup a free OpenWeather account.
- Initiate an outbound HTTP GET request utilizing Salesforce Flow without the need for code.
- Manage the outbound request response and implement appropriate actions.
- and much more
👉 In the past I’ve written an article on BarCode and QR Code generation. Why not check them out while you are at it?!
Business Use case
Jestilla Zetkin is working as a Salesforce Architect at Gurukul On Cloud (GoC). During her work on Sales Cloud implementation, she was assigned a task to fetch the current temperature, longitude and latitude of the ‘ShippingCity’ using the OpenWeather API, whenever an account is created. The detailed specifications are as follows:
- Initiate a request to the OpenWeather API each time an account is created.
- Get the following details for ShippingCity and record it in the corresponding fields (within the account):
- Feels Like
- Temp Min
- Temp Max
- Longitude
- Latitude
- Get the following details for ShippingCity and record it in the corresponding fields (within the account):
- In the event of a failed response, institute a contingency action to create a task for the account’s designated owner.
What is OpenWeather API?
OpenWeatherMap is an online service owned by OpenWeather Ltd that provides global weather data via API, including current weather data, forecasts, nowcasts, and historical weather data for any geographical location. The company offers a minute-by-minute hyperlocal precipitation forecast for any location.
One Call 3.0 allows users to receive access to the various data for a specific location and includes:
- Current weather
- Minute forecast for 1 hour
- Hourly forecast for 48 hours
- Daily forecast for 8 days
- Government weather alerts
- Historical weather data for 40+ years back
- History daily aggregation for 40+ years back
OpenWeather API provides an API with JSON, XML, and HTML endpoints and a limited free usage tier. Making more than 60 calls per minute requires a paid subscription. Access to historical data also requires a subscription. Users can request current weather information, extended forecasts, and graphical maps (showing cloud cover, wind speed, pressure, and precipitation).
Here’s an illustrative example of a response obtained from invoking the OpenWeather API:
{
   "coord":{
      "lon":-96.8864,
      "lat":33.089
   },
   "weather":[
      {
         "id":800,
         "main":"Clear",
         "description":"clear sky",
         "icon":"01n"
      }
   ],
   "base":"stations",
   "main":{
      "temp":24.11,
      "feels_like":24.56,
      "temp_min":22.01,
      "temp_max":25.72,
      "pressure":1008,
      "humidity":76
   },
   "visibility":10000,
   "wind":{
      "speed":3.13,
      "deg":31
   },
   "clouds":{
      "all":0
   },
   "dt":1686459485,
   "sys":{
      "type":2,
      "id":2041986,
      "country":"US",
      "sunrise":1686395899,
      "sunset":1686447350
   },
   "timezone":-18000,
   "id":4736388,
   "name":"The Colony",
   "cod":200
}
To use this current weather data API, one must need the API key, which can be obtained from here.
If you need the geocoder to automatic convert city names and zip-codes to geo coordinates and the other way around, you have to use Geocoding API.
Read OpenWeather API documentation to understanding about different parameters and capabilities.
Automation Champion Approach (I-do):
While this can be solved using various automation tools like Apex Trigger and others, we will use Salesforce Flow and newly introduced HTTP GET Callout flow feature.
HTTP Callout pulls or sends data between the Salesforce database and an external system via Flow Builder without using code. You can set up direct integrations as needed without having to work with a developer or call a middleware tool, such as Mulesoft. After you configure the HTTP callout action in a flow, Flow Builder auto-generates an external service registration, an invocable action, and Apex class that you can use to create an Apex-defined resource for flows. You can then use the data output of the API request as input within Flow Builder and across Salesforce.
You can use HTTP Callout to connect a flow to a variety of APIs.
- Get address information using a map API
- Get weather conditions with a weather service API
- Generate the barcode with a barcode service API
- Get payment authorization information with a payment processing API
- and much more
Before discussing the solution, let me show you a diagram of the process at a high level. Please spend a few minutes going through the following Flow diagram to understand it.

Guided Practice (We-do):
There are 4 steps to solve Jestilla’s business requirement using Record-Triggered After-Save Flow. We must:
- Getting the OpenWeather API key
- Create custom fields on the Account to store the response
- Create a Named Credential
- Salesforce Flow
- Define flow properties for record-triggered flow
- Configure an HTTP GET callout for OpenWeather API
- Add a Decision element to check the response code
- Add an Update Records element to update the account
- Add a Create Records element to create a Task for the Account owner to handle error response
Step 1: Getting the OpenWeather API Key
To get the API key, we need to register with OpenWeatherMap. After signing up, it will redirect us to the profile settings.
- Click here to open the OpenWeather website.
- Click the Sign in button.
- A new window opens. If you already have an account on the website, enter your credentials. Otherwise, click the Create an Account option.
- Once your account is ready, you are automatically directed to the OpenWeather page where you signed in. It asks you about your company, and the purpose of using the OpenWeather platform.
- From the top menu bar, click on your username next to the For Business label and select My API keys from the dropdown list. This will redirect you to a page where you’ll see an API key named Default.

Step 2: Create Custom Fields on the Account Object to Store the Response
- Click Setup.
- In the Object Manager, type Account.
- Select Fields & Relationships, then click New.
- Now create few custom fields as shown in the screenshot below:
- Click Save.

Step 3: Create a Named Credential
- Click Setup.
- In the Quick Find box, enter Named Credentials, and then select Named Credentials.
- Click New Legacy.
- Fill out the page with the callout endpoint’s URL and authentication parameters.
- Click Save.

Step 4.1: Define Flow Properties
- Click Setup.
- In the Quick Find box, type Flows.
- Select Flows, then click on the New Flow.
- Select the Record-Triggered Flow option, click on Create
- Object: Account
- Trigger the Flow When: A record is created
- Set Entry Conditions:
- Field: ShippingCity
- Operator: Does Not Equal
- Value: {!$GlobalConstant.EmptyString}
- Optimize the Flow For Action and Related Records
- Choose the Option to Include a Run Asynchronously path to access an external system after the original transaction for the triggering record is successfully committed.
- Click Done.

Step 4.2: Configure an HTTP GET Callout Action
HTTP Callout guides you through entering the details about the HTTP web-based service or REST API endpoint that you’re connecting to. After you complete the configuration, you invoke the action in a flow.
- Under Run Asynchronously node, select Action.
- Click + Create HTTP Callout.
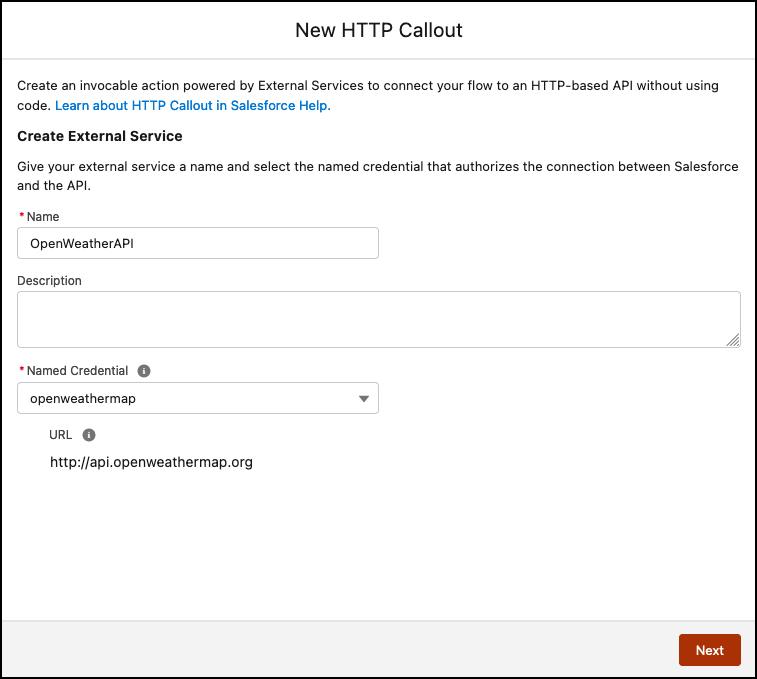
- Configure the external service that connects Salesforce to the HTTP-based API.
- Enter a Name for the external service.
- Select the named credential that you created in the step 2.
- Click Next.

- The next step is to configure the invocable action that you can use in Flow Builder or across Salesforce.
- For Label, enter the action that the callout performs.
- Method: GET
- Add the URL endpoint for the request.
- URL Path: /data/2.5/weather
- Add query parameter keys if the API you’re calling has them. When you use this action in a flow, you input values for the defined keys.
- Click Add Key
- Key: q
- Data Type: String
- Required: True
- Click Add Key
- Key: units
- Data Type: String
- Required: True
- Key: units
- Click Add Key
- Key: appid
- Data Type: String
- Required: True

- Click Add Key
- Provide a sample API response body. Salesforce generates a data structure from the sample response.
- Navigate to Provide Sample Response section.
- Click New.
- Paste a sample JSON response.
- Click Review and confirm that the Apex data structure is correct.
- To make changes, edit the text in Sample JSON Response or select data types from the data structure.
- Click Review.
- Click Done.

- Click Save.
-
Flow Builder creates the action and external service. The action is available in the Actions window in the flow.
-
The next step is to add apex action generated by HTTP Callout setup in the previous steps. We will use the Action element.
-
Label the new action OpenWeather Callout.
-
Set Input Values
- appid: YOUR_OpenWeather_API_KEY
- q: {!$Record.ShippingCity}
- units: metric
-
- Click Done.


Step 4.3: Using Decision Element to Check the OpenWeather Callout Response Code
Now we will use the Decision element to check the OpenWeather API response code.
- On Flow Designer, click on the +icon and select the Decision element.
- Enter a name in the Label field; the API Name will auto-populate.
- Under Outcome Details, enter the Label the API Name will auto-populate.
- Condition Requirements to Execute Outcome: All Conditions Are Met (AND)
- Row 1:
- Resource: {!OpenWeather_Callout.responseCode}
- Operator: Equals
- Value: 200

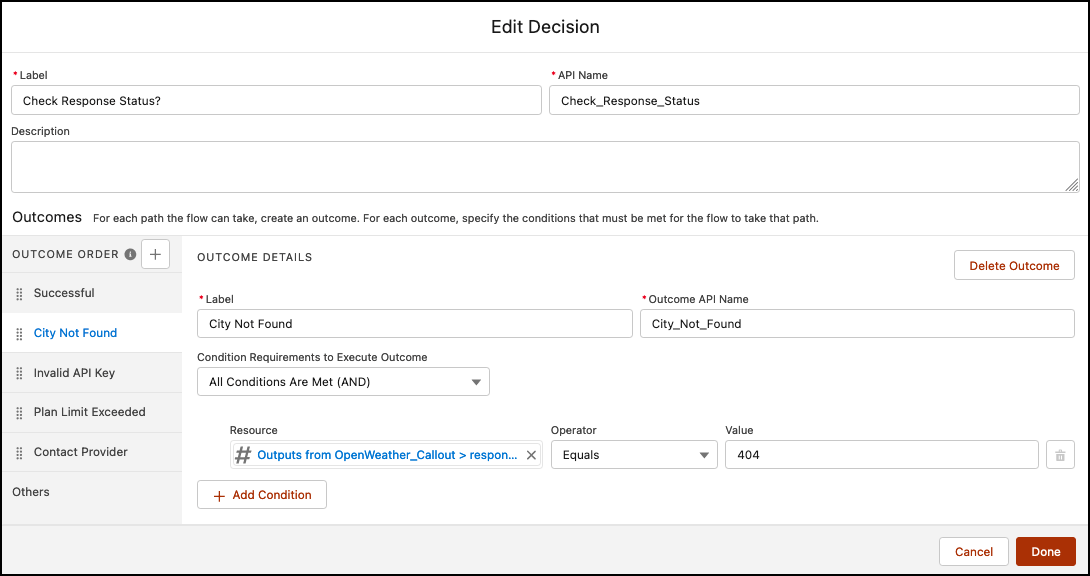
- Add a new OUTCOME ORDER by clicking on the + icon to check City Not Found response.
- Row 1:
- Resource: {!OpenWeather_Callout.responseCode}
- Operator: Equals
- Value: 404

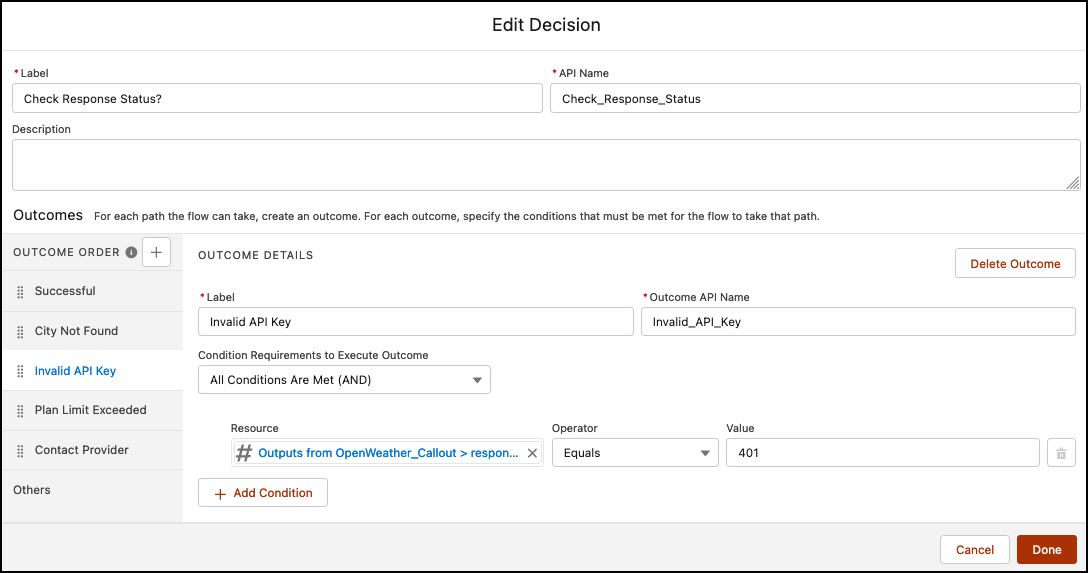
- Add a new OUTCOME ORDER by clicking on the + icon to check Invalid API Key response.
- Row 1:
- Resource: {!OpenWeather_Callout.responseCode}
- Operator: Equals
- Value: 401

- Add a new OUTCOME ORDER by clicking on the + icon to check Plan Limit Exceeded response.
- Row 1:
- Resource: {!OpenWeather_Callout.responseCode}
- Operator: Equals
- Value: 429

- Add a new OUTCOME ORDER by clicking on the + icon to check Contact Provider response.
- Condition Requirements to Execute Outcome: Any Conditions Is Met (OR)
- Row 1:
- Resource: {!OpenWeather_Callout.responseCode}
- Operator: Equals
- Value: 500
- Row 2:
- Resource: {!OpenWeather_Callout.responseCode}
- Operator: Equals
- Value: 502
- Row 3:
- Resource: {!OpenWeather_Callout.responseCode}
- Operator: Equals
- Value: 503
- Row 4:
- Resource: {!OpenWeather_Callout.responseCode}
- Operator: Equals
- Value: 504

- Row 1:
- Click Done.


Step 4.4: Adding an Update Records Element to Update the Account
The next step is to update the accounts fields to store the callout response. We will use the Update Records element.
- On Flow Designer, below the Successful node, click on the +icon and select the Update Records element.
- Enter a name in the Label field; the API Name will auto-populate.
- For How to Find Records to Update and Set Their Values select Use the account record that triggered the flow
- Set Filter Conditions: None – Always Update Record
- Set Field Values for the Account Records
- Row 1:
- Field: Feels_Like__c
- Value: {!OpenWeather_Callout.2XX.main.feelsx5flike}
- Field: Feels_Like__c
- Click Add Field
- Row 2:
- Field: ShippingCity_GeoCode__Latitude__s
- Value: {!OpenWeather_Callout.2XX.coord.lat}
- Field: ShippingCity_GeoCode__Latitude__s
- Click Add Field
- Row 3:
- Field: ShippingCity_GeoCode__Longitude__s
- Value: {!OpenWeather_Callout.2XX.coord.lon}
- Field: ShippingCity_GeoCode__Longitude__s
- Click Add Field
- Row 4:
- Field: Temp_Max__c
- Value: {!OpenWeather_Callout.2XX.main.tempx5fmax}
- Field: Temp_Max__c
- Click Add Field
- Row 5:
- Field: Temp_Min_Celcius__c
- Value: {!OpenWeather_Callout.2XX.main.tempx5fmin}
- Field: Temp_Min_Celcius__c
- Row 1:
- Click Done.

Step 4.5: Add Action – Create a Record to Handle Error Response
The next step is to create a task, for this, we will use the Create Records element.
- On Flow Designer, below the City Not Found node, click on the +icon and select the Create Records element.
- Enter a name in the Label field; the API Name will auto-populate.
- Input the following information:
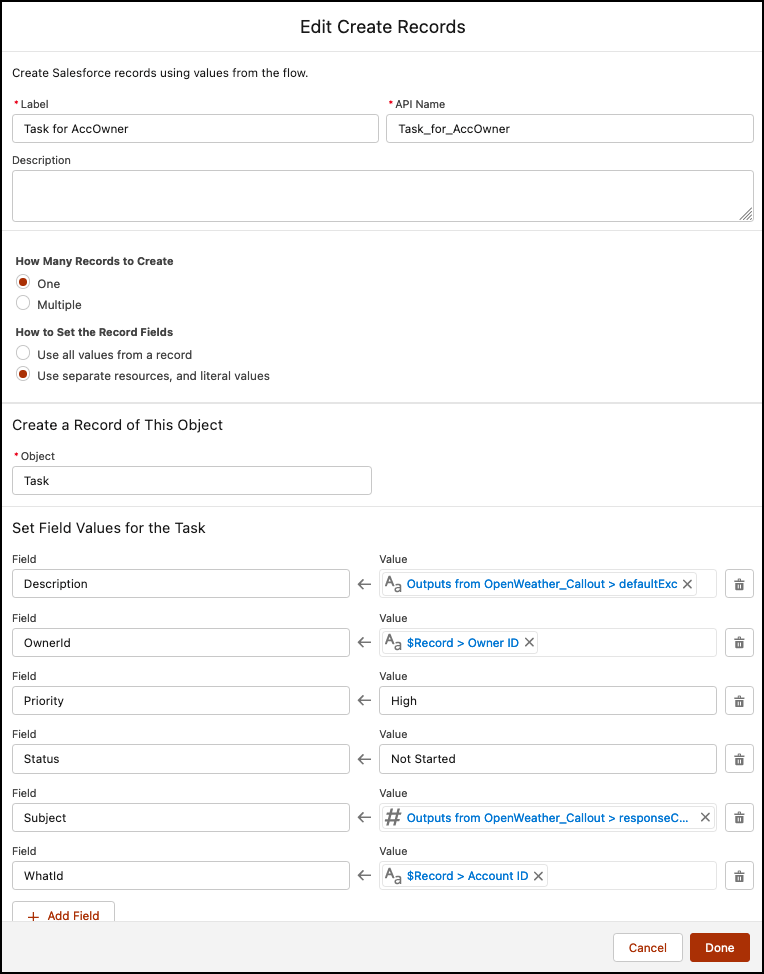
- Enter Label the API Name will auto-populate.
- How Many Records to Create: One
- How to Set the Record Fields: Use separate resources, and literal values
- Object: Task
- Set Field Values for the Case
- Row 1:
- Field: Description
- Value: {!OpenWeather_Callout.defaultExc}
- Click Add Field
- Row 2:
- Field: OwnerId
- Value: {!$Record.OwnerId}
- Click Add Field
- Row 3:
- Field: Priority
- Value: High
- Click Add Field
- Row 4:
- Field: Status
- Value: Not Started
- Click Add Field
- Row 5:
- Field: Subject
- Value: {!OpenWeather_Callout.responseCode}
- Click Add Field
- Row 6:
- Field: WhatId
- Value: {!$Record.Id}
- Click Done.
In the end, Jestilla’s Flow will look like the following screenshot:

Once everything looks good, perform the steps below:
- Click Save.
- Enter Flow Label the API Name will auto-populate.
- Click Show Advanced.
- API Version for Running the Flow: 58
- Interview Label: HTTPS Callout {!$Flow.CurrentDateTime}
- Click Save.

Almost there! Once everything looks good, click the Activate button.
👉 Check out the video for step-by-step instructions.

Proof of Concept
- Now onwards, when a user creates an account, the flow will fire and bring the current weather, longitude, and latitude for the current ShippingCity from OpenWeather API.

- In an error response, the flow will create a task and assign it to Account Owner.


Formative Assessment:
I want to hear from you!
What is one thing you learned from this post? How do you envision applying this new knowledge in the real world? Feel free to share in the comments below.
Thank you for your response. ✨


Hi,
I am getting the below error. Please help me with this.
Error Occurred:
The flow can’t run because nothing is connected to the Start element.
The Salesforce flow can’t run because nothing is connected to the Start element. – it means that the starting point of your flow has not been connected to any subsequent actions or elements.
Hi Rakesh,
I am getting below error when I debug it. This showed up at Action element.
Error Occurred:
Unexpected error while calling external service. Contact Salesforce Customer Support with error ID: 579838291-141036 (-11429193)
Any idea what should I do ?
Please review the error email sent by Salesforce or utilize the debug log for further investigation. Please keep me posted on your progress.
Hi, I am getting “Received fatal alert: protocol_version” error when callout made. I tried this process in sandbox.
I’m sorry to hear that you’re encountering the “Received fatal alert: protocol_version” error. This error usually indicates a mismatch in the SSL/TLS protocol version between the client and server.
I recommend reaching out to OpenWeatherMap’s support team or their documentation for assistance with this specific error. They would be in a better position to help you diagnose and resolve the issue.
if you created Named Credential then no need to create Remote Site Settings
You’re right! I have revised the post to incorporate the changes. Thank you! 😊