


Last Updated on October 28, 2023 by Rakesh Gupta
Big Idea or Enduring Question:
- How to hard delete records from Salesforce using Flow?
Objectives:
After reading this blog, you’ll be able to:
- Understand @InvocableMethod Annotation
- Learn about database.emptyRecycleBin method
- Configure Apex action to hard delete records from Flow
- Configure Screen Flow with Record Delete element
- And much more
What is Hard Delete?
Hard delete is permanently deleting the specified records from the Recycle Bin. When data is hard deleted, it is nearly impossible to recover. This is usually achieved through Database.EmptyRecycleBin methods.
When emptying recycle bins, consider the following rules and guidelines:
- After records are deleted from the Recycle Bin using this call, they can be queried using queryAll() for some time. Typically this time is 24 hours, but may be shorter or longer.
- Once records are deleted using Database.EmptyRecycleBin call, it cannot be undeleted.
Business Use case
Warren Mason is a System Administrator at Gurukul on Cloud (GoC). At GoC they are using Salesforce Flow to streamline Sales Processes. Warren has a requirement to hard delete leads with no email. He is building a Screen Flow:
- Find out all leads with no email
- Hard delete such leads
Automation Champion Approach (I-do):
While this can be solved using various automation tools like Apex Trigger and others, we will use Salesforce Flow and call an Apex method. To call an Apex method, add the Action element to your Salesforce Flow and select an Apex class with a @InvocableMethod Annotation.
In this article, we will use the EmptyRecycleBin database class. With Database.EmptyRecycleBin it is possible to hard delete the records from Salesforce. EmptyRecycleBin() method delete records from the recycle bin immediately. As of Summer’23 release, it is not possible to directly access EmptyRecycleBin method from Flow, that’s why we are using the Invocable apex class.
Before discussing the solution, let me show you a diagram of the process at a high level. Please spend a few minutes going through the following Flow diagram to understand it.

Let’s begin building this automation process.
Guided Practice (We-do):
There are 2 steps to solve Warren’s business requirement using Screen Flow. We must:
- Create Apex class and Test class to permanently deletes records from the Recycle Bin.
- Salesforce Flow
- Define flow properties for screen flow
- Add a Get Records element to find all leads with no email address
- Add a Decision element to check the leads found or not (from step 2)
- Add Delete Records element to delete leads
- Add action – call Empty RecycleBin Invocable Apex Class
Step 1: Create an Apex class and Test class
Now, we have to understand a new Apex annotation i.e. @InvocableMethod. This annotation let us use an Apex method as being something that can be called from Flow and Apex. Invocable methods are called with REST API and used to invoke a single Apex method. Invocable methods have dynamic input and output values and support describe calls.
The InvocableVariable annotation identifies a class variable used as an input or output parameter for an InvocableMethod method’s invocable action. If you create your own custom class to use as the input or output to an invocable method, you can annotate individual class member variables to make them available to the method.
The invocable variable annotation supports the modifiers shown in this example.
@InvocableVariable(label='variableLabel' description='variableDescription' required=(true | false))
The EmptyRecycleBin class contains two variables, one for deleting a single record and another for handling multi-record deletion. Feel free to pass the value to one or both variables as needed. Create the following class in your organization.
public class EmptyRecycleBin {

    @InvocableMethod(label='Empty RecycleBin'
                     description='Permanently delete the records from the Recycle Bin.'
                     iconName='slds:standard:record_delete'
                     category = 'Custom Apex Actions')

    public static void execute(List<Requests> requestList) {

        List<SObject> recordstoDelete = New List<SObject>();

        for (Requests req: requestList) {
            if(req.obj != null){
                recordstoDelete.add(req.obj);
            }
            if(req.listofSObjects != null){
                recordstoDelete.addAll(req.listofSObjects);
            }
        }

        if(recordstoDelete.size()>0){
            Database.emptyRecycleBin(recordstoDelete);
        }
    }

    public class Requests{

        @InvocableVariable (description ='Accept one record of an SObject type.' required=false)
        public SObject obj;

        @InvocableVariable (description ='Accept multiple records of an SObject type.' required=false)
        public List<SObject> listofSObjects;
    }
}
Copy code from GitHub or Install using this URL.
Step 2.1: Define Flow Properties
- Click Setup.
- In the Quick Find box, type Flows.
- Select Flows then click on the New Flow.
- Select the Screen Flow option and click on Create and configure the flow.

- It will open the flow designer for you.

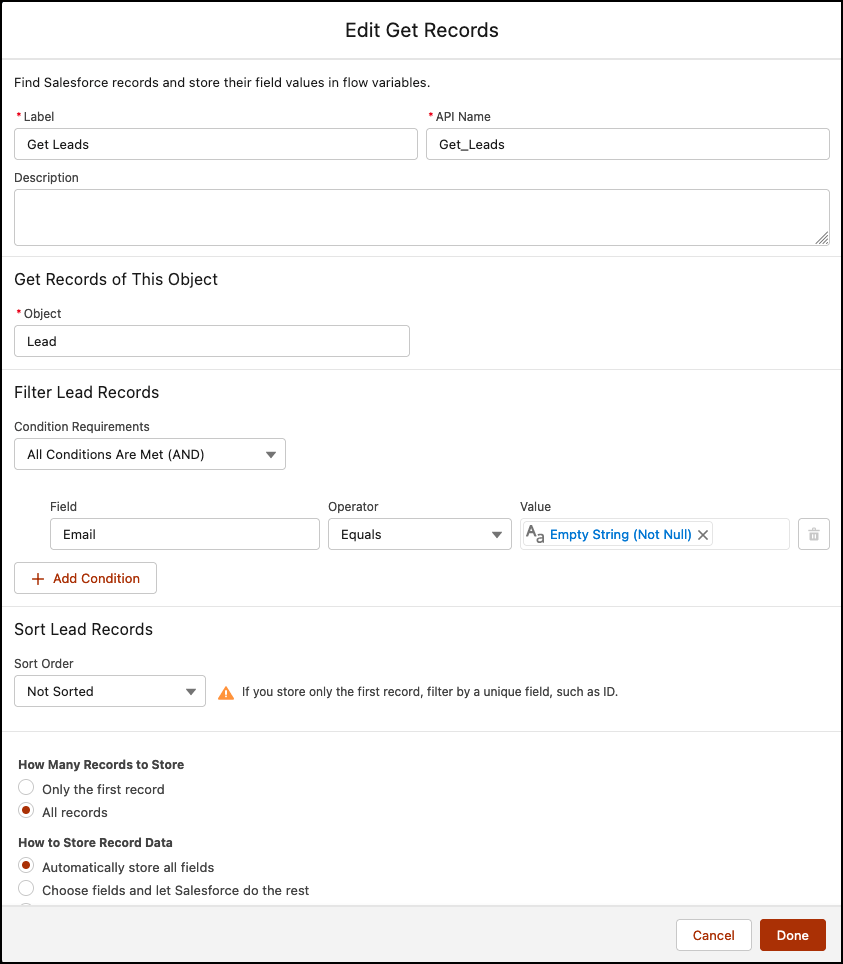
Step 2.2: Adding a Get Records Elements to Find Leads Without Email
The next step is using the Lead object to find the leads without email address.
- On Flow Designer, click on the +icon and select the Get Records element.
- Enter a name in the Label field; the API Name will auto-populate.
- Select the Lead object from the dropdown list.
- Select All Conditions Are Met (AND).
- Set Filter Conditions
- Row 1:
- Field: Email
- Operator: Equals
- Value: {!$GlobalConstant.EmptyString}
- Row 1:
- How Many Records to Store:
- Select All record
- How to Store Record Data:
- Choose the option to Automatically store all fields.
Step 2.3: Using Decision Element to Check the Record Collection Variable (from step 2)
Now we will use the Decision element to check the Record Collection Variable from step 2 to find if it returns the lead or not.
- On Flow Designer, click on the +icon and select the Decision element.
- Enter a name in the Label field; the API Name will auto-populate.
- Under Outcome Details, enter the Label the API Name will auto-populate.
- Condition Requirements to Execute Outcome: All Conditions Are Met (AND)
- Row 1:
- Resource: {!Get_Leads}
- Operator: Is Null
- Value: {!$GlobalConstant.False}
- Click Done.
- Row 1:

Step 2.4: Add Action – Delete Records to Delete Leads
The next step is to delete the leads we found in Step 2.2. For this, we will use the Delete Records element.
- On Flow Designer, below the Yes node, click on the +icon and select the Delete Records element.
- Enter a name in the Label field; the API Name will auto-populate.
- For How to Find Records to Delete select Use the IDs stored in a record variable or record collection variable.
- Select the {!Get_Leads} from the dropdown list.
- Click Done.

Step 2.5: Adding an Action to Call Invocable Apex Class
- On Flow Designer, click on the + icon and select the Action element.
- Select the EmptyRecycleBin Invocable Apex class.
- Enter a name in the Label field- the API Name will auto-populate.
- Set Input Values:
- Object for “listofSObjects” (Input): Lead
- Object for “obj” (Input): Lead
- Object for “listofSObjects” (Input): Lead
- Store Input Values
- listofSObjects: {!Get_Leads}
- listofSObjects: {!Get_Leads}
- Click Done.

In the end, Warren’s Flow will look like the following screenshot:

Once everything looks good, Save the Flow.
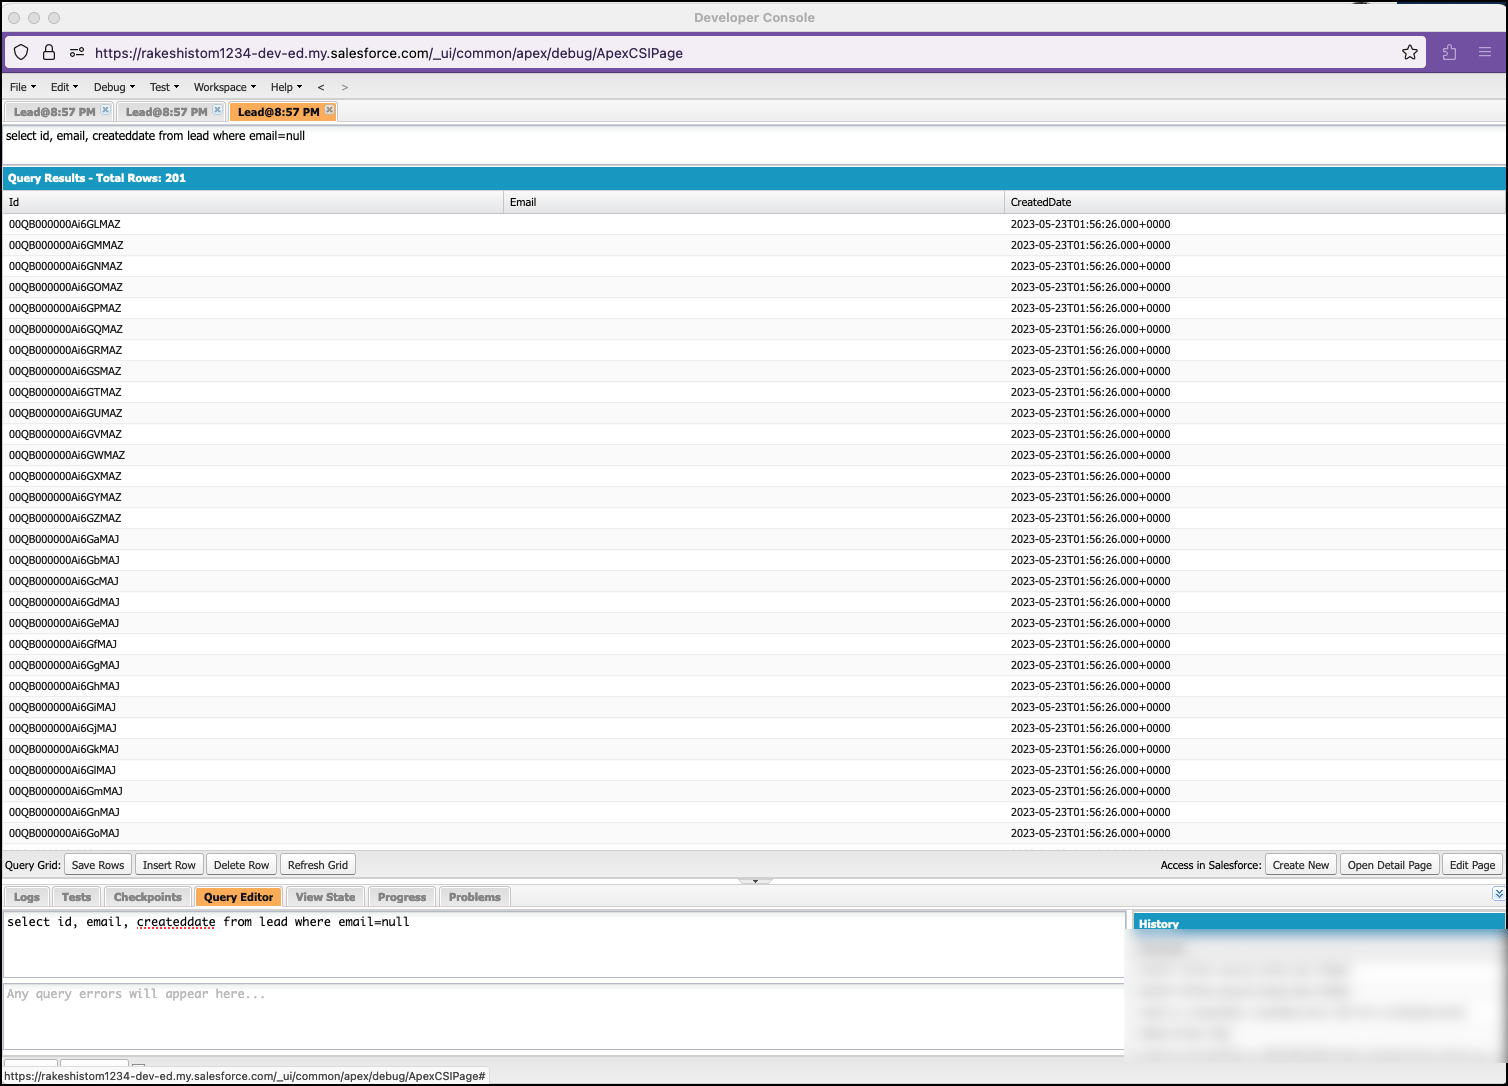
Proof of Concept
- I’ve created 201 leads without an email address to test the above flow.

- Now Run the Screen Flow and wait for the flow to complete.
- Go back to Recycle Bin to make sure that leads were hard deleted.


Formative Assessment:
I want to hear from you!
What is one thing you learned from this post? How do you envision applying this new knowledge in the real world? Feel free to share in the comments below.


Hi! Could you help me with step 2.4? Specifically with “Select the {!Get_Leads} from the dropdown list.” There are no options for me to select in the dropdown list. It only gives me the option to +New Resource
Please check step 2.2 – where you have to perform get record on lead.