


Last Updated on December 11, 2022 by Rakesh Gupta
Big Idea or Enduring Question:
How can I use gamification in Salesforce to drive sales? What are the ways to automate gamification?
Objectives:
After reading this blog post, the reader will be able to:
- Create a flow that will automatically post a badge
- Learn how to use a Decision element to find whether a Record variable or a Record collection variable contains a record
- Use decision element to validate the data
- Automatically post to Chatter
- and much more
Business Use case
Martin Jones is working as a System administrator at Gurukul On Cloud (GoC). His organization wants to implement gamification to help boost the sales pipeline. He received a requirement from his manager if an Opportunity is closed within 7 days of its creation, do the following:
- Give a Deal Maker badge to the Opportunity Owner from the SVP of Sales & Marketing (i.e., Tushar Gupta)
- Post this info on the Opportunity Owner’s Chatter profile (see screenshot)

Automation Champion Approach (I-do):
Gamification is the use of game mechanics (challenges, competition, scoring points, etc.) in other areas of activity. In business, it is a way to harness the competitive spirit of sales reps, the creative drive of marketers, and the desire for recognition and the reward of everyone in between. It helps your organization boost Salesforce adoption by applying proven game mechanics to reward sales representatives for driving actual business results.
The three major pillars of gamification are Challenge, Competition, and Recognition. We can implement gamification in Salesforce using clicks, not code. There are multiple solutions possible for the above business scenario. We will use Record-Triggered Flow to solve the above business requirement. Before proceeding, you have to understand the below-mentioned objects in Salesforce.
- WorkBadge: – This object contains information about who the badge was given to and which badge was given.
- WorkThanks: – This object represents the source and message of a thanks post.
We will use Flow to create WorkThanks, WorkBadge, and Chatter Post records. To launch the Flow whenever Opportunity gets Closed Won.
Before discussing the solution, let me show you a diagram of a Process Flow at a high level. Please spend a few minutes going through the following Flow diagram and understand it.

Guided Practice (We-do):
There are 4 steps to solve Martin’s business requirement using Record-Triggered Flow. We must:
- Steps to set up work.com
- Creating a custom label to store the SVP of Sales & Marketing user-id
- Creating a custom label to store badge Id
- Salesforce Flow Steps:
- Define Flow properties
- Add a text variable to construct a Chatter Post Message
- Create a formula to calculate elapsed days
- Use a Decision element to check elapsed days
- Add a create records element – create a thanks (WorkThanks) record
- Add a create records element – create a badge received (Work Badge) record
- Add a create records element – post thanks badge to chatter
Step 1: Setup Work.com
Follow the steps provided by Salesforce to set up work.com (some of this will need to be done in Classic).
Step 2: Creating a Custom Label to Store the SVP of Sales & Marketing User’s Id
To store the ID for the SVP of Sales & Marketing, we need to get the User ID **Alternatively, you could create a variable for the ID of the specific user, but it is best practice not to hard-code User IDs**
- Click Setup.
- In the Quick Find box, type Custom Labels.
- Click on the New Custom Label button.
- Enter Short Description the Name will auto-populate.
- Now enter the SVP Tushar User Id in the Value.
- In the Developer Console Query Editor, run the following SOQL query to get the SVP of Sales & Marketing user Id
- select id from user where userrole.Name=’SVP, Sales & Marketing’
- In the Developer Console Query Editor, run the following SOQL query to get the SVP of Sales & Marketing user Id
- Click Save.

Step 3: Creating a Custom Label to Store Badge Id
Now we will create a Variable to store BadgeId, in this case, Badge Deal Maker.
- Click Setup.
- In the User Interface, type Custom Labels.
- Click on the New Custom Label button.
- Enter Short Description the Name will auto-populate.
- Now enter the Deal Maker Badge Id in the Value.
- In the Developer Console Query Editor, run the following SOQL query to get the deal maker badge Id
- select id from WorkBadgeDefinition where Name =’Deal Maker’
- In the Developer Console Query Editor, run the following SOQL query to get the deal maker badge Id
- Click Save.

Step 4.1: Define Flow Properties
- Click Setup.
- In the Quick Find box, type Flows.
- Select Flows, then click on the New Flow.
- Select the Record-Triggered Flow option, click on Create and configure the flow as follows:
- Object: Opportunity
- Trigger the Flow When: A record is created or updated
- Set Entry Criteria
- Condition Requirements: None
- Optimize the Flow For Action and Related Records
- Click Done.

Step 4.2: Add a Text Variable to Construct a Chatter Post Message
- Under Toolbox, select Manager, then click New Resource to create a message for Chatter Post. You can also use Text Template.
- Input the following information:
- Resource Type: Variable
- API Name: varT_Message
- Data Type: Text
- Default Value: Congratulations! You Just earned Deal Maker badge for closing the Opportunity “{!$Record.Name}” within {!Day_Elapsed} days of it’s creation.
- Check Available for Input
- Check Available for Output
- Click Done.

Step 4.3: Create a Formula to Calculate Elapsed time
- Under Toolbox, select Manager, then click New Resource to calculate elapsed time.
- Input the following information:
- Resource Type: Formula
- API Name: forN_ElapsedTime
- Data Type: Number
- Decimal Places: 2
- Formula: {!$Record.LastModifiedDate} – {!$Record.CreatedDate}
- Click Done.

Step 4.4: Using Decision Element to check Elapsed Days
Now we will use the Decision element to check the opportunity stage and elapsed time.
- On Flow Designer, click on the +icon and select the Decision element.
- Enter a name in the Label field; the API Name will auto-populate.
- Under Outcome Details, enter the Label the API Name will auto-populate.
- Condition Requirements to Execute Outcome: All Conditions Are Met (AND)
- Row 1:
- Resource: {!forN_ElapsedTime}
- Operator: Less Than or Equal
- Value: 7
- Click Add Condition
- Row 2:
- Resource: {!$Record.StageName}
- Operator: Equals
- Value: Closed Won
- Row 1:
- Click Done.

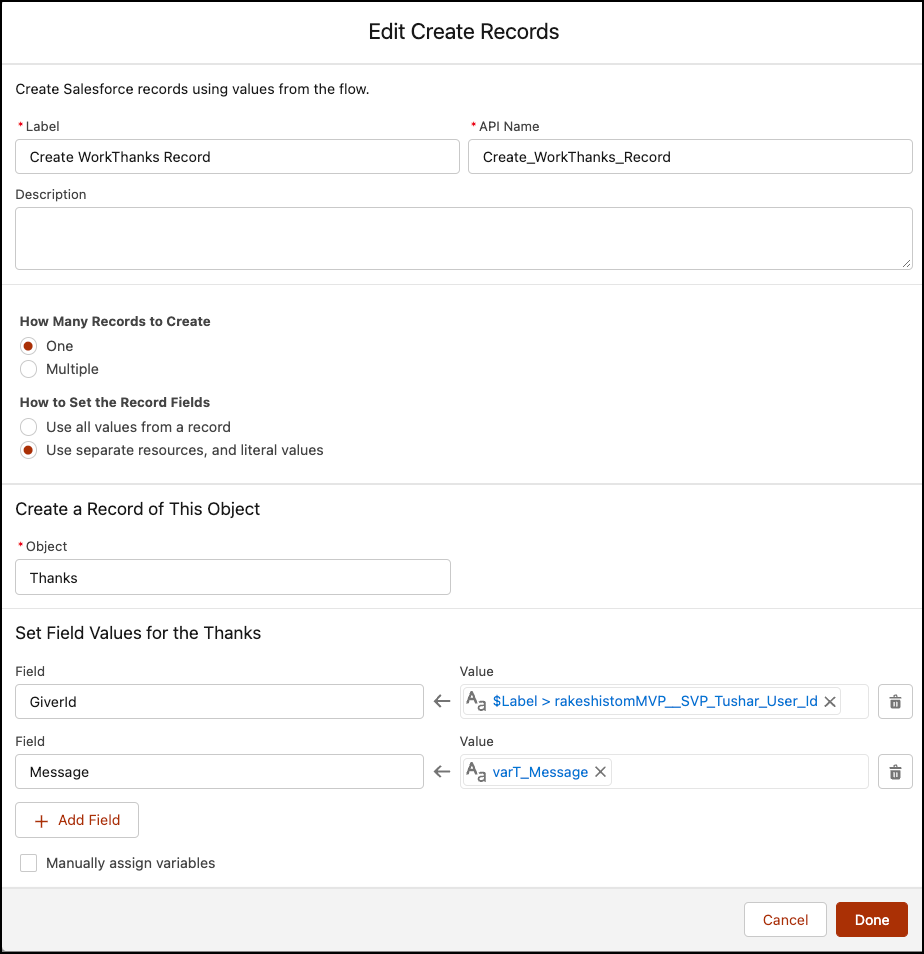
Step 4.5: Create Records – Create a Thanks (WorkThanks) Record
If the time taken to successfully close a deal is less than 7, the next step is to create a WorkThanks record.
- On Flow Designer, below the <= 7 node, click on the +icon and select the Create Records element.
- Enter a name in the Label field; the API Name will auto-populate.
- Input the following information:
- How Many Records to Create: One
- How to Set the Record Fields: Use separate resources, and literal values
- Object: WorkThanks
- Set Field Values for the Thanks
- Row 1:
- Field: GiverId
- Value: {!$Label.SVP_Tushar_User_Id}
- Click Add Row
- Row 2:
- Field: Message
- Value: {!varT_Message}
- Click Done.
Step 4.6: Create Records – Create a Badge Received (Work Badge) Record
The next step is to create a Work Badge record.
- On Flow Designer, click on the +icon and select the Create Records element.
- Enter a name in the Label field; the API Name will auto-populate.
- Input the following information:
- How Many Records to Create: One
- How to Set the Record Fields: Use separate resources, and literal values
- Object: Badge Received
- Set Field Values for the Badge Received
- Row 1:
- Field: DefinitionId
- Value: {!$Label.Deal_Maker_Badge_Id}
- Click Add Row
- Row 2:
- Field: RecipientId
- Value: {!$Record.OwnerId}
- Click Add Row
- Row 3:
- Field: SourceId
- Value: {!Create_WorkThanks_Record}
- Click Done.
![]()
Step 4.7: Create Records – Post Thanks Badge to Chatter
The final item to create is the Chatter post.
- On Flow Designer, click on the +icon and select the Create Records element.
- Enter a name in the Label field; the API Name will auto-populate.
- Input the following information:
- Enter Label the API Name will auto-populate.
- How Many Records to Create: One
- How to Set the Record Fields: Use separate resources, and literal values
- Object: Feed Item
- Set Field Values for the Feed Item
- Row 1:
- Field: Body
- Value: {!varTMessage}
- Click Add Row
- Row 2:
- Field: CreatedById
- Value: {!$Label.SVP_Tushar_User_Id}
- Click Add Row
- Row 3:
- Field: ParentId
- Value: {!$Record.Id}
- Click Add Row
- Row 4:
- Field: RelatedRecordId
- Value: {!Create_WorkThanks_Record}
- Click Add Row
- Row 5:
- Field: Type
- Value: RypplePost
- Click Done.

In the end, Martin’s Flow will look like the following screenshot:

Once everything looks good, perform the steps below:
- Click Save.
- Enter the Flow Label the API Name will auto-populate.
- Click Show Advanced.
- API Version for Running the Flow: 56
- Interview Label: Implement Gamification to Your Salesforce – Flow {!$Flow.CurrentDateTime}
- Click Save.

Almost there! Once everything looks good, click the Activate button.
Proof of Concept
Suppose a business user updates the Opportunity Stage to Closed Won. In that case, the record-trigger flow will automatically fire and give a badge to the opportunity owner if he closes the opportunity in less than or equal to 7 days.
- Opportunity Burlington Textiles Weaving Plant Generator Third Phase is in Stage Qualification and created on 3/17/2015, 12:54 am, as shown in the following screenshot:

- Now update the Opportunity status to Closed-Won and check your Chatter profile ( Currently, I am logged In as Brandon Schaefer).


Independent Practice (You-do):
Create an automation that posts the Key Win badge to a user’s Feed when she closes an opportunity over $25,000. The badge should come from a Sales Executive.
Formative Assessment:
I want to hear from you!
What is one thing you learned from this post? How do you envision applying this new knowledge in the real world? Feel free to share in the comments below.


Informative blog especially the business usecase diagrams with detailed explanation and complete process everything. Keep Posting
Hi ,
I am New to Communities, Trying to setup Badges for my org and working fine in Communities ,My requirement to see the Badges available in Communities
How to query the Gamification Badges?
Is there a way to build in a logic to this for receiving the same thanks/badge? I was able to create this successfully, we just don’t want a salesperson to be able to have more than certain badge during the fiscal year. Any ideas how we might be able to build this.
I have tried limiting per user on the badge creation area, but this process still triggers even with the limit.
Before giving the badge to anyone, you have to put additional logic. Check the badge count. If it is under the limit, then give the current budget; else, do nothing.
Can process builder with flow be bulkify?
Yes, they are bulkified
Hi Rakesh,
Nice Tutorial. Do you have an idea on further how to measure these badges. Suppose an Sales rep got 10 Badges and we want to promote him to next Badge? Can we create a report on these Badges?
Regards,
Asmita
I think yes you shout able to create a report in badges.
I followed the instruction to the word.
When testing the flow:
An unhandled fault has occurred in this flow
When trying to change opportunity status from Negotiation to Closed WOn
The record couldn’t be saved because it failed to trigger a flow. A flow trigger failed to execute the flow with version ID ###############. Contact your administrator for help.
Please help.!!
Can you please post the complete error log here (I mean to say the email that you received from Salesforce).
Great tutorial. I have successfully implemented it 🙂
Glad to know! Thank you 🙂
Thanks!!
Do you need a work.com license for this?
No
Can you elaborate on that, please? Thanks.
You can add Thanks in Chatter even without a work.com license. To Enable Chatter Thanks, from Setup, enter Work.com Settings in the Quick Find box, then select Work.com Settings and select Enable.
Do you know if work.com is still available, or has it been discontinued? Thanks.
As per my knowledge, work.com is still available.
Very practical example – you have the wheels turning in my head. Thanks!
Glad to know that you liked it!