


Last Updated on June 11, 2022 by Rakesh Gupta
Big Idea or Enduring Question:
- How to scan and process a barcode from Screen Flow?
Objectives:
After reading this blog, you’ll be able to:
- Use BarcodeScanner API in Lightning Web Component
- Create a Lightning Web Component for Screen flow
- Add custom property editor for a screen component
- Add a Lightning Web Component to Screen Flow
- Get the Barcode scanner outcome and create a case
- and much more
Business Use case
Rachel Gillett is working as a Junior Developer at Gurukul on Cloud (GoC). She has received a requirement from the management that requires him to build a Lightning Web Component for Screen flow to scan barcode code, and later use the barcode result to create a case in Salesforce.
What Is a Barcode Scanner, and How Does It Work?
The barcode scanner does nothing more than scan a barcode, interpret and decode barcode data and send the data to a device ((smartphone, or tablet) that has an application that will process the data.
What Is a Barcode Scanner API?
BarcodeScanner is a JavaScript module that provides an API to Lightning web components to make mobile hardware and platform (operating system) feature available in JavaScript. It requires access to device hardware and device platform APIs.
This access is only available when BarcodeScanner runs within a compatible Salesforce mobile app. It does not and cannot function when running in a web browser, whether the browser runs on a desktop or mobile device.
Can Barcode Scanner API read all Barcodes?
There are two classes of barcodes: 1D and 2D. 1D codes, such as the UPC code, are usually variable-width black and white spaces. 2D codes, such as QR codes and Data Matrix, use squares, hexagons, and other shapes to store data.
Not all barcode scanners can read all barcodes, the same principle applies to BarcodeScanner API. BarcodeScanner can recognize the following standard barcode symbologies.
| Barcode Symbology | Barcode Scanner Type |
|---|---|
| Code 128 | CODE_128 |
| Code 39 | CODE_39 |
| Code 93 | CODE_93 |
| Data Matrix | DATA_MATRIX |
| EAN-13 / GTIN-13 | EAN_13 |
| EAN-8 / GTIN-8 | EAN_8 |
| Interleaved 2 of 5 | ITF |
| PDF417 | PDF_417 |
| QR-Code | QR |
| UPC-E / GTIN-12 | UPC_E |
BarcodeScanner is available in Lightning apps distributed using:
- Salesforce Mobile app
- Mobile Publisher for Salesforce
- Mobile Publisher for Communities
Automation Champion Approach (I-do):
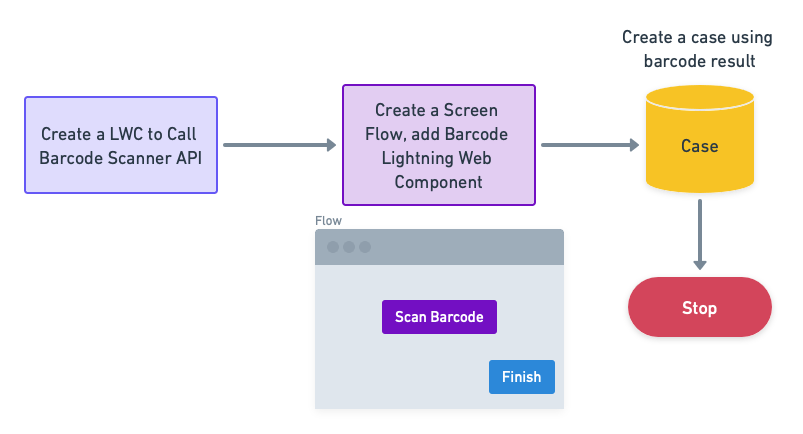
There are a few possible solutions for the above business scenario. We will use Lightning Web Component and Screen Flow to solve the requirement.
Before discussing the solution, let me show you a diagram of a Process Flow at a high level. Please spend a few minutes going through the following Flow diagram and understanding it.
Let’s begin building this automation process.
Guided Practice (We-do):
There are 3 steps to solve Rachel’s business requirement using Lightning Web Component and Screen Flow . We must:
- Create a Barcode Scan Screen Flow Component using lightning web component
- Salesforce Flow Steps
- Define flow properties for screen flow
- Add a text variable to store the barcode scanner result
- Add a text variable to store the record Id
- Add a screen to display the Barcode Scanner custom component
- Add a create records element to create a case
- Add a screen flow to the contact record page
Step 1: Create a BarCode Scan Screen Flow Component Using the Lightning Web Component
First of all, create a Barcode Scanner Lightning Web Component using the code below. If you don’t know how to create a lightning component then please review this developer guide Create a Lightning Web Component.
barcodeScannerScreenFlow.html

barcodeScannerScreenFlow.js

barcodeScannerScreenFlow.js-meta.xml

barcodeScannerScreenFlow.css

Copy code from GitHub or Install using this URL. The sample code is taken from the Salesforce developer guide for Barcode Scanner API.
Step 2.1: Define Flow Properties
- Click Setup.
- In the Quick Find box, type Flows.
- Select Flows then click on the New Flow.
- Select the Screen Flow option and click on Create and configure the flow.
- It will open the flow designer for you.
Step 2.2: Create a Text Variable to Store the Barcode Scanner Result
The purpose of creating a text variable is to store the result of the barcode scanner.
- Under Toolbox, select Manager, then click New Resource to store the org base URL.
- Input the following information:
- Resource Type: Variable
- API Name: varT_barcodeResult
- Data Type: Text
- Default Value: {!$GlobalConstant.EmptyString}
- Check Available for Input
- Check Available for Output
- Click Done.

Step 2.3: Create a Text Variable to Store the Record Id
The purpose of creating a text variable is to store the current record id.
- Under Toolbox, select Manager, then click New Resource to store the org base URL.
- Input the following information:
- Resource Type: Variable
- API Name: varT_recordId
- Data Type: Text
- Default Value: {!$GlobalConstant.EmptyString}
- Check Available for Input
- Check Available for Output
- Click Done.

Step 2.4: Add a Screen Element to Display the Barcode Scanner Lightning Web Component
- On Flow Designer, click on the +icon and select the Screen element.
- Input the following information:
- Enter Label the API Name will auto-populate.

- Enter Label the API Name will auto-populate.
- Under the Input section on Screen Element, drag and drop the barcodeScanner custom component onto the screen.
- Input the following information:
- API Name: Barcode Scanner
- Button Code (Hex Code): #800080
- Button Label: Scan Barcode
- Advanced
- Check Manually assign variables
- Barcode Result: {!varT_barcodeResult}
- Click Done.


Step 2.5: Add Create Records Element to Create a Case
The final step is to create a case. For this, we will use Create Records element.
- On Flow Designer, below the Barcode Example node, click on the +icon and select the Create Records element.
- Enter a name in the Label field; the API Name will auto-populate.
- Input the following information:
- How Many Records to Create: One
- How to Set the Record Fields: Use separate resources, and literal values
- Object: Case
- Set Field Values for the Case
- Row 1:
- Field: Origin
- Value: Web
- Click Add Field
- Row 2:
- Field: Status
- Value: New
- Click Add Field
- Row 3:
- Field: Type
- Value: Other
- Click Add Field
- Row 4:
- Field: Description
- Value: Created from barcode scanning for product {!varT_barcodeResult}
- Click Add Field
- Row 5:
- Field: ContactId
- Value: {!varT_recordId}
- Click Done.

In the end, Rachel’s Flow will look like the following screenshot:

Once everything looks good, perform the steps below:
- Click Save.
- Enter Flow Label the API Name will auto-populate.
- Click Show Advanced.
- API Version for Running the Flow: 55
- Interview Label: Use Barcode in Screen Flow {!$Flow.CurrentDateTime}
- Click Save.

Almost there! Once everything looks good, click the Activate button.
Step 3: Add a Screen Flow to the Contact Record Page
The next step is to distribute a flow to Lightning Experience or Salesforce app users by embedding it on a Lightning record page for contact objects.

Proof of Concept
Now onwards, when a business user scans a barcode and clicks on the Finish button, the flow will auto-create a case.
Formative Assessment:
I want to hear from you!
What is one thing you learned from this post? How do you envision applying this new knowledge in the real world? Feel free to share in the comments below.
Thank you for your response. ✨


