


Auto Post a Message to Chatter When an Event is Created
Last Updated on April 6, 2022 by Rakesh Gupta
Big Idea or Enduring Question:
How do you automatically Post a message to the Chatter Group message when a user creates an event?
In Salesforce, Chatter Group represents the group of people. It’s a great way to boost collaboration in your organization. You can add unlimited members to a Chatter Group, but a user can only join a maximum of 100 Groups. In the article Post Opportunity details to a Chatter Group, I had discussed how to post Opportunity closed information to a Chatter Group using the Flow. In the current article, we will discuss how to post a message to the Chatter Group using the Salesforce Flow.
Objectives:
After reading this blog, you’ll be able to:
- Use After-save Record-Triggered Flow to Post a message to Chatter
- Use Get element to avoid hard coding of Id
- Use the Decision element to validate the get records outcome
- Auto-create a Post to Chatter when an Event is created
Business Use case
Brandon Schaefer is working as a System Administrator at Gurukul on Cloud (GoC). His organization wants to post a message to the Chatter Group UC Internal Announcements, whenever an event is created for the public calendar Universal Container Conference Rooms.
Automation Champion Approach (I-do):
Public Calendars and resources are for managing group activities or shared resources. By using Public Calendars, a group of people can track events of interest to all of them (e.g., Sales events, weekly knowledge sharing sessions, or training classes) or schedule a common activity (e.g., a team vacation calendar).While this can be solved using various automation tools like Apex Trigger, or Flow, we will use After-save Record-Triggered Flow. Check out this article to understand why we are using after-save record-triggered flow for this scenario.
Before discussing the solution, let me show you a diagram of a Process Flow at a high level. Please spend a few minutes going through the following Flow diagram and understand it. 
Guided Practice (We-do):
There are 3 steps to solve Brandon’s business requirement using Record-Triggered Flow. We must:
- Create a chatter group
- Create a public calendar
- Salesforce flow
- Define flow properties for record-triggered flow
- Add a Text Template to construct the chatter post message body
- Create a formula to determine whether the event is created or updated
- Add a decision element to check if an event is owned by a public calendar
- Add a get records element to find the chatter group details (UC Internal Announcements)
- Add a decision element to check if the chatter group was found or not
- Add action post to chatter – to post a message to the chatter group
Step 1: Create a Chatter Group
- Navigate to App Launcher and click on the Groups.
- Clicks on the New button.
- Name the Group and make sure to select the Private Access Type.
- Click Save.

Step 2: Create a Public Calendar Universal Container Conference Rooms
- Click Setup.
- In the Quick Find box, type Public Calendars and Resources.
- Clicks on the New button.
- Name the Calendar and make sure to select the Active checkbox.
- Click Save.

Step 3.1: Define Flow Properties
- Click Setup.
- In the Quick Find box, type Flows.
- Select Flows then click on the New Flow.
- Select the Record-Triggered Flow option, click on Create and configure the flow as follows:
- Object: Event
- Trigger the Flow When: A record is created or updated
- Set Entry Criteria
- Condition Requirements: None
- Optimize the Flow For Action and Related Records
- Click Done.

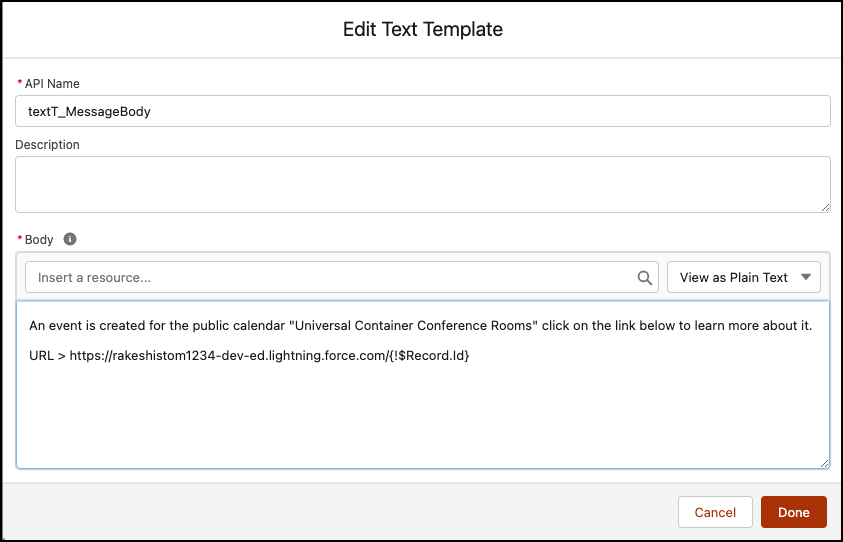
Step 3.2: Add a Text Template to Construct Chatter Post Message
Now we’ll create an email template using the Text Template. The text template allowed you to specify the multi-line messages. It also allows you to use HTML code.
- Under Toolbox, select Manager, then click New Resource to create a text template.
- Input the following information:
- Resource Type: Text Template
- API Name: textT_MessageBody
- Select View as Plain Text
- Body
- An event is created for the public calendar “Universal Container Conference Rooms” click on the link below to learn more about it.
- URL > https://rakeshistom1234-dev-ed.lightning.force.com/{!$Record.Id}
- Click Done.
Step 3.3: Formula to Determine Whether the Event is Created or Updated
- Under Toolbox, select Manager, then click New Resource to determine whether the record is created or updated.
- Input the following information:
- Resource Type: Formula
- API Name: forB_IsNew
- Data Type: Boolean
- Formula: IsNew()
- Click Done.

Step 3.4: Using Decision Element to Check if Event is Owned by Public Calendar
Now we will use the Decision element to check if the event is owned by the public calendar Universal Container Conference Rooms.
- On Flow Designer, click on the +icon and select the Decision element.
- Enter a name in the Label field; the API Name will auto-populate.
- Under Outcome Details, enter the Label the API Name will auto-populate.
- Condition Requirements to Execute Outcome: All Conditions Are Met (AND)
- Row 1:
- Resource: {!$Record.Owner:Calendar.Name}
- Operator: Equals
- Value: Universal Container Conference Rooms
- Click Add Condition
- Row 2:
- Resource: {!forB_IsNew}
- Operator: Equals
- Value: {!$GlobalConstant.True}
- Row 1:
- When to Execute Outcome: If the condition requirements are met.
- Click Done.

Step 3.5: Adding a Get Record Element to Find Chatter Group – UC Internal Announcements
The next step is to use the Get Records element to find chatter group UC Internal Announcements details.
- On Flow Designer, below the Yes node, click on the +icon and select the Get Records element.
- Enter a name in the Label field; the API Name will auto-populate.
- Select the Group (CollaborationGroup) object from the dropdown list.
- Select All Conditions Are Met (AND).
- Set Filter Conditions
- Row 1:
- Field: Name
- Operator: Equals
- Value: UC Internal Announcements
- Row 1:
- How Many Records to Store:
- select Only the first record
- How to Store Record Data:
- Choose the option to Automatically store all fields.
- Click Done.

Step 3.6: Using Decision Element to Check If Chatter Group was Found or Not
Now we will use the Decision element to check the Record Variable from step 3.5 to find if it returns the Chatter group UC Internal Announcements or not.
- On Flow Designer, click on the +icon and select the Decision element.
- Enter a name in the Label field; the API Name will auto-populate.
- Under Outcome Details, enter the Label the API Name will auto-populate.
- Condition Requirements to Execute Outcome: All Conditions Are Met (AND)
- Row 1:
- Resource: {!Get_Chatter_Group}
- Operator: Is Null
- Value: {!$GlobalConstant.False}
- Row 1:
- When to Execute Outcome: If the condition requirements are met.
- Click Done.

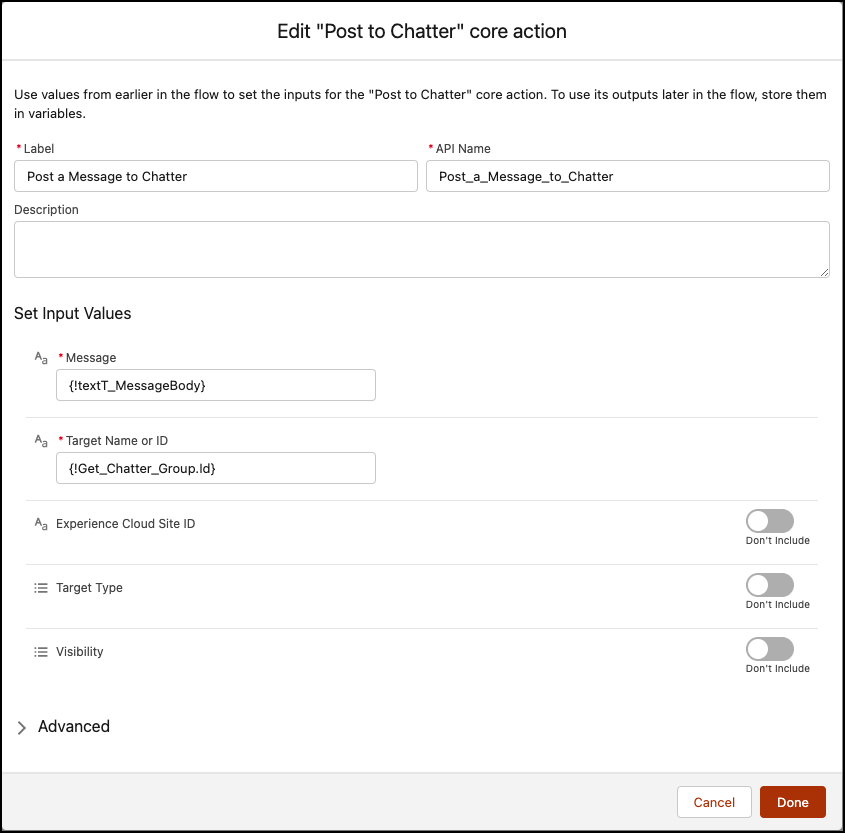
Step 3.7: Add Post to Chatter Action to Post a Message to Chatter Group
Now we will use the Post to Chatter static action to post a message to chatter group UC Internal Announcements.
- On Flow Designer, below the Group Found node, click on the +icon and select the Action element.
- Search and select the Post to Chatter from the dropdown menu
- Enter a name in the Label field; the API Name will auto-populate.
- Set Input Values
- Message: {!textT_MessageBody}
- Target Name or ID: {!Get_Chatter_Group.Id}
- Click Done.
In the end, Brandon’s Flow will look like the following screenshot:

Once everything looks good, perform the steps below:
- Click Save.
- Enter Flow Label the API Name will auto-populate.
- Click Show Advanced.
- API Version for Running the Flow: 54
- Interview Label: Post a Message to Chatter Group {!$Flow.CurrentDateTime}
- Click Save.

Almost there! Once everything looks good, click the Activate button.
Proof of Concept
Now onwards, if a user creates an event for the public calendar Universal Container Conference Rooms, then the Record-triggered flow will automatically post a message in the Chatter group UC Internal Announcements. It’s time to test out the process.
- Create a new event on the Public calendar Universal Container Conference Rooms
- Click on the App Launcher.
- In the Search Apps and items box, type Calendar and click it.
- Add a new event by clicking a timeslot in the calendar.
- For the Assigned To field, select Universal Container Conference Rooms.
- Fill in the remaining details for the event like the screenshot below, then click Save.

- Check out the Chatter Group, UC Internal Announcements. The following post will be automatically added to the group wall.


Formative Assessment:
I want to hear from you!
What is one thing you learned from this post? How do you envision applying this new knowledge in the real world? Feel free to share in the comments below.


I didn’t get OwnerId field in Event Object please suggest me any step
Hi Rakesh, I am able to successfully post the message to chatter, but it doesn’t notify the user. Can you help me with that?
@rakesh Any way to modularize this across sandbox refreshes? I’ve found even if a Group exists in SB with the same name as in production, I have to deactivate my PBs, and reactivate in sandbox, selecting the desired group.
I’ve looked through some of JenWLee’s blogs, but can’t think of a custom label, custom setting, or custom metadata way to get Process Builder to use the native Post-To-Chatter action to a Group, when I want to look up the group from 1 of these. Am I missing something? Do you get PB in Sandbox to post to group effortlessly after refreshes, or do you have to modify each PB?
I never encountered such scenario. But my suggestion would use Custom Label (to store Chatter Group Id) and refer this to process builder.
P.S.:- looks like your comment is marked as SPAM by WordPress (i don’t have any idea, how and why).
Hi Rakesh
I’m trying to via process builder create a chatter post onto the Opportunity record if certain products are contained in the Opp product.
I think I need what you refer to as Record Chatter Feed below, but the only 2 options I see are post to User or Chatter Group, how do you make this third option accessible from Process Builder please?
Thanks
Nic
Our final task is to add an Immediate action to the Process. Click on Add Action (Under Immediate actions) and select the type of action to create (In our case Post to Chatter) , enter the Name Post to Chatter. This action allows you to post a message on User Profile or Chatter Group or on Record Chatter Feed. In this case select Chatter Group UC Internal Announcement, as shown in the following screenshot
1) To enable “This Record” option under post to chatter action, make sure that you have enabled feed tracking for that particular object.
2) In your scenario, you are creating a PB on Opportunity Product and want to post a message to opportunity record. To achieve this, you have to use both Process and Flow.
Process builder wont let me post anything to chatter in my community anyone know why?
Could you please post the error you are greeting
It appears the process builder wont link at all to community, none of the partner community groups appear in the selection either
POST TO CHATTER: myRule_1_A2
Inputs:
text = Below are a few steps to get you up to speed with our new system. 1.Search Q&A for Onboarding- Post a message. 2. Search Q&A forOnboarding- Responding in a post Welcome to TSV Connect. 3. Search Q&A forOnboarding- How to like a post Welcome to TSV Connect. 4. Search Q&A forOnboarding- Share a post titled Welcome to TSV Connect. 5. Search Q&A forOnboarding- How to @mention on Welcome to TSV Connect. 6. Search Q&A forOnboarding-How to find and join groups.
type = USER
subjectNameOrId = {!myVariable_current.Id} (005U00000066yFrIAI)
Error Occurred: The record for this post was deleted.
Hi Onttu,
Its a pretty late reply but thought to answer anyhow – the issue is due to process builder deployed from one sandbox to another, it retains the chatter group salesforce id from the source org even when activated post deployment in target org. You will have to delete the post to chatter action in target and recreate it once more as it will now fetch the target org’s chatter group id.
Regards,
M
Is there a chance to use @Case.Owner for posting on his Chatter Feed?
Thanks
how did you made the 15digits to 18 digits ID , i am applying the same thing but i believe this 3additional number in reference id is not allowing me to trigger the rule
please assist
Use the below link to convert 15 digit ID to 18 digit
https://rakeshistom2-developer-edition.gus.force.com/SalesforceIDConverter/