


Last Updated on April 3, 2022 by Rakesh Gupta
Big Idea or Enduring Question:
- How can you use Flow to automatically assign the permission set group to new users?
Has it only been five years since I wrote, ‘auto-assign Permission Set to new users’?. The article was written using Flow Trigger – now, an obsolete functionality. You can read it here. Wow! How time flies! Similarly, just two years ago, I wrote another article showing how one can assign a Permission Set to new users using Process Builder and Flow.
Salesforce continues to transform at a lightning speed – yes, an understatement, I know! Three releases a year are keeping me on my toes! – making it harder and harder to keep my blogs abreast of the new features and functionalities! Whew! Hot out of the oven comes – Permission Set Group! Now, this is hot, indeed!
Let us taste it together!
What is a Permission Set Group?
Let us relish the moment and understand the Permission Set Group. For user access/management, we assign multiple permission sets to users – either manually or via automation. The onset of ‘Permission Set Group’ shows how time-consuming both these methods are! 


For example, you can compile three permission sets – CRM User, Salesforce Console User, and custom permission set View and Edit Convert Leads – in a group; a.k.a, the Permission Set Group. You can label the group as ‘Sales Manager Users’ Permission Set Group – see image below.
Then, you can assign the ‘Sales Manager Users’ Permission Set Group, as a single entity, to your users instead of the three different permission sets


Now suppose you assigned the ‘Sales Manager Users’ Permissions Set Group to User A. Then comes User B. In addition to all the permission sets contained in the ‘Sales Manager Users’ Permission Set Group, User B also needs the Manage External Users permission set.
Now what? No worries! Clone the ‘Sales Manager Users’ Permission Set Group and add to it the ‘Manage External Users’ permission set and save it as a new Permission Set Group! You could say, name the new Permission Set Group as ‘External Sales Manager Users’. Simple!
Explore this article to learn more about the Permission Set Group.
Business Use case
Martin Jones is a System Administrator at Gurukul on Cloud (GoC). Today he was going through the release notes and found that Permission Set Group is now generally available (GA). He just created a permission set group called ‘Sales Manager Users’. Now, Martin has a requirement to auto-assign the ’Sales Manager Users’ Permission Set Group to all new users with the Sales Manager Role.
Automation Champion Approach (I-do):
To solve this requirement, we will use the Custom Metadata Types and After-save Record-Triggered Flow. Check out this article to understand why we are using after-save record-triggered flow for this scenario.
Before proceeding, ahead, PermissionSetAssignment (It represents an association between a User and a PermissionSet) object in Salesforce.
| Field Name | Details |
| AssigneeId | The ID of the user to assign the permission set. |
| PermissionSetGroupId | If associated with a permission set group, this is the ID of that group. |
Before discussing the solution, let me show you a diagram of a Process Flow at a high level. Please spend a few minutes going through the following Flow diagram and understand it.
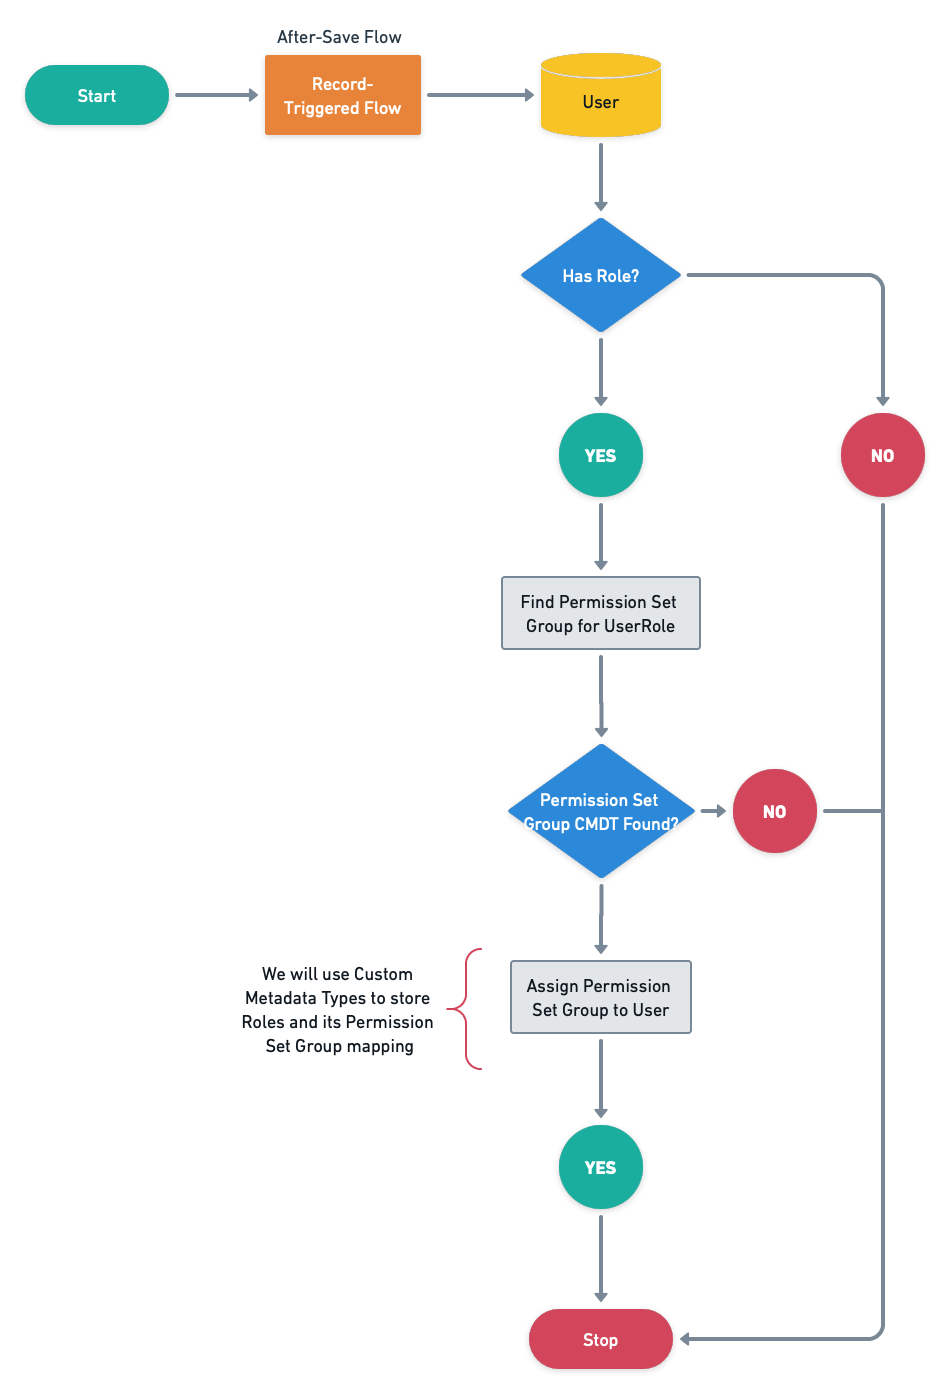
We will create an automation that will not only work for the current scenario but, it will also work for other Roles as well. This means that, if Martin wants to automate the Permission Set Group assignment for other Roles (Sales Rep, Sales Director, VP of Sales) – it should work without him having to modify automation.
Guided Practice (We-do):
There are 2 steps to solve Martin’s business requirement using Record-Triggered Flow. We must:
- Create custom metadata types to store user role and permission group mapping
- Salesforce Flow
- Define flow properties for record-triggered flow
- Formula to determine whether the user is created or updated
- Add a Decision element to check whether the user is created and has a user role populated
- Add a get records element to find the permission set Id for a given role
- Add a decision element to check the record variable (from step 2.3)
- Add a Create Records element to assign a permission set group to a user
Step 1: Create Custom Metadata Types to store User Role and Permission Set Group Mapping
- First, we will create a Custom Metadata Type to store Role Name and Permission Set Group Id mapping.
- To create a new custom metadata type, navigate to Setup | Custom Code | Custom Metadata Types and click on the New Custom Metadata Type button. Now populate the form as shown in the following screenshot:

- Once you are done, click on the Save button.
- Create a Text field PS Group Id to store the Permission Set Group Id for each User Role. In the end, the User Role PS Group Mapping custom metadata type should look as follows:

- The next step is to insert a few records into the custom metadata type. Click on the Manage User Role PS Group mapping button on the custom metadata type detail page, and then click on New to insert some records, as shown in the following screenshot:

- To create a new custom metadata type, navigate to Setup | Custom Code | Custom Metadata Types and click on the New Custom Metadata Type button. Now populate the form as shown in the following screenshot:


Step 2.1: Define Flow Properties
- Click Setup.
- In the Quick Find box, type Flows.
- Select Flows then click on the New Flow.
- Select the Record-Triggered Flow option, click on Create and configure the flow as follows:
- Object: User
- Trigger the Flow When: A record is created and updated
- Set Entry Criteria
- Condition Requirements: None
- Optimize the Flow For Action and Related Records
- Click Done.


Step 2.2: Formula to Determine Whether the user is Created or Updated
- Under Toolbox, select Manager, then click New Resource to determine whether the record is created or updated.
- Input the following information:
- Resource Type: Formula
- API Name: forB_IsNew
- Data Type: Boolean
- Formula: IsNew()
- Click Done.

Step 2.3: Using Decision Element to Check Whether the User is Created/Updated and has a User Role Populated
Now we will use the Decision element to check whether the user is created or updated and has a user role populated.
- On Flow Designer, below the Run Immediately node, click on the +icon and select the Decision element.
- Enter a name in the Label field; the API Name will auto-populate.
- Under Outcome Details, enter the Label the API Name will auto-populate.
- Condition Requirements to Execute Outcome: All Conditions Are Met (AND)
- Row 1:
- Resource: {!forB_IsNew}
- Operator: Equals
- Value: {!$GlobalConstant.True}
- Click Add Condition
- Row 2:
- Resource: {!$Record.UserRoleId}
- Operator: Is Null
- Value: {!$GlobalConstant.False}
- Row 1:
- When to Execute Outcome: If the condition requirements are met.
- Click Done.

Step 2.4: Adding a Get Record Element to Find Permission Set Group Id for a Given User
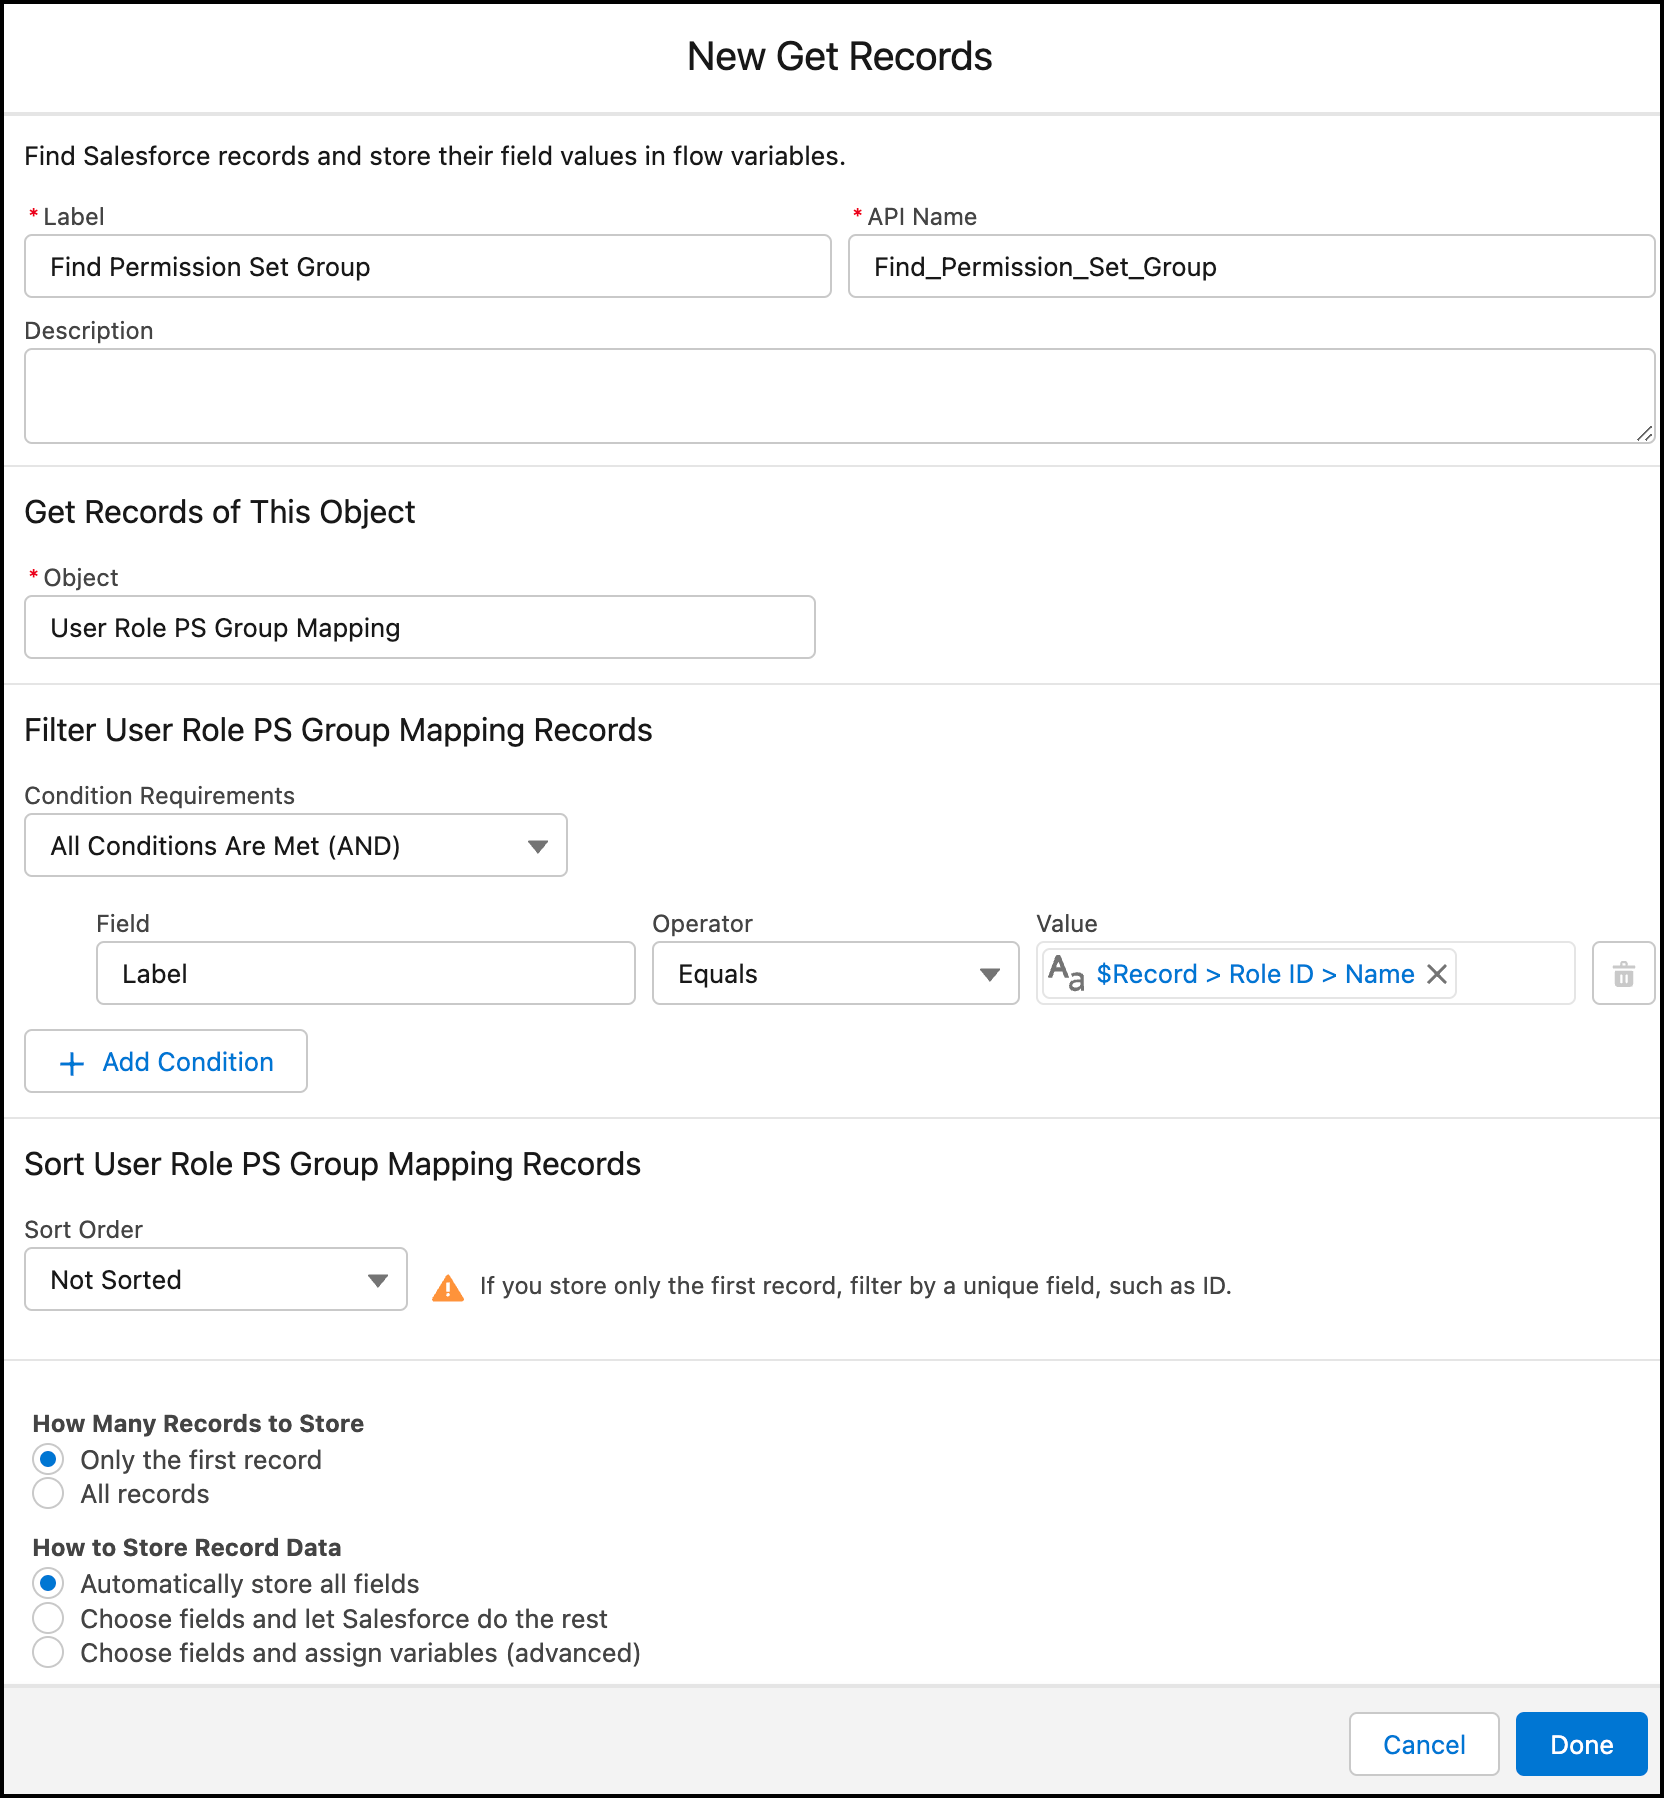
The next step is to use the Get Records element to find the permission set group id for a given role.
- On Flow Designer, below the Created node, click on the +icon and select the Get Records element.
- Enter a name in the Label field; the API Name will auto-populate.
- Select the User Role PS Group Mapping object from the dropdown list.
- Select All Conditions Are Met (AND).
- Set Filter Conditions
- Row 1:
- Field: Label
- Operator: Equals
- Value: {!$Record.UserRole.Name}
- Row 1:
- How Many Records to Store:
- select Only the first record
- How to Store Record Data:
- Choose the option to Automatically store all fields.
- Click Done.
Step 2.5: Using Decision Element to Check If Permission Set Group Id was Found or Not
Now we will use the Decision element to check the Record Variable from step 2.3 to find if the permission set group id was found or not.
- On Flow Designer, click on the +icon and select the Decision element.
- Enter a name in the Label field; the API Name will auto-populate.
- Under Outcome Details, enter the Label the API Name will auto-populate.
- Condition Requirements to Execute Outcome: All Conditions Are Met (AND)
- Row 1:
- Resource: {!Find_Permission_Set_Group}
- Operator: Is Null
- Value: {!$GlobalConstant.False}
- Row 1:
- When to Execute Outcome: If the condition requirements are met.
- Click Done.

Step 2.6: Add Create Records Element to Assign Permission Set Group to a User
Next, we will use the Create Records element to assign a Permission Set Group to a User.
- On Flow Designer, below the Yes node, click on the +icon and select the Create Records element.
- Enter a name in the Label field; the API Name will auto-populate.
- Input the following information:
- How Many Records to Create: One
- How to Set the Record Fields: Use separate resources, and literal values
- Object: Permission Set Assignment
- Set Field Values for the Permission Set Assignment
- Row 1:
- Field: AssigneedId
- Value: {!$Record.Id}
- Click Add Field
- Row 2:
- Field: PermissionSetGroupId
- Value: {!Find_Permission_Set_Group.PS_Group_Id__c}
- Click Done.

In the end, Martin’s Flow will look like the following screenshot:

Once everything looks good, perform the steps below:
- Click Save.
- Enter Flow Label the API Name will auto-populate.
- Click Show Advanced.
- API Version for Running the Flow: 54
- Interview Label: Auto Assign Permission Set Group {!$Flow.CurrentDateTime}
- Click Save.

Almost there! Once everything looks good, click the Activate button.
Proof of Concept
Next time, when a User is created by a System Administrator at Gurukul on Cloud, the process we created (Using a Record-triggered Flow) will fire and assign Permission Set Group to the User based on his/her Role (In this scenario, Sales Manager Role).
- Create a user and assign the Sales Manager Role to the user. Then, check Permission Set Assignment Group:


Great! You are done!
Now you can streamline your user access/management process by leveraging Permission Set Group! Availability of Permission Set Group will transform a super Admin into a super-duper Admin. No more lugging through multiple individual Permission Sets! What is there not to love?!
Formative Assessment:
I want to hear from you!
What is one thing you learned from this post? How do you envision applying this new knowledge in the real world? Feel free to share in the comments below.


Hey
I was wondering how i will be if i want to add more than one permission group to be assigned the new user?
You can, but you need to add logic to assign another permission set group to users.
For a scalable solution, create a Custom Metadata Type to store the custom permission sets required for a given user role. Then, in the flow, find this Custom Metadata Type and loop through it to add new assignments to a list. Finally, assign these to the user using a single ‘Create Record’ element.
How to use the same logic but for removing the ps-group
how can we do it based off of Profiles instead of Role?
Check Profile in Process Builder entry criteria.
What happens if a user changes roles? I’m guessing we will have to add steps to the flow to remove the permission set and assign to permission set to the user.
Yes, you are right here.
Hi Rakesh would you please be able to outline the steps to do this? Thanks so much!