

Last Updated on May 24, 2021 by Rakesh Gupta
Currently, Spring’19 release is available under the pre-release program. On the 4th and 5th of January, Sandboxes will be upgraded; as a result, your organization will get the look and feel of Spring’19 release. In this release, you will find lots of new features, as well as, new enhancements related to Lightning Experience, Lightning Flow, Lightning Web Component, Apex, Communities, and APIs.

For example, features like, Streamline Outreach to Help Reps Sell Faster with Sales Cadences, Add Custom Resources to the Lightning Experience Help Menu, Create a Call Center in Lightning Experience with the Voice Support Setup Flow, View Historical Tracking Reports in Lightning Experience and Use External Objects in Processes and Flows features are now available in Lightning Experience.
Also, check out these beta and pilot features:
- Quickly Focus on Relevant Data with Conditional Formatting (Beta): – If you loved applying conditional formatting to reports in Salesforce Classic, you’ll love it more in Lightning Experience. For more precision, you can now apply up to five formatting rules to a report in a Lightning Experience. And, you can define up to three bins for each rule you apply. Setting the color for each bin is faster, and you also get to customize colors. Conditional formatting is only available in summary or matrix report.

- Assign Work Based on Field Data Using Attribute-Based Routing (Beta): – Direct work to the right agents with attribute-based routing. Use the fields of incoming records to assign work to the most capable, available agents. Fine-tune your routing solution so that incoming service requests are grouped according to your business needs. Attribute-based routing works with cases, leads, orders, and custom objects.
- Enforce Field-Level Security Permissions for SOQL Queries (Beta): – Use the WITH SECURITY_ENFORCED clause to enable checking for field- and object-level security permissions on SOQL SELECT queries, including subqueries and cross-object relationships. Although performing these checks was possible in earlier releases, this clause substantially reduces the verbosity and technical complexity in query operations. This feature is tailored to Apex developers who have minimal development experience with security and to applications where graceful degradation on permissions errors isn’t required.
- Check a Field’s References Before You Edit It (Beta): – In a sandbox org, you can view the references to a custom field, such as in a formula, layout, or Apex class, with the click of a button. The new Where is this used? button lists where a field is used and where changes to the field appear.

- Encrypt Einstein Discovery Data (Pilot): – Now you can encrypt sensitive Einstein Discovery data with Shield Platform Encryption. When you encrypt this data at rest in Salesforce, you add another layer of security to your Einstein Discovery answers, explanations, and recommendations.
- Permission Set Groups: Group Permission Sets Based on User Tasks for Easier Assignment (Pilot): – Instead of assigning users multiple permission sets, you can combine them into a single permission set group based on the tasks that a user regularly performs. You can include the permission sets in other permission set groups, too. Updates in a permission set propagate to all permission set groups that include the permission set, giving users in the groups the aggregated permissions. ISV partners can package permission sets in groups and allow subscribers to extend the groups with their own local permission sets.


Be Lightning Ready by the Winter ’20 Release!
The future of the Salesforce user experience and platform is Salesforce Lightning. Moving forward, all innovations will be in Lightning Experience. If there’s ever been a time to get serious about Lightning, it’s NOW. Starting in October 2019 with the Winter ’20 release, Salesforce will turn on Lightning Experience for all orgs on a rolling basis.
When it’s turned on, standard profile users and custom profile users with the Lightning Experience User permission enabled will see the Switch to Lightning Experience link in Salesforce Classic and be automatically switched into Lightning Experience on a regular basis.
Take advantage of the lead time before Lightning Experience is turned on to understand how your org’s features and customizations perform in the new interface and to prepare your users via change management. Start now to prepare to transition to Lightning Experience ensuring a better experience for everyone when Lightning Experience is turned on later.
Supported Browsers for Lightning Experience
Lightning Experience is supported by Apple® Safari® version 12.x+ on macOS. The most recent stable versions of Microsoft® Edge, Mozilla® Firefox®, and Google Chrome™ are also supported. You can continue to use IE11 to access Lightning Experience until December 16, 2017, If you opt into Extended Support for IE11, you can continue to use IE11 to access Lightning Experience and Communities until December 31, 2020. You can not access Lightning Experience via a mobile browser.
Supported Browsers for Salesforce Classic
Salesforce Classic is supported with Microsoft® Internet Explorer® version 9, 10 (support for 9 and 10 ends on April 5, 2019), and 11, Apple® Safari® version 12.x on macOS. The most recent stable versions of Microsoft® Edge, Firefox®, and Google Chrome™ are also supported.
Below is the quick summary of Spring’19 release from user’s /customer’s
Customers/Users Point of view
1. Share your Feedback with Salesforce: – Salesforce wants to hear from you! Salesforce is continually innovating based on feedback from their customers. A feedback form now appears in Lightning Experience to hear from more users. System Administrator can disable the form.

This feature takes effects in March 2019.
2. Add Hyperlinks to Your Posts and Comments: – You can now add links to posts and comments if the Rich text editor is enabled in your org.  To add a link to your post, highlight the link text in your post or comment. Click the hyperlink icon, enter a URL, and click Save.
3. Lightning Experience Configuration Converter: Scan All Objects At Once: – For the JavaScript Buttons tab and Actions and Buttons tab, it’s one click to scan and see all the actions and buttons for all objects. Salesforce is also introducing a way to move actions and buttons for all objects at once. And coming in early 2019, Salesforce is adding support for Visualforce pages to the converter to make your transition to Lightning Experience even smoother.
4. Jump Right into Your Most Important List View with Pinned Lists: – Do you have a go-to list view that you want to load as your default list? Now you can. With pinned lists, all users can make any list their new default.

To pin an unpinned list, click its pin icon. To pin a different list, select the list view and pin it instead. The default pinned list for all objects is Recently Viewed.
5. Print a Record page: – Print key details and related lists from a record page in Lightning Experience, just as in Salesforce Classic. Specify record details visibility on the printable page and print the page from the browser. This feature is available for all users, for Account, Campaign, Case, Contact, Contract, Lead, Opportunity, Order, and custom objects.
To print a record page, on the record home page, click on the Printable View button as shown in the preceding screenshot.
6. Create Personalized Appointments with Lightning Scheduler: – Delight your customers and prospects by scheduling appointments with the right person at the right time and place. Use Lightning Scheduler to quickly set up appointments within standard Salesforce workflows, such as leads and referrals, opportunities, and accounts. And with greater visibility into appointments, you can assign resources more efficiently and better address customer needs.
This feature is available for an extra cost in Enterprise and Unlimited editions.
7. Streamline Outreach to Help Reps Sell Faster with Sales Cadences: – With sales cadences, your inside sales reps can work through their prospects at top speed. Inside sales managers use Sales Cadence Builder to create consistent, scheduled cadences of outreach activities to help reps nurture their prospects with maximum efficiency. A sales cadence can include activities like sending emails, making calls, arranging meetings, and sending text messages. Sales managers and reps can add leads and contacts to each sales cadence. Sales reps act on the sales cadence activities from a prioritized work queue that shows them at a glance which prospects are ready for each outreach.
8. Grant Access to Records, Report and Dashboard Folders, and List Views by Territory: – Sharing rules give groups of users wider access to records than what organization-wide defaults allow. Now you can define sharing rules based on the users assigned to territories. For example, keep opportunities private, except for Dallas reps, who need to view and edit opportunities assigned to Austin reps. You can also share report folders, dashboard folders, and list views by territory.
9. Add Sales Reps to Groups and Queues Based on Territory Assignment: – Now it takes only a few clicks to add all the reps assigned to specific territories to groups or queues. For example, you can add all your Dallas reps to your East Coast public group. It’s faster than adding reps one by one and helps you avoid redundant groupings of users.

10. Organize Email Templates with Folders and Nesting: – You and your sales reps can now organize email templates into more folders than just Private and Public. And nesting folders makes it easier to organize and find email templates.

Create a hierarchy for email templates with up to four levels of nesting. Reps can put templates for your entire company in the first level of folders, and then add folders on the next level for different departments in your company. In this example, the Special Projects folder has three subfolders: Customer Surveys, Landscaping RFPs, and Search for New HQ.
11. Keep Your Team Organized with Public Calendars in Lightning Experience: – Use public calendars to keep team members in the loop and everyone’s projects on track more easily. Everyone who shares a public calendar can view, schedule, and update events without switching to Salesforce Classic. Previously, you could enable public calendars, but reps couldn’t access them from Lightning Experience.

12. Log Emails to People Who Aren’t Email Recipients from Outlook®: – Previously, sales reps could log emails from Microsoft® Outlook to contacts, leads, and person accounts in Salesforce that matched an address in the To or CC fields in the email. Because an email can include important information, reps can now log messages to any people record, ensuring that pertinent information is recorded in Salesforce. Sales reps can search for other people using global search in the Gmail integration pane. Emails logged to other people records are included in the record’s activity timeline.
13. Choose Which Records Sync Between Salesforce and Pardot: – No more adjusting sharing rules and organization-wide defaults to share the data with Pardot. Now you can use Marketing Data Sharing to decide what syncs between Salesforce and Pardot. And because selective sync rules are managed in Pardot, you don’t need to be a Salesforce admin or even have a Sales Cloud license.
This change applies to the Pardot Lightning app with any Pardot edition.
14. Make Your Bots Smarter with Customer Input Classification and Feedback – Review how a bot classifies what your customers type in chat and then approve, ignore, or reclassify each input to the proper intent. This feedback process helps your bot learn and become smarter over time.

Einstein Bots is available to orgs with both Service Cloud and Live Agent user licenses. Each org is provided with 25 Einstein Bot conversations per month for each Live Agent User with an active subscription.
15. Manage Your Articles with Lightning Experience Actions: – Get more done in Lightning Experience with three new and expanded actions, Restore, Edit as Draft, and Archive. Restore archived articles or past versions in Lightning Knowledge. Previously, restoring a past version required switching to Salesforce Classic. Make last-minute changes to translations that are published or in the publication queue to keep articles in sync. Quickly declutter your knowledge base by archiving multiple articles at once from list views. And customize your knowledge base however you like—these Lightning Experience actions are available in the Salesforce APIs and with Flow.
16. Help Agents Find and Resume Paused Flows in the Guided Action List: – When there’s an agent handoff or a customer calls back, agents often search for flows that they paused midstream. Show agents all paused flows for a record page in the Guided Action List. This single go-to location makes it easy for agents to find and complete flows that automate your procedures.

The Guided Action List shows all paused flows for the current record page, regardless of whether the flow was started from the list.
17. Filter Reports by Inactive Picklist Values: – Filtering a report by picklist values is helpful when you want to focus on a specific product family, opportunity stage, or area of the business. Previously, you could filter reports on active picklist values only. Now you can filter by picklist values that are marked inactive as well.
18. Gather Insights Faster with Stacked Summaries: – You created those complex—but awesome – matrix reports so you could summarize large volumes of data and compare values in different fields. But the summarized metrics that you wish to compare are not always conveniently located next to each other. For a more viewer-friendly version of the report involves less scrolling, view the report with Stacked Summaries option enabled.
The Stacked Summaries option is available for all matrix reports in the report footer. By default, stacked summaries are enabled in Lightning report builder and the run page.
19. Subscribe to Reports and Dashboards by Group or Role – Now you can add subscribers to report sand dashboards based on Public g]Group or Role. A group subscription keeps your subscriber list current even when people join or leave the group. A role-based subscription keeps your subscriber list current even when people change roles.
20. Translate Feed Items on the Spot: – When your users have a common interest but not a common language, you can help. Use Community Builder’s new translation setting to put a Translate with Google menu on every feed item. Translate posts, questions, comments, answers, and replies. Over 50 languages are available to get people talking. Translations are offered through a Google Cloud Translation API key that you provide.
Additional enhancements worth noting!
1. Enjoy Increased Data Storage: – Data storage for select editions is increasing from 1 GB to 10 GB, giving you lots more room to grow. For example, previously a Professional Edition org with 10 users received 1 GB, because 10 users multiplied by 20 MB per user allotment is 200 MB. Now, a Professional Edition org with 10 users receives 10 GB + 200 MB.
This change applies to Lightning Experience, Salesforce Classic, and all versions of the Salesforce app in Contact Manager, Group, Essentials, Professional, Enterprise, Performance, and Unlimited editions. Orgs will begin to see the increase beginning in late March 2019.
2. Generate Survey Invitations for Contacts and Person Accounts: – Broaden your survey scope. You can now generate a customized survey invitation for a contact or a person account directly from the record.

3. Add Two Groups to Lightning Tables: – Lightning tables (In dashboard) now support two groups. Previously, you could have only one.

For example, this dashboard shows Accounts grouped by Site and Source.
Administrators/Developers Point of view
1. Build an Action Strategy to Produce Recommended Actions and Offers (Einstein feature): – Use Strategy Builder to create a stream of actions and offers that you can display on Lightning record pages and Community pages. Strategy Builder is a point-and-click automation tool for creating strategies for Einstein Next Best Action. With Strategy Builder, you can sort, filter, and prioritize your recommendations. Deliver the right recommendations at the right time by designing a strategy that fits your use case.

For example: Let’s say you own a bank, and you want your service representatives to see the offers that best suit the customer’s situation. When a customer loses a credit card and contacts support, the service rep creates a case with the type “lost credit card.” You can create a strategy that recognizes the case type and recommends offers. The strategy here suggests credit monitoring, fraud protection, and maybe a new credit card offer, depending on the customer’s credit score.
2. Switch Your Lightning Page to a Different Template: – Don’t like the layout of a Lightning page? Did your business needs change? Now with a few clicks, you can swap a Lightning page’s template.

When you view a Lightning page’s properties in the Lightning App Builder, click Change next to the Template field to start the template-switching process.
3. Create Custom Big Objects from Setup: – A big object stores and manages a massive amount of data natively on the Salesforce platform. You can archive data from other objects or bring massive datasets from outside systems into a big object to get a full view of your customers. Big objects provide consistent performance, whether you have 1 million records, 100 million, or even 1 billion. Previously, creating a big object required using Metadata API. But now, if you aren’t comfortable using the API, you can create a big object in Setup, define its fields, and build the index that defines how the big object is queried.
4. Create Objects from Spreadsheets: – Now with a few clicks, you can create a custom object by importing its fields and field data from a Google sheet, a Quip spreadsheet, a .xls file, or a .csv file. Not only can you create an object and its fields quickly, but when you’re done, all its data is there, too.
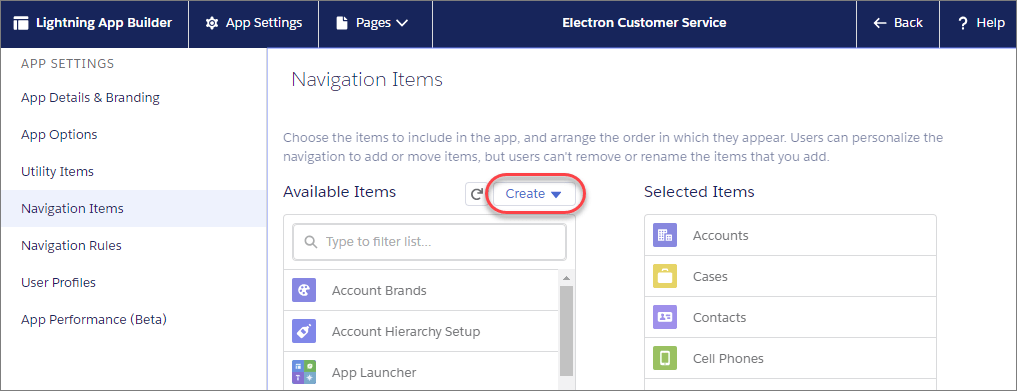
To create a custom object from a spreadsheet, navigate to Setup | App Manager | Select an App | Edit| Navigation Items and click on the new Create button at the top of the Available Items list.
5. Assign Default Home Pages Based on the Lightning App: – Make sure that users see the home page that’s most relevant to them by assigning default home pages by the app. The app default homepage overrides the org default homepage for users in the app. But if you have profile-specific default home pages assigned, those assignments override all others.

To assign a home page as an app default, from Setup, enter Home in the Quick Find box, and then select Home. You can also assign specific home pages from the Lightning App Builder.
6. Lightning Flow and Process Builder Enhancements: – There are several enhancements in Lightning Flow, as follows:
A) Faster, Easier, and More Intuitive Flow Building with Flow Builder: – Your flow-building experience just got a whole lot better! Salesforce is replacing Cloud Flow Designer with a much faster tool Lightning Flow Builder. It streamlines flow building and maintenance with a simplified user interface.

Check out my article Want to be an Early Adopter of the New Lightning Flow Builder? Welcome Aboard! to learn more about it.
B) Create or Install Pre-Built Business Processes That You Can Customize: – A process or flow template is a base business process that you can clone to create customized business processes. Unlike non-template processes and flows, if you install a template from a managed package, you can open and clone it. Even if you build your own templates and don’t use managed packages, marking a process or flow as a template clearly identifies it as a base business process.

To make a process a template, open it in Process Builder and click Edit Properties. For Template, select Yes. To make a flow a template, go to the flow list page in Setup. Find the flow, click Edit, and select Template.
C) Create a Flow to Let Community Users Request Help: – Use a flow to let community members request that your support team call them back. When creating flows, look for the new Contact Request Flow type and the Create Customer Contact Request action. After you create a flow, use Community Builder to add the component to your page.
D) Display an Image and Capture Address Information More Easily in Your Flows: – Two new screen components improve your flows. Use the Display Image component to insert images in flow screens. Use the Address component to display a complete address form that’s customized to your settings.
E) Test Process Scheduled Actions and Flow Resume Events with Apex: – To help you provide more test coverage for behind-the-scenes automation, the stopTest Apex method executes processes’ pending scheduled actions and resumes flows those are waiting for a time-based resume event. Previously, Apex tests could start processes and autolaunched flows, but they couldn’t validate scheduled actions or whether a flow resumes.
F) Use Snap-Ins to Let Guest Users Run Flows: – Unauthenticated users can run flows from your website. Choose or create a flow and then embed it in your website using a Snap-ins deployment.
G) Execute Scheduled Actions in Event Processes: – When you create a process that starts when a platform event is received, you can now set times to execute actions. Previously, only record-change processes supported scheduled actions. But event processes can do more with scheduled actions. These scheduled actions can create or update data that’s stored outside of Salesforce via external objects. Record-change processes don’t support external objects.
H) Schedule Actions in Processes to Happen Immediately: – You can now create a schedule in Process Builder that waits for zero hours or days, which means the pending actions are executed as soon as possible. Previously, one hour was the minimum time for a pending scheduled action that’s adjusted from the current time.

You can use scheduled actions to avoid governor limits, because scheduled actions are executed in a separate transaction from immediate actions.
7. Create an Identity-First Login Page with My Domain Login Discovery: – Configure My Domain with Login Discovery to simplify the login process for users. Instead of requiring users to login with a username and password, My Domain Login Discovery page prompts them to enter a custom unique identifier such as an email address or phone number. Then, users are prompted to authenticate based on the identifier they supplied. If they’re configured for SSO, they don’t even have to choose.

My Domain Login Discovery sends them directly to the identity provider (IdP) login page to authenticate. This login process is sometimes called interview-based or identity-first login.
8. Synchronize Your Data with Self-Service Background Encryption: – Sometimes you add fields to your encryption policy, apply a different encryption scheme to a field, or rotate key material. In these cases, it’s important to synchronize encrypted data with your encryption policy and active key material.

Now you can sync data in most fields, as well as field history and feed tracking changes, from Setup. Self-service background encryption gives you the autonomy to maintain your encryption policy on your own schedule with fewer calls to Salesforce Customer Support.
9. Clone, Deploy, Upload, and Validate Change Sets with Fewer Clicks: – You no longer have to load the change set’s detail page to initiate these operations. Salesforce has added links to the Inbound Change Set page that you can use to initiate validation and deployment operations for both deployed and undeployed change sets. If the change set has been deleted from its source org, these operation links aren’t available. If a deployment of the Change Set is in progress, these operation links aren’t available until after the deployment completes. We also added links to the Outbound Change Set page that you can use to upload or clone Change Set. If the Change Set doesn’t contain any components, the Upload link isn’t available.
10. Lightning Web Components (Generally Available): – Now you can build Lightning components using two programming models: Lightning Web Components, and the original model, Aura Components. Lightning web components are custom HTML elements built using HTML and modern JavaScript. Lightning web components and Aura components can coexist and interoperate on a page. To admins and end users, they both appear as Lightning components. To learn more about Lightning Web Component click here.
Lightning Locker supports the new Lightning Web Components programming model.
11. Get Notified About Unsaved Changes: – Notify the UI about unsaved changes in your component with the lightning:unsavedChanges Aura component. You can use lightning:unsavedChanges in standard and console navigation apps. You can then use a controller to save or discard the changes.
12. Reference Asset Files with the $ContentAsset Global Value Provider: – The $ContentAsset global value provider lets you reference images, style sheets, and JavaScript used as asset files in your Lightning components. Reference $ContentAsset asset files by name instead of using cumbersome file paths or URLs. $ContentAsset provides sharing, versioning, and access control for all asset files, as well as options for mobile optimization and resizing of image files. You can use $ContentAsset in Lightning components markup and within JavaScript controller and helper code.
13. Fewer Round-Trips for the FlexiPage Object by Using SObject Collections: – Using Tooling API, you now can take action on multiple records belonging to the FlexiPage object with a single request. By grouping operations by object type, you reduce the number of round-trips between the client and server. SObject Collections supports XML and JSON formats. Only the FlexiPage object is supported.
Use a POST request to add up to 200 records or a PATCH request to update up to 200 records, returning a list of SaveResult objects.
http:///vXX.X/tooling/composite/sobjects
Use a GET request to retrieve one or more records of the same object type, specified by ID.
http:///vXX.X/tooling/composite/sobjects/sobjectType?ids=recordId1,recordId2&fields=fieldname1,fieldname2
Use a DELETE request to delete to up 200 records, specified by ID, returning a list of DeleteResult objects.
http:///vXX.X/tooling/composite/sobjects/?ids=recordId1,recordId2
14. Build Your Own Salesforce CLI Plug-In with Open-Source Tools: – Plug-ins add functionality to Salesforce CLI. Salesforce includes several plug-ins when you install the CLI that provide commands and functionality to meet common needs that customers and partners have. You can also choose to install other plug-ins built by Salesforce and others. But when you have requirements that existing plug-ins don’t meet, Salesforce Plug-In Generator simplifies building your own using Node.js. Salesforce Plug-In Generator and the CLI @salesforce/core and @salesforce/command libraries are open source.
15. Simplify Lightning Web Component Development with the VS Code Extension Pack: – Install the Salesforce Extensions for VS Code extension pack, and get the Lightning Web Component extension to speed your component development. You no longer need to install or manage separate extensions nor worry about the order in which you install and update your Salesforce extensions.
Install the Salesforce Extension Pack from the VS Code Marketplace. To work with Lightning web components in VS Code before Salesforce Extensions for VS Code v45 is released, install the extension pack, the Lightning Web Component extension, and the pre-release version of Salesforce CLI.
16. Package Pre-Built Business Processes That Subscribers Can Open and Build Upon: – Create process and flow templates that subscribers can view and clone and that you can maintain via package upgrades. When installing from managed packages, processes and flows can’t be viewed or cloned by subscribers because of intellectual property (IP) protection. But when those processes and flows are templates, subscribers can open them in a builder, clone them, and customize the clones. You can upgrade templates as needed without affecting subscribers’ clones.
Additional enhancements worth noting!
1. Simpler Format for User Email Addresses in Sandboxes: – When you create or refresh a sandbox, Salesforce appends .invalid to all user email addresses. This email invalidation ensures that production users aren’t sent automatically generated messages from the sandbox. For example, the address name@email.com becomes name@email.com.invalid. Previously, the address changed to name=email.com@example.com.
2. Allow External iframes of Visualforce Pages with Clickjack Protection: – Use iframes to include Visualforce pages on external web pages while enabling clickjack protection. Whitelist the external domains that you trust to bring your Visualforce content outside the Salesforce domain. Previously, it was all or nothing: You could allow iframes of Visualforce pages on all external domains or none at all.
Salesforce1 Enhancements
Your users have several options for accessing Salesforce on mobile devices that meet minimum platform requirements.
- Install Salesforce for Android or iOS. Users can download the app from Google Play or the App Store.
- Access Salesforce mobile web from a supported mobile browser on select Android, Apple, or Windows mobile devices. This option doesn’t require anything to be installed.
1. Keep More Related Records When Transferring Accounts in Lightning Experience – When an account rep transfers an account to a different owner, more of the historical information that the new owner needs is also transferred. Account owners can transfer opportunities that they own, open cases, and closed cases. They can keep the account team and opportunity teams related to opportunities being transferred or delete them.

2. Remove an Account or Opportunity Team Using the Salesforce App: – When an account or opportunity team isn’t needed, account or opportunity owners can remove the entire team with a tap. Previously, you had to remove a team one member at a time.

To remove a team, on the team’s related list, tap Remove All Members.
3. Sort Order Is Sticky on Mobile: – You can set a default sort order for a community feed. Users can select some other sort order that stays in place when they navigate away from a feed and then return. You get a great way to design your users’ initial experience, and users get greater control over how they view their feeds.
4. Delete Push Registrations for Mobile Devices: – Admins can now ensure that push notifications aren’t being sent to users whose refresh tokens have been revoked. Deleting push registrations for mobile devices gives you more control over who receives Salesforce data from your Org.
After revoking a refresh token for a user, delete push registrations for each user as well. In the record detail page for the user, go to Mobile Push Registrations and View all devices.
5. Block Topic Selection on Questions: – You can block topic selection when a user asks a question in a community topic from a mobile device. For example, with blocking in place, a user who selects a topic and then asks a question cannot select a new topic in the ask dialog. Instead, the dialog shows the read-only current topic in the Posting to the field.
What are your favorite Spring’19 release note gems?
Note: – You can download release notes in HTML format!, for PDF file.


Nice article , keep it up, keep share such article
Hey Jivan, thanks for the great comment. Hearing stuff like this makes my day.
Thank you so much for sharing this blog. Nice Stuff
Hi Rakesh Gupta,
Thanks for Spring 19 Quick Summary Notes and its really helpful 🙂
I noticed today for the to Create Objects from Spreadsheets from Salesforce as a part of Spring 19 in my org and there is no button called Create in the top of the Available Items list.
Checked the release notes and salesforce removed this feature as a part of Spring 19.
FYI – https://releasenotes.docs.salesforce.com/en-us/spring19/release-notes/rn_change_log.htm
Thanks again for all your notes & posts. keep it up.
Thanks & Regards,
Sakthivel Madesh
Thanks for letting us know about Create Objects from Spreadsheets release update.
Fantastic article, thanks for all the details. This is an amazing release!
🙂