

Last Updated on November 12, 2017 by Rakesh Gupta
Till date, we have created many processes to fulfill business requirements. I have created 100+ processes just for my blog posts! Process Builder is a very powerful tool to declaratively implement business requirements. It helps businesses to save time, as well as money, by implementing solutions quickly. The best part is, you do not have to write test classes for your Processes or Flows. So far so good, but these processes may create problems in future if you start creating a new process for each requirement. That not only is not a best practice but, in the long run, it is highly unproductive and unsustainable approach to managing process development.

Prior to Summer’16 release, processes executed actions that were tied to only one criteria node. Previously, when a record met your defined criteria node (1) or (3), the process executed the associated action group and then stopped at (2) or (4). It means, processes are designed to execute only one criteria node either (1) or (3) in one execution.
After Summer’16 release, it is possible to choose what happens after your process executes a specific criteria node. Should the process stop? Should it continue evaluating the next criteria in the process? It depends on you! By using this new feature, you can execute multiple action groups in a single process – making it easy to manage all of your processes, for a given object, like an Account, in one place!
Business Use Case
Pamela Kline is working as System administrator at Universal Containers. She has developed a process for a requirement to update Account custom field, Out of Business, to True if an Opportunity Stage is updated to Closed Lost – refer to (For Lost Opportunities) – (Getting Started with Process Builder – Part 71 (Set Your Productivity on Steroids by Creating Reusable Processes!)
Today, Pamela received another requirement – post a message to Chatter group UC Internal Announcement whenever an Opportunity is successfully closed by a Sales Representative.
Solution for the Above Business Requirement
It is quite easy to create a new process for the above business requirement; but, since we can, we will reuse the process – For Lost Opportunities – that we created to meet Pamela’s requirements in my previous blog – part 71. By implementing the new requirement in the existing process, we are not only following best practices – to build minimums number of processes on one object – but we are also increasing our ability to better manage our processes in the long run.
- Create a public Chatter group named UC Internal Announcement.
- Now we will modify the existing process, which we have created in part 71. Click on the Clone button available on the button bar. It will open a popup for you. Under Save Clone As, select Version of current process option. It will look like the following screenshot:

- Once you are done, click on the Save button.
- Now modify your existing process, to meet your new business requirement, by adding one more criteria node to the process – to check the Opportunity Stage to Closed Won.
- For Criteria for Executing Actions, select Conditions are met
- Add first criteria [Opportunity].StageName Equals Picklist Closed Won

- The next step is to add an Immediate action to Process. Click on Add Action (Under Immediate actions), Select the type of action to create (In our case Post to Chatter), and then fill the values into fields to define the action – as shown in the following screenshot:

- Once you are done, click on the Save button.
- As of now, your process will look like the following screenshot:
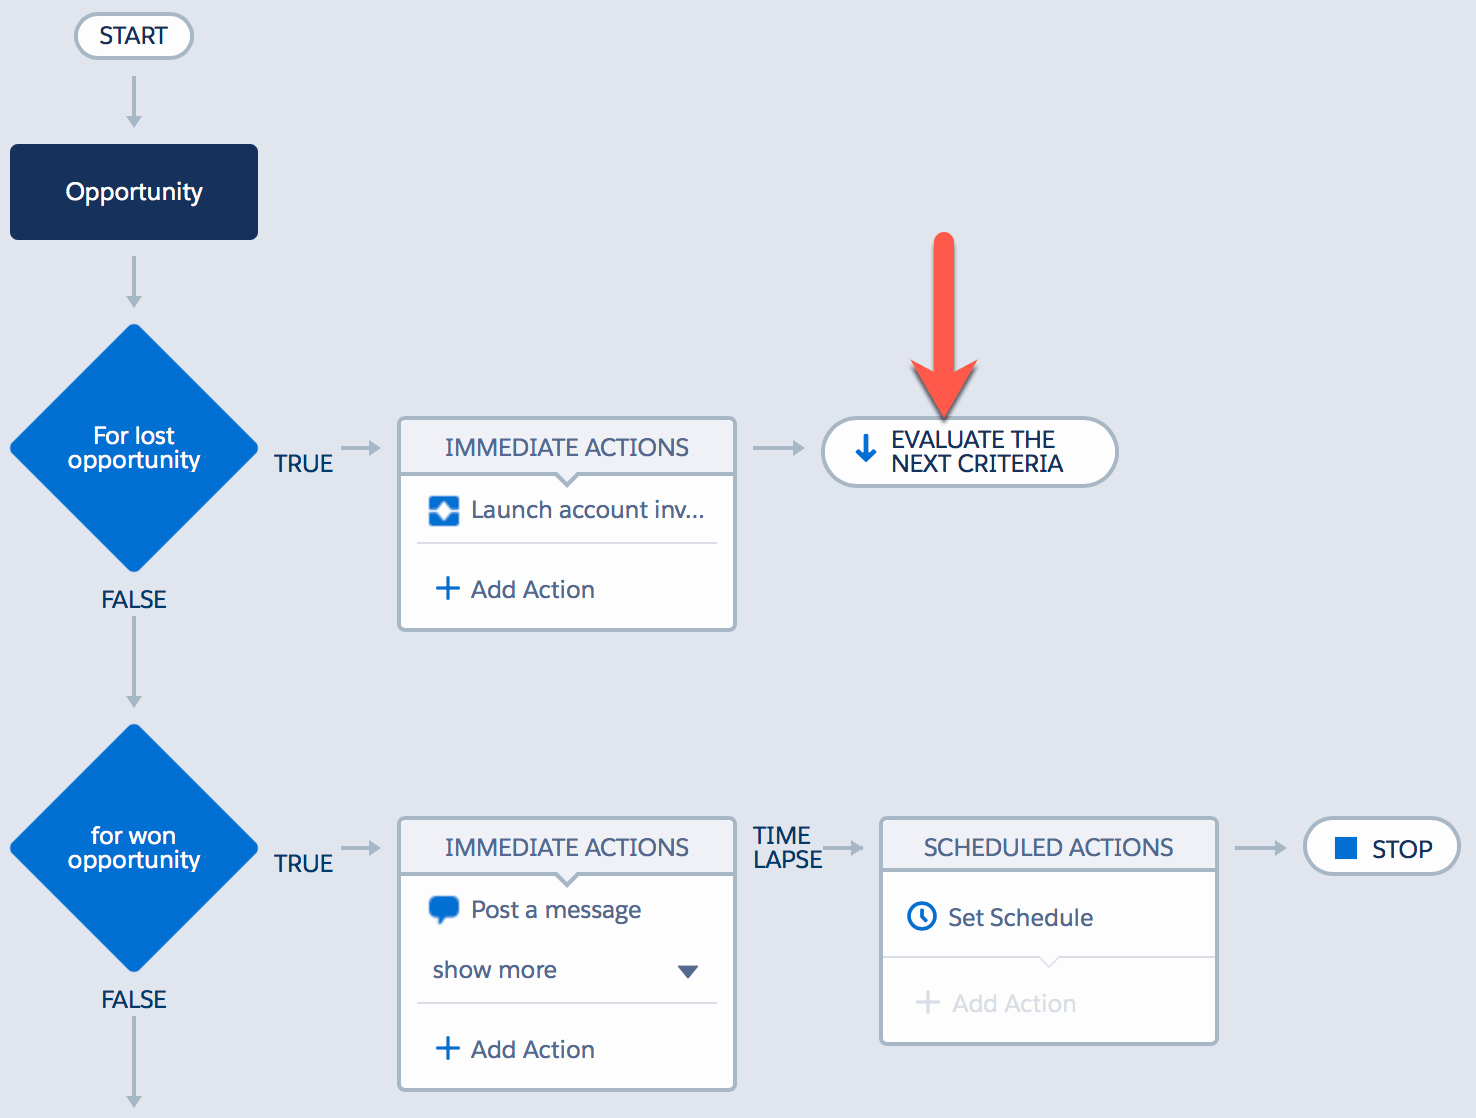
 Now, in one execution either (1) or (2) criteria node will execute not both. But, since we have used our existing process to fulfill new requirement, we have to make sure that both – criteria (1) and (2) – execute in one transaction.
 - Click STOP (3) and then select EVALUATE THE NEXT CRITERIA to change what happens after actions execute. Initially, each action group is set to stop after executing one action.

- Once done, click on the Save button, it will redirect you to Process canvas. Finally, the Process will look like the following screenshot:

- Don’t forget to active the Process by clicking on the Activate button.


It’s time to test the Flow and Process
From now onwards, if an Opportunity is successfully closed by a sales representative then the process will fire and post a message on the Chatter Group, as shown in the following screenshot. The same process will still work for requirement part 71.

To recap, since Summer ’16 release, Administrators are able to streamline their workload by executing more than one criteria node to existing processes! As a result of this new feature, now an Administrator can execute multiple criteria nodes in a single process – making it easy for them to manage multiple processes, for a given object, in one place!
Technical Editor and Proofreader: - Munira Majmundar


If i have 10 conditions in process builder and i just want to stop only 7th condition and rest all conditions should work. Should i remove the 7th condition ?
Better to move the 7th condition to the end.
Great post as always. It has been a process rewriting some of the legacy Pre-summer ’16 Process Builder entries into new ones. Question on the Chatter entry (off-topic). Is there a way to not hard code the instance number into the link (naXX.salesforce.com/ID_Here)? You can use a mydomain address, but other than that, is there an option?
I am glad you liked my post.
To answer you question yes it is possible to not hard code the instance number into the link. For this, you have to use Visual Workflow with process Builder.
Where you can able to query organization instance id and other information.
That makes sense. Unfortunately process builder doesn’t appear to have some function to plug the current instance data so you could just add “/{![ObjectNameHere].ID}” to the Process Builder Chatter post function, similar to how you can use in custom buttons, javascript, etc.