

Last Updated on April 15, 2019 by Rakesh Gupta
In the last article Add Record to Multiple Chatter Groups – Parsing Multi-Select Picklist fields (Flow) I had discussed the way through which you can Parse Multi-select picklist or Multi-select check-boxes and store Parsed Ids into a collection variable. In this article, I am going to give you a reusable component (Flow) that you can use to Parse Multi-select picklist or Multi-select check-boxes. You have to install this component (Package) in your org, after installation you can use it.
Business Use case
Tamara McCleary is working in Universal Container as a system administrator. After user creation, she has to spend few hours to add the user to multiple Public groups. Now she is looking for an application that allows her to add new users to multiple Public Groups without moving to screen-to-screen.
Steps to Install this app
I am offering this app as Managed package, you can install it from below URL
https://login.salesforce.com/packaging/installPackage.apexp?p0=04tB00000001Al4
To install this app replace Login with your Salesforce instance name in my case this url will look like
https://gs0.salesforce.com/packaging/installPackage.apexp?p0=04tB00000001Al4
Note :- For Mismatching Versions error please refer this thread. I have successfully installed this package into multiple org those are upgraded to Spring’15, as I have created it from Spring’15 pre-release org.
How to use this package as Sub-flow
Once you have successful installed this package in your org, after that you can use it as sub-flow. To use this app It’s required one Input fields to pass SCREEN MULTI_SELECT FIELDS into Subflow variable {!SelectedIDs}, as shown in the following screenshot

One Output fields to reference Subflow Collection variable {!All_Selected_IDS} to flow collection variable, as shown in the following screenshot

Solution for the above business requirement
To solve this requirement we will use Visual Workflow, and then we will embed Flow to a custom link. Before proceeding you have to understand Group and GroupMember objects in Salesforce.
- Group :- This Group object represents Queue and Public Group both. Groups are sets of users. A Group can contain individual users, other groups, the users in a particular role. By using Type field you can distinguish between Queue and Public Group. For Public Group (Use Type = Regular) and for Queue (Use Type = Queue).
- GroupMember :- Represents a User or Group that is a member of a public group.
Note:- In this article I will only discuss about adding user into Public groups . In similar fashion you can develop a flow for the Queue.
1. Click on Name | Setup | App Setup | Create | Workflows & Approvals | Flows
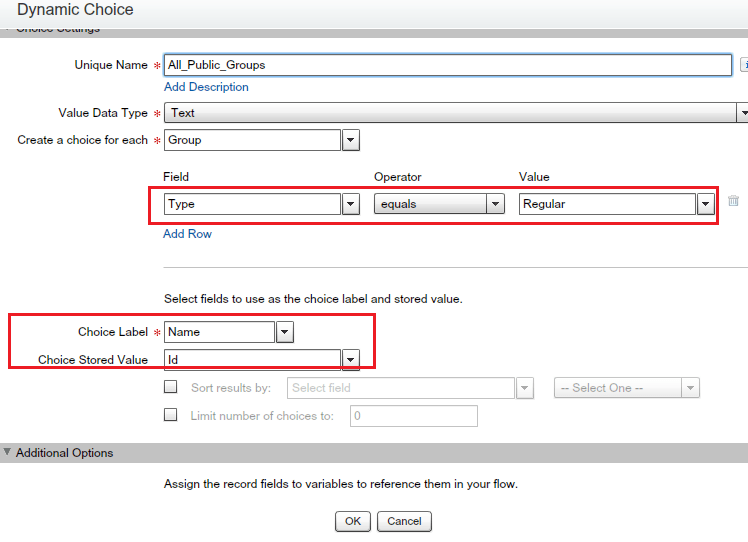
2. Click on New Flow, it will open flow canvas for you. Create One Text variable UserID (To pass the User ID from custom URL – to whom you wants to add into multiple Public Groups). Next step is allowing users to select multiple Public Groups. To do that drag-and-drop a Screen Element ( Give the name Select Public Groups) onto the window and add a Dynamic choice Multi-Select check-box field with below detail
| Name | Data Type | Required |
| Public Groups | Multi-Select Checkbox | Yes |
It will look like the below screenshot
3. Create a collection variable {!All_IDs_In_One} as shown in the flowing screenshot to store the parsed IDs

4. Next step is to parse Multi-select check-box values into a collection variable. To do this drag-and-drop Flow MSP to Collection Variable onto the window and map Input/Output Variables assignment. Please refer to the following screenshot for more details

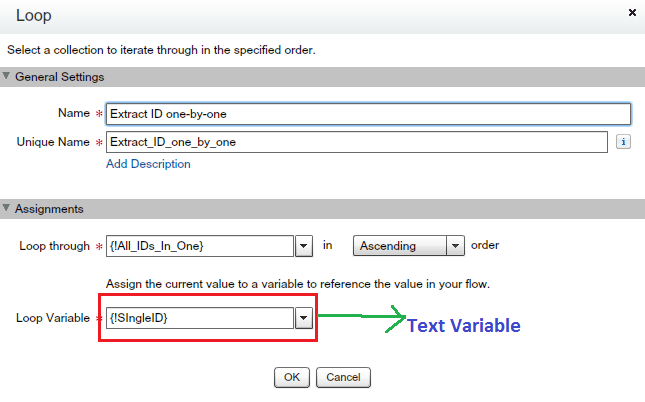
5. Drag and drop a Loop Element (Give the name Extract ID one by one) on the window and extract IDs from Collection variable and pass it to Text variable, as shown in the following screenshot
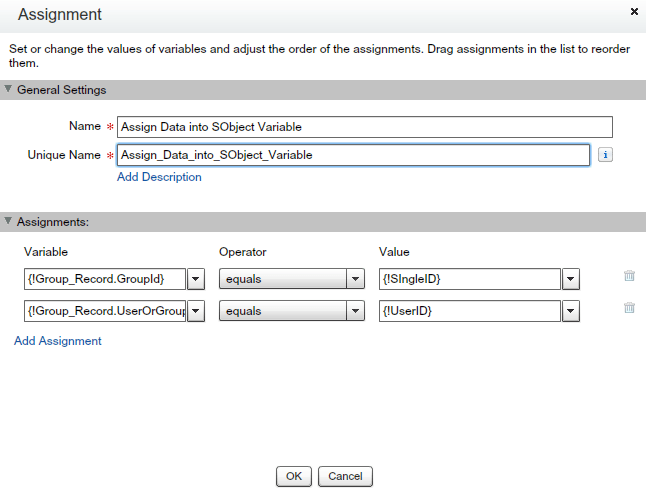
6. Drag and Drop Assignment Element (Give the name Assign Data into SObject Variable) on the window and assign value of {!SingleID} and {!UserID} to Sobject variable {!Group_Record} (GroupMember Object Type) ,as shown in the following screenshot
7. Drag-and-drop Assignment Element (Give the name All in one) on the window and assign value from Sobject variable {!Group_Record} to Sobject Collection variable {!All} (GroupMember Object Type) so at the end of the flow will use it inside the Fast Create to add user to Public Groups. Please refer to the following screenshot for more details

8. Finally drag-and-drop Fast Create (Give the name Add user to Public Groups) on the window and map the field according to the below screenshot

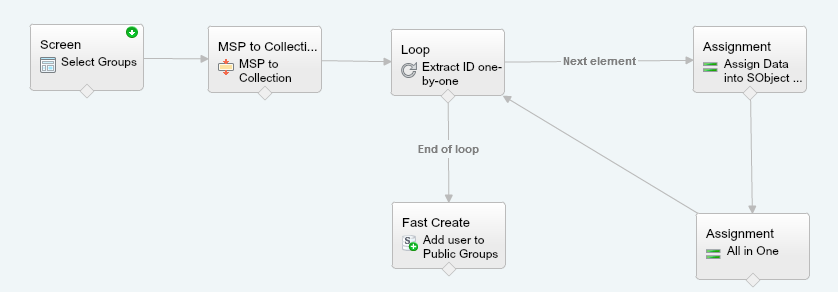
9. Finally our Flow will look like the following screenshot
10. Save the flow with name Add User to multiple Group and close the canvas.
Call a Flow from a Custom link
We can call a Flow from custom button, link, sub-flow, Visualforce page , Apex start() or using Process builder. Here we will use custom link on User object to call our flow. To do that follow below instruction
1) Click on Setup | Build | Customize | Users | Custom Links
2) Click on New Button or Link button and construct a custom URL, as shown in the following screenshot

3) Add custom link into the User Page Layouts.
It’s time to test this feature
To test this flow, follow the below instructions
1) Create a New user, I have created a user with name “Demo user”
2) Then click on custom link “Add user to multiple Groups“, available on the user detail page
3) It will open the flow for you. Select few public groups and click on the Next button, as shown in the following screenshot

4) Navigate to the Group related list available on detail page and you can see user is added to all of the selected groups.

Note :- I will suggest you to Implement this first on your developer org test it and then move it to Production.


Hi. I have the 1.2 version installed, but am getting weird behavior. I’ve used this plugin previously without any issues.
Loop Through: [Dental;Medical;Vis,on] <— All_Selected_IDS
Iteration: 0
Current iteration item: Dental;Medical;Vis
It seems to not be parsing the MSP text values, and also randomly inserting commas. I'm using SelectedIDs and outputting as All_Selected_IDS. Any ideas? Thanks
It is still working for me. Can you try again and share the debug log?
How to install in sandbox
Try this url https://test.salesforce.com/packaging/installPackage.apexp?p0=04tB00000001Al4
I grabbed the wrong URL…I’m all set now!
I updated the package in a sandbox and it still shows Version Name Spring 2015 / Version Number 1.0 / First Installed Version Number 1.0 but that I Modified the package today. The component (MSP to Collection variable Flow) is still the same version and I am still getting the same error in the debug log. Is there an additional step needed to upgrade?
Hi Rakesh,
Thanks a lot for the automation it worked.now i wanted to know when we add public group and click on next,we should get redirected to user detail page automatically and if possible can we have read access to the msp package flow?
Yes, it is possible.
– If you use the Custom button to invoke the flow, append retURL.
– If you use Quick Action, then check out this article
Hi Rakesh,
Thanks a lot for the help it worked but the issue is iam not getting all the public groups is there any limitation?
Hi Rakesh i couldnt find the fast create element in my sandbox org please help me with that?
Pls use Get Records element
Dear Rakesh, thank you so much for your quick ’22 release update! Fixed all of our issues!
Glad to know 😊
Thanks for that very timely update to this package. Helped our client in a big way today.
😊
It seems that this might have broken in the Spring 2022 release. The first value parses correctly, but the remainder don’t. For example,
Amanda -> Amanda
Becky -> ecky,
Camille -> mille,C
Dorothy -> othy,Do
Is there any possibility the component will be updated?
Yes, the problem with the Winter 22 release.
I have created a new version of package https://login.salesforce.com/packaging/installPackage.apexp?p0=04tB00000001ApM
Let me know if it works
It worked! Thank you very much for the link and the update.
Rakesh,
I’ve tried a variation of this where I am creating new records rather than doing what you are suggesting here. When I create the records, it seems as thought I am limited to naming the records with just 18 characters, and then if more, the characters are pushed into the next record and created there.
Basically, I have a custom metadata type, which I am using to create the choices. From the selected choices, I wish to create a record which is associated to the record from which the flow is running from (In Lightning). I can’t access your flow to modify. Can you advise?
This is awsome.I just tested it on my dev org and learnt too
Dear Rakesh,
Thank you so much for taking the time to post this, it works perfectly and really just saved me a lot of frustration.
Thank you so much! I really appreciate it!
The next time you’re in Berlin, come to the SF Dev group for a beer (or maybe two!). 🙂
Alex
Hi. Is there a way to put this into my sandbox. I tried updating the id to my dev OrgID but it just updated what I had in my production. Tried a change set, but that didn’t work either. 🙂
Use the below URl
https://test.salesforce.com/packaging/installPackage.apexp?p0=04tB00000001Al4
Thank you. I will give this a try and let you know how it turns out.
Shawna R. Brooks
Sales Support Manager/SFDC Administrator
Merkle Inc.
🙂
Your app works great, Rakesh. Thanks so much for making this available.
Thanks for feedback Mark!
I’ve got your plugin working properly but now I’m struggling with the multi-select choice values being retained as I pass through a loop. Is there a way to clear the values so that the checkboxes don’t show up checked off the next time through the loop?
Let me try this in my Dev org, will get back to you soon